Node.js offers a vast array of options to developers. This is why Red Hat and IBM teamed up to produce the Node.js reference architecture, a series of recommendations to help you build Node.js applications in the cloud. One of our recommendations is that you use Pino, an object logger for Node.js. You can visit this GitHub page for an overview of how and why to use Pino. This article demonstrates how to create and consume Pino logs with the Red Hat OpenShift Logging service.
Prerequisites
To follow along, you need a Red Hat OpenShift cluster and a Node.js application you can deploy to OpenShift. For our example, we'll use the nodejs-circuit-breaker from NodeShift, a collection of tools maintained by Red Hat for Node.js developers.
Installing OpenShift Logging
To deploy OpenShift Logging, we'll install two operators: The OpenShift Elasticsearch Operator and the OpenShift Logging Operator.
To install the OpenShift Elasticsearch Operator:
- In the OpenShift web console, open OperatorHub under the Operators submenu.
- Select OpenShift Elasticsearch Operator and click Install.
- Double-check that the All namespaces on the cluster option is selected.
- For an installed namespace, select openshift-operators-redhat.
- Select the option to enable recommended monitoring on this namespace.
- Click Install.
- Wait for the operator to install.
This operator installs both the Elasticsearch text data store and its Kibana visualization tool, which serve as the backbone of the OpenShift Logging system.
After the Elasticsearch Operator is installed, install the OpenShift Logging Operator as follows:
- Navigate back to the OperatorHub and select the OpenShift Logging Operator.
- Select a specific namespace, then openshift-logging.
- Select the option to enable recommended monitoring on this namespace.
- Click Install.
- Wait for the operator to install.
The key component installed with this operator is the OpenShift Log Forwarder, which sends logs to the Elasticsearch instance. The Log Forwarder takes the container logs from every pod in every namespace and forwards them to the namespace and containers running Elasticsearch. This communication allows the logs to flow where you can analyze them without requiring each container to have a certificate and route set up to access the separate namespace containing Elasticsearch.
Deploying OpenShift Logging
Now that you have the building blocks installed via operators, you will deploy the pods containing the logging system. To do this you need a custom resource definition (CRD), a configuration concept in Kubernetes.
This CRD defines what and how many pods you need, where to install them, and key setup features for the Elasticsearch instance, such as the size of the disk and the retention policy. The following YAML code is an example CRD for deploying the logging infrastructure:
apiVersion: "logging.openshift.io/v1"
kind: "ClusterLogging"
metadata:
  name: "instance"
  namespace: "openshift-logging"
spec:
  managementState: "Managed"
  logStore:
    type: "elasticsearch"
    retentionPolicy:
      application:
        maxAge: 1d
      infra:
        maxAge: 7d
      audit:
        maxAge: 7d
    elasticsearch:
      nodeCount: 3
      storage:
        storageClassName:
        size: 200G
      resources:
        requests:
          memory: "8Gi"
      proxy:
        resources:
          limits:
            memory: 256Mi
          requests:
             memory: 256Mi
      redundancyPolicy: "SingleRedundancy"
  visualization:
    type: "kibana"
    kibana:
      replicas: 1
  curation:
    type: "curator"
    curator:
      schedule: "30 3 * * *"
  collection:
    logs:
      type: "fluentd"
      fluentd: {}
Note: OpenShift Logging is not designed to be a long-term storage solution. This example stores its logs for only seven days before deletion. For long-lived logs, you need to change the retentionPolicy property and the storage type under storageClassName. For more information on how to set up suitable storage for long-lived logs, please refer to the documentation.
To create the CRD:
- Navigate to Custom Resource Definitions under the Administration tab in the sidebar. Search for "ClusterLogging" and click on the result.
- On this page, click on Actions and then View Instances (the page might need a refresh to load). Then click Create.
- Replace the YAML code there with the YAML from the preceding example and click Create again.
To check the installation's progress, navigate to the pods page. The page should show three Elasticsearch pods spinning up, along with the Kibana pod and some Fluentd pods that support logging. These pods will take a few minutes to spin up.
Enabling JSON parsing
As explained at the beginning of this article, we use Pino for logging in our sample Node.js application. To most effectively use the log data generated by Pino, you need to ensure that the OpenShift Logging Operator can parse the JSON data correctly. JSON parsing is possible as of version 5.1 of this operator. You only need to deploy a custom ClusterLogForwarder resource. This will overwrite the Fluentd pods and provide the configuration needed to parse JSON logs. The configuration is:
apiVersion: logging.openshift.io/v1
kind: ClusterLogForwarder
metadata:
  name: instance
  namespace: openshift-logging
spec:
  outputDefaults:
    elasticsearch:
      structuredTypeKey: kubernetes.pod_name
  pipelines:
  - inputRefs:
      - application
      - infrastructure
      - audit
    name: all-to-default
    outputRefs:
      - default
    parse: json
The structuredTypeKey property determines how the new indexes are split up. In this example, the forwarder creates a new index for each pod that has its logs forwarded to Elasticsearch.
Generating the Node.js logs
Next, you'll push the application to generate logs from the NodeShift starter repository.
In a terminal, clone the repository and change into the directory installed:
$ git clone git@github.com:nodeshift-starters/nodejs-circuit-breaker.git

$ cd nodejs-circuit-breaker
Before deploying your application, log in to your OpenShift cluster. Logging in requires a token, which you can retrieve from the OpenShift user interface (UI) by clicking on Copy login command from the user drop-down menu in the top right corner. This gives you a command similar to:
oc login --token=$TOKEN --server=$SERVER:6443
After logging in, run the deployment script to deploy the application to OpenShift:
$ ./start-openshift.sh
Deployment takes a few minutes. You can check progress from the Topology overview in the Developer console. Once the services are deployed, you can start viewing your logs.
Viewing the Node.js logs
To view your logs, first set up a Kibana instance as follows:
- Inside the OpenShift UI, click the nine squares at the top right and then select logging.
- Accept the permissions required by the service account.
This takes you to your Kibana page, where you have to do a few things before viewing data.
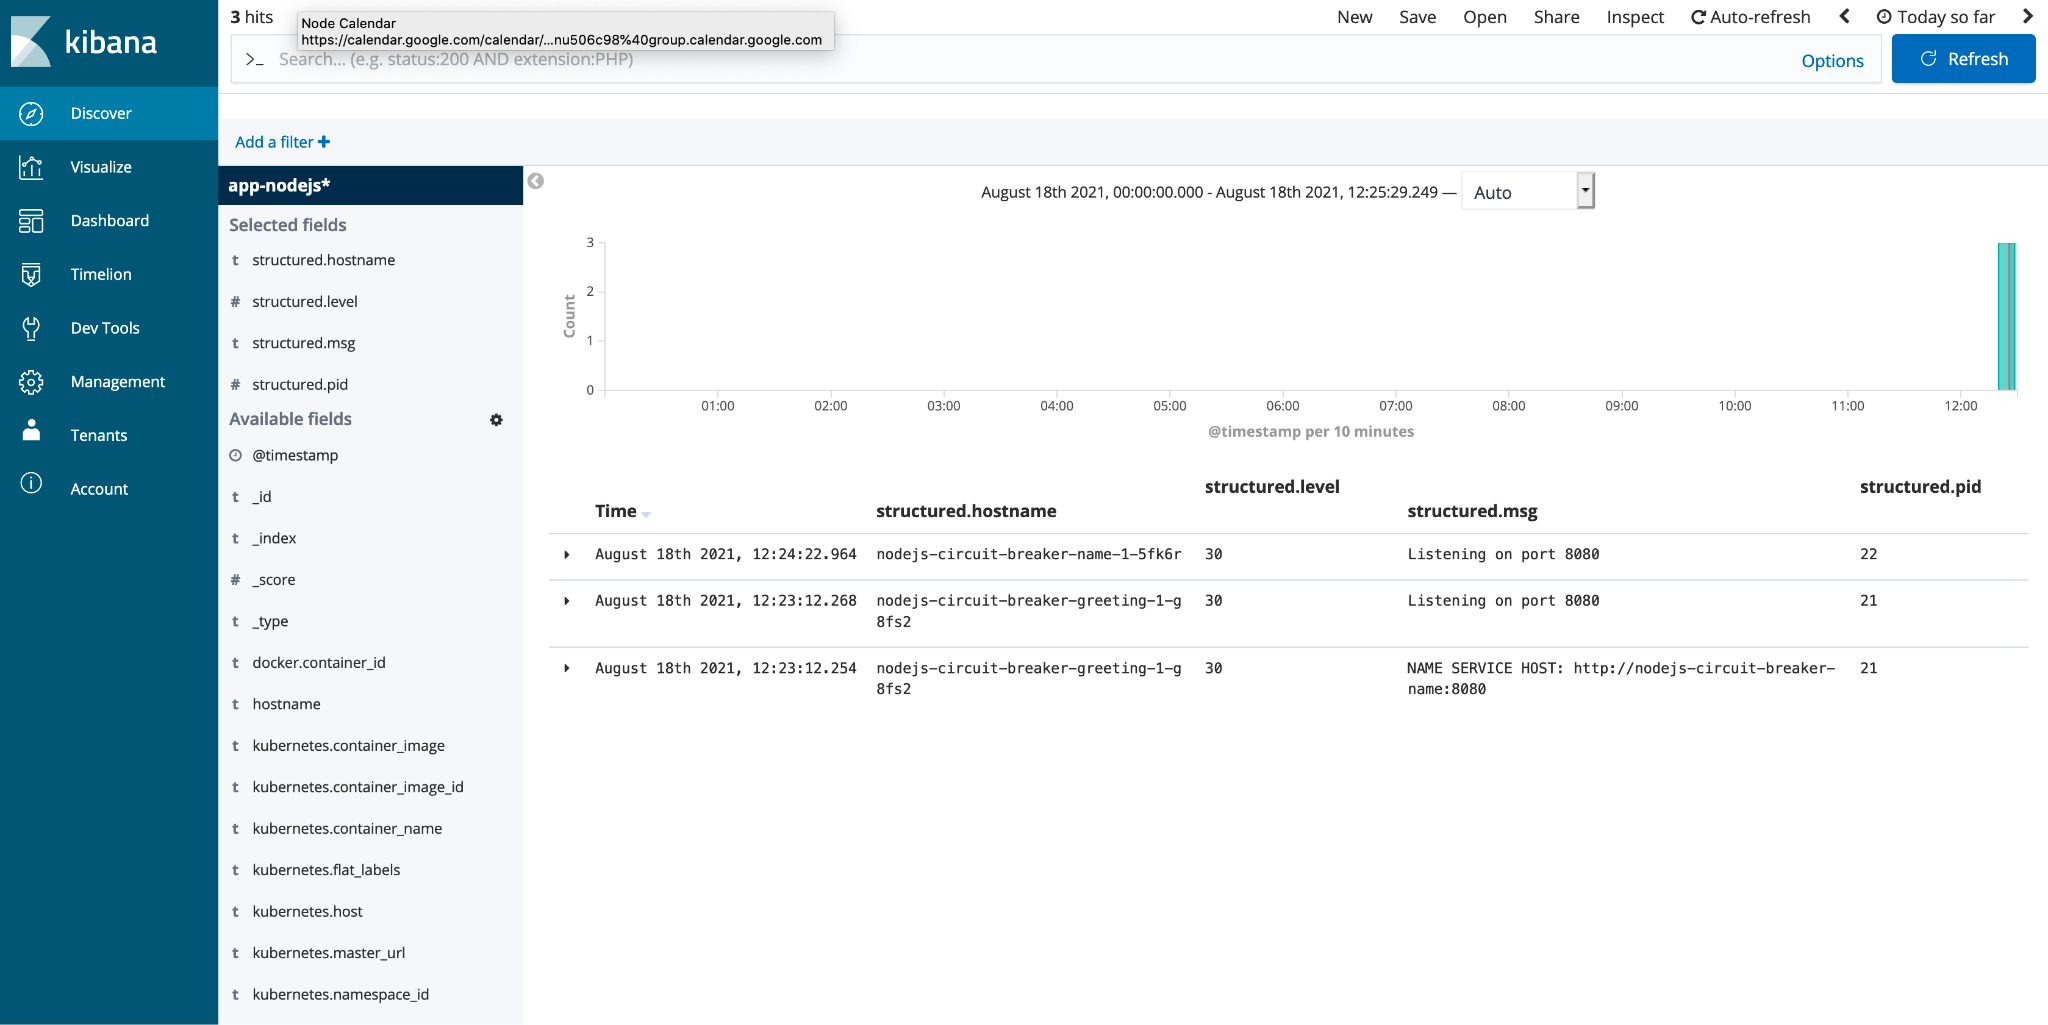
The first task is to set up an index pattern so you can view the data. Enter "app-nodejs*" for the pattern. Thanks to the trailing asterisk, the pattern allows you to view all logs from any application that uses "nodejs" in its naming convention for its pods. The prepended string "app" is from the ClusterLogForwarder, to indicate that this index came from an application pod.
Select Timestamp as the time filter field.
That's all you need to retrieve the logs.
Now, select Discover at the top left, which displays all the logs inside your Elasticsearch instance. Here, you can filter through all the logs and look for specific logs from certain pods.
Because the index pattern I've suggested here matches logs from indexes belonging to my "nodejs" apps, I only have three logs, as shown in Figure 1. If I go down the left-hand side and select all the "structured." fields, the display shows only the parsed JSON in my Kibana results. These are the fields you can search on, making the most of your JSON logging.
Conclusion
This article was an introduction to using OpenShift's built-in cluster logging to consume Pino logs from your Node.js applications. We installed both the Elasticsearch Operator and the OpenShift Logging Operator, then deployed the OpenShift default Elasticsearch service and a custom ClusterLogForwarder, all of which enabled us to collate all of our application logs.
If you want to learn more about what Red Hat is up to on the Node.js front, check out our Node.js landing page.
Last updated: September 20, 2023