Many years ago, Hercules was traveling back to Athens when he lost his way in a wood. Arriving at a crossroad, he found two women. One of them was Aletheia, the goddess of truth, and the other was Apate, the goddess of lies. But he didn't know who was who. Hercules needed all his intelligence to find the only question capable of revealing the way to Athens.
If you are lost in a computer network and don't know which path to take, don't worry—you don't need Hercules to find your way: You can use Multipath TCP.
Multipath TCP in Red Hat Enterprise Linux 8
Multipath TCP (MPTCP) is an extension to the Transmission Control Protocol (TCP) to use multiple paths between peers simultaneously. Linux's MPTCP implementation is fairly recent and was included in version 5.6. Red Hat Enterprise Linux includes MPTCP starting with version 8.3.
In the first part of this series, Davide Caratti showed how to enable MPTCP, open an MPTPC socket in an application, and verify that MPTCP is working as expected. You can follow his tutorial to start experimenting with MPTCP.
In this article, you will learn how to:
- Use
iproute2to add multiple subflows to an MPTCP connection. - Verify that MPTCP uses multiple subflows.
Opening an MPTCP socket
To see MPTCP in action, you need to open an MPTCP socket from a user-space application. Let's follow the instructions from the first article of this series to set up a multiple subflow testbed.
First of all, because MPTCP is disabled in the default Red Hat Enterprise Linux configuration, you need to enable it using sysctl so you can create MPTCP sockets:
# sysctl -w net.mptcp.enabled=1
# sysctl net.mptcp.enabled
net.mptcp.enabled = 1
MPTCP sockets are the same as the regular TCP sockets and use the same semantics. An application can natively add support to MPTCP using a socket with IPPROTO_MPTCP like this:
fd = socket(AF_INET, SOCK_STREAM, IPPROTO_MPTCP);Implementing a full-fledged MPTCP application is not difficult, but what if you want to use a normal user-space application without any knowledge of IPPROTO_MPTCP?
Fear not: There are multiple paths to avoid patching and rebuilding all networking applications. The easiest path is probably to use systemtap to replace IPPROTO_TCP with IPPROTO_MPTCP in all the calls to __sys_socket() in the kernel. To make the replacement, you need to install a few packages:
$  dnf -y install \
  kernel-headers \
  kernel-devel \
  kernel-debuginfo \
  kernel-debuginfo-common-x86_64 \
  systemtap-client \
  systemtap-devel
Now you can download the systemtap script from this guide and use the following command to start it:
# stap -vg mpctp.stapVerify that the systemtap script is working by looking at the output from dmesg:
# dmesg
...
[1114254.601040] Kprobes globally unoptimized
[1114254.611265] stap_d60b4bc4e0332aa247ebd9b2ffa597_213373: module_layout: kernel tainted.
[1114254.620296] Disabling lock debugging due to kernel taint
[1114254.626423] stap_d60b4bc4e0332aa247ebd9b2ffa597_213373: loading out-of-tree module taints kernel.
[1114254.636597] stap_d60b4bc4e0332aa247ebd9b2ffa597_213373: module verification failed: signature and/or required key missing - tainting kernel
[1114254.680368] stap_d60b4bc4e0332aa247ebd9b2ffa597_213373 (mptcp.stap): systemtap: 4.4/0.182, base: ffffffffc1082000, memory: 224data/32text/15ctx/24678net/202alloc kb, probes: 1
Setting up the testbed
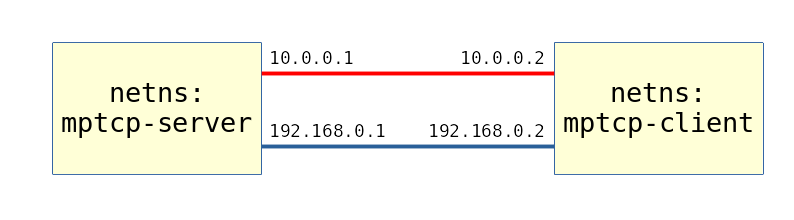
As a simple test setup, we will use two network namespaces, mptcp-client and mptcp-server, to simulate the client and the server in an MPTCP connection. The two namespaces will be connected by two different virtual Ethernet (veth) paths: From 10.0.0.1 to 10.0.0.2 and from 192.168.0.1 to 192.168.0.2 (Figure 1).
You can use the following script to set up the testbed:
#!/bin/sh

ip netns add mptcp-client
ip netns add mptcp-server

sysctl -w net.ipv4.conf.all.rp_filter=0
ip netns exec mptcp-client sysctl -w net.mptcp.enabled=1
ip netns exec mptcp-server sysctl -w net.mptcp.enabled=1

ip link add red-client netns mptcp-client type veth peer red-server netns mptcp-server
ip link add blue-client netns mptcp-client type veth peer blue-server netns mptcp-server

ip -n mptcp-server address add 10.0.0.1/24 dev red-server
ip -n mptcp-server address add 192.168.0.1/24 dev blue-server
ip -n mptcp-client address add 10.0.0.2/24 dev red-client
ip -n mptcp-client address add 192.168.0.2/24 dev blue-client

ip -n mptcp-server link set red-server up
ip -n mptcp-server link set blue-server up
ip -n mptcp-client link set red-client up
ip -n mptcp-client link set blue-client up
You can verify that your setup is working as expected by following the instructions in the first part of this series.
Working with multiple paths
Now that you have MPTCP working on a single path, it's time to take multiple paths.
First, instruct the kernel to set up multiple MPTCP subflows. iproute2 provides a handy mptcp command that can help you:
# ip -n mptcp-server mptcp endpoint flush
# ip -n mptcp-server mptcp limits set subflow 2 add_addr_accepted 2
# ip -n mptcp-client mptcp endpoint flush
# ip -n mptcp-client mptcp limits set subflow 2 add_addr_accepted 2
# ip -n mptcp-client mptcp endpoint add 192.168.0.2 dev blue-client id 1 subflow
These commands configure the MPTCP server to accept up to two different subflows and then add a second subflow to the client. To verify that everything is configured as expected, use iproute2 again:
# ip -n mptcp-server mptcp limit show
add_addr_accepted 2 subflows 2
# ip -n mptcp-client mptcp limit show
add_addr_accepted 2 subflows 2
# ip -n mptcp-client mptcp endpoint show
192.168.0.2 id 1 subflow dev blue-client
Now you are ready to use subflows. To test them, you can use ncat. The following command starts an ncat server instance on the mptcp-server:
# ip netns exec mptcp-server ncat -k -4 -i 30 -c "sleep 60" -C -o /tmp/server -l 0.0.0.0 4321 &
Next, the following command sends a "hello world!" message to the server from the mptcp-client namespace:
$ ip netns exec mptcp-client ncat -c "echo hello world!" 10.0.0.1 4321Using tcpdump, you can verify that there are two different three-way handshakes from different interfaces:
# tcpdump --number -tnnr /tmp/mptcp.pcap
reading from file /tmp/mptcp.pcap, link-type LINUX_SLL (Linux cooked v1)
dropped privs to tcpdump
1  IP 10.0.0.2.43474 > 10.0.0.1.4321: Flags [S], seq 908898843, win 29200, options [mss 1460,sackOK,TS val 3701631927 ecr 0,nop,wscale 7,mptcp capable[bad opt]>
2  IP 10.0.0.1.4321 > 10.0.0.2.43474: Flags [S.], seq 3314791626, ack 908898844, win 28960, options [mss 1460,sackOK,TS val 3198006599 ecr 3701631927,nop,wscale 7,mptcp capable Unknown Version (1)], length 0
3  IP 10.0.0.2.43474 > 10.0.0.1.4321: Flags [.], ack 1, win 229, options [nop,nop,TS val 3701631927 ecr 3198006599,mptcp capable Unknown Version (1)], length 0
4  IP 10.0.0.2.43474 > 10.0.0.1.4321: Flags [P.], seq 1:14, ack 1, win 229, options [nop,nop,TS val 3701631928 ecr 3198006599,mptcp capable[bad opt]>
5  IP 10.0.0.1.4321 > 10.0.0.2.43474: Flags [.], ack 14, win 227, options [nop,nop,TS val 3198006600 ecr 3701631928,mptcp dss ack 3158259848540329265], length 0
6  IP 192.168.0.2.36423 > 10.0.0.1.4321: Flags [S], seq 2791202022, win 29200, options [mss 1460,sackOK,TS val 1604001975 ecr 0,nop,wscale 7,mptcp join id 1 token 0xc0715389 nonce 0xcae83dcb], length 0
7  IP 10.0.0.1.4321 > 192.168.0.2.36423: Flags [S.], seq 637604674, ack 2791202023, win 28960, options [mss 1460,sackOK,TS val 511057212 ecr 1604001975,nop,wscale 7,mptcp join id 0 hmac 0x465e4bf08492bb0c nonce 0x47d18eca], length 0
8  IP 10.0.0.2.43474 > 10.0.0.1.4321: Flags [.], ack 1, win 229, options [nop,nop,TS val 3701631928 ecr 3198006600,mptcp dss fin ack 641236127 seq 3158259848540329265 subseq 0 len 1,nop,nop], length 0
9  IP 10.0.0.1.4321 > 10.0.0.2.43474: Flags [.], ack 14, win 227, options [nop,nop,TS val 3198006600 ecr 3701631928,mptcp dss ack 3158259848540329266], length 0
10  IP 10.0.0.2.43474 > 10.0.0.1.4321: Flags [F.], seq 14, ack 1, win 229, options [nop,nop,TS val 3701631928 ecr 3198006600,mptcp dss ack 641236127], length 0
11  IP 10.0.0.1.4321 > 10.0.0.2.43474: Flags [.], ack 15, win 227, options [nop,nop,TS val 3198006641 ecr 3701631928,mptcp dss ack 3158259848540329266], length 0
Indeed, a first three-way handshake takes place with packets 1-3 on the 10.0.0.* path, while a second handshake kicks in with packets 6-8 on the 192.168.0.* path (note the S flag for SYN and the S. for SYN/ACK).
Tired of manual subflows? mptcpd to the rescue
By now you are probably tired of having to manually specify endpoints and subflows for each new test you want to do. Luckily, this is not the only way to use MPTCP endpoints.
Linux kernel version 5.11 is able to send netlink notifications to user space when the kernel receives an add address netlink command. A small user-space application, mptpcd, can tap into these notifications to provide a path management mechanism to user space and control MPTCP behavior. mptpcd will be available with RHEL 9.
Conclusion
In the end, Hercules managed to find his way to Athens by simply asking one of the goddesses which path the other goddess would tell him to use. He chose the other path and quickly returned to Athens.
With MPTCP, you don't need to solve path riddles anymore: You can ask for multiple roads and take them all together to head where you need to go.
Last updated: November 7, 2024