The Developer Sandbox is a great platform for learning and experimenting with Red Hat OpenShift. Because OpenShift is built on Kubernetes, the Developer Sandbox is also a great platform for learning and experimenting with Kubernetes.
This article is the first article in a two-part series that takes you through the creation of an application using plain Kubernetes instead of OpenShift.
Where commands differ between Bash and PowerShell, I'll note the difference. Otherwise, the commands work at either command line.
A personal note from the author
Sit down, relax, and be prepared to spend some quality time with this tutorial. We cover a lot of ground, and I've attempted to mimic a real-life situation in order to bring the most value to the time you spend on the tutorial. If you're new to Kubernetes, you'll go from zero to deploying applications in this guide. You'll be rolling out a back-end application, a front-end application, and (in part 2) a database. You'll also be scaling an application and updating an application. You'll be doing hands-on experimentation, gaining skills that are 100% applicable to a production environment. Thanks for taking to time to trust me with your learning. Enjoy.
Prerequisites
It should take less than half an hour to set up all the following tools if you don't have them already. For most of the tools, I have not provided URLs because they are different for different operating systems, but they can all be found easily through web searches.
- A free Developer Sandbox account.
- The Kubernetes command-line interface (CLI),
kubectl, installed on your local PC. - GitHub, installed on your local PC.
- An image registry that you can use: Quay.io is a good option.
- The ability to build an image on your local PC using either Podman or Docker.
Steps in this article
The following steps build and deploy the tutorial's Kubernetes application in the Developer Sandbox:
- Log into the sandbox.
- Create a back-end program called
quotes. - Create a React front-end program called
quotesweb. - View
quoteswebin your browser. - Scale the back end to two pods and observe the result in
quotesweb. - Create a persistent volume claim to host MariaDB (a popular spin-off from the MySQL database) running in Kubernetes.
- Create a Secret to use with the database.
- Create a MariaDB database,
quotesdb, running in Kubernetes. - Create and populate the
quotestable in thequotesdbdatabase. - Destroy the MariaDB pod to observe Kubernetes's "self-healing."
- Update the
quotesback end to version 2 and observe the results inquotesweb.
The Kubernetes features we use, as described at the Kubernetes by example web site, are:
- Pods
- Labels
- Deployments
- Services
- Service discovery
- Environment variables
- Namespaces
- Volumes
- Persistent volumes
- Secrets
- Logging
Preparation
Download or clone three repositories (repos) from GitHub using the following commands. You can choose any directory on your system to hold these repos:
git clone https://github.com/DonSchenck/quotesweb.git
git clone https://github.com/DonSchenck/quotemysql
git clone https://github.com/DonSchenck/qotd-python
This tutorial refers to the three directories you just created by their repo names: quotesweb, quotemysql, and qotd-python.
Logging into the Developer Sandbox
You don't actually "log in to" a Kubernetes cluster. Instead, you set your local environment to connect to your cluster when you issue kubectl commands. This procedure is a bit cumbersome but necessary. You can, of course, automate it. You can also use tools to help you. Finally, if you have the OpenShift CLI (the oc command) installed, you can cheat and use the oc login command—it does make life a lot easier.
Three elements go into setting up your environment:
- Your credentials (username, etc.)
- A Kubernetes (or OpenShift) cluster
- A context: i.e., a namespace within the cluster
After establishing those three elements, you use the context that has been created.
Before establishing the context, you need to extract the following information from your sandbox:
- Username, which is represented by {username} in the commands in this article
- Authorization token, represented by {token}
- Name of the cluster, represented by {cluster}
- Context assigned to you, represented by {context}
- URL of the cluster API server, represented by {server}
The following sections show how to get this information, which requires you to log in to your sandbox.
Username
This is displayed in the upper right corner of the dashboard in a red box and looks like Figure 1.
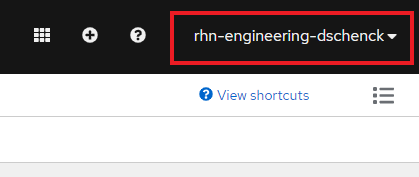
Given this example, your username would be rhn-engineering-dschenck. Insert the name from your dashboard wherever {username} appears in this article.
Note: The Kubernetes namespace (which OpenShift calls a project) you'll be using is simply your username with -dev appended: e.g., rhn-engineering-dschenck-dev.
Authorization token
The procedure to get this token is a bit complicated and is explained in the article Access your Developer Sandbox for Red Hat OpenShift from the command line. Find the DevSandbox option to get the authorization token, and insert it wherever {token} appears in this article.
Name of the cluster
The cluster name is a modification of the host URL with all dots converted to dashes. You must also change the console-openshift-console-apps portion of the host URL to that of the API server. For example, if you navigate to the Topology page of your dashboard, your URL looks something like Figure 2.

Given this string, the cluster name is api-sandbox-x8i5-p1-openshiftapps-com:6443.
Insert the cluster name you derived from your Topology page wherever {cluster} appears in this article.
Context
The context is constructed by combining your username with the name of the cluster in the following format: {username}-dev/{cluster}/{username}.
For example, using what we have up to this point, your context would be:
rhn-engineering-dschenck-dev/api-sandbox-x8i5-p1-openshiftapps-com:6443/rhn-engineering-dschenck
Insert your context wherever {context} appears in this article.
URL of the cluster API server
This is almost the same as the cluster name, but it keeps the dots. For example, given what we have up to this point, the URL would be :
https://api.sandbox.x8i5.p1.openshiftapps.com:6443
Insert your API server's URL wherever {server} appears in this article.
Viewing and deleting your local PC's Kubernetes configuration
The kubectl config view command shows your configuration. If you wish, you can remove all of your local Kubernetes configuration information by deleting the ~/.kube/config file.
Use this command in Bash:
rm ~/.kube/configUse this command in PowerShell:
Remove-Item -Recurse -Force ~/.kube/configConnecting to your Kubernetes cluster
Using the information you have obtained from your sandbox, issue the following commands and substitute your own values where noted:
kubectl config set-credentials {username}/{cluster} --token={token}
kubectl config set-cluster {cluster} --server={server}
kubectl config set-context {context} --user={username}/{cluster} /
  --namespace={username}-dev --cluster={cluster}
kubectl config use-context {context}
What we're creating in this tutorial
This tutorial guides you through using Kubernetes to create three components:
- RESTful back-end service.
- React front-end web page.
- MariaDB database (in part 2).
Figure 3 shows a typical display from the complete application.
About the RESTful back-end service
A back-end application named quotes, written in Python 3.8, supplies strings resembling a "quote of the day" via a RESTful API. The endpoints are described in Table 1.
| Endpoint URL | HTTP method | Action |
|---|---|---|
/ | GET | Returns the string "qotd" simply to identify the service. |
/version | GET | Returns a string denoting the version ID of the service, "2.0.0" for instance. |
/writtenin | GET | Returns the programming language in which the service is written. In this case, it is "Python," but this same service is available in several different programming languages. |
/quotes | GET | Returns a JSON array containing all of the quotes. |
/quotes/random | GET | Returns a JSON object containing one randomly chosen quote from among the set of available quotes. |
/quotes/{id} | GET | Returns a JSON object of one specific quote matching the {id} within the set of available quotes. |
Creating the back-end quotes app
This step creates Kubernetes objects associated with the quotes application: a deployment, a service, and a route (which is similar to Ingress and Ingress Controller objects in Kubernetes). We will also set an environment variable that will allow us to change the name of the database service if we want to.
About the route, Ingress, and Ingress controller
Because Developer Sandbox for Red Hat OpenShift is administered by Red Hat, you do not have administrator access to the Kubernetes cluster. One of the limitations created by this access restriction is that you are not granted rights to create Ingress and Ingress controller objects.
OpenShift has its own built-in Ingress-like object, the Route. For this tutorial, we're going to "cheat" and use the Route object. Be aware that we are using this workaround. In your own Kubernetes cluster, you'll create the Ingress and Ingress controller objects.
The blog posting Kubernetes Ingress vs OpenShift Route offers more historical background and details on the role of the route.
Creating the route
In the directory where you cloned the qotd-python repo, move into the k8s sub-directory and run the following commands:
kubectl apply -f quotes-deployment.yaml
kubectl apply -f service.yaml
kubectl apply -f route.yaml
For example:
PS C:\Users\dschenck\src\github\qotd-python\k8s> kubectl apply -f .\quotes-deployment.yaml
deployment.apps/quotes created
PS C:\Users\dschenck\src\github\qotd-python\k8s> kubectl apply -f .\service.yaml
service/quotes created
PS C:\Users\dschenck\src\github\qotd-python\k8s> kubectl apply -f .\route.yaml
route.route.openshift.io/quotes created
PS C:\Users\dschenck\src\github\qotd-python\k8s>
At this point, you have the back-end quotes application running in a Kubernetes pod. It's exposed within Kubernetes as a service, and the route allows anyone to access it over the internet. Therefore, you can run the kubectl get routes command to get the route URL and then issue a curl command with the route URL to see the service serving up data. Here's an example:
PS C:\Users\dschenck\src\github\qotd-python\k8s> kubectl get routes
NAME     HOST/PORT                                                                    PATH   SERVICES   PORT        TERMINATION   WILDCARD
quotes   quotes-rhn-engineering-dschenck-dev.apps.sandbox.x8i5.p1.openshiftapps.com          quotes     10000-tcp                 None
PS C:\Users\dschenck\src\github\qotd-python\k8s> curl http://quotes-rhn-engineering-dschenck-dev.apps.sandbox.x8i5.p1.openshiftapps.com/quotes
[
  {
    "author": "Don Schenck",
    "hostname": "quotes-8649f468d4-jhnkd",
    "id": 0,
    "quotation": "It is not only what you do, but also the attitude you bring to it, that makes you a success."
  },
  {
    "author": "Francis Bacon",
    "hostname": "quotes-8649f468d4-jhnkd",
    "id": 1,
    "quotation": "Knowledge is power."
  },
  {
    "author": "Confucius",
    "hostname": "quotes-8649f468d4-jhnkd",
    "id": 2,
    "quotation": "Life is really simple, but we insist on making it complicated."
  },
  {
    "author": "William Shakespeare",
    "hostname": "quotes-8649f468d4-jhnkd",
    "id": 3,
    "quotation": "This above all, to thine own self be true."
  },
  {
    "author": "Will Ferrell",
    "hostname": "quotes-8649f468d4-jhnkd",
    "id": 4,
    "quotation": "I got a fever, and the only prescription is more cowbell."
  },
  {
    "author": "Andrew Hendrixson",
    "hostname": "quotes-8649f468d4-jhnkd",
    "id": 5,
    "quotation": "Anyone who has ever made anything of importance was disciplined."
  }
]
Pods and labels
When you create the deployment, Kubernetes pulls the image for your application from the image registry named in the YAML file and creates a pod. Kubernetes also assigns the labels that you specified in the deployment. The pod name is automatically generated from the deployment name, with random characters appended to it.
The quotes-deployment.yaml file shows that our pods will be named quotesweb (plus the random characters, e.g., "quotesweb-5468c95fc6-5sp9j"), while the label will be app=quotesweb:
kind: Deployment
apiVersion: apps/v1
metadata:
  name: quotesweb
  labels:
    app: quotesweb
spec:
  replicas: 1
  selector:
    matchLabels:
      app: quotesweb
  template:
    metadata:
      labels:
        app: quotesweb
    spec:
      containers:
        - name: quotes
          image: quay.io/donschenck/quotesweb:v1
          imagePullPolicy: Always
          ports:
            - containerPort: 3000
              protocol: TCP
Note that the pod name and application name can differ. Be careful here, because this is where good or poor management can make a big difference.
The YAML file also shows that the deployment (the quotes-deployment.yaml file) uses the following image:
quay.io/donschenck/quotes:v1This image is a Linux image that has data (six "quote of the day" type entries) hard-coded into the source code. The second article in this series upgrades the image to version 2, which reads quotes from a MariaDB database running in your Kubernetes cluster.
Creating the front-end web application
Before you create the React front-end program, you need to change some code in the back-end application, build an image, and push the image to a publicly available registry from which you can pull it into your Kubernetes cluster.
First, change the source code for the quotesweb application to point to the route you created to the quotes service running in the Kubernetes cluster. You can find the URL of this route by running the following command:
kubectl get routesFor example:
PS C:\Users\dschenck\src\github> kubectl get routes
NAME     HOST/PORT                                                                    PATH   SERVICES   PORT        TERMINATION   WILDCARD
quotes   quotes-rhn-engineering-dschenck-dev.apps.sandbox.x8i5.p1.openshiftapps.com          quotes     10000-tcp                 None
PS C:\Users\dschenck\src\github>
The URL, plus the endpoint you need (/quotes/random), needs to be specified in the quotesweb application. The URL looks somewhat like the following:
http//quotes-rhn-engineering-dschenck-dev.apps.sandbox.x8i5.p1.openshiftapps.com/quotes/randomTo alter the code, change into your quotesweb/src/components directory and edit the quotes.js file. Substitute your URL for your-url-goes-here in line 26 of the code (Figure 4):
fetch('your-url-goes-here')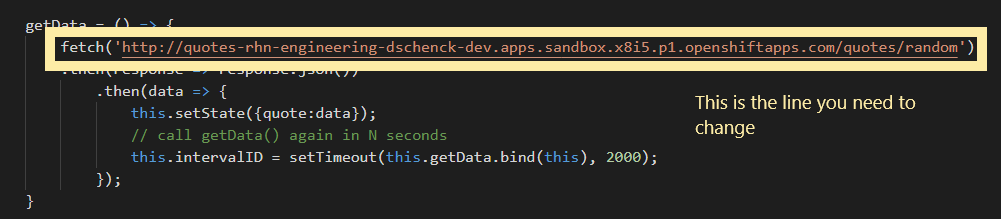
Save this change.
Move back into your quotesweb directory where the Dockerfile file is located and build your image. You will need to use your own naming pattern based on your own image registry. For example, if you are using Docker Hub as your image registry, and your username there is janedoe, you'd enter the command:
docker build -t docker.io/janedoe/quotesweb:v1 .
I'm using Red Hat's Quay.io image registry, so I entered the command:
docker build -t quay.io/donschenck/quotesweb:v1 .No matter what image registry you use, you'll need to log in to it: e.g., run docker login.
With the image built, push it to your image registry. For example:
docker push quay.io/donschenck/quotesweb:v1The name of the image you create (such as quay.io/donschenck/quotesweb:v1) will be used when you alter the deployment file, quote-deployment.yaml. This deployment file is in the k8s subdirectory of quotesweb. Find and change the following line, replacing the image name with your own image.
image: quay.io/donschenck/quotesweb:v1This change (Figure 5) will direct Kubernetes to pull your custom-built image to create the quotesweb front-end application:
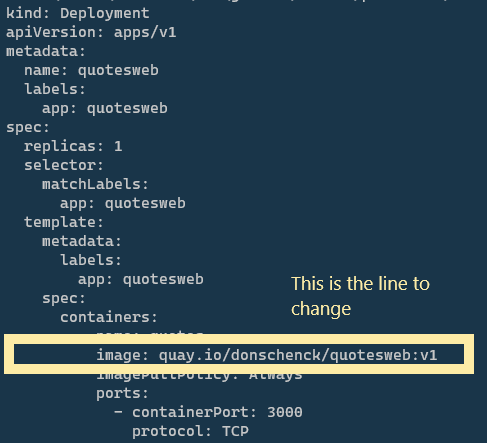
Optionally, you can leave the deployment file unchanged, and use the image that I've built.
Why use the external, publicly available route?
When you want one service in Kubernetes to communicate with another Kubernetes service, you use the internal service name. For example, the URL to communicate with the quotes service might be http://quotes/quotes/random. However, because you are using a React application, this won't work. React sends a JavaScript payload to the browser where the JavaScript executes. Because this code, communicating with the quotes application's RESTful API, is running in the browser, it is outside Kubernetes, and therefore must use a public URL to reach your back-end quotes service.
"But can't the whole world access this?" you ask.
Yes. If this were your actual production architecture, you would implement a form of authorization here or use a secure API service such as Red Hat 3scale API Management.
Running the front-end application
It's time to get our front-end quotesweb application up and running in our Kubernetes cluster.
In your quotesweb/k8s directory on your local machine, run the following commands to create the deployment, service, and route:
kubectl apply -f quotesweb-deployment.yaml
kubectl apply -f quotesweb-service.yaml
kubectl apply -f quotesweb-route.yaml
Here's an example from my own machine:
PS C:\Users\dschenck\src\github\quotesweb\k8s> kubectl apply -f .\quotesweb-deployment.yaml
deployment.apps/quotesweb created
PS C:\Users\dschenck\src\github\quotesweb\k8s> code .\quotesweb-route.yaml
PS C:\Users\dschenck\src\github\quotesweb\k8s> kubectl apply -f .\quotesweb-route.yaml
route.route.openshift.io/quotesweb created
PS C:\Users\dschenck\src\github\quotesweb\k8s> kubectl apply -f .\quotesweb-service.yaml
service/quotesweb created
Get the URL with which you can view quotesweb in your browser:
kubectl get routesHere's an example from my own machine:
PS C:\Users\dschenck\src\github\quotesweb\k8s> kubectl get routes
NAME HOST/PORT PATH SERVICES PORT TERMINATION WILDCARD
quotes quotes-rhn-engineering-dschenck-dev.apps.sandbox.x8i5.p1.openshiftapps.com quotes 10000-tcp None
quotesweb quotesweb-rhn-engineering-dschenck-dev.apps.sandbox.x8i5.p1.openshiftapps.com quotesweb 3000-tcp None
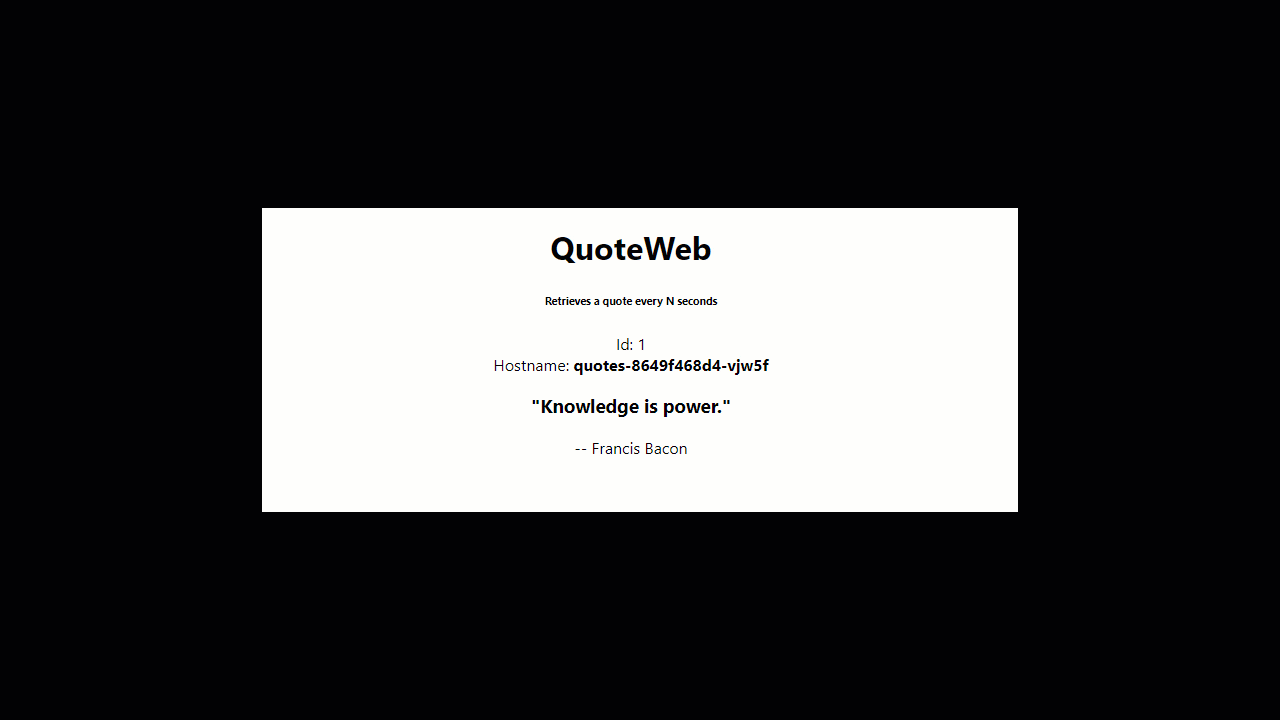
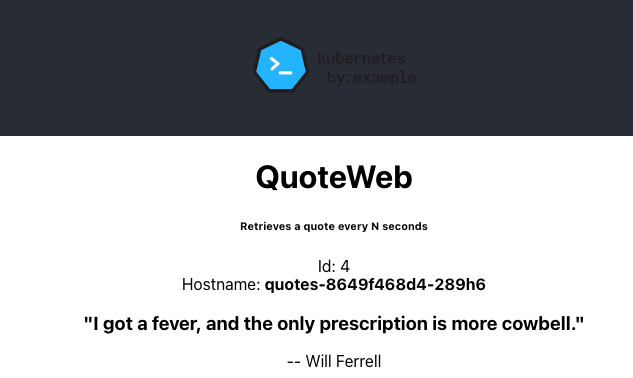
PS C:\Users\dschenck\src\github\quotesweb\k8s>When you paste the "quotesweb" URL into your browser, you can see the QuoteWeb application running (Figure 6).
Scale to meet demand
At this point, we have two applications (or Kubernetes services) running in our cluster. As you watch the QuoteWeb application in your browser, you will notice that the hostname is always the same. That's because you have only one pod running our quotes service. You can prove this with the following command:
kubectl get podsHere's an example:
PS C:\Users\dschenck\src\github\quotesweb\k8s> kubectl get pods
NAME                         READY   STATUS    RESTARTS   AGE
quotes-8649f468d4-jhnkd      1/1     Running   0          24m
quotesweb-5468c95fc6-krgxw   1/1     Running   0          4m40s
PS C:\Users\dschenck\src\github\quotesweb\k8s>
Although Kubernetes can be configured to autoscale by spinning up additional pods, you can mimic this behavior from the command line and observe the results in your browser. Use the following command to increase the number of pods to 3:
kubectl scale deployments/quotesweb --replicas=3If you now run kubectl get pods, you'll notice that there are more pods serving quotes.
What you accomplished so far
If you actually performed the steps we've gone through in this article and successfully exposed your applications, you learned the following tasks:
- Creating back-end and front-end applications and connecting them.
- Scaling an application with one command.
In the next article of the series, you'll create and populate a database running in Kubernetes to serve your application. You'll also see how easy it is to update an application.
Last updated: January 13, 2025