
Red Hat Data Grid can be used as an external cache container for application-specific data such as HTTP sessions in Red Hat JBoss Enterprise Application Platform (JBoss EAP). This lets us scale the data layer independently from the application. It also makes it possible for JBoss EAP clusters residing in various domains to access data from the same Data Grid cluster.
This article offers quick instructions for getting Data Grid 8.1.1 working with JBoss EAP version 7.3.6 deployed on Red Hat OpenShift. For this integration, we will deploy Data Grid and JBoss EAP in the same project on OpenShift. We will use a Hot Rod store to externalize HTTP sessions to Data Grid.
I recently explored this integration for a Red Hat customer, and figured it would be helpful to put together detailed instructions for replicating it.
Benefits of this integration
This integration increases application scalability, elasticity, and session persistence. Offloading session data to a remote data grid makes the application tier more scalable and elastic, and it ensures the application will survive JBoss EAP node failures. A JVM failure will not cause you to lose session data.
Setting up the environment
The integration described in this article requires the following technologies:
- The
occlient on a laptop - Red Hat JBoss Enterprise Application Platform 7.3.6
- Data Grid 8.1.1
- OpenShift 4.6.x
Step 1: Set up Data Grid on OpenShift
The first step in the process is to log in to your OpenShift cluster and create a new project. Once you've done that, you will install Data Grid 8.1.1 using the Data Grid Operator.
Install the Data Grid Operator
To install the Data Grid Operator, open your Red Hat OpenShift console, then navigate to Operators—>Operator Hub—>Data Grid 8.1.x. For the approval strategy, select Automatic. For the installation mode, select Namespace: <project-name>—> Install:
NAME                                  READY   STATUS    RESTARTS   AGE
infinispan-operator-88d585dd7-xc5xh   1/1     Running   0          58s
Note: See Installing Data Grid Operator on Red Hat OpenShift for further instructions.
Create the Infinispan cluster
Next, you will create an Infinispan custom resource (CR) for the cluster. Using the Data Grid Operator makes it easy to deploy Data Grid in a variety of configurations. Once you’ve deployed the operator from the OpenShift OperatorHub, it exposes custom resources, called the Infinispan cluster and Infinispan cache, which Data Grid uses to provision the caches on an existing cluster.
Start by creating an Infinispan cluster from the OpenShift console by going to Installed Operators—>Infinispan Cluster—>Create. Then, select the DataGrid service type under the Service field.
Disable SSL security for HTTP communication
You will need to disable the Secure Sockets Layer (SSL) communication between JBoss EAP and Data Grid and change the endpointEncryption type to none in the security spec:
apiVersion: infinispan.org/v1
kind: Infinispan
metadata:
 name: eap-infinispan
 namespace: dgeap
spec:
 service:
   type: DataGrid
 replicas: 1
 security:
   endpointEncryption:
     type: None
Step 2: Deploy your application in JBoss EAP
You can use one of two strategies to build and deploy the application in JBoss EAP:
- Use one of the JBoss EAP templates.
- Use a binary build, the WAR artifact, and the official JBoss EAP container image.
We'll take the second approach for our implementation here.
A note about JBoss EAP templates
If you choose to deploy your application using JBoss EAP templates, you will need to add the web-clustering Galleon layer to the Infinispan subsystem, as shown here:
-p GALLEON_PROVISION_LAYERS=jaxrs-server, web-clustering \
GALLEON_PROVISION_LAYERS trims your server by removing pieces that will not be used. Note that the jaxrs-server Galleon layer doesn't pull in the Infinispan subsystem; for that, you will also need the web-clustering Galleon layer. See the documentation for available JBoss EAP layers for more information.
Deployment with the JBoss EAP container image
First, you will import the JBoss EAP container image:
$ oc import-image jboss-eap-7/eap73-openjdk11-openshift-rhel8 --from=registry.redhat.io/jboss-eap-7/eap73-openjdk11-openshift-rhel8 --confirm
Deploy the WAR file
Deploying an external WAR file on OpenShift is a two-step process. First, you will define and create the new application without providing a source of any type. To ensure that no source is provided to the oc client, create an empty directory and use it to set up the new application:
$ mkdir /tmp/nocontent
$ oc get is
$ oc new-app eap73-openjdk11-openshift-rhel8~/tmp/nocontent --name=verify-cluster
This results in a new build being created, which has the same name as the application. You can start the build by providing the binary source:
$ oc start-build APPLICATION_NAME --from-file=/tmp/verify-cluster.war (application under /tmp)
Note: You can download the application source from my GitHub repository.
Mount a config map to execute the custom scripts
To include custom scripts when starting JBoss EAP from an image, we have to mount the config map to be executed as postconfigure.sh. To start, create two files, one named actions.cli and one named postconfigure.sh. Here is the content for actions.cli:
embed-server --std-out=echo --admin-only --server-config=standalone-openshift.xml
/socket-binding-group=standard-sockets/remote-destination-outbound-socket-binding=remote-rhdg-server:add(host=eap-infinispan.dgeap.svc.cluster.local,port=11222)
batch
/subsystem=infinispan/remote-cache-container=rhdg:add(default-remote-cluster=data-grid-cluster,\
        properties={infinispan.client.hotrod.use_auth=true,infinispan.client.hotrod.sasl_properties.javax.security.sasl.qop=auth,infinispan.client.hotrod.sasl_mechanism=SCRAM-SHA-512,infinispan.client.hotrod.auth_username=developer,infinispan.client.hotrod.auth_server_name=eap-infinispan,infinispan.client.hotrod.auth_password=Cx2ak@E9fGcaSfs4,infinispan.client.hotrod.use_ssl=false,infinispan.client.hotrod.auth_realm=default})
/subsystem=infinispan/remote-cache-container=rhdg/remote-cluster=data-grid-cluster:add(socket-bindings=[remote-rhdg-server])
run-batch
batch
/subsystem=infinispan/cache-container=web/invalidation-cache=infinispan:add()
/subsystem=infinispan/cache-container=web/invalidation-cache=infinispan/store=hotrod:add( remote-cache-container=rhdg,\
                fetch-state=false,\
                purge=false,\
                passivation=false,\
                shared=true)
/subsystem=infinispan/cache-container=web/invalidation-cache=infinispan/component=transaction:add(mode=BATCH)
/subsystem=infinispan/cache-container=web/invalidation-cache=infinispan/component=locking:add(isolation=REPEATABLE_READ)
/subsystem=infinispan/cache-container=web:write-attribute(name=default-cache,value=infinispan)
run-batch
stop-embedded-server
And here is the content for postconfigure.sh:
$JBOSS_HOME/bin/jboss-cli.sh --file=$JBOSS_HOME/extensions/actions.cli
Next, you'll mount the config map:
- Create a config map with the content (
actions.cli) that we need to include in thepostconfigure.sh:oc create configmap jboss-cli --from-file=postconfigure.sh=postconfigure.sh --from-file=actions.cli=actions.cli
- Mount the config map into the pods via the deployment controller or deployment:
oc set volume deployment/verify-cluster --add --name=jboss-cli -m /opt/eap/extensions -t configmap --configmap-name=jboss-cli --default-mode='0777'
- Check the pod status:
$ oc get po
NAME                                   READY   STATUS      RESTARTS   AGE
eap-infinispan-0                       1/1     Running     1          13d
infinispan-operator-59949fc49c-vk22x   1/1     Running     0          20d
verify-cluster-1-build                 0/1     Completed   0          20d
verify-cluster-2-build                 0/1     Completed   0          20d
verify-cluster-69bc4ff545-7vkb5        1/1     Running     0          6d6h
Update the ports section of the deployment
Enter the following to update the ports section of the deployment:
$oc edit deployment/verify-cluster
ports:
  - containerPort: 8080
    name: http
    protocol: TCP
  - containerPort: 8443
    name: https
    protocol: TCP
  - containerPort: 8778
    name: jolokia
    protocol: TCP
Expose the service needed for JBoss EAP
Enter the following to expose the service needed for JBoss EAP:
$ oc expose svc/verify-cluster (name of servicefrom [ $ oc get svc])
$ oc get svc
NAME                          TYPE        CLUSTER-IP       EXTERNAL-IP   PORT(S)                      AGE
verify-cluster                ClusterIP   172.30.102.7     <none>        8080/TCP,8443/TCP,8778/TCP   20d
$ oc get routes
NAME             HOST/PORT                                                       PATH   SERVICES         PORT       TERMINATION      WILDCARD
verify-cluster   verify-cluster-ssldgeap.apps.test1234.lab.rdu2.cee.redhat.com          verify-cluster   8080-tcp                    None
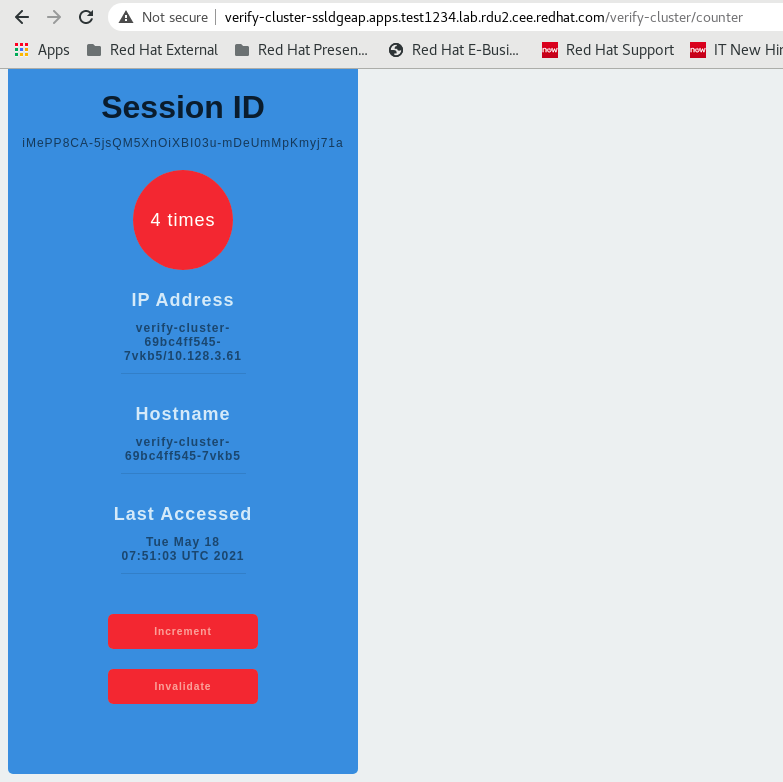
Copy the URL from the output (verify-cluster-ssldgeap.apps.test1234.lab.rdu2.cee.redhat.com) to a web browser and append the context path name (/verify-clustername of context path) to access the application, as shown in Figure 1.
Step 3: Test the HTTP session externalization
On incrementing the counter while accessing the application, observe the logs:
07:50:55,023 INFO  [com.example.verify_cluster.CounterServlet] (default task-1) Session:iMePP8CA-5jsQM5XnOiXBI03u-mDeUmMpKmyj71a, IP :verify-cluster-69bc4ff545-7vkb5/10.128.3.61, Hostname: verify-cluster-69bc4ff545-7vkb5, Visit Count:1
07:51:01,904 INFO  [com.example.verify_cluster.CounterServlet] (default task-1) Increment visitCount to 2
07:51:01,905 INFO  [com.example.verify_cluster.CounterServlet] (default task-1) Session:iMePP8CA-5jsQM5XnOiXBI03u-mDeUmMpKmyj71a, IP :verify-cluster-69bc4ff545-7vkb5/10.128.3.61, Hostname: verify-cluster-69bc4ff545-7vkb5, Visit Count:2
07:51:03,907 INFO  [com.example.verify_cluster.CounterServlet] (default task-1) Increment visitCount to 3
07:51:03,907 INFO  [com.example.verify_cluster.CounterServlet] (default task-1) Session:iMePP8CA-5jsQM5XnOiXBI03u-mDeUmMpKmyj71a, IP :verify-cluster-69bc4ff545-7vkb5/10.128.3.61, Hostname: verify-cluster-69bc4ff545-7vkb5, Visit Count:3
07:51:05,056 INFO  [com.example.verify_cluster.CounterServlet] (default task-1) Increment visitCount to 4
07:51:05,056 INFO  [com.example.verify_cluster.CounterServlet] (default task-1) Session:iMePP8CA-5jsQM5XnOiXBI03u-mDeUmMpKmyj71a, IP :verify-cluster-69bc4ff545-7vkb5/10.128.3.61, Hostname: verify-cluster-69bc4ff545-7vkb5, Visit Count:4
Scale down the JBoss EAP pod to 0 and then try scaling it up. The counter should not be reset:
09:44:40,628 INFO  [org.jboss.as] (Controller Boot Thread) WFLYSRV0060: Http management interface listening on http://0.0.0.0:9990/management
09:44:40,628 INFO  [org.jboss.as] (Controller Boot Thread) WFLYSRV0054: Admin console is not enabled
09:44:46,960 INFO  [com.example.verify_cluster.CounterServlet] (default task-1) Increment visitCount to 5
09:44:46,962 INFO  [com.example.verify_cluster.CounterServlet] (default task-1) Session:q3QKwxM0GPvrSssbE6ubuR9866iNIn9dEuJrQuS1, IP :verify-cluster-69bc4ff545-dgkls/10.128.3.26, Hostname: verify-cluster-69bc4ff545-dgkls, Visit Count:5
Now, log in to the Data Grid pod to verify whether a cache was created. A local cache is automatically created with a web application name such as verify-cluster.war. Use the CLI to connect to the remote Data Grid server to verify the cluster:
$ oc rsh eap-infinispan-0
[eap-infinispan-0-56270@infinispan//containers/default]> ls caches
___protobuf_metadata
___script_cache
Verify-cluster.war
Step 4: Enable security between JBoss EAP and Data Grid
To externalize a session to Data Grid with security enabled, add the following Hot Rod client properties to your config map:
infinispan.client.hotrod.use_ssl=true,
infinispan.client.hotrod.auth_realm=default,infinispan.client.hotrod.trust_store_path=/var/run/secrets/kubernetes.io/serviceaccount/service-ca.crt
On the Data Grid end, create an infinispan cluster using Endpoint Encryption:
spec:
  ...
  security:
    endpointEncryption:
      certSecretName: eap-infinispan-cert-secret
      certServiceName: service.beta.openshift.io
      type: Service
Conclusion
You have successfully externalized the session data!
Last updated: September 19, 2023