Page
Create the Quotes for U system
Now that you know the parameters for this learning path, it's time to create the first system: Quotes for U.
Create the Quotes For U system
Create the first system, Quotes For U system, by following these steps:
- Create a Mongodb database instance for quotes.
- Build and populate the database.
- Create a data access layer.
- Create an API gateway.
- Create a front-end web application.
Note the labels
In each of the following object-creation commands, make note of the labels (inside the quotesdb.yaml file) attached to each object. Labels are key/value pairs that have meaning to you. Here’s a list of the labels listed in the quotesdb.yaml:
app.kubernetes.io/part-of: quotesforusystemname: quotesforutier: databasedatabase: mongodbquotesforu: databasesandbox: labelsdbtype: ephemeral
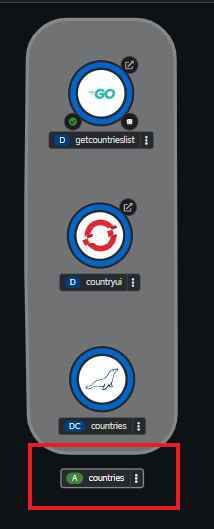
The only OpenShift-specific key used in each example is app.kubernetes.io/part-of, which is displayed at the application grouping in the OpenShift dashboard. Figure 1 is an example of this.
Log into your Developer Sandbox at the command line
If you’re not aware of how to do this, you can find instructions here: Access your Developer Sandbox from the command line
Download the Git repositories
Clone the following git repositories using these commands or download from the websites if you don’t have Git installed.
git clonehttps://github.com/redhat-developer-demos/quotesforudatabasegit clonehttps://github.com/redhat-developer-demos/rsalbumsgit clonehttps://github.com/redhat-developer-demos/countriesdbgit clonehttps://github.com/redhat-developer-demos/customersdb
Create a MongoDB database instance for quotes
Several database options are built into the Developer Sandbox. The MongoDB database, however, is not built into the Developer Sandbox. So you will create it using an existing image. Two YAML files are included in the Git repository: quotesdb.yaml and quotesdb_secrets.yaml. You may wish to view the contents of these files to get an idea of what is built, which image is used, and more. This is optional.
Move into your quotesforudatabase directory and run the following two commands:
oc create -f quotesdb_secrets.yaml

oc create -f quotesdb.yaml
Build and populate the database
Move into your quotesforudatabase directory and run the appropriate following command:
If using a Bash shell:
./buildDB.shIf using Powershell:
./buildDB.ps1You should expect output much like this:
C:\quotesforudatabase> .\buildDB.ps1
BUILD AND POPULATE QUOTE DATABASE
---------------------------------
Waiting for pod to be ready...
pod/quote-7b7ddb47f7-96pk7 condition met
pod/quote-7b7ddb47f7-nmnnr condition met
getting pod name ...
creating database and user account...
{ ok: 1 }
copying quotes to temporary folder in pod...
importing quotes data...
2023-10-05T16:57:21.613+0000    connected to: mongodb://localhost/
2023-10-05T16:57:21.629+0000    11 document(s) imported successfully. 0 document(s) failed to import.
FINISHED
Optional step
Curious to see what’s in the MongoDB quote database? Run the following commands:
oc get pods
You’ll need the pod name for the following:
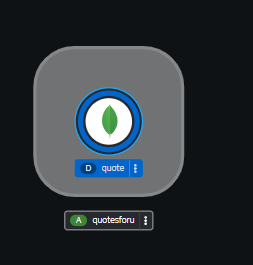
oc exec (podname_goes_here) -- mongosh -u admin -p quote --authenticationDatabase admin --eval 'use quote' --eval 'db.quote.find()'If you look at your OpenShift dashboard (the web-based part of your sandbox), you’ll find your quote database up and running. The dark blue circle around the icon indicates that everything is running. In all of the following steps, you can check on your results by viewing the dashboard and looking for the dark-blue, ringed icon. An example of this for the MongoDB database is Figure 2.
Create a data access layer
The next object will be a microservice in C# and reads from the MongoDB database. It will be built by pulling the source code from a Git repository on Github. The OpenShift s2i feature will compile the code and create all of the necessary objects.
At the command line, run this command:
oc new-app https://github.com/redhat-developer-demos/getquoteslistforu --labels=app.kubernetes.io/part-of=quotesforu,systemname=quotesforu,tier=dataaccess,language=csharp,quotesforu=dataaccess,sandbox=labels --image-stream="openshift/dotnet:8.0-ubi8" -e MONGODB_URI=mongodb://quote:quote@quote/quoteCreate API gateway
All of the web front ends in this activity use the same API gateway microservice, octriviahhh-api-gateway. This API gateway is written in Quarkus and stored as a prebuilt image in an image registry.
At the command line, run this command:
oc new-app --image=quay.io/rhdevelopers/triviahhh-api-gateway:latest --name=triviahhh-api-gateway --labels=tier=apigateway,language=quarkus,quotesforu=apigateway,sandbox=labelsBecause applications external to your sandbox will use this service, you need to create an external route (i.e., a URL to the service). Use the following command:
oc expose service/triviahhh-api-gatewayNote: The oc expose command gives the application a public URL. You can see this by running the command oc get routes. At this point, anyone on the internet can reach your service and use it. A future sandbox activity will show you how to secure this route to limit access. For now, because it is a short-lived instance, this will suffice.
Create a web application
Before you can create the web front-end application, you need to retrieve the external route — the URL — assigned to the API gateway. Use the oc get routes command, with very specific command-line options, to do this. The following is the command with the proper parameters:
C:\> oc get routes/triviahhh-api-gateway -o custom-columns=POD:.spec.host --no-headers

triviahhh-api-gateway-rhn-engineering-dsch-dev.apps.sandbox-m3.1530.p1.openshiftapps.com
When specifying the URL in the oc new-app command, use the output from the previous command and add the scheme prefix (i.e., http://). Using the previous result, here’s an example:
http://triviahhh-api-gateway-rhn-engineering-dsch-dev.apps.sandbox-m3.1530.p1.openshiftapps.comWith that information, run the following commands:
oc new-app --image=quay.io/rhdevelopers/triviahhh-web:latest --name=triviahhh-web --labels=app.kubernetes.io/part-of=quotesforu,systemname=quotesforu,tier=frontend,language=reactjs,quotesforu=frontend,sandbox=labels -e TRIVIAHHH_BACKEND_HOST={url to api gateway}Because this is a web front-end application, you will need to create a route to it. Use the following command:
oc expose service/triviahhh-webQuotes For U is up and running
You should see the screen shown in Figure 3 in your OpenShift (web-based) dashboard:
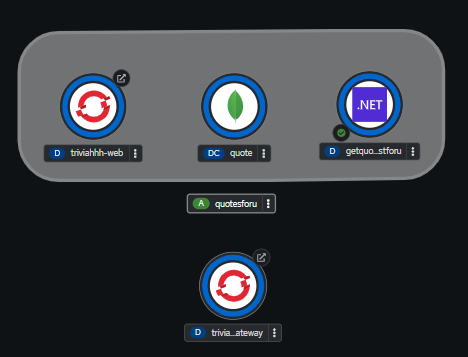
Notice that by using the label app.kubernetes.io/part-of=quotesforu, we were able to group the database (quote), the data access service (getquoteslistforu), and the front-end web page (triviahhh-web) into the same application. Because the API gateway (triviahhh-api-gateway) is used by multiple applications, we purposely did not include it in any application grouping.
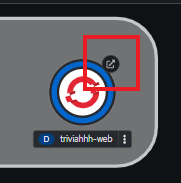
You can view the resulting application in your default browser by clicking on the small arrow icon in the upper right corner of the triviahhh-web container icon (Figure 4).
Congratulations. Quotes for U is up and running. Now it's time to create your next system: The Customer Viewer System
