Page
Create the Customer Viewer system

Congratulations. The Quotes for U system is up and running. Now it's time to create the Customer Viewer system.
Create the Customer Viewer system
The next system to be created is the customer system by following these steps:
- Create PostgreSQL database instance.
- Build and populate the database.
- Create a customer data access layer.
- Create the customer viewer web app.
Create a PostgreSQL database instance
Because this instance is ephemeral, all tables and data will be destroyed when the pod is scaled to zero. When that happens, you will have to scale back to one pod, then rerun the commands to build and populate the database. In a production environment, you would most likely use a persistent model. But since this is a short-lived activity, the ephemeral version will suffice.
The PostgreSQL template is built into the Developer Sandbox. You will use that template to create this database instance. Run the following command to create an ephemeral instance of a PostgreSQL database:
oc new-app --template=postgresql-ephemeral --param NAMESPACE=openshift --param DATABASE_SERVICE_NAME=customersdb --param POSTGRESQL_USER=customersdb --param POSTGRESQL_PASSWORD=customersdb --param POSTGRESQL_DATABASE=customersdb --labels=app.kubernetes.io/part-of=customers,systemname=customers,tier=database,database=postgresql,customers=database,sandbox=labels,dbtype=ephemeral
Build and populate the database
Move into your customersdb directory and run the following command:
If using a Bash shell
./create_and_load.sh
If using Powershell:
./create_and_load.ps1
You should expect output much like this:
C:\> .\create_and_load.ps1
CREATE AND POPULATE DATABASE TABLE(S)

-------------------------------------

Waiting for pod to be available...
Getting pod name...
customersdb-1-cmf8f
Copying table-creation script to pod...
Copying data to pod...
Creating table(s)...
CREATE TABLE
Importing data...
COPY 9
FINISHED
Create a customer data access application
Run the following commands to create the data access app:
oc new-app https://github.com/redhat-developer-demos/getcustomerlist --labels=app.kubernetes.io/part-of=customers,systemname=customers,tier=dataaccess,language=nodejs,customers=dataaccess,sandbox=labels
oc set env deploy/getcustomerlist PG_PORT=5432 PG_HOST=customersdb PG_USER=customersdb PG_PASSWORD=customersdb PG_DATABASE=customersdb
Note: In previous commands, we specified environment variables when creating an object. As a demonstration, we use the oc set command to set environment variables after the object is created.
Create the customer viewer web application
Run the following commands to create the web app:
oc new-app https://github.com/redhat-developer-demos/customerviewer --labels=app.kubernetes.io/part-of=customers,systemname=customers,tier=frontend,language=blazor,customers=frontend,sandbox=labels --image-stream="openshift/dotnet:6.0-ubi8"

oc expose service/customerviewer

oc set env deploy/customerviewer TRIVIAHHH_GATEWAY_URL=http://triviahhh-api-gateway:8080/gateway/customers
Notice the URL in that last command, and consider that you did not need to look up or create a route in order to specify it. That’s because the URL is internal to OpenShift, based on the service name we assigned to the API gateway earlier. The takeaway is when using services inside of OpenShift, you will know the URL ahead of time because you create it.
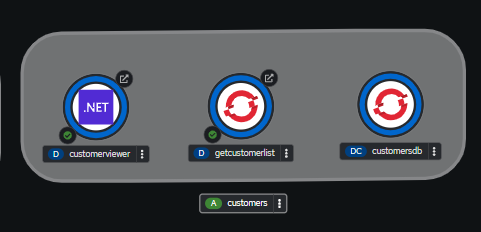
Customers is up and running
After a minute or so, you should see the screen in Figure 5 in your OpenShift (web-based) dashboard:

Congratulations. You created the Customer Viewer web application. Now it's time to create the Stones system.
