Link distributed services across OpenShift clusters using Red Hat Service Interconnect
Learning path|4 resources|50 mins|Published on October 30, 2023
In this activity, you will connect services distributed across multiple OpenShift clusters using Red Hat Service Interconnect to establish a Virtual Applications Network, also known as a service network. This involves using straightforward Kubernetes annotations to manage which services are securely exposed over the network. This method enables you to seamlessly leverage your existing GitOps workflow for service management.
As indicated in the image below you are now done installing the patient portal frontend in the Public Cluster and the database and payment processor in the private cluster. Both these clusters are not connected.
The challenge for us is now to enable the patient portal application to connect to the database and payment processor. For obvious reasons, we do not want to expose the database and payment processor over the public internet, so a private, secure link needs to be setup between the OpenShift instance on the public cloud and the private cloud. This can be accomplished with a VPN between the public cloud and the data center. However a VPN can be hard to set up, and requires deep networking expertise. Developers also need to request the network admins and go through a time taking approval process for the VPNs to be setup. Red Hat Service Interconnect on the other hand creates a dedicated layer 7 service network and is a lot easier to set up. It allows application Developers to establish secure interconnection with other services and applications in different environments without relying on network specialists. With Service Interconnect developers can now create secure virtual application networks without the cumbersome overhead, complexity and delays of traditional connectivity solutions.
Connect the front end of the public cluster to the services deployed on the private cluster
You are now done installing the patient portal front end in the public cluster as well as the database and payment processor in the private cluster, but neither of these clusters are connected. Let's connect them:
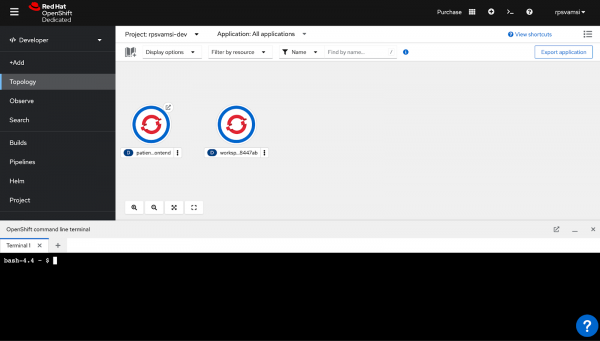
Make sure you're in your Developer Sandbox environment (Figure 7).
Figure 7: Your Developer Sandbox window.
Initialize Red Hat Service Interconnect in the public OpenShift cluster:
skupper init --site-name public --enable-console --enable-flow-collector --console-auth unsecured
Service Interconnect provides observability out of the box and comes with its own console, which you can access by clicking on the Skupper Console tab. You can get the console link by running the following command:
skupper status
Your output will look similar to this:
Skupper is now installed in namespace 'rpsvamsi-dev'. Use 'skupper status' to get more information.
Copy the console URL from the previous output (Figure 8).Figure 8: Copy the console URL.
You should be able to see the public cluster displayed in the console (Figure 9). At the moment, there is not a lot to see because we have only installed one side of the service network.
In order to create the connection, we must also initialize Service Interconnect in the private cluster. Make sure you are on the terminal of your private cluster (Figure 10).Figure 10: The terminal of your Private Cluster.
Skupper is now installed in namespace 'private'. Use 'skupper status' to get more information.
Link the public and private clusters using Service Interconnect
Creating a link between Service Interconnect-enabled namespaces requires a secret token that allows permission to create the link. All intersite traffic is protected by mutual TLS (mTLS) which employs a private, dedicated certificate authority (CA).
The token carries the link details required for connection. You generate the token in the public cluster and use it to link the namespaces in the other clusters.
A claim token is not a certificate. You securely exchange the token for a certificate during the linking process. By implementing appropriate restrictions, like creating a single-use claim token, you can avoid the accidental exposure of certificates.
Make sure you are on your public cluster (Figure 11).
Figure 11: The public cluster display window that indicates the available clusters.
Generate a secret token in the public cluster:
skupper token create secret.token
View the token:
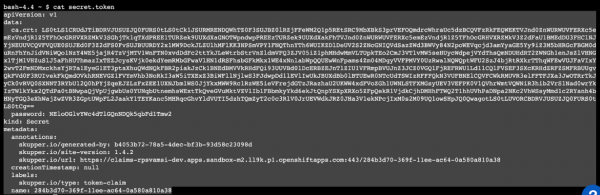
cat secret.token
Select the full token from the terminal (Figure 12). Carefully copy the token without missing any characters. Note: This is a very important step. Any missing characters in pasting the token will lead to failed connections. Figure 12: Carefully copy the token without missing any characters.
Now switch to the private cluster and click on the Visual editor tab (Figure 13).Figure 12: Switch to the Private Cluster and click on the Visual editor tab.
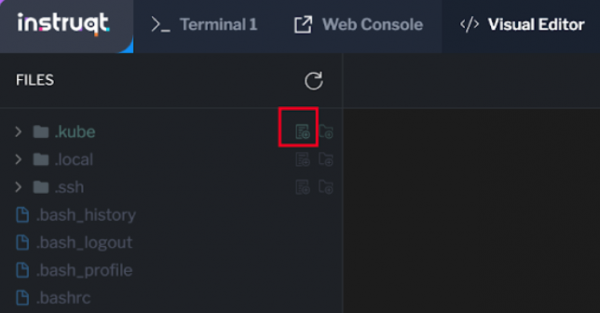
The FILES sidebar will appear. Select the .kube folder, then the Add file icon (Figure 14). We will use this file to paste the connection token we created in the public cluster. Note: You can store the token in any folder. For the purpose of this exercise, it's stored in the .kube folder. Figure 14: Select the kube folder then the add file icon.
Name the file secret.token (Figure 15).Figure 15: Name the file secret.token.
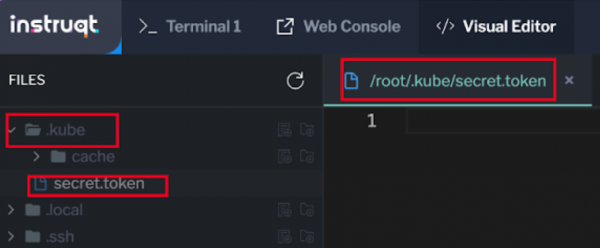
Click on the .kube folder then the secret.token file (Figure 16).Figure 16: Click on the .kube folder then the secret.token file.
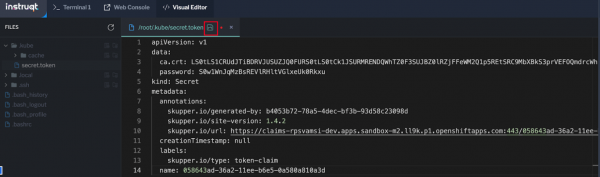
Paste the token that you copied from the public cluster into the field then select Save (Figure 17).Figure 17: Paste the token that you copied and save it.
You have successfully saved the token in the private machine. Let's switch back to the terminal of the private machine to create the connection by using the secret token.
skupper link create /root/.kube/secret.token
You should see output like this:
Site configured to link to https://claims-rpsvamsi-dev.apps.sandbox-m2.ll9k.p1.openshiftapps.com:443/058643ad-36a2-11ee-b6e5-0a580a810a3d (name=link1)
Check the status of the link using 'skupper link status'.
Verify that the private cluster now appears in the console as a part of the network you can access by refreshing the Skupper Console tab that you opened earlier. (Figure 18).
Figure 18: Click on the Skupper Console tab to verify the linked clusters.Note: The circles denoting the environments might overlap each other and might not be visible. If that's the case, click on the circle and drag it to ensure proper visibility.
Expose the services
Though we have linked both the namespaces in two different clusters, we have not exposed any services yet. We have to explicitly mention which services we want to expose over the service network. By default, none of the services in the namespaces are exposed by Service Interconnect.
To verify this, go to the browser tab where the front end is open and refresh it. Note: The patient and doctors names are neither retrieved from the database, nor displayed on the portal (Figure 19).
Figure 19: Verify your exposed services.
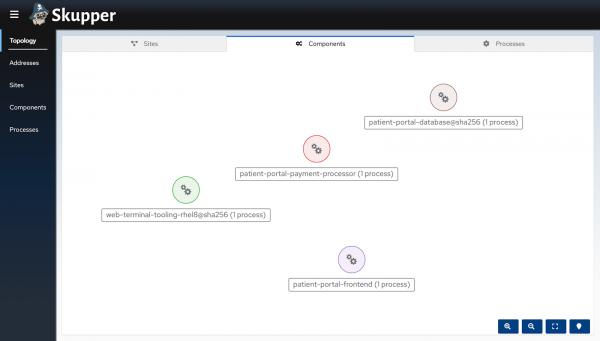
Verify the same thing by going back to the console. Click on the Components tab (Figure 20). You should not be able to see any lines or arrows connecting the individual services.Figure 20: The components tab and the disconnected individual services.
Congratulations. Now that you have connected your private and public clusters, it's time to expose the database services over your network.
Red Hat Service Interconnect: Link distributed services across OpenShift clusters using Red Hat Service Interconnect
In this activity, you will connect services distributed across multiple OpenShift clusters using Red Hat Service Interconnect to establish a Virtual Applications Network, also known as a service network. This involves using straightforward Kubernetes annotations to manage which services are securely exposed over the network. This method enables you to seamlessly leverage your existing GitOps workflow for service management.