Link distributed services across OpenShift clusters using Red Hat Service Interconnect
Learning path|4 resources|50 mins|Published on October 30, 2023
In this activity, you will connect services distributed across multiple OpenShift clusters using Red Hat Service Interconnect to establish a Virtual Applications Network, also known as a service network. This involves using straightforward Kubernetes annotations to manage which services are securely exposed over the network. This method enables you to seamlessly leverage your existing GitOps workflow for service management.
In order to get to this point in our path, you have installed front-end applications on your public cluster followed by the database and payment service on your private clusters and created a service network using Red Hat Service Interconnect. It's time to securely expose the services over this network.
Expose your network services
Now let's expose the database service over the service network. This will allow the front end on the public cluster to connect to the database and payment-processor as if it was a local service, while in reality, the service is a proxy for the real service running on the private cluster.
You can either do this by using the skupper expose command or by using simple kubectl annotations. In your example, you are going to use the annotations because it's super useful when making connections through your GitOps workflow.
Expose the database and payment processor over the service network by running the following commands in the Terminal1 tab of your private cluster:
kubectl annotate service database skupper.io/proxy=tcp
kubectl annotate service payment-processor skupper.io/proxy=http
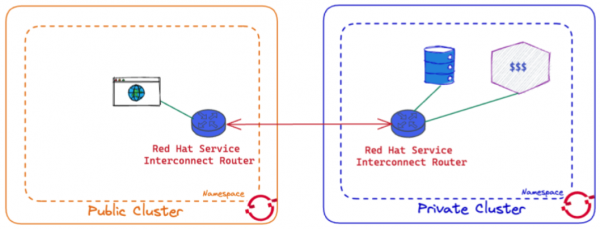
You have now established a secure link between the two clusters, and exposed the database and payment processor as services on public cluster. This will allow the front end on the public cluster to connect to the database and payment processor services as if they were a local service, but are really proxies for the real service running on the private cluster (Figure 21).
Figure 21: A secure link between the two clusters that exposes the database and payment processor as services on public cluster.
Note: You are not exposing the database and payment processor service to the internet. Only the services in the service network enabled by Service Interconnect can access them
After a few seconds, go back to the browser tab where you opened the patient portal front end and refresh it. You should now be able to see the the list of patients and doctors that the portal retrieved from the database. This shows that you have successfully connected our front end to the database using Red Hat Service Interconnect (Figure 22).
Figure 22: The list of patients and doctors that have been retrieved from the database.
Click on the patient, Angela Martin (Figure 23).Figure 23: Select the patient, Angela Martin.
Access the Bills tab to find Angela Martin's unpaid bills then select Pay (Figure 24).Figure 24: Click the Bills tab and select Pay.
Submit the payment (Figure 25).Figure 25: Submit the payment.
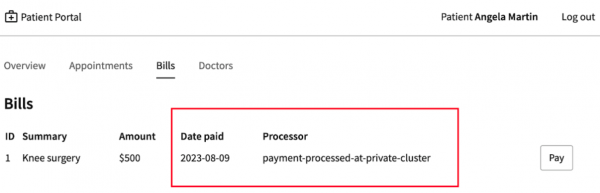
There is now a Date Paid and Processor location value, indicating that the payment is successful. This shows that you have successfully connected your payment-processor to the application using Service Interconnect (Figure 26).Figure 26: There is now a Date Paid and a processor location value.
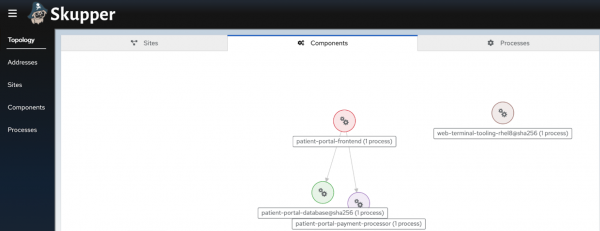
Revisit the console and click on the Components tab. All the services should now be connected (Figure 27).Figure 27: Your services are now be connected.
Congratulations! You successfully used Red Hat Service Interconnect to build a secure service network between services on two different OpenShift clusters and allowed application to connect and communicate over the secure network.
Red Hat Service Interconnect: Link distributed services across OpenShift clusters using Red Hat Service Interconnect
In this activity, you will connect services distributed across multiple OpenShift clusters using Red Hat Service Interconnect to establish a Virtual Applications Network, also known as a service network. This involves using straightforward Kubernetes annotations to manage which services are securely exposed over the network. This method enables you to seamlessly leverage your existing GitOps workflow for service management.