Page
Run your Quarkus application
At this point, we have created the code, built and tested it, created the image, and uploaded the image ready to be used in the sandbox. All that is left now is to run it and have a play.
In order to get full benefit from taking this lesson, you need:
- The Red Hat build of Quarkus
- Access to the Developer Sandbox
In this lesson, you will:
- Run and test your application
Run the Quarkus application
There are many ways to get your Quarkus application into the Developer Sandbox. What we have done here is the basic step-by-step approach from scratch using some of the best tools from Red Hat Developer, but you could do the following instead:
- Build a fat-jar: Add
quarkus.package.type=uber-jarinto theapplication.propertiesfile and simply do a/mvnw clean package. You can upload this JAR file directly into the Developer Sandbox from the Developer Add+ menu. - Use Maven to upload directly: Add the
quarkus-OpenShiftdependency in thepom.xmland simply do a/mvnw clean package -Dquarkus.kubernetes.deploy=true. - Use Quarkus itself: Simply type
quarkus deployin the root directory (once you log in to the Developer Sandbox, it will deploy into your project).
All of these make some assumptions as to what you want the format of the application to be (i.e., a Kubernetes deployment). The approach we will describe here allows you to configure any aspect of the deployment, which is much more flexible.
- Go to the Developer Sandbox in the browser and navigate to the Developer viewpoint (top left of the interface).
- Click +Add → Container Images. We are going to deploy an application directly from the image we just uploaded).
- In the Deploy Image tab, select Image Stream Tag from Internal Registry. Because we uploaded directly into the registry, we have access to the image as what is known as an Image Stream, a project-specific view of that image.
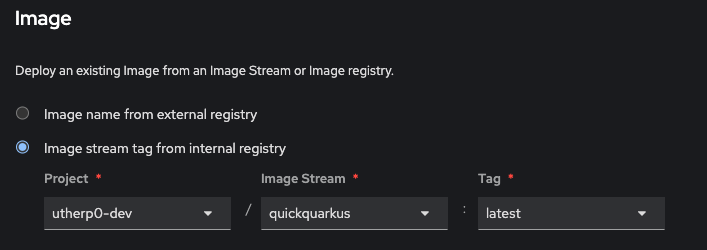
The drop-down menus that appears will give you quick and easy access to the image we uploaded earlier. As Figure 4 shows, my project is
utherp0-dev, the name I chose to upload it under wasquickquarkus, and I was lazy enough to use just:latest.
Figure 4: OpenShift image deployment. - Give it an appropriate application name for cosmetic grouping in the Topology view and a sensible name for deployment since all of the OpenShift objects created will have this name.
- What's nice here is that you can then choose what kind of deployment to use. For instance, the Developer Sandbox has serverless installed, so you can deploy it as a serverless component (and you should, because it is fun).
- When you're ready, select Create.
And there we have it. The application you scaffolded (hopefully) five minutes ago from the Quarkus website is now running as a serverless component on the Developer Sandbox.
Test the application
Test it out by clicking the Route icon at the top right of the roundel. This route will display the standard Quarkus landing page. Quarkus uses a scaffolded main function to generate this page.
To see your RESTful endpoints, click the URL bar, change the https to http, and add /hello/subdir to the end of the URL. You should see the system time appear in the browser window along with the code changes you just made.
Move it or rename it
As mentioned, there are many other ways you could approach this exercise:
- Upload the image directly using the OpenShift extension in Podman Desktop.
- Deploy directly from the Quarkus source and tools using the three different mechanisms explained earlier.
- Create the scaffolded code from the Quarkus website, add it to a Git repository, and then use the brilliant Red Hat OpenShift Dev Spaces IDE in the Developer Sandbox to edit, commit, and deploy the code right there and then.
- Automatically set up a build to rebuild and redeploy when the code changes using Tekton Pipelines and a webhook from the Git repo.
- Deploy Kubernetes objects containing your image using Argo CD.
Ready for more Developer Sandbox learning? Explore more paths and activities here.