Page
Setup and configure Ansible plug-ins for RHDH on the Developer Sandbox.
In this lesson, you will:
- Fetch and upload the Ansible plug-in .tar file.
- Create a plugin registry in your OpenShift cluster.
- Update the Helm chart configuration to include Ansible plugins.
- Configure a GitHub to perform repository related functions.
- Verify the installation and functionality of Ansible plugins.
Download plugins and create plugin registry
Fetch the .tar Files for the plugins:
- Locate the Ansible plug-ins for Red Hat Developer Hub Setup Bundle and download the .tar.gz file from access.redhat.com.
- Extract the downloaded .tar file into a directory.
mkdir /path/to/plugins
tar -xzf ansible-backstage-rhaap-bundle-x.x.x.tar.gz -C /path/to/plugins
Substitute the Ansible plug-ins release version, for example 1.0.0, for x.y.z
- In the directory where the plugins are extracted, you will also see “*.integrity” files, these files contain integrity checksums of the plugin with the same name. You can view these files using the “cat” command. Keep them handy as their content will be needed later.
- Export the path of the directory containing the extracted plugin files as an environment variable.
export DYNAMIC_PLUGIN_ROOT_DIR=/path/to/pluginsDownload and install the oc CLI
The oc CLI is required to interact with your OpenShift cluster. Download and install the oc CLI.
Log in to your OpenShift cluster from the CLI:
- On the top right corner of your OpenShift cluster in the developer sandbox click
> Command Line Tools.
- Click the Copy Login Command link. This opens a new tab.
- Click Display Token after logging in.
- Copy the oc command that looks like this and run it in your terminal.
oc login --token=<your-token> --server=<your-server-url>- To set the CLI context to the allowed project on OpenShift, run the following command
oc project <project-with-your-username>Create a plugin registry:
Run commands to create a plugin registry in your OpenShift cluster. These commands set up a plugin registry in your OpenShift project which will host the Ansible plugins and make them available for installation in RHDH.
oc new-build httpd --name=plugin-registry --binary
oc start-build plugin-registry --from-dir=$DYNAMIC_PLUGIN_ROOT_DIR --wait
oc new-app --image-stream=plugin-registry
Note(Optional): In case you need to update the plugins to a newer version, please point the DYNAMIC_PLUGIN_ROOT_DIR to the new plugins directory and run the “oc start-build” command again from the above block. After the build completes, upgrade the Helm chart to point to the newer versions of the plugins and edit the integrity hash accordingly.
Adding a pull secret to the Red Hat Developer Hub Helm configuration
Prerequisite
The Ansible Development container download requires a Red Hat Customer Portal account and Red Hat Service Registry account. You can also use your developers.redhat.com account.
Procedure
- Create a new Red Hat Registry Service account, if required.
- Click the token name under the Account name column.
- Select the OpenShift Secret tab and follow the instructions to add the pull secret to your Red Hat Developer Hub OpenShift project on developer sandbox.
- Add the new secret to the Red Hat Developer Hub Helm configuration:
upstream:
  backstage: |
    ...
    image:
      pullSecrets:
        - rhdh-secret-registry
    ...
For more information, refer to the Red Hat Container Registry documentation
Upgrade the Helm chart
On your Developer Sandbox in the browser, you can now upgrade the Helm chart with the new custom configuration:
- Click Helm on the left-hand navigation. There is a Helm chart already installed for the Developer Hub application.
- Click the three-button icon to the far right of your project and select Upgrade. Click YAML view.
- Replace the lines below
dynamic:
    includes:
      - dynamic-plugins.default.yaml
with
 dynamic:
    includes:
      - dynamic-plugins.default.yaml
    plugins:
      - disabled: false
        integrity: <add plug-in checksum here>
        pluginConfig:
          dynamicPlugins:
            frontend:
              ansible.plugin-backstage-rhaap:
                appIcons:
                  - importName: AnsibleLogo
                    name: AnsibleLogo
                dynamicRoutes:
                  - importName: AnsiblePage
                    menuItem:
                      icon: AnsibleLogo
                      text: Ansible
                    path: /ansible
        package: 'http://plugin-registry:8080/ansible-plugin-backstage-rhaap-x.y.z.tgz'
      - disabled: false
        integrity: <add plug-in checksum here>
        pluginConfig:
          dynamicPlugins:
            backend:
             ansible.plugin-scaffolder-backend-module-backstage-rhaap: null
        package: http://plugin-registry:8080/ansible-plugin-scaffolder-backend-module-backstage-rhaap-x.y.z.tgz
      - disabled: false
        integrity: <add plug-in checksum here>
        pluginConfig:
          dynamicPlugins:
            backend:
              ansible.plugin-backstage-rhaap-backend: null
package: http://plugin-registry:8080/ansible-plugin-backstage-rhaap-backend-x.y.z.tgz- In the package: sections, replace x.y.z in the plug-in filenames with the correct version numbers for the Ansible plug-ins.
- Replace the value of the “integrity:” fields in the above configuration with the content of the “.integrity” files where you extracted the downloaded plugins tar bundle.
- Replace the first value with the contents of
ansible-plugin-backstage-rhaap-x.y.z.tgz.integrity - Replace the second value with the contents of
ansible-plugin-scaffolder-backend-module-backstage-rhaap-x.y.z.tgz.integrity - Replace the third value with the contents of
ansible-plugin-backstage-rhaap-backend-x.y.z.tgz.integrity
- Replace the first value with the contents of
- Add the following configuration under the upstream.backstage section.
Make sure that the extraContainers key is at the same level as the extraAppConfig or extraEnvVars key.
upstream:
  backstage: |
    ...
    extraContainers:
      - image: 'registry.redhat.io/ansible-automation-platform-25/ansible-dev-tools-rhel8'
        imagePullPolicy: IfNotPresent
        command:
           - adt
           - server
        name: ansible-devtools-server
        ports:
- containerPort: 8000- Click Upgrade. This will re-execute the Helm chart with the additional configuration.
Update the ConfigMap
You must also make some changes to the custom configuration map. Please make sure to complete Chapter 2 and Chapter 3 from the Red Hat Developer Hub learning path which provides you with a ConfigMap called app-config-rhdh.
In this section we will add the Ansible specific configuration to our ConfigMap.
- Select ConfigMaps in the left navigation pane.
- Click the three dots icon in the app-config-rhdh row and select Edit ConfigMap.
This opens the YAML view to edit the ConfigMap. - Make the following changes and make sure that the ansible: key is at the same level as the integrations: or auth: key.
data:
  app-config-rhdh.yaml: |
    ...
    ansible:
      creatorService:
        baseUrl: 127.0.0.1
        port: '8000'
Integrate with Red Hat OpenShift Dev Spaces
- Ansible plug-ins provide a way to integrate with OpenShift Dev Spaces. The Red Hat Developers portal provides you a way to try OpenShift Dev Spaces. Click Try Red Hat OpenShift Dev Spaces. You will be redirected to the Dev Spaces dashboard.
- Copy the Dev Spaces link in your sandbox from the address bar, omitting the “dashboard/#/workspaces”. This link will be used to configure the Dev Spaces integration with Ansible plug-ins. This integration centralizes the development environment, allowing developers to create, manage, and deploy Ansible content efficiently.
- In the ansible section of the app-config-rhdh ConfigMap, add the devSpaces.baseUrl pointing to the link for your Dev Spaces sandbox:
data:
  app-config-rhdh.yaml: |
    ...
    ansible:
      creatorService:
        baseUrl: 127.0.0.1
        port: '8000'
      devSpaces:
        baseUrl: '<https://MyOwnDevSpacesUrl/>'
By integrating Ansible plug-ins with OpenShift DevSpaces, you can streamline your development workflow, reduce context switching, and ensure that all tools are accessible from a single interface. This approach significantly enhances productivity and simplifies the process of creating and managing Ansible content.
Integration with Ansible Automation Platform
Integrating Ansible plug-ins for RHDH with the Ansible Automation Platform (AAP) is crucial for providing a unified entry point to all your organization’s automation resources. Ansible plug-ins for Red Hat Developer Hub (RHDH) offer a seamless connection to Ansible automation controller and private automation hub. By configuring these settings, users can ensure that their automation workflows are centralized, accessible, and efficiently managed.
Configuration
Add sections for rhaap: and automationHub: to the app-config-rhdh ConfigMap. The following configuration enable integration with Ansible Automation Platform, connecting to both automation controller and private automation hub:
data:
  app-config-rhdh.yaml: |
    ...
    ansible:
      creatorService:
        baseUrl: 127.0.0.1
        port: '8000'
      devSpaces:
        baseUrl: '<https://MyOwnDevSpacesUrl/>'
      rhaap:
        baseUrl: '<https://MyAapControllerUrl>'
        token: '<TopSecretAAPToken>'
        checkSSL: true
      automationHub
        baseUrl: '<https://MyAapHubUrl>'
Warning and validation
If the settings for automation controller are not correctly configured, the following warning message appears in the RHDH:
“Verify that Ansible Automation Platform is reachable and correctly configured in the Ansible plug-ins.”
This warning indicates that the integration is not properly set up.
Click “Save” to save the ConfigMap.
Add template configurations to your RHDH instance
Ansible plug-ins provide you with pre-built templates that enable the creation of Ansible playbook or collection projects. These templates simplify the process of setting up standardized project structures and configurations, ensuring consistency and best practices across your organization.
Configuration
To add these template configurations to your Red Hat Developer Hub (RHDH) instance, add the catalog: key in app-config-rhdh ConfigMap, catalog: key is at the same level as ansible, integrations or auth key
data:
  app-config-rhdh.yaml: |
  ...
    catalog:
      locations:
        - type: url
          target: https://github.com/ansible/ansible-rhdh-templates/blob/main/all.yaml
Restarting the Application
By adding GitHub authentication from the Red Hat Developer Hub learning path and the Ansible details above, users can login via GitHub and use ansible-dev-tools to create Ansible Playbook or collection projects in their Github accounts or the GitHub organizations they have access to.
To restart the application:
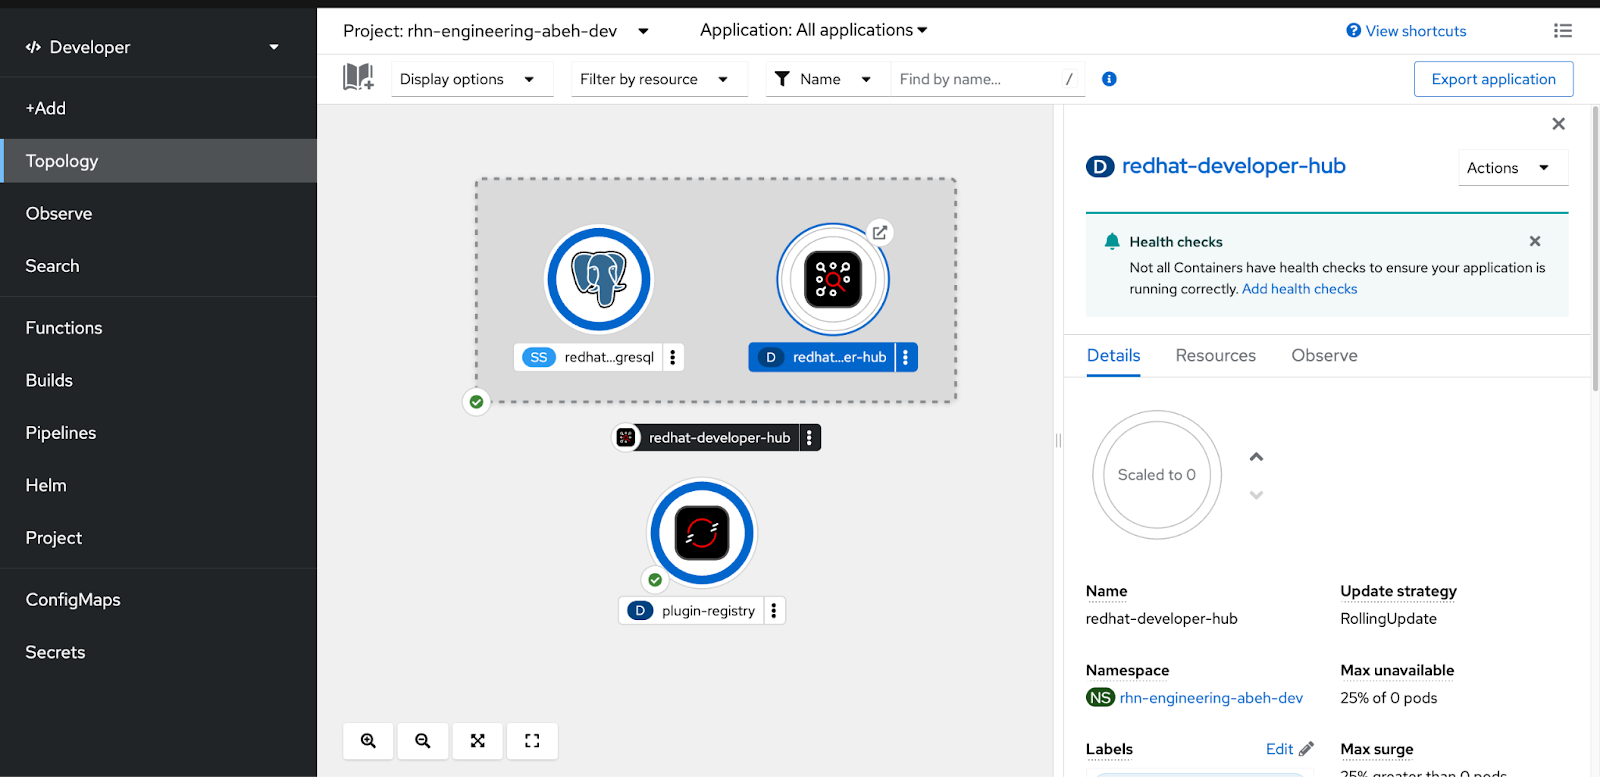
- Open to the Developer viewpoint in the Developer Sandbox.
- Select Topology.
- Click on the developer-hub application (not the Postgres stateful set) and use the scaling controls to reduce the replica count to 0 (Figure 1).
NOTE: The nature of adding information through the ConfigMap means that your changes are not propagated automatically, unlike when you add something to the Helm chart and re-publish.
- Once the application has shut down, use the scaling controls again to set the replicas to 1. The application restarts and the new contents of the ConfigMap are injected.
- Refresh your Developer Hub portal web page.
- Click the Settings gear icon (bottom left).
- Under Profile (which should say Guest), click the three-button icon, then select Sign Out. This redirects you to a login page that has two options(Figure 2).

We are now ready to start using Ansible plug-ins for RHDH.
