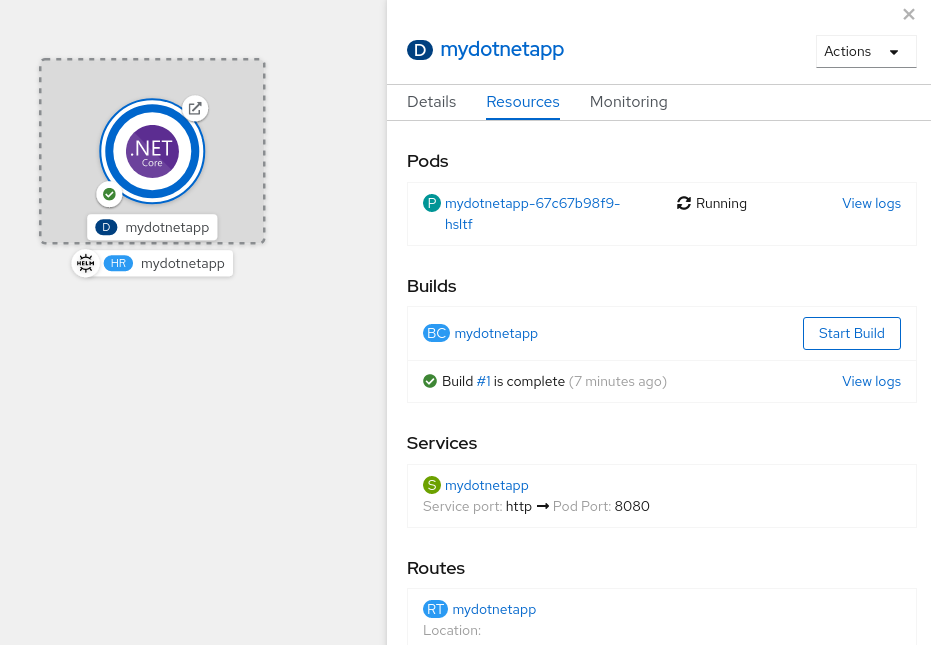
Figure 1: Resources tab for the application in the OpenShift console.
Article
Helm is a package manager for Kubernetes. It provides an easy way to deploy a set of resources on a Kubernetes or Red Hat OpenShift clusters. This article starts with a quick introduction to Helm. Then we'll use it to deploy a .NET application.
A Helm chart describes a set of resources to deploy. The chart uses templates that can be configured on the command line or through a YAML file.
Charts can be distributed by hosting them on an HTTP server called a chart repository. The helm executable can fetch charts from the repository.
A Helm chart deployed on Kubernetes is called a release. After you install the initial release, it can be updated. Each update has a corresponding release number. The release can also be rolled back to an earlier version.
To use Helm, you need the helm binary and an OpenShift cluster.
You can download the binary from the GitHub release page. After you’ve extracted the tarball, add the directory containing the command to your PATH environment variable. You can check that the command works by executing helm version as follows:
$ helm version
version.BuildInfo{Version:"v3.5.4", GitCommit:"1b5edb69df3d3a08df77c9902dc17af864ff05d1", GitTreeState:"clean", GoVersion:"go1.15.11"}
Use the oc client command to log in to your OpenShift cluster:
$ oc login --token=xxx --server=https://yyy
Note: If you are not familiar with the OpenShift client, check out the Getting started with the OpenShift CLI documentation.
For our example, we’ll use the .NET Core 3.1 and .NET 5.0 versions. You can check which versions are available globally using the following command:
$ oc get -n openshift is dotnet --template='{{range .spec.tags}}{{.name}}{{"\n"}}{{end}}'
2.1
2.1-el7
2.1-ubi8
3.1
3.1-el7
3.1-ubi8
latest
The output shows that the .NET 5 version is not available on my cluster. Because I am not an administrator. I will import the images into my project namespace using the Bash shell script install-imagestreams.sh from the s2i-dotnetcore repository. The repository has a PowerShell script, too:
$ wget https://raw.githubusercontent.com/redhat-developer/s2i-dotnetcore/master/install-imagestreams.sh
$ chmod +x install-imagestreams.sh
$ ./install-imagestreams.sh --os rhel
When the shell script finishes, you can check the versions available in the project namespace by running the previous command without the -n openshift argument:
$ oc get is dotnet --template='{{range .spec.tags}}{{.name}}{{"\n"}}{{end}}'
2.1
2.1-el7
2.1-ubi8
3.1
3.1-el7
3.1-ubi8
5.0
5.0-ubi8
latest
The output shows that .NET 5.0 is available now.
First, we’ll configure Helm to fetch templates from the redhat-helm-charts repository:
$ helm repo add redhat-charts https://redhat-developer.github.io/redhat-helm-charts
You can see the available charts using the helm search command:
$ helm search repo redhat-charts
NAME                    CHART VERSION ...
redhat-charts/dotnet    0.0.1         ...
redhat-charts/nodejs    0.0.1         ...
redhat-charts/quarkus   0.0.3         ...
To get more information about the dotnet chart, you can use the helm inspect command. The readme subcommand displays a description of the template. The values subcommand shows the configuration values of the template:
$ helm inspect readme redhat-charts/dotnet | less
...
You must change the `build.uri`, `build.ref` and `build.startupProject` to refer to your own application. `build.imageStreamTag.name` must be set to match the .NET version used by your application.
...
I showed here, from the output of the readme subcommand, the line that describes the mandatory values to set.
Let’s now use the chart to deploy the .NET Core 3.1 version of the s2i-dotnetcore-ex sample application:
$ helm install mydotnetapp \
     --set build.uri=https://github.com/redhat-developer/s2i-dotnetcore-ex \
     --set build.ref=dotnetcore-3.1 \
     --set build.startupProject=app \
     --set build.imageStreamTag.name=dotnet:3.1 \
     --set build.imageStreamTag.useReleaseNamespace=true \
     redhat-charts/dotnet
NAME: mydotnetapp
LAST DEPLOYED: Thu May 20 10:22:14 2021
NAMESPACE: demo
STATUS: deployed
REVISION: 1
TEST SUITE: None
NOTES: Your .NET app is building! To view the build logs, run: oc logs bc/mydotnetapp --follow Note that your Deployment will report "ErrImagePull" and "ImagePullBackOff" until the build is complete. Once the build is complete, your image will be automatically rolled out.
The first argument (mydotnetapp) is the name for our release. We’ve specified the Git repository (build.uri), the Git branch name (build.ref), and the location of the .NET project file in the repository (build.startupProject). Using build.imageStreamTag.name, we selected the s2i-dotnetcore image for .NET 3.1 that is used to build and run our application.
You can visually follow the build's progress in the OpenShift web console, as shown in Figure 1.
Using the helm upgrade command, you can make changes to the release. Let’s change the release to the .NET 5 version.
As we saw during the prerequisites, my cluster didn’t include a .NET 5 image. To use the image that was installed into the project namespace, I’ve added the argument --set build.imageStreamTag.useReleaseNamespace=true to the upgrade subcommand:
$ helm upgrade mydotnetapp \
    --set build.ref=dotnet-5.0 \
    --set build.imageStreamTag.name=dotnet:5.0 \
    --set build.imageStreamTag.useReleaseNamespace=true \
    redhat-charts/dotnet
Release "mydotnetapp" has been upgraded. Happy Helming!
NAME: mydotnetapp
LAST DEPLOYED: Thu May 20 10:25:39 2021
NAMESPACE: demo
STATUS: deployed
REVISION: 2
TEST SUITE: None
Instead of specifying these values on the command line, you can read them from a YAML file. For example, the values could be placed in a values.yaml file that lives in a .helm folder next to the .NET csproj project file. The values.yaml file can be checked into version control to track changes and to make the file available to other developers deploying the application. For our current release, we’re using the following values:
build:
  uri: https://github.com/redhat-developer/s2i-dotnetcore-ex
  startupProject: app
  ref: dotnet-5.0
  imageStreamTag:
	name: dotnet:5.0
	useReleaseNamespace: true
The filename can be passed to helm using the -f argument:
$ helm upgrade mydotnetapp -f values.yaml redhat-charts/dotnet
Release "mydotnetapp" has been upgraded. Happy Helming!
NAME: mydotnetapp
LAST DEPLOYED: Thu May 20 10:32:33 2021
NAMESPACE: demo
STATUS: deployed
REVISION: 3
TEST SUITE: None
Changes to a BuildConfiguration do not automatically trigger a new build. You need to start it manually:
$ oc start-build mydotnetapp
The OpenShift console recognizes Helm charts. Under the Helm tab, you can navigate to your chart and see the three revisions you’ve deployed, as shown in Figure 2.
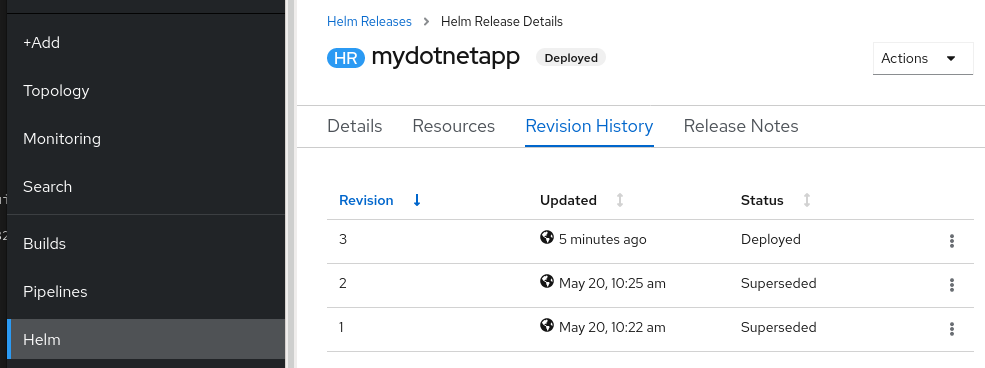
Under the Actions dropdown menu, you can remove the release completely or roll back to an earlier version. These operations can also be performed from the terminal using the helm history and helm rollback commands.
The dotnet Helm chart provides many configuration settings that make it usable for a wide range of .NET applications. These settings support adding probes, sidecar containers, and more. If you want to do something that is not supported by the chart, you can download the chart into your source repository and customize it. When running helm install or helm upgrade, you can point to the chart that lives with your sources:
$ helm pull --untardir charts --untar redhat-charts/dotnet
$ git add charts
...
make some changes to the chart at charts/dotnet
…
$ helm upgrade mydotnetapp -f values.yaml charts/dotnet
This article has illustrated the purpose and use of Helm. We went through the steps of deploying and updating a .NET application on OpenShift using the .NET helm chart from redhat-helm-charts. To learn more about Helm, you can read the Helm documentation. To learn more about the .NET Helm chart, you can run the helm inspect readme redhat-charts/dotnet command.

Build here. Go anywhere.
We serve the builders. The problem solvers who create careers with code.
Join us if you’re a developer, software engineer, web designer, front-end designer, UX designer, computer scientist, architect, tester, product manager, project manager or team lead.