Welcome to this new series of posts about using Large Language Models (LLM) with Node.js. The series is currently planned to be four parts. The first part, which is this post, will explore using a LLM chat bot with Node.js. The second part will go a little deeper and look at using a LLM for email generation. Third, we will look at using Retrieval-Augmented Generation (RAG) to improve our chatbot results. Finally, we will wrap up the series while exploring how these various features might be used in a real world application.
Application Overview
The application that we will be using across these posts is a very basic claims management system. It is similar to something that an insurance company might use to process their insured's claims.
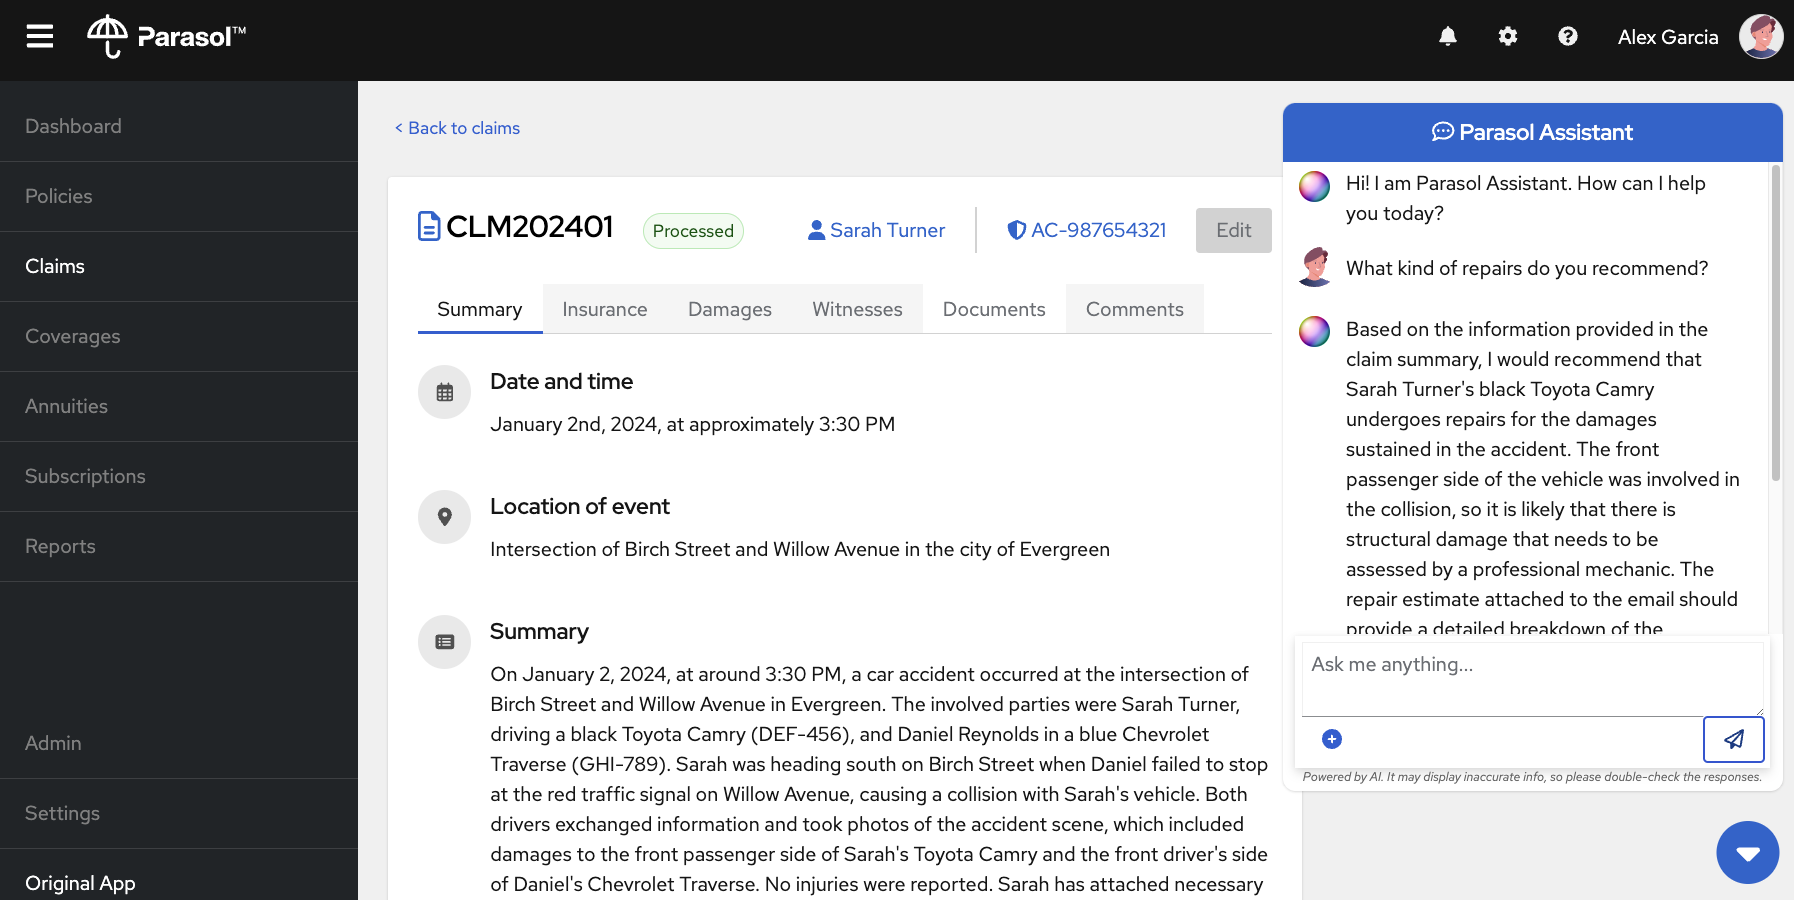
This first post will demonstrate the usage of a chatbot in the application. Each subsequent post will then add on new AI features.
While the final post of the series will tie everything together, we can quickly look at how the application is constructed and what JavaScript/Node.js modules it uses.
Front End
The front-end is a React application which connects to some REST endpoints to load and display the claims data. The chatbot is also a React component that talks to the backend via websockets. The front-end code is currently located here: https://github.com/rh-rad-ai-roadshow/parasol-insurance/tree/main/app/src/main/webui
Even though the front-end is a pure JavaScript project(Typescript in this case), it lives inside another Java project. This is because this application originally started as just a Java based application(React Front-end, Quarkus Back-end), but the backend is now being ported to Node.js.
Back End
The majority of the backend is nothing fancy. It is a Fastify application with a couple REST endpoints. We are also just using an in-memory sqlite db to store our claims data using the sqlite3 node module. We also use a couple Fastify plugins for managing the WebSocket connections as well as for serving that static React front-end.
The interesting part of the backend is the AI related code, which we will dive into in the next section.
The backend code can be found here: https://github.com/nodeshift/parasol-insurance-nodejs
ChatBot Construction
As mentioned before, the interesting part of the backend is how it interacts with the Large Language Model(LLM). This application makes extensive use of the Langchain.js modules. To learn more about Langchain.js and the various modules it provides, check out its github repo.
Setting up the chatbot to interact with the LLM is multiple steps and we think the best way to demonstrate all the pieces is just to walk through the chatbot's life cycle.
The life cycle begins when a user types something into the chatbot and hits enter. This sends a message over websockets to the backend. The message contains the question asked as well as the claim data(Claim Summary, Claim Id, Inception Date, etc..). At this point, we have yet to do anything AI related. Now it is time to start interacting with our LLM.
Model
Before we can interact with our LLM, we need to set up access to it. In the case of this application, we chose to allow it to interact with any OpenAI compatible inference server. There are multiple options for creating this server. We have been using ollama on our local machine ( M3 Macbook), but InstructLab is also an option. You could also use https://openai.com/ for a hosted solution.
No matter what server you choose, the code to connect to it will be very similar. We use the ChatOpenAI method from the @langchain/openai module. This abstracts away any of the differences that might occur with the different serving platforms. The full code can be found here, but here is just a snippet of what it would look like to setup access to the model:
return new ChatOpenAI({
    temperature: 0.9,
    openAIApiKey: 'EMPTY',
    modelName: 'mistral'
  }, {
    baseURL: 'http://localhost:8000/v1'
});
This code will be run whenever we establish a new websocket connection(Whenever we view a new Claims summary). Once the model has been set up, we then pass that to our function that sets up the prompt.
Prompt
According to the LangChain docs:
Prompt templates help to translate user input and parameters into instructions for a language model. This can be used to guide a model's response, helping it understand the context and generate relevant and coherent language-based output.
In our case, we will be using a ChatPromptTemplate class to construct our prompt. Specifically, the fromMessages method which gives us a little more flexibility when constructing our messages.
The fromMessages method takes an array of Chat Messages. The first is the system message. This lets us give the LLM a little more context on how to answer our question. For example, we mention that the LLM will be given a Claims summary and should use that information as much as possible when answering the question.
Next is a MessagePlaceholder for any chat history. A LLM is inherently stateless. So if we ask any follow up questions, the LLM won’t know what we are talking about since they do not have the previous questions context. That is where the MessagePlaceholder class comes in handy.
We will see in a moment how this works when we talk about chains.
Next we add the human input, this is the question that the end user sent via front-end. We are just using the {input} token that will eventually get replaced when we finally invoke this prompt. We will see in a couple minutes, when and where this substitution happens.
Since we want the prompt we just created to interact with our model, the final thing is to connect the prompt and model, which is called creating a “chain”.
const prompt = ChatPromptTemplate.fromMessages([
  [ 'system',
    `You will be given a claim summary, references to provide you with information, and a question. You must answer the question based as much as possible on this claim with the help of the references.`
  ],
  new MessagesPlaceholder('history'),
  [ 'human', '{input}' ]
]);

const chain = prompt.pipe(model);
Message History
As previously mentioned, a LLM is inherently stateless, but we would like our chat bot to remember our previous conversations so we can ask follow up questions. To do this we need to use the RunnableWithMessageHistory class to create a chain that we will interact with.
Let's take a look at what the code looks like and then dive into the pieces:
let sessions = {};
let chainWithHistory
.....
chainWithHistory = new RunnableWithMessageHistory({
    runnable: chain, //1
    getMessageHistory: (sessionId) => { //2
      if (sessions[sessionId] === undefined) {
        sessions[sessionId] = new ChatMessageHistory();
      }
      return sessions[sessionId];
    },
    inputMessagesKey: 'input', //3
    historyMessagesKey: 'history' //4
  });
If we weren’t worrying about message history we would usually just interact with the chain we created directly, but since we do care about history, we need to do things a little differently. The first parameter we specify is the runnable parameter and we set this to our chain. This tells our message history chain, to use the chain we just created.
The second parameter is the getMessageHistory function. When our chain is actually called, this function will be called to look up our message history and add it to our prompt. How you store your chat history is up to you, maybe it is stored in a redis store or something similar, but in this example, we create a simple JavaScript object to store them in. The function will pass in a parameter, the sessionId, which can be used to find our message from the message history object. In our case, the sessionId will be the object reference of the WebSocket that gets created when we start to interact with the chatbot.
You can see that we pass this object along with the client message when we ask our chatbot a question:
ws.on('message', async (data) => {
.....
  const answerStream = await answerQuestion(JSONmessage, websocketReference);
....
});
The last two parameters inputMessageKey and historyMessageKey reference the input and history placeholders from our prompt
Putting it together
Now that we have our message history chain put together, we can finally ask our question. There are actually two methods on the chainWithHistory object we created that can be run to get our result, invoke and stream. The “invoke” method will return everything all at once, which is fine in most cases, but we want our chatbot to feel a little more “alive”, so we are going to use the “stream” method, which should come as no surprise, will stream the result back.
Let’s take a look at the code:
const result = await chainWithHistory.stream(
    { input: createQuestion(question) },
    { configurable: { sessionId: sessionId } }
);

function createQuestion(rawQuestion) {
  return `Claim ID: ${rawQuestion.claimId}

  Claim Inception Date: ${rawQuestion.inceptionDate}

  Claim Summary:

  ${rawQuestion.claim}

  Question: ${rawQuestion.query}`
}
In this case, the stream function takes 2 parameters, the first is an object that lets us specify what the input is. Input in this context is the question we are asking. To make things a little cleaner, the question is constructed in its own function. Nothing fancy is happening here, just constructing a string and returning it.
The second parameter is an object of options. We set the configurable option object to be our sessionId, which will eventually be passed into the getMessageHistory function that we defined in our message history chain.
Since we are streaming back the result, we can iterate through it using the for await …. Of syntax and then construct our message to send back to the UI client like this:
const answerStream = await answerQuestion(JSONmessage, ws);

for await (const chunk of answerStream) {
    console.log(`Got Chat Response: ${chunk.content}`);

    const formattedAnswer = {
      token: chunk.content,
    };

   ws.send(JSON.stringify(formattedAnswer));
}
Conclusion
As we saw, using a package like Langchain.js, we can write a chatbot that knows about our previous conversations in not that many lines of code.
In the next post, we will see how we can interact with a LLM to generate an email response based on a certain criteria as well as seeing how we can instruct our chain to return a properly formatted JSON object using an outputParser.
As always if you want to learn more about what the Red Hat Node.js team is up to check these out:
https://developers.redhat.com/topics/nodejs
https://developers.redhat.com/topics/nodejs/ai
https://github.com/nodeshift/nodejs-reference-architecture
https://developers.redhat.com/e-books/developers-guide-nodejs-reference-architecture
