Virtualization is a common technology for workload consolidation. It is provided for Red Hat OpenShift Container Platform by Red Hat OpenShift Virtualization. This platform allows organizations to run and deploy their virtual machine-based workloads, and allows for simple management and migration of virtual machines (VMs) in a cloud environment.
By design, Kubernetes, and hence OpenShift and OpenShift Virtualization, does not allow use of swap. Memory oversubscription without use of swap is hazardous because if the amount of memory required by processes running on a node exceeds the amount of RAM available, processes will be killed. That's not desirable in any event, but particularly not for VMs where the workloads running on VMs will be taken down if the VMs are killed.
Red Hat OpenShift does not presently support the use of swap to increase virtual memory (it is a tech preview in 4.18, for virtualization only); indeed, without special precautions nodes with swap configured will not start.
Even with swap, memory oversubscription can result in paging memory to storage, which is much slower—in particular, has orders of magnitude longer latency—than RAM. Contemporary RAM has latency typically on the order of 100 nanoseconds, whereas even fast storage (NVMe) has latency typically on the order of 100 microseconds. Heavy use of swap can therefore greatly slow down workloads.
Nevertheless, there are situations where use of swap is appropriate. To allow for this, OpenShift Virtualization has built the wasp-agent component to permit controlled use of swap with VMs.
Maximizing workload density with OpenShift Virtualization
This article focuses on lower-level aspects of configuring and tuning the wasp-agent to allow greater workload density. We report our work on setting wasp-agent parameters, determining how many VMs we could create with different parameter settings on our system and the performance implications thereof.
The key takeaways from our wasp-agent memory overcommit evaluation are:
- Ensuring proper configuration of the kubelet to allow swap usage, controlled by the wasp-agent, and configuring wasp thresholds, page-per-second burst protection limits, and system overcommit percentages based on workload needs is essential.
- Configuring a fast, dedicated swap device is most desirable for performance of swap as well as other workloads running on the system.
- Demonstrating constant VM allocation pattern behavior while swapping, to characterize absolute max density.
This post does not cover CPU overcommitment, which does not have the same issues of processes being killed and severe performance degradation. If CPU is overcommitted, the only result is that workloads are slowed by the excess CPU demand relative to the availability of that resource.
Testing environment
We used an OpenShift cluster of 5 nodes, with 3 masters and 2 workers. We performed all of the work on one worker node. The nodes themselves are Dell PowerEdge R740xd systems, each with two Intel Xeon Gold 6130 CPU at 2.10GHz with 16 cores each, for a total of 64 CPUs with 192G memory. The node has a 480 GB SATA SSD for the system disk with multiple Dell Enterprise NVMe CM6-V 1.6 TB drives, of which we used one for swap. These drives offer 6.9 GB/sec sequential read, with 1300K 4KB maximum IO/sec, and 2.8 GB/sec sequential write, with 215K 4KB writes/sec. These drives were used for no other purpose during this test.
The cluster was running OpenShift Container Platform 4.17.5; the current release at the time the work was started, with OpenShift Virtualization 4.17.5.
Test setup
This section describes the tests we ran. It assumes that you have read the documentation on configuring higher workload density. Steps not discussed here are done as described.
Caution—read this first!
If you want to experiment with using swap, for VM memory overcommit or any other purpose, you must enable the kubelet to start with swap enabled. By default, it will refuse to run if swap is enabled. This will prevent the node from properly booting up and joining the cluster. It is therefore absolutely essential that the kubelet be allowed to start with swap present as described below. If you don't do this first, and cannot ssh into the node to make the change, you will have to re-create the node.
We used the following KubeletConfig to make this change:
$ oc apply -f - <<'EOF'
kind: KubeletConfig
apiVersion: machineconfiguration.openshift.io/v1
metadata:
  name: wasp-config
spec:
  machineConfigPoolSelector:
    matchLabels:
      pools.operator.machineconfiguration.openshift.io/worker: ''
  kubeletConfig:
    failSwapOn: false
EOF
It is essential to do this before, not concurrently, making any other changes to the kubelet configuration or node enabling swap. This will mean multiple things done in sequence, requiring an additional restart of each node, but combining this step with anything else described below creates a race condition where if the swap is created before the kubelet starts the node will fail to come up.
After you apply this (with oc apply), you need to wait for the node(s) to sync with the new configuration before proceeding:
$ oc wait mcp worker --for condition=Updated=True --timeout=-1sWe only support worker nodes that are not also master nodes for swap. Use of master nodes is not recommended by the wasp-agent documentation, might interfere with the operation of critical system components, and is beyond the scope of this article.
Configure swap
We chose to configure swap on an otherwise unused locally attached NVMe device rather than creating a swap file on the system disk as the documentation illustrates. This ensures no cross-interference between swap traffic and filesystem use, which could negatively impact performance.
$ oc apply -f - <<'EOF'
kind: MachineConfig
apiVersion: machineconfiguration.openshift.io/v1
metadata:
  labels:
    machineconfiguration.openshift.io/role: worker
  name: 90-worker-swap
spec:
  config:
    ignition:
      version: 3.4.0
    systemd:
      units:
        - contents: |
            [Unit]
            Description=Provision and enable swap
            ConditionFirstBoot=no
            [Service]
            Type=oneshot
            ExecStart=/bin/sh -c 'disk="/dev/disk/nvme1n1" && \
            sudo mkswap "$disk" && \
            sudo swapon "$disk" && \
            free -h && \
            sudo systemctl set-property --runtime system.slice MemorySwapMax=0 IODeviceLatencyTargetSec="/ 50ms"'
            [Install]
            RequiredBy=kubelet-dependencies.target
          enabled: true
          name: swap-provision.service
EOF
Following this, you again need to wait for the node(s) to sync with the new configuration before proceeding, as the node(s) will reboot a second time:
$ oc wait mcp worker --for condition=Updated=True --timeout=-1sConfigure the wasp-agent DaemonSet
We followed the procedure for creating the wasp-agent DaemonSet as documented, with the following exceptions:
SWAP_UTILIZATION_THRESHOLD_FACTORwas set to0.99rather than the default0.8. This controls the utilization at which point the wasp-agent will start evicting VMs. The purpose of this setting is to allow reserving some swap space for non-Kubernetes processes; that was not of concern for this purpose.MAX_AVERAGE_SWAP_IN_PAGES_PER_SECONDandMAX_AVERAGE_SWAP_OUT_PAGES_PER_SECONDwere set to1000000000000(effectively unlimited) rather than the default1000. These parameters tell the wasp-agent what level of swap traffic (averaged over 30 seconds) should be allowed before VMs are evicted.The purpose is to prevent swap traffic from flooding disk I/O bandwidth, starving other processes. The defaults correspond to about 4 MB/sec averaged over 30 seconds. As we were swapping to dedicated devices with high bandwidth and IO/sec, we saw no reason to evict VMs on these grounds. Because we recommend using dedicated local storage for swap, we suggest setting these parameters to very high values to allow using all of the device bandwidth.
Memory overcommit percentage
The final configuration parameter that needs to be used is memoryOvercommitPercentage. This is part of the hyperconverged object rather than just the wasp-agent and controls the calculation of the memory request that CNV applies to the virt-launcher pod that actually creates the VM. It's parameterized in our testing, so this is part of the test description, but we're including it here as it is a system configuration parameter.
Set to a value greater than 100 (i.e., 100%), it tells CNV how to scale the memory request that is made for each VM created. So when set to 100, CNV calculates its memory request based on the full declared memory size of the VM; when it's set to a higher value, CNV sets the request to a smaller value than that actually required by the VM, allowing overcommitting of memory.
For example, with a VM with 16 GiB configured, if the overcommit percentage is set to its default value of 100, the memory request that CNV will apply to the pod is 16 GiB plus some extra for the overhead of the QEMU process running the VM. If it's set to 200, the request will be set to 8 GiB plus the overhead.
Test description
We used the memory workload in ClusterBuster to apply memory pressure with CPU utilization, so that we can see the effect of memory overcommitment on CPU-based performance. This is a purely synthetic workload that allocates a defined block of memory and has options for what to do with it. In our case, we used two options:
- Scan through the memory, writing to one byte per page, for a defined period of time (180 seconds)
- Write one byte per page to random pages within the block for the same period of time.
ClusterBuster uses a controller-worker architecture with a controller pod managing a set of worker pods or VMs (in this case, all VMs). The workload only starts running after each worker has started and allocated its block of memory. We obtain synchronization to within about 0.1 second with this method, which with the 180 second runtime is quite sufficient to achieve very precise results. We ran the controller on one of the two workers, and the workers on the other.
The VMs were all single core, 16 GiB guest memory size. The workload memory size was 14 GiB.
The basic command line we used was:
$ clusterbuster --workload=memory --deployment-type=vm --memory-scan=<scan_type> --vm-memory=16Gi --processes=1 --deployments=<n> --workload-runtime=180 --memory-size=14Gi --pin-node=<desired_node>
scan_type was either 1 (for sequential scan) or random (for random scan). The other currently accepted value is 0, indicating no memory scan (which is useful for some other kinds of tests). The pin node is the node that we're choosing to run all of the workers on.
The memoryOvercommitPercentage parameter in the hyperconverged CRD is the last piece of the puzzle. CNV functions by setting the memory request on VMs to a smaller value than the memory size of the VM; the amount of the request on the requested VM size is based on the guest memory and the memoryOvercommitPercentage.
For each value of memoryOvercommitPercentage tested (100, 700, 800, 900, 1000, and 1100), we started at 1 VM and increased the number of VMs until the job failed to run. We picked these values to extend above and below the availability of all virtual memory (RAM + swap) compared to RAM only, and we stopped when we were able to create 100 VMs. That corresponds to 1.4 TiB working set on a node with 192 GiB of RAM. This is performed by means of the oc -n openshift-cnv patch HyperConverged step in the documentation. We also collected the per-VM number of pages per second processed, and from that calculated the aggregate, for both random and sequential scan. Finally, we ran without swap enabled at all.
Results
This section summarizes VM density and performance impacts observed in our test.
VM density
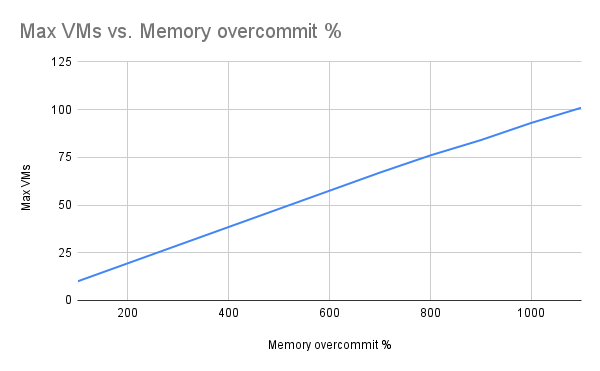
For VM density, we saw a steady increase in the number of VMs we could create with the level of memory overcommitment, as we would expect (Figure 1). We saw the expected linear scaling of the number of VMs with the overcommit ratio. We observed no indications of node stress prior to reaching the limit, including OOM kills, evictions, or the node going not ready.

Memory throughput
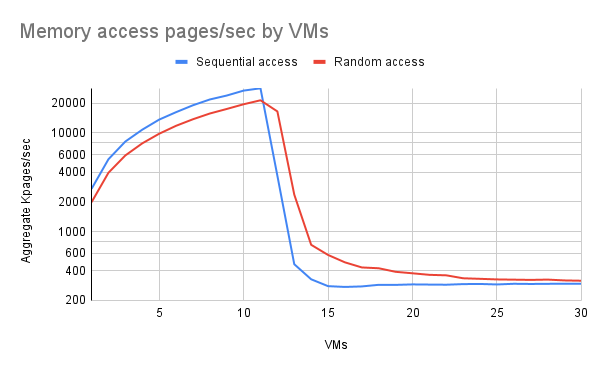
We observed 3 performance regimes:
- Up to 11 VMs, everything fit in RAM and we observed linear performance (notice that this graph is logarithmic).
- Between 12 and roughly 15 VMs, performance fell sharply as swap was more heavily used, but not entirely off a cliff.
- Above 15 VMs or thereabouts, performance leveled off (it remained approximately level out to 100 VMs, the limit of our test).
Results were substantially identical regardless of the overcommit percentage used (not shown).

Notice that in the RAM-dominated regime sequential access moderately outperformed random access. There are a few possible reasons for this: the random access might have caused more TLB thrashing with large pages, or the random number generator itself might have taken significantly more time. Experiments with the random number generator suggest that that was not likely the bottleneck.
In the transition region, random access significantly outperformed sequential access. We believe that this is because the random access sometimes touches pages that are still in RAM, while sequential access combined with least-recently-used paging behavior almost always results in having to fetch pages from storage.
Beyond the transition region, random access still results in the occasional hit, but increasingly less frequently as the number of VMs increases.
Variation between VMs
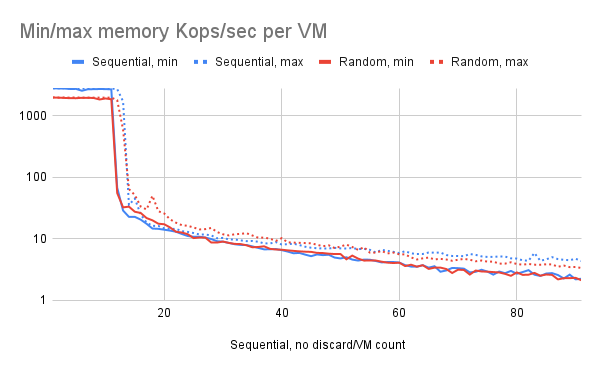
One factor we wanted to understand was whether all VMs exhibited similar performance or whether some outperformed/underperformed. We found that in the transition region between roughly 12 and 14 VMs there were substantial differences per VM—particularly at 12 VMs, some VMs were performing at full RAM speed, while others were limited by paging.
We do not have a clear explanation for this; perhaps the "lucky" VMs were scanning memory so quickly that their pages were never the most recently used, while the unlucky ones had essentially all of their pages evicted because they weren't touching them frequently enough. Note that the chart in Figure 3 is graphing pages per second per VM, so unlike the aggregate chart (Figure 2), this continues to trend down as the number of VMs increases.

Conclusion
Depending upon your needs, using wasp-agent might be an effective way to let yourself make more complete use of your hardware or handle sudden loads, such as VMs being forced to migrate. The synthetic workload we used for this test is a worst-case workload, and it is possible to take advantage of memory overcommitment to achieve greater VM density in many cases. While slowing down the overall performance of a VM in case of an overload scenario, the VMs still kept running and did not crash or fail.
Last updated: April 28, 2025