I used the Qt Creator IDE for most of my C++ work in the past. Then I joined Red Hat around mid-2016 and worked on a project with Go for three years. I quickly realized that I wanted something similar to Qt Creator. I’m a regular Vim user, but use it only for plain-text editing and not much more. I gave Vim a shot when really I was looking for something that works out of the box and can still be customized. As usual for a modern project, I needed to be able to do more than edit the files of one programming realm. Enter Visual Studio Code (VS Code).
I can't say that VS Code worked out of the box. But being new to Go, I figured I would give it a try, especially because others were using it. Three years later, in 2019, I needed a change and joined our debuggers group to work on LLDB, a debugger that is part of the much larger LLVM project. LLVM also hosts Clang, a well-known compiler front-end for C-like languages.
I began by checking out the LLVM codebase—which is huge, by the way—and compiling it on my local machine, which was very slow. You can read about my initial endeavor to speed up the compilation in this article. To sum things up: A notebook isn’t ideal when you want to code and compile with LLVM. The speed of compilation isn’t the only thing that matters. It’s the linking, as well, that can easily freeze my laptop. That said, distributed compilation using distcc or similar tools doesn't cut it.
Our group in Red Hat has access to high-powered shared machines in Toronto (e.g., 56 cores with 256 GB of memory). I live in Germany, and at first I was skeptical whether I could successfully use those machines without too much latency. Qt Creator wasn’t a true option for editing files remotely because, as far as I know, it needed to run next to the code it was supposed to compile. After giving Vim and Emacs another shot for coding and compiling remotely, I went back to VS Code and found out that there’s a remote SSH extension. This article navigates you through how I’ve been using VS Code's remote SSH extension for editing and compiling LLVM, step by step.
Prerequisites
My base system is a laptop running the Fedora 32 operating system. For the sake of this tutorial, we’ll call the remote host just remote-host. If you want to follow the tutorial step by step, you can put the following into your ~/.ssh/config file to create an alias to whatever host you want:
Host remote-host
  HostName YOUR_OWN_REMOTE_HOST_GOES_HERE
  User USER_NAME_WITH_WHICH_YOU_LOGIN_TO_YOUR_REMOTE_HOST
Replace the obvious bits in that definition. Make sure you can log in to the remote host without entering a password by copying the public part of your SSH-key to the remote host: ssh-copy-id remote-host.
Double-check that you can now log in using ssh remote-host. Now log back out.
Setting up VS Code
First, make sure you have a recent copy of VS Code or grab it from the download site. Once it's installed, you will need a bunch of extensions. To install the extensions I find useful when building and editing LLVM, run this snippet in the command line:
$ for i in ms-vscode.cmake-tools \
ms-vscode-remote.remote-ssh \
ms-python.python \
ms-vscode.cpptools \
twxs.cmake \
rreverser.llvm \
jakob-erzar.llvm-tablegen \
xaver.clang-format \
pkief.material-icon-theme; do code --install-extension $i; done
Preparing the remote host
In my case, the architecture of the remote host (Fedora 31) and my laptop is the same: x86_64. I'm not sure if this always needs to be the case. I can confirm that instead of my Linux laptop and Linux remote host, I can use a Mac laptop and a Linux remote host. I'm sure the same is true for Windows.
Log in to the remote host with:
$ ssh remote-host
Your remote host needs to have all the development tools installed that are required to build LLVM.
Let's decide where to download LLVM and refer to it with an environment variable for now. In my case, the directory is not ~/ which would have simplified things a bit:
$ export MYHOME=/opt/notnfs/kkleine/ # replace this with ~/
Navigate to $MYHOME:
$ cd $MYHOME
Fetch the LLVM source tree:
$ git clone https://github.com/llvm/llvm-project
Now create a build directory inside the source directory:
$ mkdir llvm-project/build
This directory makes it simpler to find build files within the VS Code IDE later.
Firing up VS Code
When you start VS Code, it presents a screen like Figure 1.
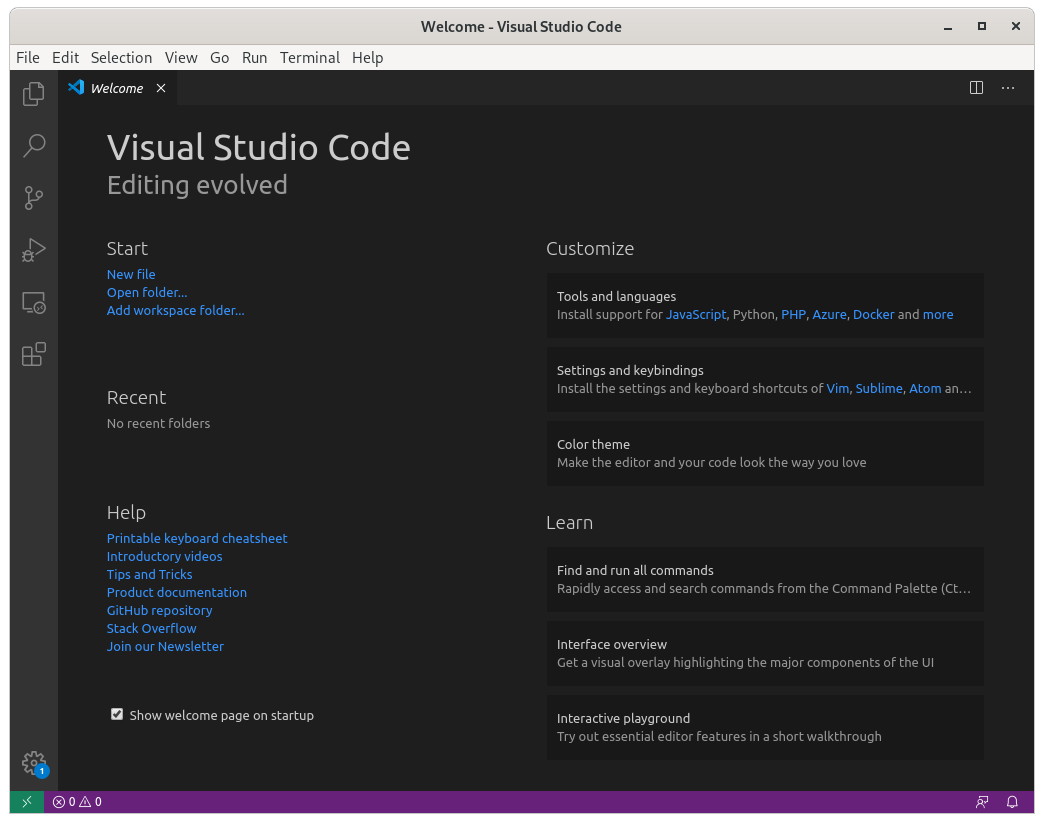
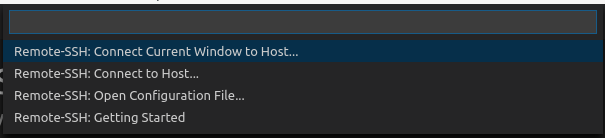
Notice the little green icon in the lower left corner of the screen. Click on it and select Remote-SSH: Connect Current Window to Host... as shown in Figure 2.
If you've configured your ~/.ssh/config properly, you can now select remote-host from the drop-down list. Notice that the green icon from before now shows Opening Remote ... and then turns into SSH: remote-host once you have connected successfully.
Congratulations: You can now edit files on your remote host using VS Code. To test this, go to File—>Open File... and open the main CMakeLists.txt file from the LLVM project that you checked out earlier: /opt/notnfs/kkleine/llvm-project/llvm/CMakeLists.txt.
Installing extensions remotely
Let's head over to the extensions by clicking on the extensions symbol, which is a grid of squares. Notice that the side panel shows locally installed extensions and marks some with Install in SSH: remote-host. Click that little green icon to view all the extensions that can be installed on the remote host. Once that's done, click the blue Reload Required icon and enjoy all the extensions when developing remotely.
Adjusting the settings
We need to adjust some settings for CMake to work properly. Press Ctrl+Shift+P to open the command palette in Visual Studio Code and start typing >open remote set, as shown in Figure 3.

Then, click on Preferences: Open Remote Settings (SSH: remote-host). This should open up a settings.json file in a new tab, as shown in Figure 4.

This file is an empty JSON settings file, in my case. If you already have configurations in there, I assume that you have used VS Code before and know how to integrate my settings into yours. If your file is empty, you can copy the settings here:
{
    //--------------------------------------------------------------------------
    //              C++
    //--------------------------------------------------------------------------
    "clang-format.fallbackStyle": "LLVM",
    "clang-format.style": "LLVM",
    "C_Cpp.clang_format_style": "LLVM",
    "C_Cpp.default.cppStandard": "c++14",
    "C_Cpp.default.cStandard": "c11",
    //--------------------------------------------------------------------------
    //              CMake
    //--------------------------------------------------------------------------
    "cmake.generator": "Ninja",
    // Adjust this path to the expansion of $MYHOME/llvm-project/llvm.
    "cmake.sourceDirectory": "/opt/notnfs/kkleine/llvm-project/llvm",
    // Adjust this path to the expansion of $MYHOME/llvm-project/build.
    "cmake.buildDirectory": "/opt/notnfs/kkleine/llvm-project/build",
    "cmake.configureSettings": {
        "LLVM_ENABLE_PROJECTS": ["clang","clang-tools-extra","compiler-rt","lld","mlir"],
        "CMAKE_EXPORT_COMPILE_COMMANDS": 1,
        "BUILD_SHARED_LIBS": "Off",
        "LLVM_BUILD_LLVM_DYLIB": "On",
        "LLVM_LINK_LLVM_DYLIB": "On",
        "CLANG_LINK_CLANG_DYLIB": "On",
        // I only need LLVM Backends to produce X86, decide what you need here!
        "LLVM_TARGETS_TO_BUILD": "X86",
        "LLVM_ENABLE_LDD": "On",
        "LLVM_CCACHE_BUILD": "On",
        "LLVM_CCACHE_MAXSIZE": "20G",
        "LLVM_ENABLE_IDE": "On",
        "LLVM_ENABLE_ASSERTIONS": "On",
        "LLVM_BUILD_EXAMPLES": "On",
        "LLVM_LIT_ARGS": "-v --xunit-xml-output test-results.xml",
        "PYTHON_EXECUTABLE": "/usr/bin/python3",
    },
    //--------------------------------------------------------------------------
    //              Editor
    //--------------------------------------------------------------------------
    "editor.mouseWheelZoom": true,
    "editor.renderIndentGuides": false,
    "editor.rulers": [80],
    "editor.formatOnPaste": false,
    "editor.renderWhitespace": "all",
    //--------------------------------------------------------------------------
    //              Misc
    //--------------------------------------------------------------------------
    "telemetry.enableTelemetry": false,
    "telemetry.enableCrashReporter": false,
    "[cpp]": {
        "editor.defaultFormatter": "xaver.clang-format"
    },
    "workbench.iconTheme": "material-icon-theme",
}
I've added a minimum of my personal settings to the JSON file. You can omit the Editor and Misc sections if you don't want them. When you are done, save the file with Ctrl+S.
Configuring the LLVM project with CMake
Click on File—>Open Folder and type in the expansion of $MYHOME/llvm-project (e.g.,~/llvm-project), as shown in Figure 5.

Open up the command palette in VS Code again by typing Ctrl+Shift+P followed by >cmake. This should bring up the list in Figure 6, from which you can select CMake: Select a Kit.

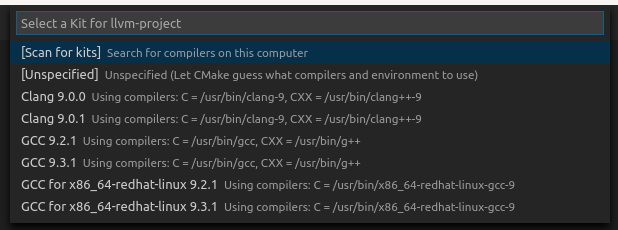
In the next dialog, shown in Figure 7, pick the compiler you want to use for compiling LLVM, or select [Scan for kits] if you don't see any options. (I chose Clang 9.0.1.)
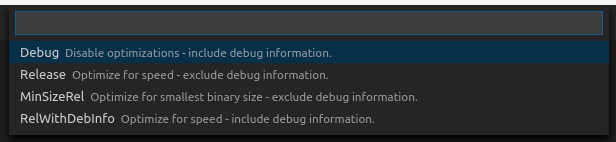
Next, you need to decide on the build variant in which CMake will configure your project. Bring back the command palette with Ctrl+Shift+P and Type CMake Select Variant, as shown in Figure 8.

Next, choose Release, as shown in Figure 9.
Notice that the Status bar now looks like Figure 10. From now on, you can control which target you want to build from this bar.

If an output pane shows something like the following when the configuration is done, you've successfully configured LLVM:
[cmake] -- Performing Test HAVE_POSIX_REGEX -- success
[cmake] -- Performing Test HAVE_STEADY_CLOCK -- success
[cmake] -- Configuring done
[cmake] -- Generating done
[cmake] -- Build files have been written to: /opt/notnfs/kkleine/llvm-project/build
Note: You can read more about CMake in VS Code in the article Get started with CMake Tools on Linux.
First build of Clang with VS Code
Let's do our first build of Clang. Click on [all] in the status bar and type in clang to select the clang Executable. Notice that the status bar now shows [clang] instead of [all].
Don't be afraid to hit that [Build] button to build the selected target.
Something interesting is that VS Code doesn't care whether you chose Ninja or Make to build your project, because it calls CMake to invoke the underlying build system:
[main] Building folder: llvm-project
[build] Starting build
[proc] Executing command: /usr/bin/cmake --build /opt/notnfs/kkleine/llvm-project/build --config Release --target clang -- -j 58
[build] [58/2573   0% :: 0.383] Building CXX object lib/Support/CMakeFiles/LLVMSupport.dir/ABIBreak.cpp.o
[build] [59/2573   0% :: 0.462] Building CXX object lib/Support/CMakeFiles/LLVMSupport.dir/COM.cpp.o/usr/bin/cmake --build /opt/notnfs/kkleine/llvm-project/build --config Release --target clang -- -j 58
Bringing in a terminal
VS Code does come with a terminal window. You can open it with Ctrl+` (the backtick character). The terminal looks like Figure 11.

Try testing your freshly built compiler with this snippet:
$ cd build
$ echo "int main(){return 42;}" | ./bin/clang++ -x c++ -
$ ./a.out ; echo $?
42
I typically run some commands like ./bin/llvm-lit -v sometest in the terminal window. One nice thing about the terminal is that you can Ctrl+Click on any of the file paths to open them in the current VS Code window in a new tab. That makes opening and navigating files from the terminal extremely convenient.
From here onward you can use all the goodies of VS Code, such as autocompletion, go-to declaration, switching between header and implementation, and so forth.
Launching the configuration for LLVM-LIT
To run llvm-lit -av current_file from inside VS Code, without using the terminal, you can bring back the command palette with Ctrl+Shift+P and type >launch to open the launch.json file. The menu displayed looks similar to Figure 12.

This file can contain multiple semi-generic configurations for programs you want to launch from time to time. Here's a configuration that will launch llvm-lit on the current file:
{
    "version": "0.2.0",
    "configurations": [
        {
            "name": "llvm-lit current file",
            "type": "python",
            "request": "launch",
            "program": "/opt/notnfs/kkleine/llvm-project/build/bin/llvm-lit",
            "args": ["${fileBasename}"],
            "cwd": "${fileDirname}",
        }
        {
            "name": "llvm-lit all tests in current dir",
            "type": "python",
            "request": "launch",
            "program": "/opt/notnfs/kkleine/llvm-project/build/bin/llvm-lit",
            "args": ["."],
            "cwd": "${fileDirname}",
        }
    ]
}
You just need to adjust the path to point to your llvm-lit binary.
Note: If the file hasn't been built yet, try building the all target or the check-llvm-tools-llvm-lit target.
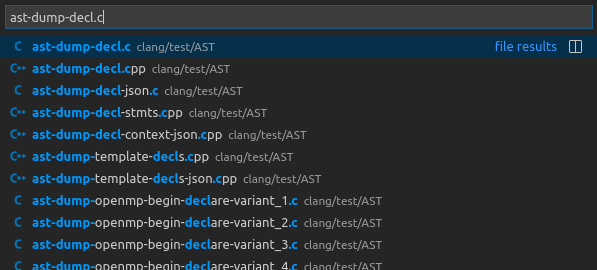
Let's open a specific lit file by pressing Ctrl+P. This opens a fuzzy dialog. Type ast-dump-decl.c and observe where the file is found (shown in Figure 13).
Once the file is opened, click on the debug symbol in the left-side bar to open a debugging pane. At this point we're not interested in debugging in the classic sense; we just want to launch llvm-lit. Click the small Play button (the triangle icon) next to your launch target name at the top of the screen. In this case, the launch target is llvm-lit current file. A terminal will open and show results like the following:
$ cd /opt/notnfs/kkleine/llvm-project/clang/test/AST ; env /usr/bin/python /home/kkleine/.vscode-server/extensions/ms-python.python-2020.6.91350/pythonFiles/lib/python/debugpy/launcher 44349 -- /opt/notnfs/kkleine/llvm-project/build/bin/llvm-lit ast-dump-decl.c
llvm-lit: /opt/notnfs/kkleine/llvm-project/build/bin/../../llvm/utils/lit/lit/llvm/config.py:347: note: using clang: /opt/notnfs/kkleine/llvm-project/build/bin/clang
-- Testing: 1 tests, 1 workers --
PASS: Clang :: AST/ast-dump-decl.c (1 of 1)

Testing Time: 1.90s
  Passed: 1
Feel free to run all the tests within the same directory as the current test file by selecting the other launch target, which is called llvm-lit all tests in current dir.
Conclusion
I hope you enjoyed reading this article—happy coding!
Last updated: February 5, 2024