This article introduces you to using Red Hat 3scale API Management for OpenID Connect (OIDC) integration and compliance. Our goal is to secure an API in 3scale API Management using JSON Web Token (JWT), OIDC, and the Oauth2 Authorization Framework. We will set up the integration using Okta as our third-party OpenID Connect identity provider. An important part of the demonstration is establishing the 3scale API Management gateway's connection with Okta.
Note: This article is not a deep dive into OIDC or Oauth2. I won't cover the details of authentication and authorization flows. Toward the end of the article, you will see how to obtain an access token, which you will need to execute a request against a protected API.
Prerequisites
For demonstration purposes, we will use 3scale API Management and Okta as self-managed services. If you don't have them already, begin by creating free service accounts using 3scale.net and okta.com.
Setting up the 3scale API Management OIDC integration
Our first step is to create the simplest possible REST API for integration. We'll use the 3scale API Management platform and an API back end configured to the echo-api: https://echo-api.3scale.net:443. As an alternative to this setup, you could try a different back end or a self-managed APIcast instance. This article showcases OIDC authentication. You can adapt different settings to the use case. Figure 1 shows the OIDC settings in 3scale API Management. [caption id="" align="aligncenter" width="633"]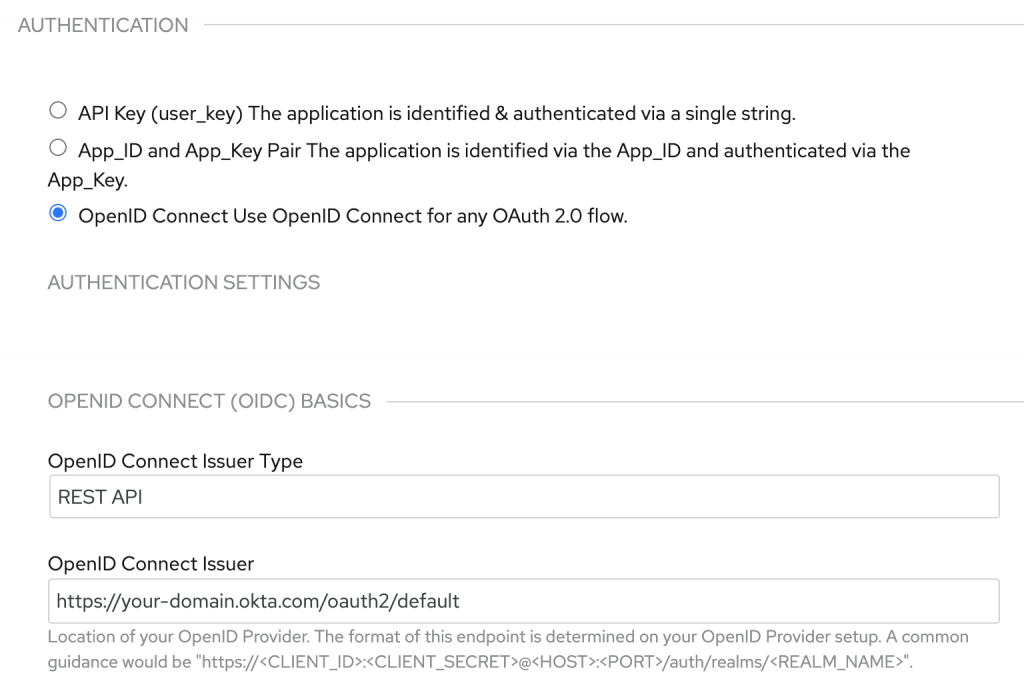 Figure 1: Enter the 3scale API Management OIDC settings for Okta authentication.[/caption] Note that the settings include AUTHENTICATION, AUTHENTICATION SETTINGS, and OPENID CONNECT (OIDC) BASICS. The OpenID Connect issuer URL is set to an Okta custom authorization server named "default." It is impossible to customize an Okta default authorization server, so we will use the custom server for this example.
Overview of the 3scale API Management Okta integration
So far, we have employed OpenID Connect's .well-known/openid-configuration endpoint to connect 3scale API Management with Okta. The 3scale API Management gateway determines what it needs from the OpenID Connect issuer URL, which we've just defined. Before going further, let's clarify what we want to accomplish. The diagram in Figure 2 illustrates the step-by-step process for integrating 3scale API Management and Okta. [caption id="" align="aligncenter" width="640"]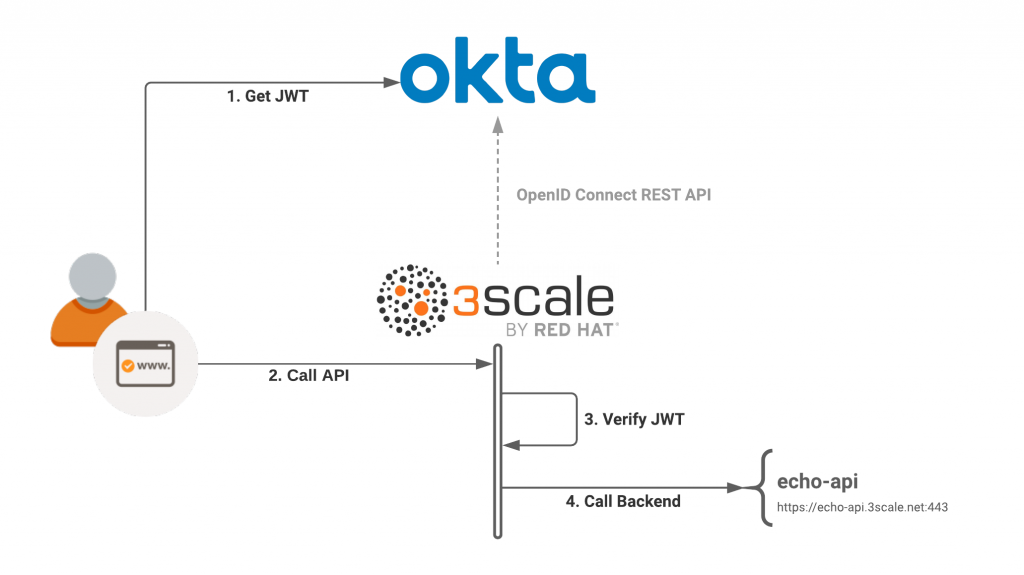 Figure 2: An overview of the 3scale API Management and Okta integration.[/caption] Our goal is to call a protected API resource from 3scale API Management and use Okta for the user-delegated access. Step 1 assumes that we've retrieved a JSON web token from the Okta authorization server, as defined in the OIDC specification. We will experiment with the OIDC authorization flow later. After calling the API in Step 2, 3scale API Management verifies the JSON web token in Step 3. If the token is valid, 3scale API Management dispatches the request to the server back end, which you can see in Step 4. Verifying the client application ID is paramount for the request to be successful. In the next sections, we will look closely at the mechanics of verification.
Verify and match the JWT claim
The 3scale API Management gateway secures every request by checking its associated JSON web token for the following characteristics:
- Integrity: Is the JWT being tampered with by a malicious user (signature check)?
- Expiration: Is this token expired?
- Issuer: Has it been issued by an authorization server that is known to the 3scale API Management gateway?
- Client ID: Does the token contain a claim matching a client application ID that is known to the 3scale API Management gateway?
The next step is to match the 3scale API Management client with the correct JWT claim. In the 3scale API Management settings, set the ClientID Token Claim field to appid, as shown in Figure 3. [caption id="" align="aligncenter" width="573"]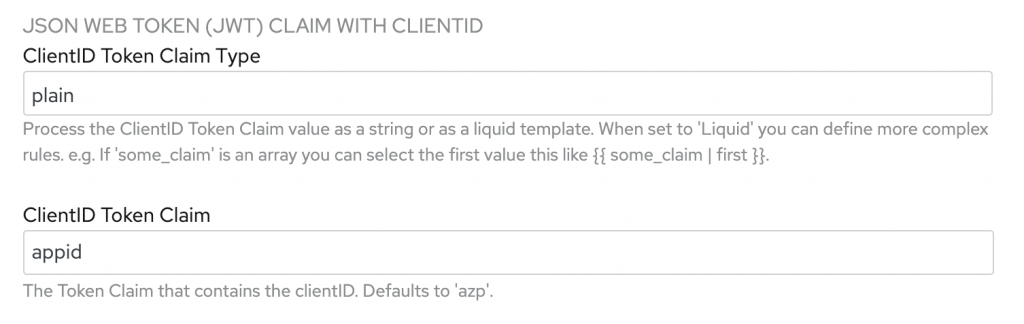 Figure 3: Set the ClientID Token Claim to
 appid.[/caption] This configuration tells 3scale API Management which claim to match against a client application in its API. For this demonstration, I decided to use appid rather than the default azp claim. The Okta authorization server requires a custom claim. I also wanted to avoid the often misunderstood and misused azp claim.
Configuring Okta
Next, let's head over to the Okta admin portal to configure the Okta authorization server and OpenID Connect application. This configuration allows a client application to request a JSON web token on behalf of a user. Recall that we’re using a custom authorization server (named default) to add the appid JWT claim. The value assigned to this claim will be the Okta client application ID.
Configure the Okta authorization server
As shown in Figure 4, we use the Authorization Servers dialog to add a new claim to the default authorization server. [caption id="" align="aligncenter" width="573"]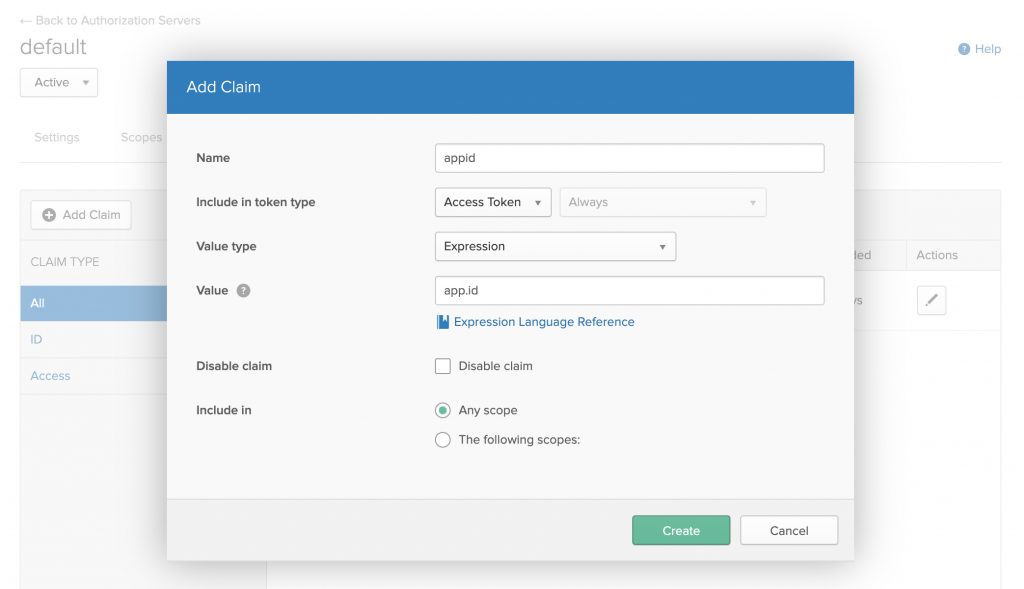 Figure 4: Add the appid claim to the default authorization server.[/caption] In OpenID Connect, two tokens are usually issued in response to the authorization code flow: The ID token and the access token. We will use the access token to access the protected resource from 3scale API Management, so we only need to add the custom claim to that token type.
Create the OIDC application
While in the Okta admin portal, we'll use the OpenID Connect sign-on method to create a new application. Figure 5 shows the dialog to create a new application integration. [caption id="" align="aligncenter" width="573"]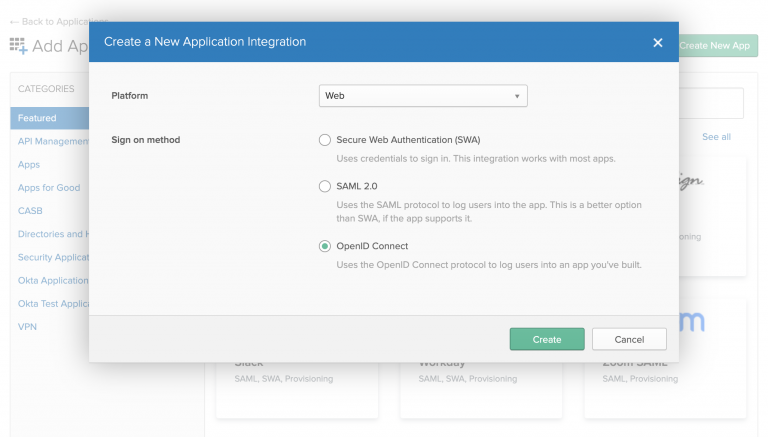 Figure 5: Select the option to create an OpenID Connect application.[/caption] Next, we use the Create OpenID Connect Integration dialog to create the application, as shown in Figure 6. Note that we'll use the login redirect URI to retrieve the token later as part of the authorization flow. [caption id="" align="aligncenter" width="573"]
 Figure 6: Create the OpenID Connect application for Okta.[/caption] After creating the OIDC application, locate the Okta-generated client ID on the Client Credentials page, shown in Figure 7. Save this value to use when we create the corresponding client application in 3scale API Management. [caption id="" align="aligncenter" width="573"]
 Figure 7: Locate the client ID on the Okta admin Client Credentials page.[/caption]
Create and assign a user to the OIDC application
The last thing we'll do in Okta is to create and assign at least one user to the application, as shown in Figure 8. This allows a valid login to execute using the OpenID Connect authorization flow. [caption id="" align="aligncenter" width="573"] Figure 8: Create and assign at least one user to the OpenID Connect application in Okta.[/caption] This completes the Okta configuration. Next, we will configure a corresponding application in 3scale API Management.
Configuring the 3scale API Management client application
The API gateway can only authorize API calls from a previously registered client application. So, our last step is to create a 3scale API Management application whose credentials match with the application we've just created in Okta. We only need to match the application_id (also called the client ID), because it is carried by the JWT appid claim. As an admin user, navigate to the 3scale API Management docs. You must use 3scale API Management to create the client application and specify a user-defined application_id. Figure 9 shows the dialog to create the 3scale API Management client application. [caption id="" align="aligncenter" width="573"] Figure 9: Use the 3scale API Management gateway API to create a client application.[/caption] Once you have it set up with the correct parameters, you will see the new application in the listing that subscribes to the API product you are testing.
Testing the application
Now, you might wonder how to ensure that the 3scale API Management application performs correctly. In this case, we can use Postman to execute a request with a valid JWT access token from Okta. The screenshot in Figure 10 shows how to execute the authorization flow in Postman. [caption id="" align="aligncenter" width="573"]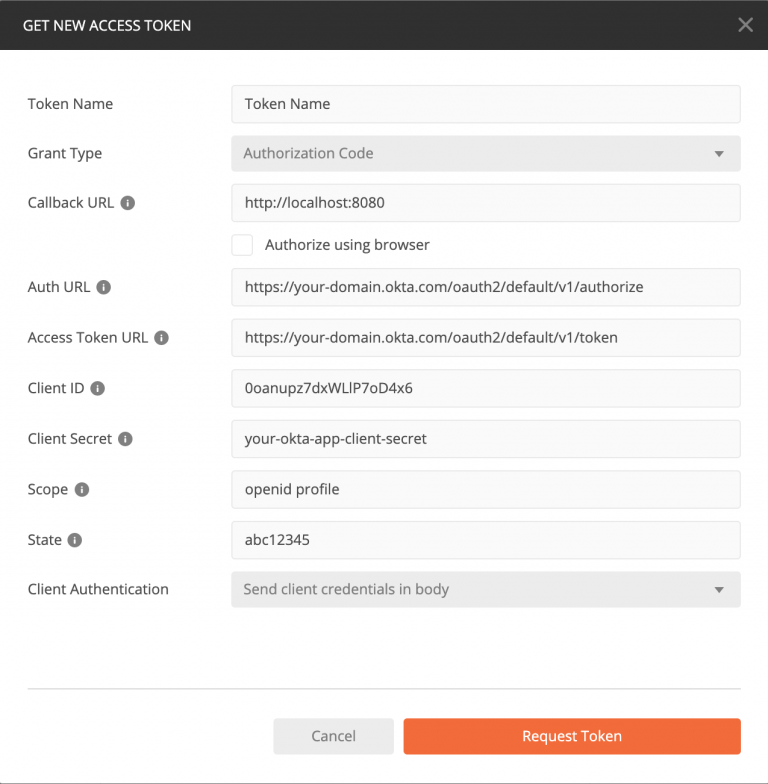 Figure 10: Using Postman to get a JWT access token from Okta.[/caption] A login screen should pop up, followed by the successful retrieval of the ID and access tokens. Then, we can successfully retrieve the client ID and access tokens shown in Figure 11. (Note that the access token is represented using jwt.io.) [caption id="" align="aligncenter" width="640"]
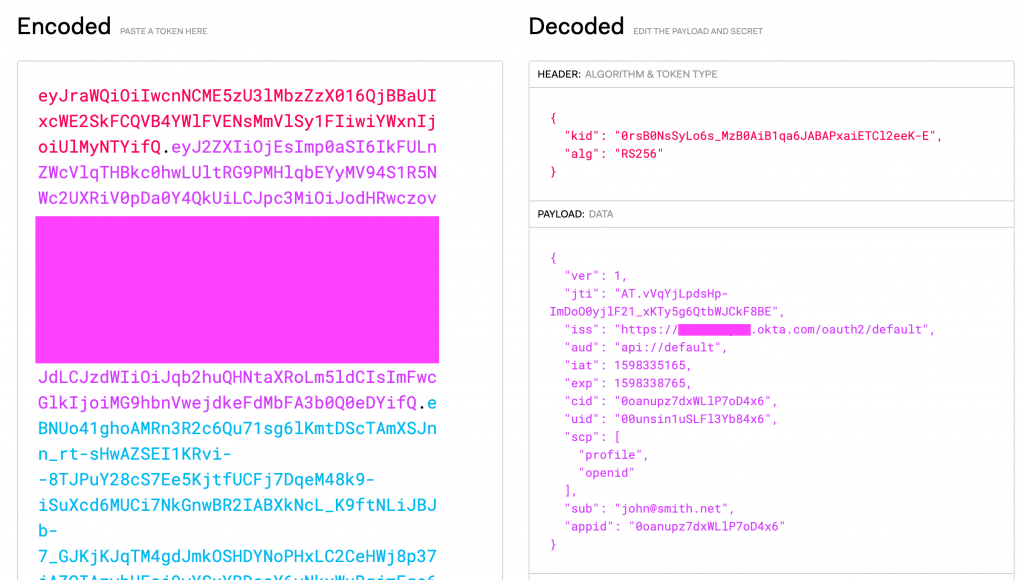 Figure 11: Retrieve the client ID and access tokens from Okta.[/caption] From here, we call the API endpoint with the JWT access token assigned to the
 Authorization: Bearer HTTP request header:
$ curl "https://some-example-api.xyz.gw.apicast.io" -H "Authorization: Bearer jwt-access-token-base64"
Postman can take care of the rest. The echo-api will respond when the authentication is successful.
Using Red Hat's single sign-on technology for OIDC integration
For this demonstration, we had to create an OpenID Connect application in both Okta and 3scale API Management. The number of applications grows as you start to delegate the process of application creation to other developers. The one OIDC specification that addresses this problem is the Dynamic Client Registration specification. At the time of this writing, 3scale API Management and Okta don't automatically integrate. However, Red Hat's single sign-on technology is an open-source OpenID provider that integrates seamlessly with 3scale API Management. You can use the 3scale API Management gateway and the single sign-on developer portal to drive the authorization flow. Find out more about Red Hat single sign-on tools (7.4) and its upstream community project Keycloak.
Conclusion
Thank you for taking the time to read this article and follow the demonstration. As you have seen, 3scale API Management works together with any OpenID provider in a way that is compliant with its specification. We've used Okta as our OpenID provider for this demonstration. I hope that breaking down the verification process and showing each party's roles and responsibilities helped to demystify aspects of application security with JWT, OIDC, and Oauth2.
Last updated: February 5, 2024