Redhat Developers  Logo
  • Products

    Platforms

    • Red Hat Enterprise Linux
      Red Hat Enterprise Linux Icon
    • Red Hat AI
      Red Hat AI
    • Red Hat OpenShift
      Openshift icon
    • Red Hat Ansible Automation Platform
      Ansible icon
    • View All Red Hat Products

    Featured

    • Red Hat build of OpenJDK
    • Red Hat Developer Hub
    • Red Hat JBoss Enterprise Application Platform
    • Red Hat OpenShift Dev Spaces
    • Red Hat OpenShift Local
    • Red Hat Developer Sandbox

      Try Red Hat products and technologies without setup or configuration fees for 30 days with this shared Openshift and Kubernetes cluster.
    • Try at no cost
  • Technologies

    Featured

    • AI/ML
      AI/ML Icon
    • Linux
      Linux Icon
    • Kubernetes
      Cloud icon
    • Automation
      Automation Icon showing arrows moving in a circle around a gear
    • View All Technologies
    • Programming Languages & Frameworks

      • Java
      • Python
      • JavaScript
    • System Design & Architecture

      • Red Hat architecture and design patterns
      • Microservices
      • Event-Driven Architecture
      • Databases
    • Developer Productivity

      • Developer productivity
      • Developer Tools
      • GitOps
    • Automated Data Processing

      • AI/ML
      • Data Science
      • Apache Kafka on Kubernetes
    • Platform Engineering

      • DevOps
      • DevSecOps
      • Ansible automation for applications and services
    • Secure Development & Architectures

      • Security
      • Secure coding
  • Learn

    Featured

    • Kubernetes & Cloud Native
      Openshift icon
    • Linux
      Rhel icon
    • Automation
      Ansible cloud icon
    • AI/ML
      AI/ML Icon
    • View All Learning Resources

    E-Books

    • GitOps Cookbook
    • Podman in Action
    • Kubernetes Operators
    • The Path to GitOps
    • View All E-books

    Cheat Sheets

    • Linux Commands
    • Bash Commands
    • Git
    • systemd Commands
    • View All Cheat Sheets

    Documentation

    • Product Documentation
    • API Catalog
    • Legacy Documentation
  • Developer Sandbox

    Developer Sandbox

    • Access Red Hat’s products and technologies without setup or configuration, and start developing quicker than ever before with our new, no-cost sandbox environments.
    • Explore Developer Sandbox

    Featured Developer Sandbox activities

    • Get started with your Developer Sandbox
    • OpenShift virtualization and application modernization using the Developer Sandbox
    • Explore all Developer Sandbox activities

    Ready to start developing apps?

    • Try at no cost
  • Blog
  • Events
  • Videos

Keycloak: Core concepts of open source identity and access management

December 11, 2019
Abhishek Koserwal
Related topics:
Security
Related products:
Red Hat Single sign-on

Share:

    Keycloak provides the flexibility to export and import configurations easily, using a single view to manage everything. Together, these technologies let you integrate front-end, mobile, and monolithic applications into a microservice architecture. In this article, we discuss the core concepts and features of Keycloak and its application integration mechanisms. You will find links to implementation details near the end.

    Core concepts

    Let's start with Keycloak's core concepts, as shown in Figure 1:

    Keycloak core concepts

    Figure 1: Keycloak's core concepts.">

    A Keycloak realm is like a namespace that allows you to manage all of your metadata and configurations. You can have multiple realms based on your requirements. Generally, it is recommended to avoid using the master realm, which is for administration purposes only.

    In Figure 1, you can see the information that Keycloak lets you manage, namely:

    • Clients (per application)
    • Configuration management
    • Custom themes (UI)
    • Events
    • Federation
    • LDAP or Active Directory integration
    • User management (users and groups)

    Note: You can have one client that contains configuration information for a single application, such as the URL, protocol, and redirect URI.

    Figure 2 shows how Keycloak gives you access to all of this information in a single view:
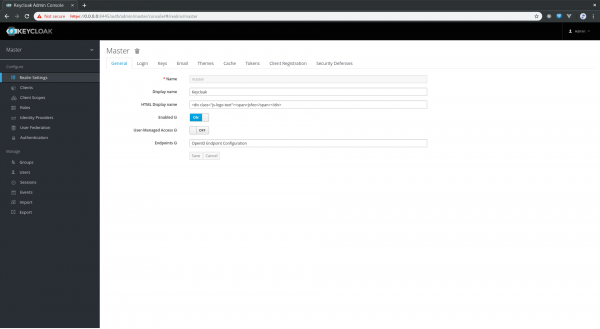
    Keycloak's UI offers access to many settings.
    Keycloak's UI offers access to many settings.

    Figure 2: Keycloak's UI offers access to many settings.">

    Why should you use Keycloak?

    Let's take a look at why you might choose Keycloak, aside from the sheer amount of management you can accomplish within a single view.

    Keycloak is reliable

    Keycloak is a reliable solution, designed following standard security protocols to provide a dynamic single sign-on solution. Red Hat runs on Red Hat products, which includes single sign-on (SSO), and Red Hat trusts the upstream product Keycloak for their downstream product Red Hat SSO. Red Hat SSO handles Red Hat's entire authentication and authorization system. Additionally, Keycloak is licensed under Apache License Version 2.0 and has a strong and active open source community.

    Keycloak supports standard protocols

    Keycloak supports the following standard protocols:

    • OAuth 2.0
    • OpenID Connect
    • SAML 2.0

    This support means that any tool or application that supports integration with the above protocols can be plugged into with Keycloak (for example, enterprise applications like Red Hat Ansible Tower or SAP Business Intelligence Platform).

    Keycloak is ready for production

    As mentioned earlier, Keycloak is already being used in production. Before doing so yourself, make sure to go through the production-readiness documentation.

    Launching Keycloak

    To launch Keycloak with Docker, use:

    $ docker pull jboss/keycloak
    $ docker run -d -e KEYCLOAK_USER=<USERNAME> -e KEYCLOAK_PASSWORD=<PASSWORD> -p 8081:8080 jboss/keycloak

    However, your configuration information (like realm settings, clients, or certificates) will be temporary in this scenario. Therefore, export the configuration and re-import every time before you instantiate a new container. In other words, use a persistent volume for storing the state.

    To do a standalone Keycloak launch (https://www.keycloak.org/downloads.html) with JBoss WildFly, use:

    $ keycloak-x.x.x.Final/bin>./standalone.sh

    Preparing to integrate with Keycloak

    Once you're ready to integrate your apps, tools, and services with Keycloak, you have decisions to make (see Figure 3):

    Keycloak integration relationship map.

    Figure 3: Keycloak integration map.">

    First, you need to decide which protocol you intend to use, such as:

    • OAuth2
    • OpenID Connect
    • Security Assertion Markup Language (SAML).

    Are you looking for authentication or authorization?

    OAuth 2 != Authentication, only Authorization 
    
    OpenID Connect = Identity + Authentication + Authorization

    Now, regarding the application:

    • Is it running on a container (stateless) or is it in a legacy clustered (shared state) environment?
    • What does the architecture consist of, such as single-page applications (SPA), microservices, serverless, or MVC?
    • Identify the resources and endpoints you want to secure. Is your integration between, for example, client and server, service-to-service, or API endpoints.
    • Identify which adapter will be suited for your architecture.

    Integrating with Keycloak

    To integrate your apps with Keycloak:

    1. Create a realm. You can use master for a dev environment or base it on your business domain (for example, external-appsor internal-apps).
    2. Create a client for your application (for example, hello-world-app). Client configuration requires details like this:
      • Protocol: Which protocol, such as SAML or OpenID.
      • Resource Endpoint: The application hostname or REST endpoint.
      • Redirect URI: Where to redirect the user when authentication is granted.
    3. Provide the client configuration to your application as input, such as:
      • The clientId (i.e.,hello-world-app)
      • The realm (i.e.,external-apps)
      • The Keycloak server's URL.

    That’s all you need to do in order to configure your application with Keycloak.

    Wrapping up

    In conclusion, you can refer to the following integration patterns when you work with Keycloak yourself:

    • Vue
    • Angular
    • React
    • Spring-boot 2
    • Quarkus and React

    References

    • Keycloak Documentation
    • Securing Applications and Services Guide

    Happy secure coding!

    Last updated: February 11, 2024

    Recent Posts

    • A deep dive into Apache Kafka's KRaft protocol

    • Staying ahead of artificial intelligence threats

    • Strengthen privacy and security with encrypted DNS in RHEL

    • How to enable Ansible Lightspeed intelligent assistant

    • Why some agentic AI developers are moving code from Python to Rust

    Red Hat Developers logo LinkedIn YouTube Twitter Facebook

    Products

    • Red Hat Enterprise Linux
    • Red Hat OpenShift
    • Red Hat Ansible Automation Platform

    Build

    • Developer Sandbox
    • Developer Tools
    • Interactive Tutorials
    • API Catalog

    Quicklinks

    • Learning Resources
    • E-books
    • Cheat Sheets
    • Blog
    • Events
    • Newsletter

    Communicate

    • About us
    • Contact sales
    • Find a partner
    • Report a website issue
    • Site Status Dashboard
    • Report a security problem

    RED HAT DEVELOPER

    Build here. Go anywhere.

    We serve the builders. The problem solvers who create careers with code.

    Join us if you’re a developer, software engineer, web designer, front-end designer, UX designer, computer scientist, architect, tester, product manager, project manager or team lead.

    Sign me up

    Red Hat legal and privacy links

    • About Red Hat
    • Jobs
    • Events
    • Locations
    • Contact Red Hat
    • Red Hat Blog
    • Inclusion at Red Hat
    • Cool Stuff Store
    • Red Hat Summit
    © 2025 Red Hat

    Red Hat legal and privacy links

    • Privacy statement
    • Terms of use
    • All policies and guidelines
    • Digital accessibility

    Report a website issue