The new release of Red Hat OpenShift 4.2 has many developer-focused improvements. In that context, we have released a new version of OpenShift Connector 0.1.1, a Visual Studio (VS) Code extension with more improved features for a seamless developer experience. Developers can now focus on higher-level abstractions like their application and components and can drill down deeper to get to the OpenShift and Kubernetes resources that make up their application directly from VS Code.
Let's take a deep tour of the new features with respect to OpenShift Connector.
Summary
The new OpenShift Connector 0.1.1 features offer three major benefits:
- Speeds up OpenShift development by supporting fully integrated OpenShift development and deployment within VS Code, which lets you connect to any OpenShift cluster and create, debug, and deploy from the IDE itself.
- Simplifies inner-loop development for cloud infrastructure, since under the hood this extension uses tools like OpenShift Do (odo)—a fast and simple CLI tool for creating applications on Red Hat OpenShift Container Platform—and OpenShift CLI (oc) to help you interact with the local or production OpenShift instance and complete the inner-loop experience.
- Enhances developer workflow by providing a streamlined developer experience for working with OpenShift instances (3.x or 4.x) and supporting public cloud instances such as Red Hat OpenShift on Azure and AWS.
Why OpenShift Connector?
OpenShift Connector on VS Code provides an end-to-end developer experience for interacting with a Red Hat OpenShift cluster. By leveraging the IDE features, developers can create, deploy, and debug (upcoming) applications and then deploy directly to the running OpenShift cluster.
In upcoming releases, the connector will also support debugging for NodeJS and Java applications. In addition, here's a look at the features.
Cluster management
When it comes to cluster management, OpenShift Connector on VS Code:
- Supports local OpenShift Cluster management for 3.x and 4.x clusters.
- Works with remote OCP clusters such as Red Hat OpenShift on Azure and OpenShift on AWS.
- Supports logging in to clusters using tokens and username/passwords.
- Provides the functionality to switch contexts between different kubeconfig entries directly from the extension view.
- Lets you view and manage OpenShift resources like build and deployment configs from the Kubernetes Explorer view.
Development
When it comes to development, OpenShift Connector on VS Code:
- Allows the user to connect to a local or hosted OpenShift cluster directly from VS Code.
- Provides a streamlined inner-loop experience and quickly updates the changes on the cluster.
- Creates components, services, and routes on the connected cluster.
- Adds storage directly to a component from the extension itself.
Deployment
When it comes to deployment, OpenShift Connector on VS Code:
- Provides single-click deployment to OpenShift clusters right from VS Code.
- Allows the user to navigate to the multiple routes you created to access the deployed application.
- Deploys multiple interlinked components and services directly on the cluster.
- Pushes and watches components changes directly.
- Streams logs directly on the integrated terminal view of VS Code.
Monitoring
When it comes to monitoring, OpenShift Connector on VS Code:
- Allows you to work with Kubernetes resources directly from VS Code.
- Starts and resumes build and deployment configurations.
- Views and follows logs for deployments, pods, and containers.
Installing the extension
You can install the OpenShift Connector extension using one of two methods. First, you can install the plugin directly from the Visual Studio Code Marketplace. Otherwise, you can open your machine's Visual Studio Code interface. Search for the OpenShift Connector extension and install it by using the Extensions view extension icon in VS Code.
Getting Started
This getting started guide offers workflows for using the extension and enhancing the developer experience when working on OpenShift.
Create a component in an OpenShift cluster
Users can log into any OpenShift cluster, local or hosted. To run the instance of OpenShift cluster locally, developers can either use CodeReady Containers for OpenShift 4.x clusters, or Minishift /Red Hat Container Development Kit for OpenShift 3.x clusters.
Next, log into your server and save your login for subsequent use. More specifically, Log into the given server with the given credentials, or log in using the bearer token for authentication to the API server.
To deploy a component:
- Create a new component from the project, and use a
gitrepository, binary file, or local workspace (directory) as the component's source. - Assign a context folder to every component when the extension prompts you to select the context folder and add it to the workspace.
Note: All component configurations are saved to /.odo/config.yaml. You can commit this file to your repository to easily recreate components with the same configuration later, or to share it with someone else.
- To deploy the component to a cluster or to apply config changes, click the Push action available in the component. A component resides in one of three states within the Tree View:
-
- pushed: When the components are deployed into the cluster.
- not pushed: When are the components are in local config but not deployed into the cluster.
- no context: When there is no context folder associated with the component in the workspace.
In this example, we will see how to create a NodeJS-based component, deploy it on a Red Hat OpenShift 4.2 cluster, and access the cluster routes:
- Right-click Cluster -> New Project as shown in Figure 1:

- Select the application as shown in Figure 2 (if no application is present in the project, extension workflow prompts the user to create a new application):

- Select the component's source type. There are three source types available. For this example, we will use
git-based workflow to create the component, so we select Git Repository as shown in Figure 3:
- Select the context folder where the component's configuration resides, as shown in Figure 4 (the dropdown will show all folders available in the workspace, if the user needs to select any other folder, click Add new context folder and a dialog will let you select the folder):

- Provide the
gitrepository's URL, as shown in Figure 5 (this example uses thegitrepository https://github.com/mohitsuman/nodejs-ex):
- Select any specific branch or tag to fetch the component's configuration, as shown in Figure 6 (this feature provides flexibility to try and test any working feature directly on your OpenShift instance):

- Provide the component's name, as shown in Figure 7:
 Figure 7: Name the component.
 - Provide the component's type, as shown in Figure 8 (in this example, we select nodejs):

- Provide the component's version, as shown in Figure 9 (for this example, we select the latest version of NodeJS):


Once the action is successful, the component is created and added to the local configuration. The state of the component is "not pushed" and is updated in the tree view for the cluster. At this stage, nothing is pushed at the cluster, as you see in Figure 10:

- Push these changes to the cluster by right-clicking the project and clicking Push in the context menu as you see in Figure 11:


Watch the push command's progress streamed directly in the integrated terminal view, as shown in Figure 12:

The state of the component is changed to "pushed" once the component is successfully pushed to the cluster, as shown in Figure 13:

Create and access a route to the cluster
Let's create a route for the component and expose the ports associated with it by selecting Component -> New URL. If the component supports multiple ports, the extension prompts the user to select the port attached to the route created. The URLs that are generated using this command can be used to access the deployed components from outside the cluster.
Once the new URL is created, it has to be pushed to the cluster, so that the new route is assigned to the cluster. You can then access the route by right-clicking the project and selecting Open in Browser, as shown in Figure 14:

If there are multiple routes associated with the component, a prompt is displayed for you to select the required one and proceed.
Add storage to a component
Do the following to let the user create storage and mount it to a component:
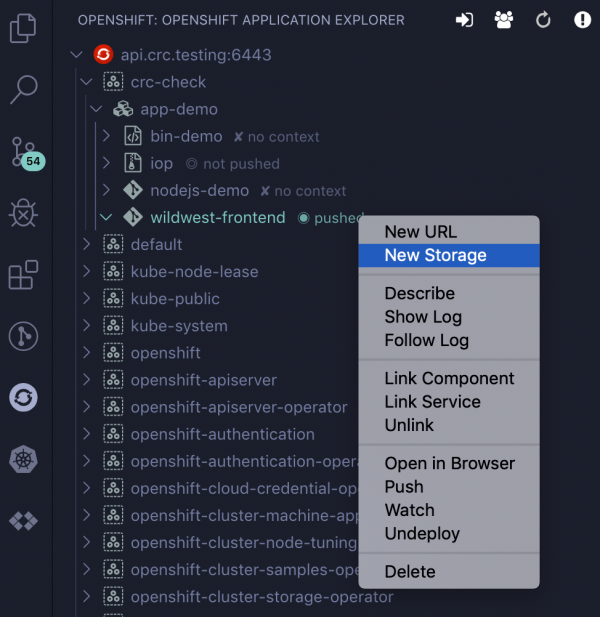
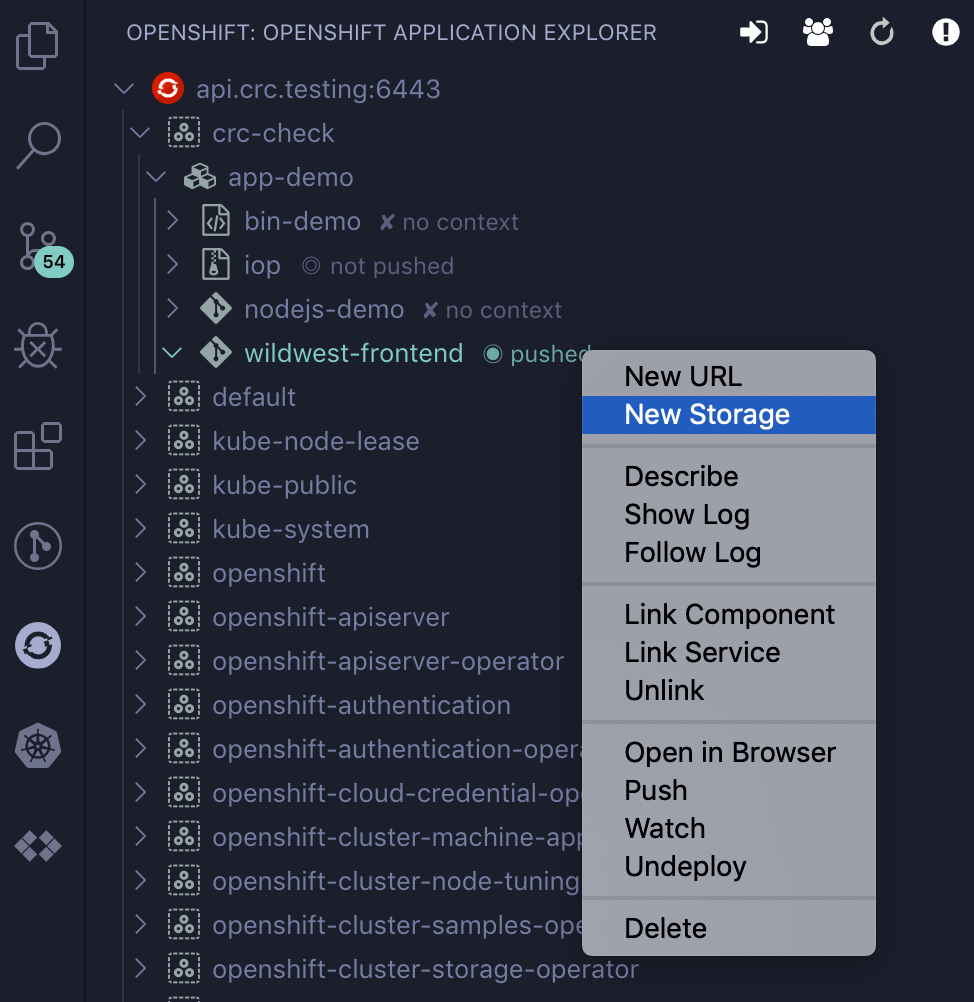
- Select the component where you want to attach the storage by choosing Component -> New Storage, as shown in Figure 15:
- Provide the name for this storage, as shown in Figure 16:

- Specify the storage mount path, as shown in Figure 17:

- Select storage size from the available options, as shown in Figure 18.

- Push this change to the cluster by running the push command, results shown in Figure 19. The Tree View is updated with the storage node after successful storage creation.


View logs
This extension adds two context menu options regarding logs. The first is Follow Logs, which lets you follow the logs stream for the running pods within the integrated terminal output from your deployment. The second is Show Logs, which lets users view logs from a specific resource, as shown in Figure 20:

Undeploy a component
To undeploy a component from the cluster and keep it in the local configuration, run the Undeploy command from the component's context menu, as shown in Figure 21:

Delete a component
To delete the component from the cluster and local workspace, select Component -> Delete. The component will be deleted from the local folder configuration, and the .odo file will be removed from the context folder, as shown in Figure 22:

Describe a resource
Users can describe a specific resource, as shown in Figure 23, including information such as its name, type, source, environment variables, and debug ports exposed:

Link components and services
Real-world applications contain multiple components and services that need to work together. Using this extension, users can perform the following:
- To link multiple components together using Component -> Link Component. For example, consider a front-end component on Node JS and a back-end component on Java linked together.
- To link a component to a service, select Component -> Link Service, as shown in Figure 24. For example, consider a front-end component on Node JS being linked to a MongoDB service.

View Kubernetes resources
For easier management of Kubernetes resources, users can use the Kubernetes explorer (added as a dependency), which is accessible from the VS Code Activity Bar. This explorer lets you access information about your Kubernetes clusters and resources. You can set an active OpenShift Project, stream and view its logs, start and stop builds, and much more. Here is a selection of the actions available for interacting with your OpenShift resources:
- Switch OpenShift projects: Set the specified project as the active project, and work with its specific resources.
- Open OpenShift projects in the console: Users can open specific projects in the running OpenShift console dashboard, as shown in Figure 25:

- Perform actions in the deployment config: Users can perform various actions specific to a deployment config, such as Show Logs, Deploy the config, and Open in console directly from the explorer, as shown in Figure 26:

- Perform actions in the build config: Users can start a specific build from the build config directly from the explorer (as shown in Figure 27) and view it in the console dashboard:


Getting support
If you encounter any bugs, confusing commands, or unclear documentation, or if you would like to propose a feature request, you can submit your feedback by:
- Selecting OpenShift: Report Extension Issue from the command palette option or the extension title view.
- Filing your issue directly on GitHub.
- Discussing your issue with the team and community on Gitter.
Conclusion
Try the latest version of OpenShift Connector from the VS Code Marketplace. There are several infrastructure options available, including Laptop, which allows you to install an OpenShift cluster locally using Red Hat CodeReady Containers.
Last updated: August 1, 2023