In part 1 of this series, we used Red Hat OpenShift Service Mesh and zero trust workload identity manager to protect communications within a cluster. This second part moves beyond the cluster boundaries to extend that trust to external infrastructure. You will learn how to integrate a Linux virtual machine and how to use Cloud Identity and Access Management (IAM) federation to access AWS services without static credentials. These tutorials show how to build a unified identity model across hybrid and multicloud environments.
Prerequisites
To follow this guide, you need:
- A completed environment from part 1, including Red Hat OpenShift Service Mesh and zero trust workload identity manager.
- A remote Linux server or virtual machine with podman installed.
- The AWS CLI (
aws) installed and configured on your local machine. - AWS account permissions to create an IAM identity provider, create roles, and attach policies.
- Network connectivity between your AWS identity provider and the SPIRE OIDC discovery provider route in your cluster.
- The
oc,openssl, andjqcommand-line utilities installed locally.
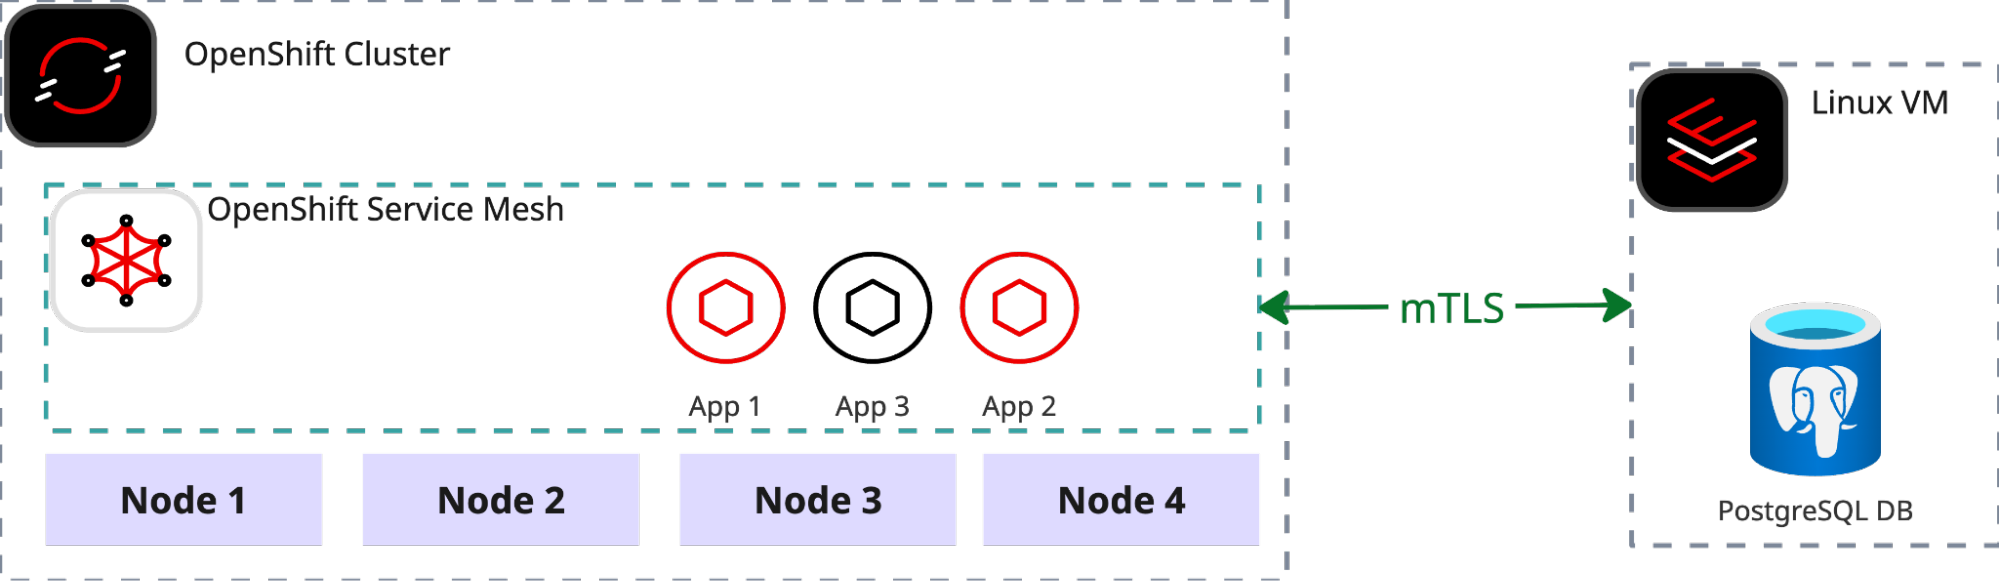
Connecting an external service to the mesh
Zero trust workload identity manager serves as the identity provider for our service mesh. It instructs the Istiod to have each Envoy sidecar proxy retrieve its identity from this provider. The identity provider offers a stable API that utilizes the SPIFFE protocol, allowing not only Envoy sidecars but also any other workload capable of understanding the protocol to access identity information. This enables services external to the mesh to fetch identities from the provider, allowing them to communicate securely with services operating inside the mesh.
This tutorial will focus on a scenario involving a Linux server that hosts a legacy DB server. Let's say it will be PostgreSQL DB. The objective is to smoothly integrate the DB server with an application running within the mesh.
Since neither the VM nor the DB are running within the OpenShift cluster, a different attestation method than K8s_psat is required. For this tutorial, we will use the most universal and environment-agnostic SPIRE attestation method: x509pop. The first step is to create the necessary attestation certificates.
Define required environment variables. This guide assumes that zero trust workload identity manager and OpenShift Service Mesh have already been deployed as described in part 1.
export TPJ=test-ossm-with-ztwim
export ZTWIM_NS=zero-trust-workload-identity-manager
export TRUST_DOMAIN=sky.computing.ocp.one
export CA_CN="Sky Computing Lab"
export CN_NODE_1="mesh-node-1"
export CERTS_DIR="$(pwd)/data"
export LEGACY_DB_SRV="legacy-db-srv1"
export NEW_ATTESTOR='{"x509pop": {"plugin_data": {"ca_bundle_path": "/tmp/x509pop-ca/ca.crt.pem","agent_path_template":"/x509pop/cn/{{ .Subject.CommonName }}"}}}'
export SPIRE_SERVER_DOMAIN="spire-server.$(oc get ingresses.config/cluster -o jsonpath={.spec.domain})"
export AGENT_SPIFFE_ID="spiffe://${TRUST_DOMAIN}/spire/agent/x509pop/cn/${CN_NODE_1}"
export WORKLOAD_SPIFFE_ID="spiffe://sky.computing.ocp.one/legacy-db-srv"
export WORKLOAD_SPIFFE_SELECTOR="unix:uid:101"
Create attestation certificates:
mkdir -p "${CERTS_DIR}"
openssl genpkey \
   -algorithm RSA \
   -out "${CERTS_DIR}/ca.key.pem"
openssl req -new -x509 -days 365 \
  -key "${CERTS_DIR}/ca.key.pem" \
  -out "${CERTS_DIR}/ca.crt.pem" \
  -subj "/CN=${CA_CN}"
openssl genpkey -algorithm RSA \
  -out "${CERTS_DIR}/${LEGACY_DB_SRV}.key.pem"
openssl req -new \
  -key "${CERTS_DIR}/${LEGACY_DB_SRV}.key.pem" \
  -out "${CERTS_DIR}/${LEGACY_DB_SRV}.csr.pem" \
  -subj "/CN=${CN_NODE_1}"
openssl x509 -req -days 365 \
 -in "${CERTS_DIR}/${LEGACY_DB_SRV}.csr.pem" \
 -CA "${CERTS_DIR}/ca.crt.pem" \
 -CAkey "${CERTS_DIR}/ca.key.pem" \
 -CAcreateserial -out "${CERTS_DIR}/${LEGACY_DB_SRV}.crt.pem" \
 -extfile <(printf "[v3_req]\nbasicConstraints=CA:FALSE\nkeyUsage=critical,digitalSignature,keyEncipherment\nextendedKeyUsage=clientAuth,serverAuth") \
 -extensions v3_req
Enable x509pop node attestor plugin on server:
# create x509pop secret with ca.pem
export CA_CRT_PEM=$(sed 's/^/    /' < "$(pwd)/data/ca.crt.pem" )
cat <<EOF | oc apply -f -
apiVersion: v1
kind: Secret
metadata:
  name: x509pop-ca
  namespace: "$ZTWIM_NS"
stringData:
  ca.crt.pem: |
${CA_CRT_PEM}
EOF
# mount the secret to spire-server
oc patch statefulset spire-server -n "${ZTWIM_NS}" --patch '
spec:
  template:
    spec:
      volumes:
      - name: x509pop-ca
        secret:
          secretName: x509pop-ca
      containers:
      - name: spire-server
        volumeMounts:
        - name: x509pop-ca
          mountPath: /tmp/x509pop-ca
          readOnly: true
'
# update spire-server configuration and enable the x509pop attestor plugin
oc get configmap spire-server -n "${ZTWIM_NS}" -o json | \
jq --argjson new "$NEW_ATTESTOR" \
   '.data["server.conf"] |= (fromjson |
    if (.plugins.NodeAttestor | any(has("x509pop")))
    then .
    else .plugins.NodeAttestor += [$new]
    end | tojson)' | \
oc apply -f -
# apply new configuraiton by restarting the spire server
oc rollout restart statefulset spire-server -n "${ZTWIM_NS}"
oc rollout status statefulset/spire-server -n "${ZTWIM_NS}" --timeout=300s
Fetch the trust bundle. To enable the spire-agent on the VM to communicate with the remote spire-server, the trust bundle must be retrieved. For the purpose of this tutorial, we will fetch and store the bundle locally. However, in a production environment, the trust bundle should be exposed via an HTTPS connection so that it is accessible to any workload that requires it.
oc exec spire-server-0 \
 -c spire-server \
 -n "${ZTWIM_NS}" \
 -- /bin/sh -c "/spire-server bundle show -format pem > /tmp/bundle.crt"
oc cp "${ZTWIM_NS}"/spire-server-0:/tmp/bundle.crt "$(pwd)/data/bundle.crt"
Create spire entry for the PostgreSQL server. Since the VM is outside the OpenShift cluster, the spire-server entry for the PostgreSQL server must be created manually.
oc exec spire-server-0 \
 -c spire-server \
 -n "${ZTWIM_NS}" \
 -- /bin/sh -c "/spire-server entry create \
                    -parentID ${AGENT_SPIFFE_ID} \
                    -spiffeID ${WORKLOAD_SPIFFE_ID} \
                    -selector ${WORKLOAD_SPIFFE_SELECTOR}"
Expose Spire-Server route. To enable the spire-agent on the remote VM to communicate with the spire-server, the spire-server must be exposed via a route. It is important to note that the TLS setting for this route should be configured as passthrough because the server and agent communicate over a private gRPC mTLS connection.
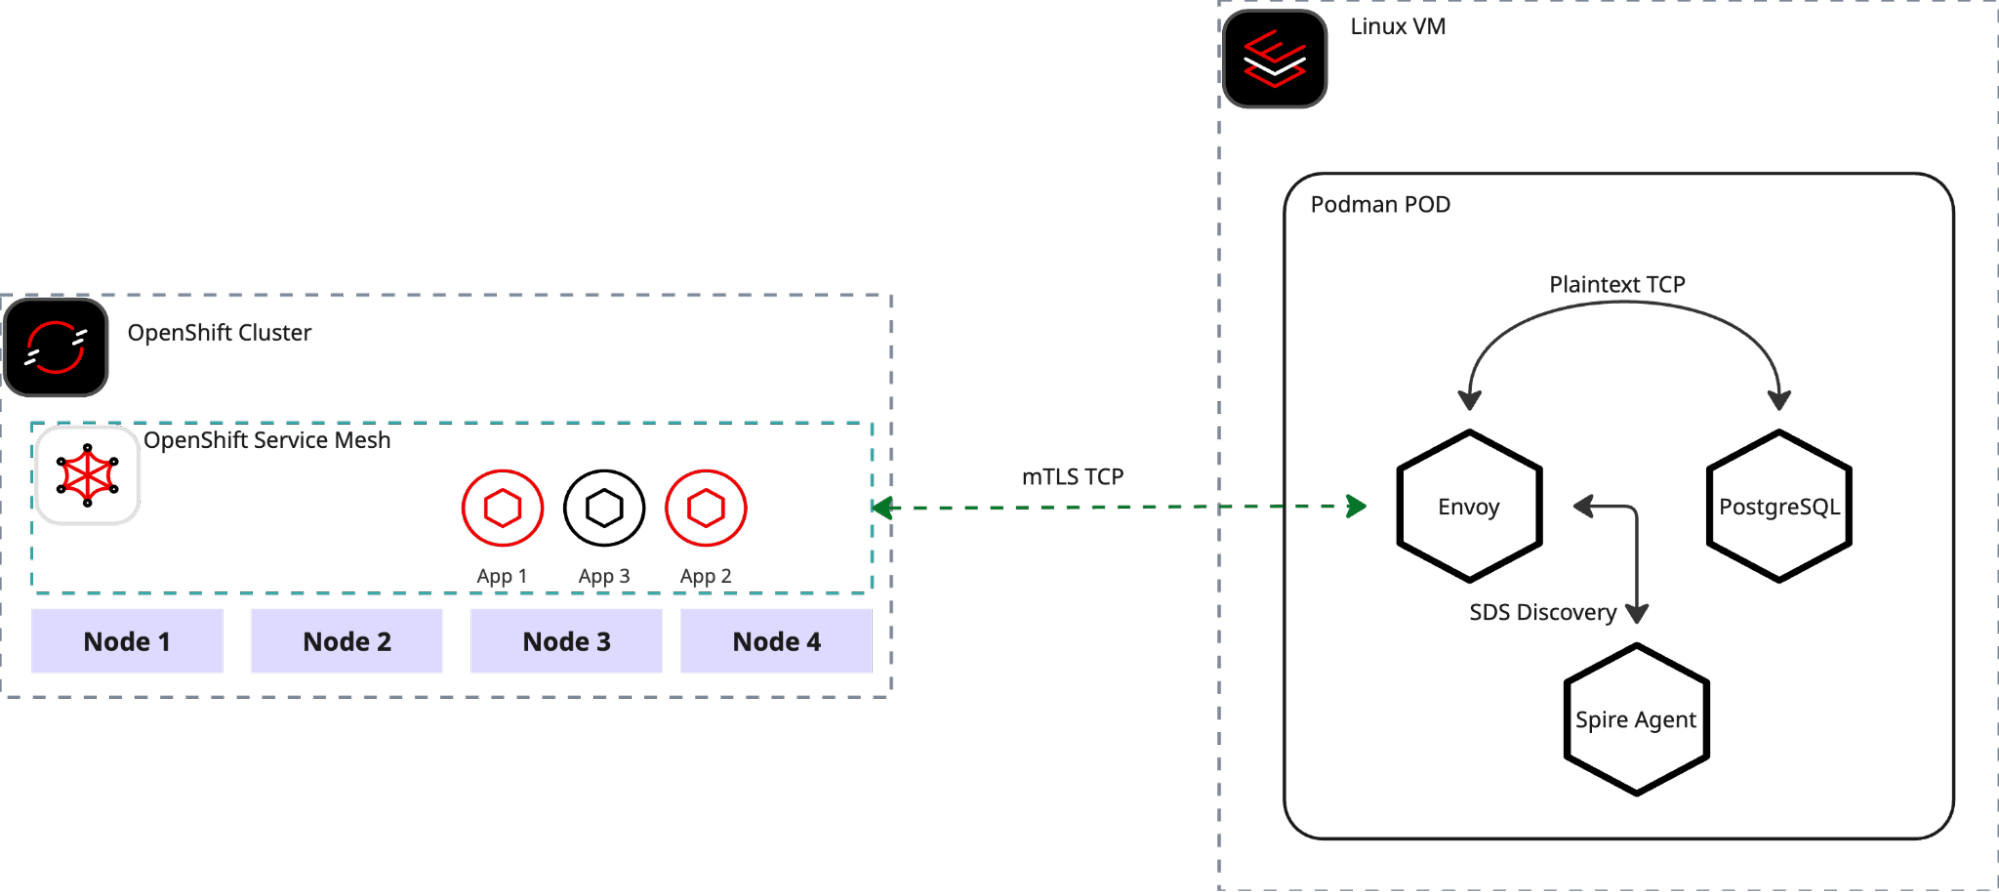
cat <<EOF | oc apply -f -
apiVersion: route.openshift.io/v1
kind: Route
metadata:
  name: spire-server
  namespace: ${ZTWIM_NS}
spec:
  host: ${SPIRE_SERVER_DOMAIN}
  port:
    targetPort: grpc
  tls:
    termination: passthrough
  to:
    kind: Service
    name: spire-server
    weight: 100
EOF
Connect to the remote server and run the Spire-Agent. To maintain distribution independence and simplify the tutorial, all workloads on the remote VM will run as containers using Podman. Since PostgreSQL does not natively support SPIFFE, we will use Envoy as an mTLS terminator for the database instance. For straightforward connectivity between the spire-agent, Envoy, and the DB, all containers will be co-located within a single pod.
Note: All the instruction commands in this section must be executed on the remote server.
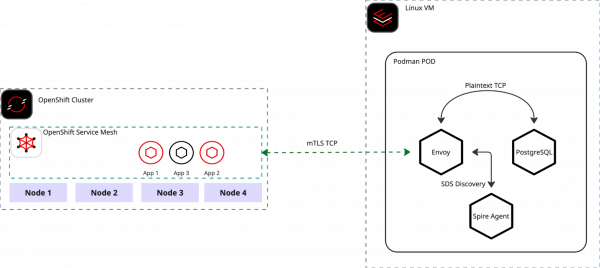
Figure 2: Inter-process communication flow on Mesh-integrated Linux VMs. Generate Spire-Agent configuration:
# run this command on remote server
cat << EOF > "$(pwd)/data/agent.conf"
agent {
    data_dir = "/tmp/data"
    log_level = "DEBUG"
    server_address = "${SPIRE_SERVER_DOMAIN}"
    server_port = "443"
    socket_path ="/tmp/spire-agent/socket"
    trust_bundle_path = "/opt/spire/data/bundle.crt"
    trust_domain = "sky.computing.ocp.one"
}
plugins {
    NodeAttestor "x509pop" {
        plugin_data {
            private_key_path = "/opt/spire/data/${LEGACY_DB_SRV}.key.pem"
            certificate_path = "/opt/spire/data/${LEGACY_DB_SRV}.crt.pem"
        }
    }
    KeyManager "disk" {
        plugin_data {
            directory = "data"
        }
    }
    WorkloadAttestor "unix" {
        plugin_data {
        }
    }
}
EOF
Create a Podman pod on the remote VM:
# run this command on remote server
# create podman pod
podman pod rm \
  spire-agent-envoy-pod \
  --force 2>/dev/null \
  && podman pod create \
  --name spire-agent-envoy-pod \
  --share pid,net,ipc,uts \
  -p 5432:5432
# create podman volume
podman volume rm --force spire-socket 2>/dev/null \
  && podman volume create spire-socket
Start Spire-Agent container:
# run this command on remote server
podman run -d --pod spire-agent-envoy-pod \
  -v spire-socket:/tmp/spire-agent \
  -v "$(pwd)/data":/opt/spire/data \
  -v spire-socket:/tmp/spire-agent \
  ghcr.io/spiffe/spire-agent:1.14.0 \
  -config /opt/spire/data/agent.conf
Start Envoy container:
# run this command on remote server
# prepare envoy config file
cat << EOF > "$(pwd)/config.yaml"
node:
  id: "pg-reverse-proxy"
  cluster: "envoy-cluster-with-spire"
static_resources:
  listeners:
    - name: ingress_postgres_mtls
      address:
        socket_address:
          address: 0.0.0.0
          port_value: 5432
      filter_chains:
        - filters:
            - name: envoy.filters.network.tcp_proxy
              typed_config:
                "@type": type.googleapis.com/envoy.extensions.filters.network.tcp_proxy.v3.TcpProxy
                stat_prefix: postgres_tcp
                cluster: postgresql_service
          transport_socket:
            name: envoy.transport_sockets.tls
            typed_config:
              "@type": type.googleapis.com/envoy.extensions.transport_sockets.tls.v3.DownstreamTlsContext
              require_client_certificate: true
              common_tls_context:
                tls_certificate_sds_secret_configs:
                  - name: "${WORKLOAD_SPIFFE_ID}"
                    sds_config:
                      resource_api_version: V3
                      api_config_source:
                        api_type: GRPC
                        transport_api_version: V3
                        grpc_services:
                          envoy_grpc:
                            cluster_name: spire_agent
                validation_context_sds_secret_config:
                  name: "spiffe://${TRUST_DOMAIN}"
                  sds_config:
                    resource_api_version: V3
                    api_config_source:
                      api_type: GRPC
                      transport_api_version: V3
                      grpc_services:
                        envoy_grpc:
                          cluster_name: spire_agent
  clusters:
    - name: spire_agent
      connect_timeout: 0.25s
      http2_protocol_options: {}
      load_assignment:
        cluster_name: spire_agent
        endpoints:
          - lb_endpoints:
              - endpoint:
                  address:
                    pipe:
                      path: /tmp/spire-agent/socket
    - name: postgresql_service
      connect_timeout: 1s
      type: STATIC
      load_assignment:
        cluster_name: postgresql_service
        endpoints:
          - lb_endpoints:
              - endpoint:
                  address:
                    socket_address:
                      address: 127.0.0.1
                      port_value: 7432
EOF
# start envoy
 podman run -d --pod spire-agent-envoy-pod  \
  -v spire-socket:/tmp/spire-agent \
  -v "$(pwd)/config.yaml":/etc/envoy/envoy.yaml \
  docker.io/envoyproxy/envoy:v1.36.2 \
  -c /etc/envoy/envoy.yaml \
  --component-log-level upstream:debug,connection:debug,filter:debug
Start PostgreSQL container:
# run this command on remote server
podman run -d --pod spire-agent-envoy-pod \
   -e POSTGRES_PASSWORD=test \
   -e PGPORT=7432 \
   postgres:16.9
Once all three containers are up and running without any errors, you are ready to begin testing the connectivity between the service mesh and the remote VM.
Deploy PSQL client on OpenShift Service Mesh:
export TPJ=test-ossm-with-ztwim
cat <<EOF | oc apply -f -
apiVersion: apps/v1
kind: Deployment
metadata:
  name: psql
  namespace: ${TPJ}
spec:
  selector:
    matchLabels:
      app: psql
      version: v1
  template:
    metadata:
      annotations:
        inject.istio.io/templates: "sidecar,spire"
        spiffe.io/audience: "sky-computing-demo"
      labels:
        app: psql
        version: v1
    spec:
      containers:
      - image: postgres:16.9
        imagePullPolicy: IfNotPresent
        name: psql
        command:
          - /bin/bash
          - -c
          - sleep inf
EOF
until oc get deployment psql -n "${TPJ}" &> /dev/null; do sleep 3; done
oc wait --for=condition=Available deployment/psql -n "${TPJ}" --timeout=300s
Define
ServiceEntryandDestinationRule:# define VM IP export VM_IP=$(curl -s ifconfig.io) export TPJ=test-ossm-with-ztwim # Create Service Entry cat <<EOF | oc apply -f - apiVersion: networking.istio.io/v1beta1 kind: ServiceEntry metadata: name: external-postgres-ip namespace: ${TPJ} spec: hosts: - postgres-db.external addresses: - $VM_IP/32 ports: - number: 5432 name: tcp-postgres protocol: TCP location: MESH_INTERNAL resolution: STATIC endpoints: - address: "$VM_IP" EOF # Create Destination Rule cat <<EOF | oc apply -f - apiVersion: networking.istio.io/v1beta1 kind: DestinationRule metadata: name: remote-postgres-mtls namespace: ${TPJ} spec: host: postgres-db.external trafficPolicy: tls: mode: ISTIO_MUTUAL EOFVerify PostgreSQL access from the cluster to remote VM:
export TPJ=test-ossm-with-ztwim
export VM_IP=$(curl -s ifconfig.io)
PSQL_POD=$(kubectl get pod -lapp=psql -n ${TPJ} -o jsonpath="{.items[0].metadata.name}")
PSQL_COMMAND="PGPASSWORD=test psql -h ${VM_IP} -U postgres -c '\\l'"
kubectl exec $PSQL_POD -n ${TPJ} -- /bin/bash -c "${PSQL_COMMAND}"
If everything was successfully configured, you should receive a list of the PostgreSQL databases
Extend the mesh with cloud services
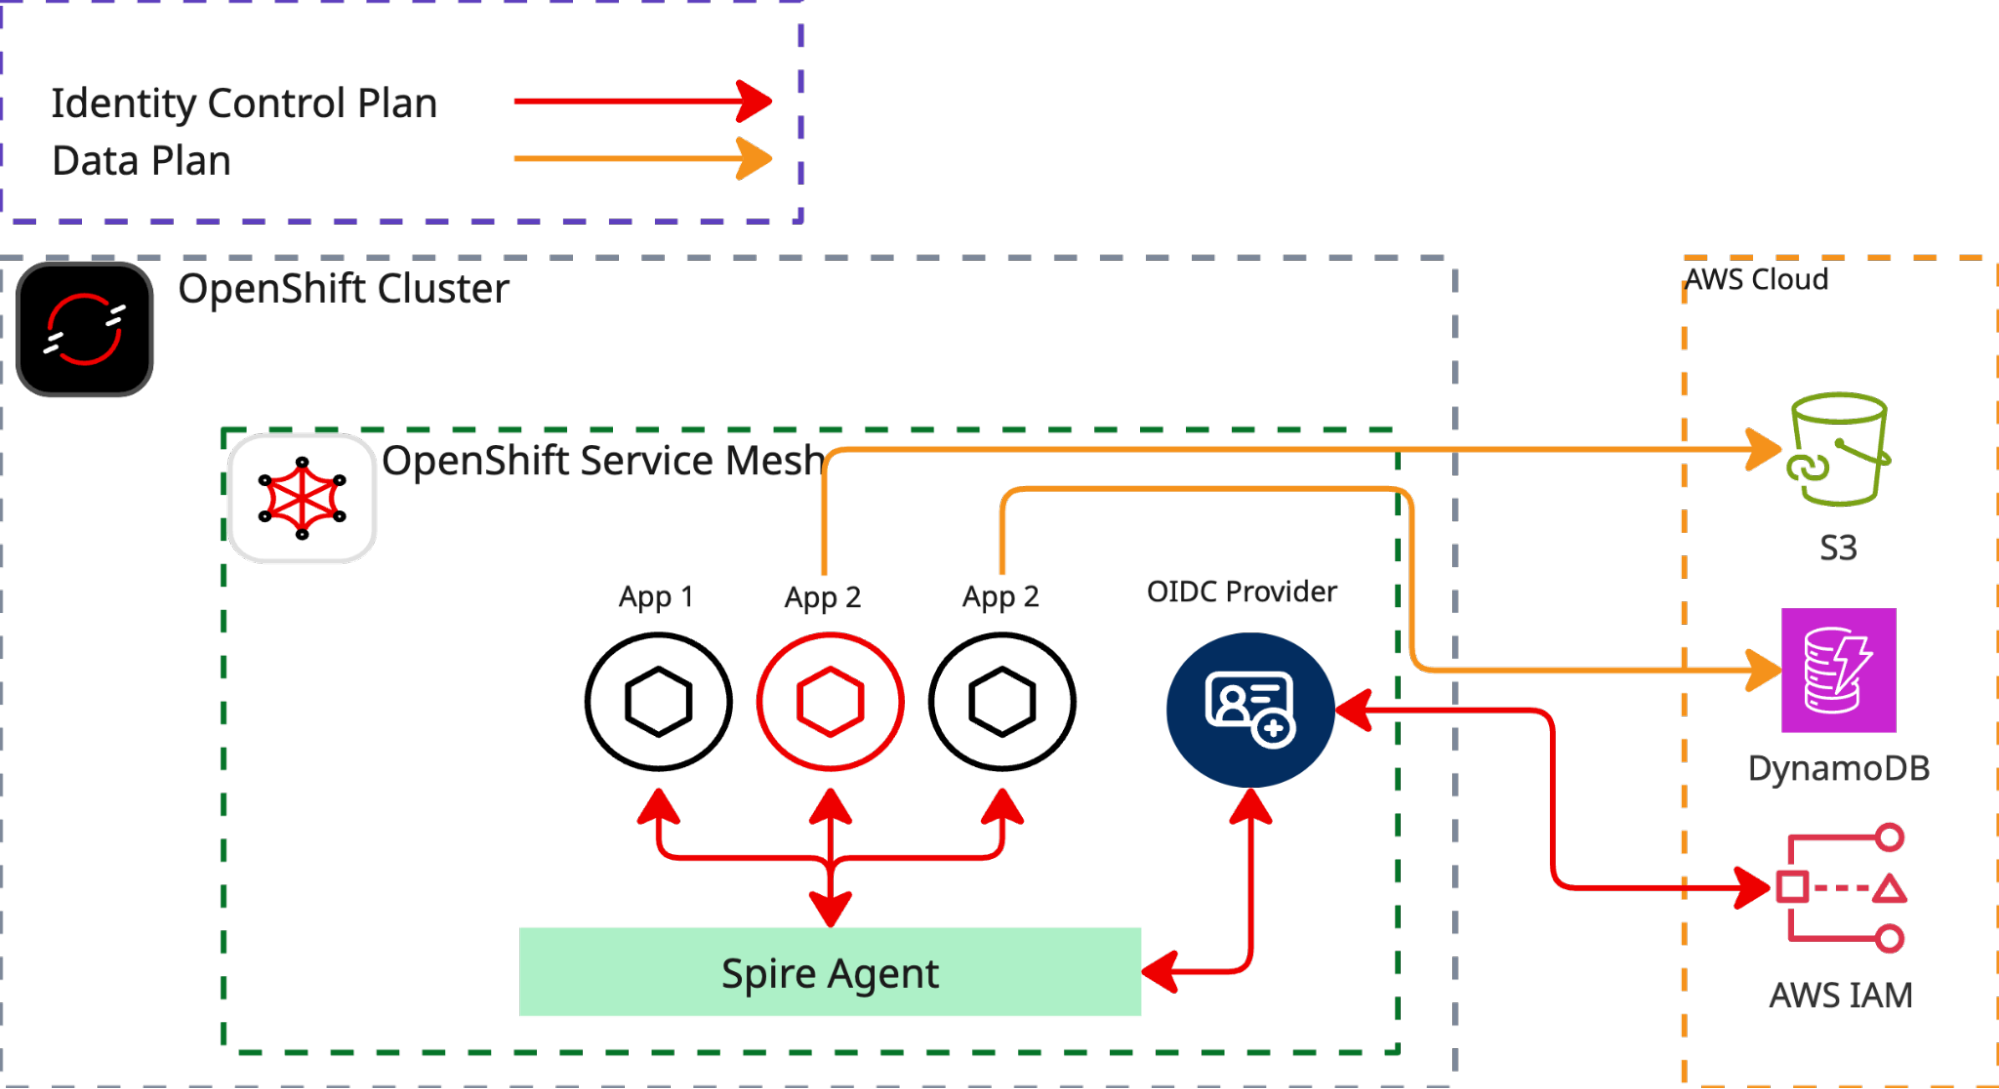
This tutorial focuses on bridging two distinct identity models: Kubernetes Service Accounts and Cloud Identity and Access Management (IAM). We will establish trust between these systems using SPIRE OIDC federation. This setup allows services within the mesh to access public services.
As an example, we use AWS DynamoDB. Our objective is to access AWS DynamoDB from a workload within the service mesh without needing to configure any application credentials. The heavy lifting for this process is managed by OpenShift Service Mesh and zero trust workload identity manager, which automatically provide the necessary credentials to the application based on workload attestation and a SPIFFE JWT SVID.
Define required environment variables
For this tutorial, you'll need to install aws cli and have privileges to create a new identity provider, creating new roles and assigning roles to policies.
export SPIFFE_AUDIENCE="sky-computing-demo"
export TPJ="test-ossm-with-ztwim"
export ZTWIM_NS="zero-trust-workload-identity-manager"
export ODIC_DISCOVER_ROUTE="spire-oidc-discovery-provider"
export AWS_BUILD_IN_POLICY=AmazonDynamoDBFullAccess
export ROLE_NAME="SkyComputingDemo2DynamoDBFullAccess"
export AUDIENCE="sky-computing-demo"
export ODIC_PROVIDER_URL=$(oc get route \
                            "${ODIC_DISCOVER_ROUTE}" \
                            -n "${ZTWIM_NS}" \
                            -o json | \
                            jq -r  .spec.host)
export FINGERPRINT=$(openssl s_client -servername "${ODIC_PROVIDER_URL}" -showcerts -connect "${ODIC_PROVIDER_URL}":443 < /dev/null 2>/dev/null \
     | awk '/BEGIN/,/END/{ if(/BEGIN/){a=""}; a=a$0"\n"; } END{print a}' \
     | openssl x509 -noout -fingerprint -sha1 \
     | cut -d= -f2 \
     | tr -d ':')
export AWS_BUILD_IN_POLICY=AmazonDynamoDBFullAccess
export ROLE_NAME="SkyComputingDemo2DynamoDBFullAccess"
export AUDIENCE="sky-computing-demo"
Create AWS IAM OIDC identity provider:
export OIDC_ARN=$(aws iam list-open-id-connect-providers \
  --query "OpenIDConnectProviderList[?contains(Arn, '${ODIC_PROVIDER_URL}')].Arn" \
  --output text)
if [ -n "$OIDC_ARN" ]; then
  echo "OIDC Provider ARN: $OIDC_ARN"
else
  aws iam create-open-id-connect-provider \
      --url "https://${ODIC_PROVIDER_URL}" \
      --thumbprint-list "${FINGERPRINT}" \
      --client-id-list "${SPIFFE_AUDIENCE}"
  export OIDC_ARN=$(aws iam list-open-id-connect-providers \
    --query "OpenIDConnectProviderList[?contains(Arn, '${ODIC_PROVIDER_URL}')].Arn" \
    --output text)
fi
Create the AWS role and assign the policy
Create AWS Role and assign the role to AWS build-in AmazonDynamoDBFullAccess policy:
export OIDC_ARN=$(aws iam list-open-id-connect-providers \
  --query "OpenIDConnectProviderList[?contains(Arn, '${ODIC_PROVIDER_URL}')].Arn" \
  --output text)
# Create the Trust Policy JSON file
cat > trust-policy.json <<EOF
{
  "Version": "2012-10-17",
  "Statement": [
    {
      "Effect": "Allow",
      "Principal": {
        "Federated": "$OIDC_ARN"
      },
      "Action": "sts:AssumeRoleWithWebIdentity",
      "Condition": {
        "StringEquals": {
          "${OIDC_ARN#*oidc-provider/}:aud": "$AUDIENCE"
        }
      }
    }
  ]
}
EOF
for policyArn in $(aws iam list-attached-role-policies --role-name "${ROLE_NAME}" 2>/dev/null | jq -r .AttachedPolicies[].PolicyArn); do
  echo "detaching policy: ${policyArn}";
  aws iam detach-role-policy --role-name "${ROLE_NAME}" --policy-arn "${policyArn}" 2>/dev/null
done
aws iam delete-role \
  --role-name "${ROLE_NAME}" 2>/dev/null
aws iam create-role \
  --role-name "${ROLE_NAME}" \
  --assume-role-policy-document file://trust-policy.json
aws iam attach-role-policy \
    --role-name "${ROLE_NAME}" \
    --policy-arn "arn:aws:iam::aws:policy/${AWS_BUILD_IN_POLICY}"
Create aws-cli deployment
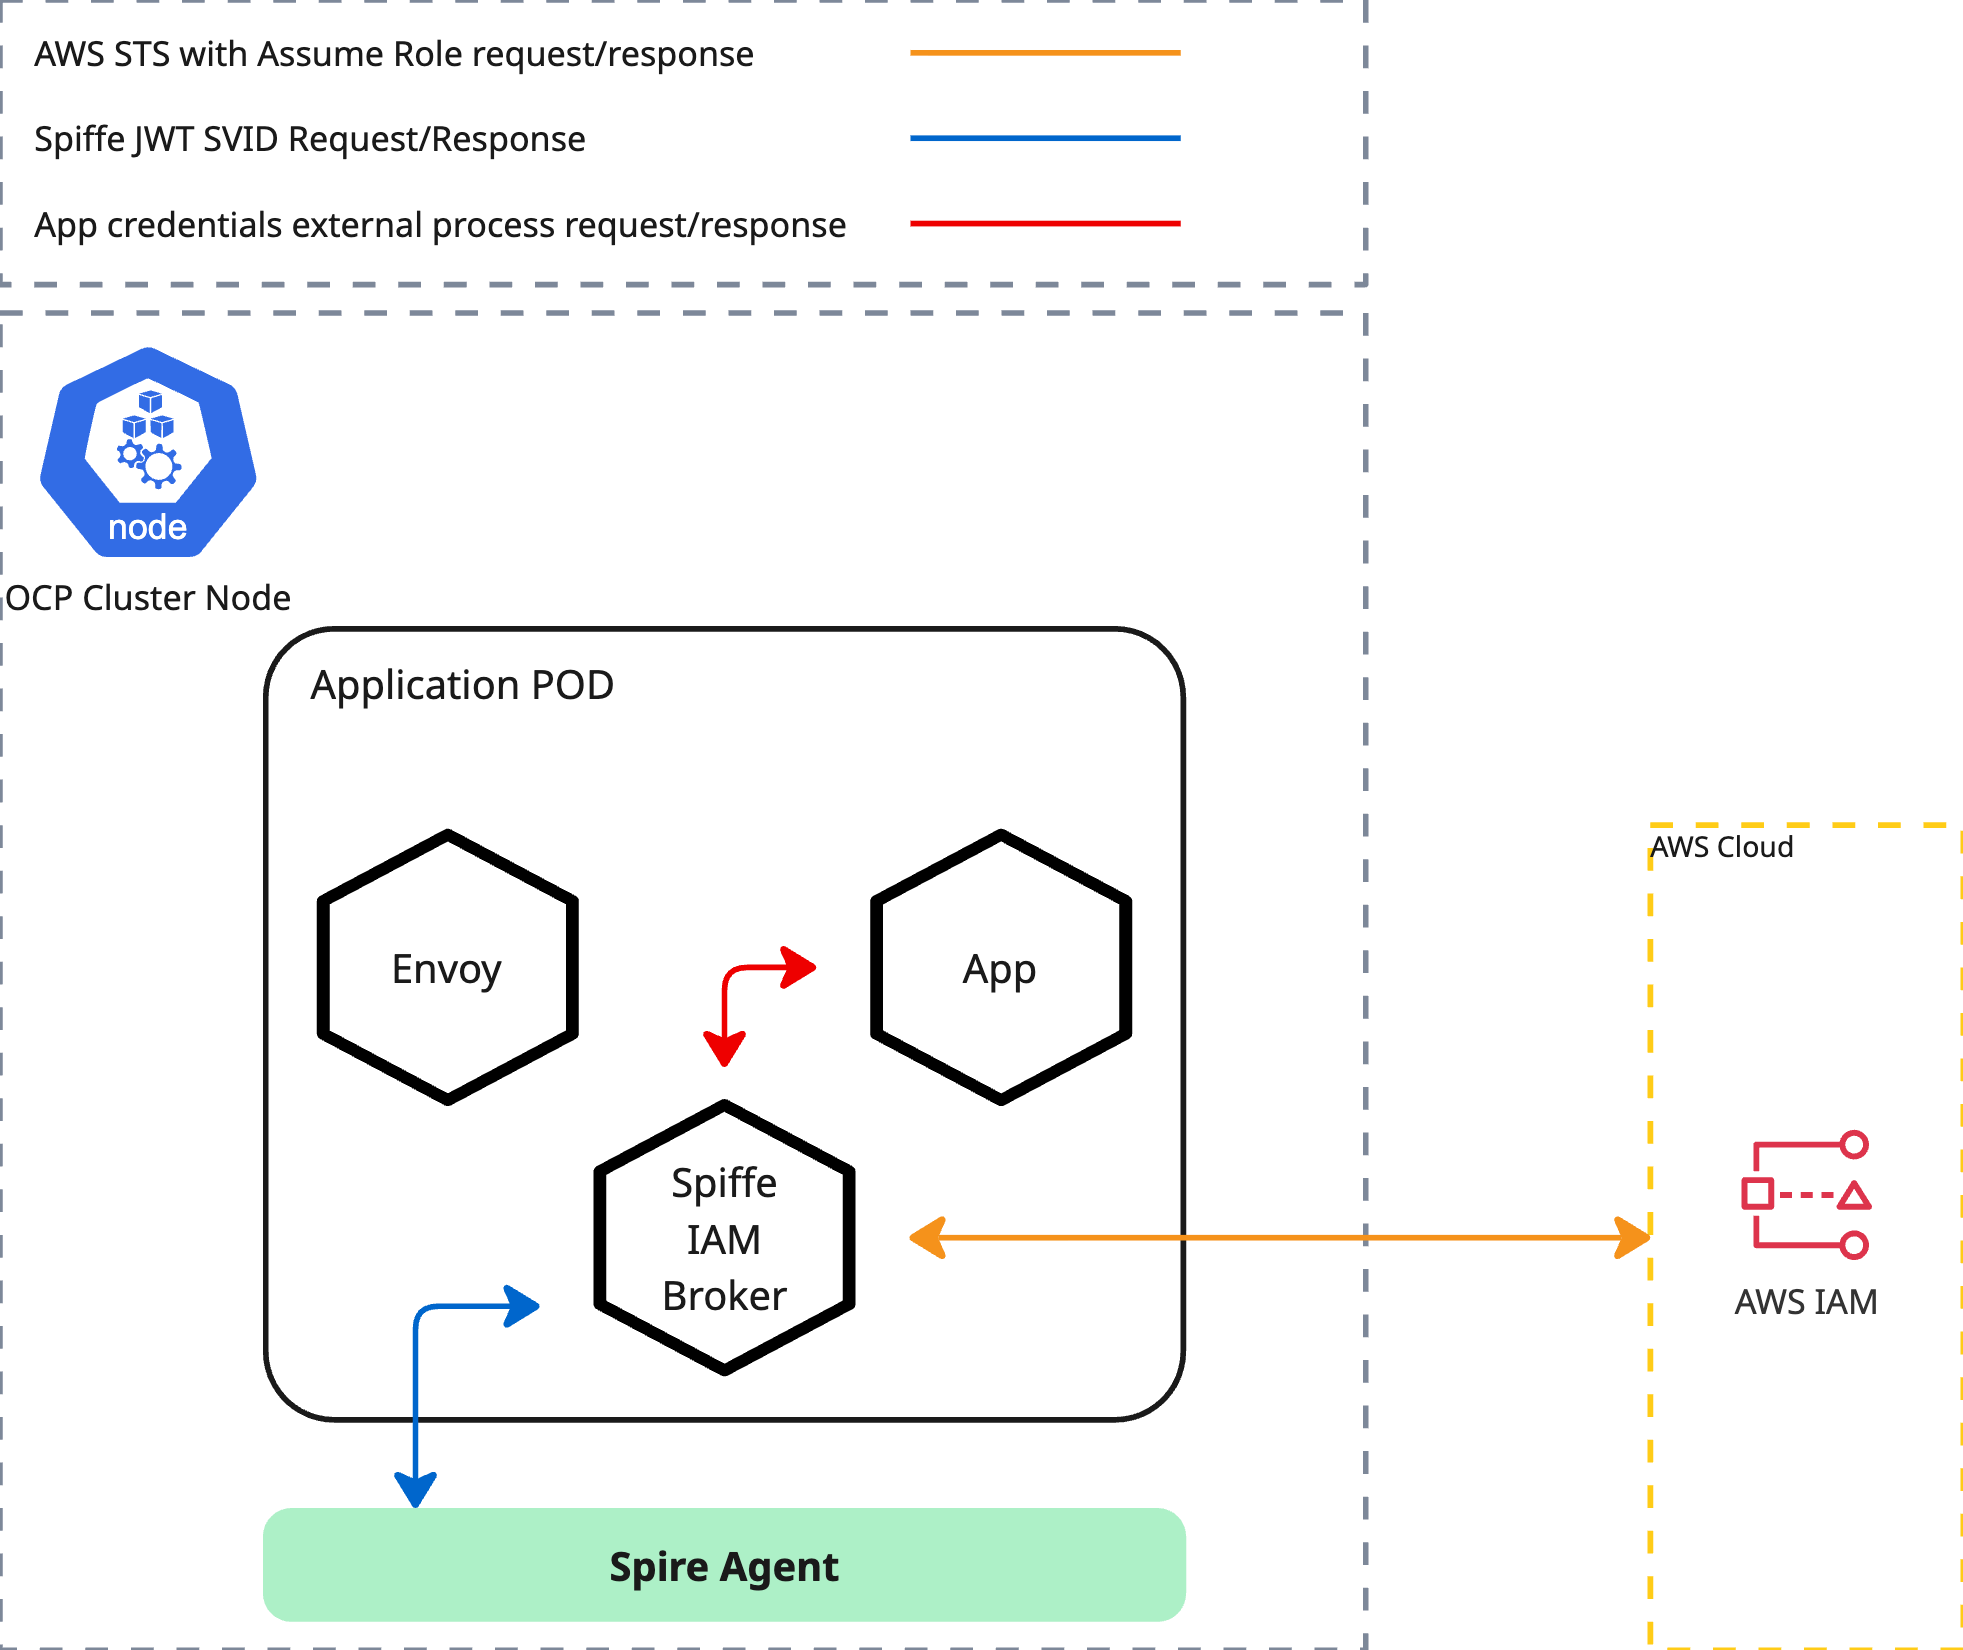
We'll demonstrate this using aws-cli as a sample application. The deployment manifest provided below does not contain any AWS credentials; it only specifies the default region and a credential_process pointing to http://localhost:9876/v1/creds.
For this external credential process, we utilize Spiffe-Iam-Broker. This tool's function is to retrieve the JWT SVID from the spire-agent and then assume an appropriate role within AWS IAM. The necessary audience and Role ARN are sourced from annotations defined in the deployment artifact. The spiffe-iam-broker is injected into the pod alongside the Istio sidecar. Access to the spiffe-iam-broker is strictly limited to other containers running within the same pod.
export ROLE_ARN=$(aws iam get-role --role-name "${ROLE_NAME}" | jq -r .Role.Arn)
cat <<EOF | oc apply -f -
apiVersion: v1
kind: ServiceAccount
metadata:
  name: aws-cli
  namespace: ${TPJ}
---
apiVersion: v1
kind: ConfigMap
metadata:
  name: aws-config
  namespace: ${TPJ}
data:
  config: |
    [profile default]
    region = eu-north-1
    credential_process = curl -s http://localhost:9876/v1/creds
---
apiVersion: apps/v1
kind: Deployment
metadata:
  name: aws-cli
  namespace: ${TPJ}
spec:
  replicas: 1
  selector:
    matchLabels:
      app: aws-cli
  template:
    metadata:
      annotations:
        inject.istio.io/templates: "sidecar,spire"
        spiffe.io/audience: "${SPIFFE_AUDIENCE}"
        spiffe.io/roleArn: "${ROLE_ARN}"
      labels:
        app: aws-cli
    spec:
      terminationGracePeriodSeconds: 0
      serviceAccountName: aws-cli
      containers:
      - name: aws-cli
        image: public.ecr.aws/aws-cli/aws-cli
        env:
        - name: AWS_CONFIG_FILE
          value: /tmp/aws/config
        command:
        - /bin/sh
        - -c
        - sleep inf
        imagePullPolicy: IfNotPresent
        volumeMounts:
        - name: aws-config
          mountPath: "/tmp/aws"
          readOnly: true
      volumes:
      - name: aws-config
        configMap:
          name: aws-config
EOF
until oc get deployment aws-cli -n "${TPJ}" &> /dev/null; do sleep 3; done
oc wait --for=condition=Available deployment/aws-cli -n "${TPJ}" --timeout=300s
Verify AWS access:
export ROLE_ARN=$(aws iam get-role --role-name "${ROLE_NAME}" | jq -r .Role.Arn)
oc exec -it \
  "$(oc get \
      pods -o=jsonpath='{.items[0].metadata.name}' \
      -l app=aws-cli \
      -n "${TPJ}" \
   )" -n "${TPJ}" -- \
  aws dynamodb list-tables
If everything has been configured correctly, you should be able to see the list of DynamoDB tables.
Example output:
{
    "TableNames": [
        "SkyCompTest"
    ]
}
Summary
By implementing the zero trust workload identity manager and Red Hat OpenShift Service Mesh, you have moved beyond the cluster to connect cloud-native workloads with external infrastructure. This architecture replaces static credentials and hardcoded secrets with short-lived, verifiable identities that are automatically rotated and attested.
