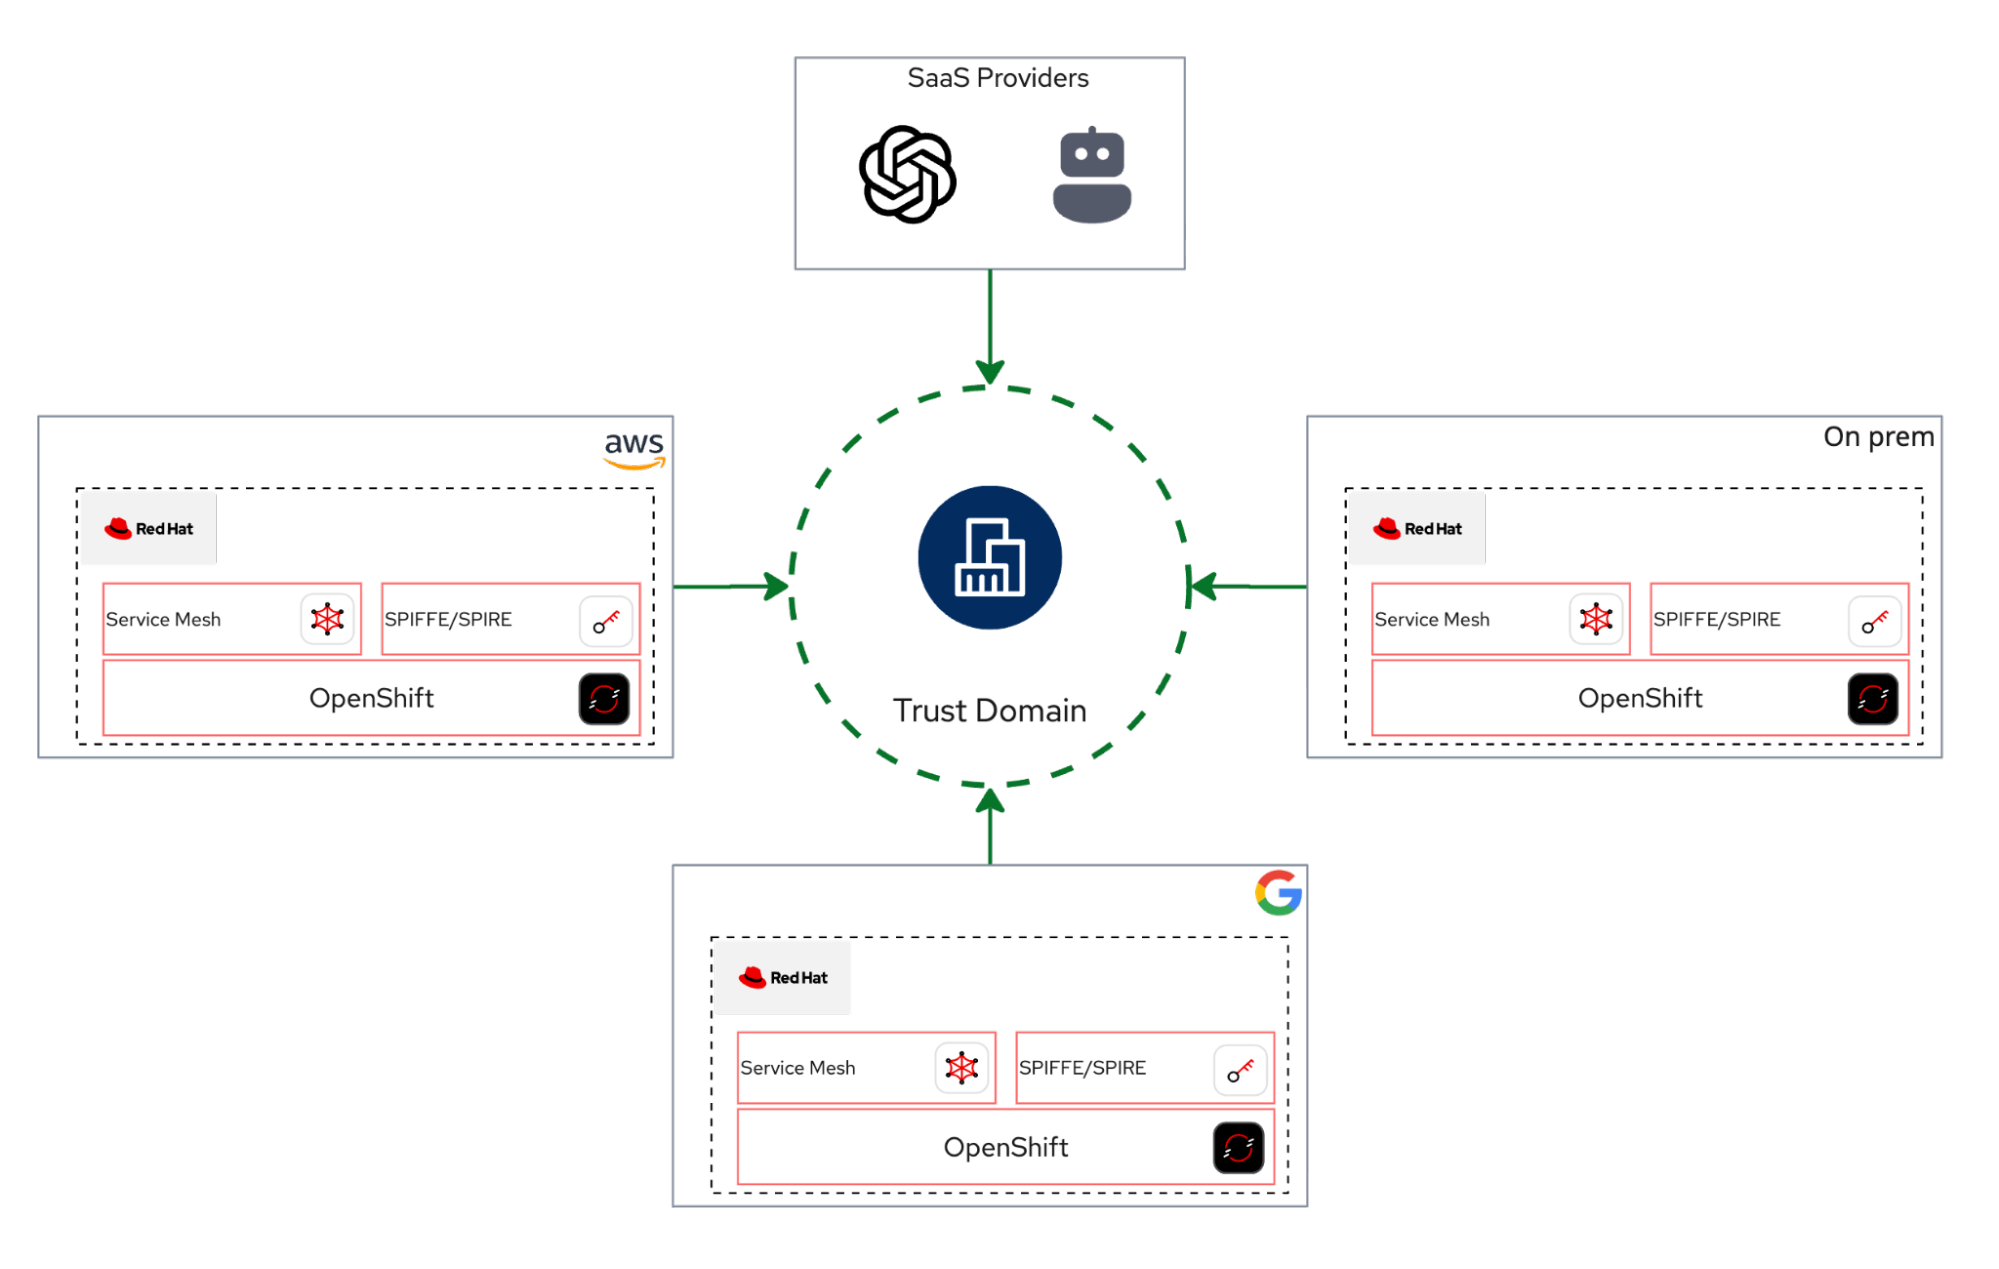
The cloud computing landscape is vast and complex. While dominant public cloud providers like AWS, Google Cloud, and Microsoft Azure lead the market, they coexist with a multitude of smaller providers. Modern IT infrastructure also relies heavily on a diverse ecosystem of SaaS applications. Simultaneously, many organizations continue to operate their own on-premise data centers and private clouds to meet specific needs. This hybrid environment persists because each model—public, private, and SaaS—remains viable by addressing distinct business use cases.
However, this architectural diversity introduces a universal and significant challenge: integration complexity. The problem shifts from the viability of any single platform to the difficulty of creating consistent interoperability between them.
This challenge manifests in several critical areas. How easily does an on-premise cloud interoperate with a single public loud provider, let alone several? How rapidly can teams achieve bidirectional integration between private data centers, multiple cloud providers, and a growing portfolio of SaaS applications? As more services are added, the complexity scales exponentially. Consequently, establishing consistent, native authentication, and secure network access across these disparate environments, each with its own security and identity model, can become a major logistical challenge.
Now, let's explore how to solve these complex integration challenges. This two-part series demonstrates how Red Hat OpenShift, Red Hat OpenShift Service Mesh, and the zero trust workload identity manager (powered by SPIFFE) work together to build a unified multicloud environment.
The triangle
To understand this solution, let's first clarify the role each technology plays in this integration triangle:
- The platform: OpenShift acts as the foundational, hybrid-cloud application platform. Think of it as the "operating system" for cloud-native applications, providing a consistent environment anywhere.
- The network: OpenShift Service Mesh serves as the application-level network orchestrator. It controls how services communicate, independent of the underlying cloud network.
- The identity: The zero trust workload identity manager (SPIFFE) completes the triad, acting as the universal identity provider. It is responsible for orchestrating and attesting workload identities across these disparate environments.
Trust domain and OpenShift Service Mesh
A trust domain is a logical boundary that encompasses various systems, services, or workloads. Within this domain, every participant must undergo attestation. Upon successful attestation, actors are issued a SPIFFE Verifiable Identity Document (SVID), which can take the form of an X.509 certificate or a JWT token. Any service mesh built on OpenShift Service Mesh can readily establish a trust domain, facilitating interconnection among diverse workloads, irrespective of their physical location.
About this guide
This post provides a practical guide for implementing architectures and solving problems using Red Hat OpenShift Service Mesh and the zero trust workload identity manager.
To make this guide more interactive, all scripts and automations have been integrated into a custom Claude.ai slash commands. You can follow along by cloning the GitHub repository, reviewing the scripts, and using Claude to guide you through the steps.
We will begin with a basic Hello World example. This initial example showcases the most basic functionalities of OpenShift Service Mesh and the zero trust workload identity manager. These features are built on complex architectural solutions that we explore later in this post.
Prerequisites
To follow this guide, you need:
- A Red Hat OpenShift cluster (version 4.20 or later).
- Cluster administrator access.
- The
istioctl,openssl,podman, andjqcommand-line utilities installed locally. - The zero trust workload identity manager operator, installed and configured for Red Hat OpenShift Service Mesh 3.x.
To quickly and simply integrate the zero trust workload identity manager with OpenShift Service Mesh, this post offers a condensed set of scripts. These scripts facilitate the installation of both the zero trust workload identity manager and OpenShift Service Mesh 3.x and its straightforward integration between them. For complete and official zero trust workload identity manager documentation, refer to the official documentation.
Install the zero trust workload identity manager
Define installation environment variables:
export ZTWIM_NS=zero-trust-workload-identity-manager
export TRUST_DOMAIN=sky.computing.ocp.one
export JWT_ISSUER="https://oidc-discovery.$(oc get ingresses.config/cluster -o jsonpath={.spec.domain})"
Deploy the zero trust workload identity manager operator:
oc new-project "$ZTWIM_NS"
oc apply -f - <<EOF
apiVersion: operators.coreos.com/v1
kind: OperatorGroup
metadata:
  name: openshift-zero-trust-workload-identity-manager
  namespace: $ZTWIM_NS
spec:
  upgradeStrategy: Default
EOF
oc apply -f - <<EOF
apiVersion: operators.coreos.com/v1alpha1
kind: Subscription
metadata:
  name: openshift-zero-trust-workload-identity-manager
  namespace: $ZTWIM_NS
spec:
  channel: stable-v1
  name: openshift-zero-trust-workload-identity-manager
  source: redhat-operators
  sourceNamespace: openshift-marketplace
  installPlanApproval: Automatic
EOF
oc -n "$ZTWIM_NS" patch subscription \
  openshift-zero-trust-workload-identity-manager \
  --type='merge' -p '{"spec":{"config":{"env":[{"name":"CREATE_ONLY_MODE","value":"true"}]}}}'
until oc get deployment zero-trust-workload-identity-manager-controller-manager  -n "${ZTWIM_NS}" &> /dev/null; do sleep 3; done;
oc wait --for=condition=Available deployment/zero-trust-workload-identity-manager-controller-manager -n "${ZTWIM_NS}" --timeout=300s
Install the
ZeroTrustWorkloadIdentityManagerCR:oc apply -f - <<EOF apiVersion: operator.openshift.io/v1alpha1 kind: ZeroTrustWorkloadIdentityManager metadata: name: cluster labels: app.kubernetes.io/name: zero-trust-workload-identity-manager app.kubernetes.io/managed-by: zero-trust-workload-identity-manager spec: trustDomain: ${TRUST_DOMAIN} clusterName: "sky-computing-cluster" bundleConfigMap: "spire-bundle" EOFDeploy Spire Server. For the purposes of this guide, we will deploy SpireServer utilizing an sqlite3 database. It is important to note that, as specified in the official zero trust workload identity manager documentation, a PostgreSQL database should be used for a production deployment.
cat <<EOF | oc apply -f -
apiVersion: operator.openshift.io/v1alpha1
kind: SpireServer
metadata:
  name: cluster
spec:
  logLevel: "info"
  logFormat: "text"
  jwtIssuer: $JWT_ISSUER
  caValidity: "24h"
  defaultX509Validity: "1h"
  defaultJWTValidity: "5m"
  jwtKeyType: "rsa-2048"
  caSubject:
    country: "US"
    organization: "Sky Computing Corporation"
    commonName: "SPIRE Server CA"
  persistence:
    size: "5Gi"
    accessMode: "ReadWriteOnce"
  datastore:
    databaseType: "sqlite3"
    connectionString: "/run/spire/data/datastore.sqlite3"
    tlsSecretName: ""
    maxOpenConns: 100
    maxIdleConns: 10
    connMaxLifetime: 0
    disableMigration: "false"
EOF
kubectl rollout restart statefulset/spire-server -n "${ZTWIM_NS}"
kubectl rollout status statefulset/spire-server -n "${ZTWIM_NS}" --timeout=300s
Deploy Spire Agent:
cat <<EOF | oc apply -f -
apiVersion: operator.openshift.io/v1alpha1
kind: SpireAgent
metadata:
  name: cluster
spec:
  socketPath: "/run/spire/agent-sockets"
  logLevel: "info"
  logFormat: "text"
  nodeAttestor:
    k8sPSATEnabled: "true"
  workloadAttestors:
    k8sEnabled: "true"
    workloadAttestorsVerification:
      type: "auto"
      hostCertBasePath: "/etc/kubernetes"
      hostCertFileName: "kubelet-ca.crt"
    disableContainerSelectors: "false"
    useNewContainerLocator: "true"
EOF
until oc get daemonset/spire-agent -n "${ZTWIM_NS}" &> /dev/null; do sleep 3; done
kubectl rollout status daemonset/spire-agent -n "${ZTWIM_NS}" --timeout=300s
Deploy SpiffeCSIDriver:
cat <<EOF | oc apply -f -
apiVersion: operator.openshift.io/v1alpha1
kind: SpiffeCSIDriver
metadata:
  name: cluster
spec:
  agentSocketPath: '/run/spire/agent-sockets'
  pluginName: "csi.spiffe.io"
EOF
until oc get daemonset/spire-spiffe-csi-driver -n "${ZTWIM_NS}" &> /dev/null; do sleep 3; done
kubectl rollout status daemonset/spire-spiffe-csi-driver -n "${ZTWIM_NS}" --timeout=300s
Deploy SpireOIDCDiscoveryProvider:
# Create SpireOIDCDiscoveryProvider
cat <<EOF | oc apply -f -
apiVersion: operator.openshift.io/v1alpha1
kind: SpireOIDCDiscoveryProvider
metadata:
  name: cluster
spec:
  logLevel: "info"
  logFormat: "text"
  csiDriverName: "csi.spiffe.io"
  jwtIssuer: $JWT_ISSUER
  replicaCount: 1
  managedRoute: "true"
EOF
# wait for the deployment being created
until oc get deployment spire-spiffe-oidc-discovery-provider -n "${ZTWIM_NS}" &> /dev/null; do sleep 3; done
# wait for deployment to be ready
oc wait --for=condition=Available deployment/spire-spiffe-oidc-discovery-provider -n "${ZTWIM_NS}" --timeout=300s
Verify zero trust workload identity manager deployment:
cat <<EOF | oc apply -f -
apiVersion: apps/v1
kind: Deployment
metadata:
  name: ztwim-client
  namespace: default
  labels:
    app: ztwim-client
spec:
  selector:
    matchLabels:
      app: ztwim-client
  template:
    metadata:
      labels:
        app: ztwim-client
    spec:
      containers:
        - name: client
          image: registry.redhat.io/zero-trust-workload-identity-manager/spiffe-spire-agent-rhel9@sha256:54865d9de74a500528dcef5c24dfe15c0baee8df662e76459e83bf9921dfce4e
          command: ["/spire-agent"]
          args: [ "api", "watch",  "-socketPath", "/run/spire/sockets/spire-agent.sock" ]
          volumeMounts:
            - mountPath: /run/spire/sockets
              name: spiffe-workload-api
              readOnly: true
      volumes:
      - name: spiffe-workload-api
        csi:
          driver: csi.spiffe.io
          readOnly: true
EOF
until oc get deployment ztwim-client -n default &> /dev/null; do sleep 3; done
oc wait --for=condition=Available deployment/ztwim-client -n default --timeout=300s
Once the
ztwim-clientpod is running, run the following command:oc exec -it \ $(oc get \ pods -o=jsonpath='{.items[0].metadata.name}' \ -l app=ztwim-client \ -n default \ ) -n default -- \ /spire-agent api fetch -socketPath /run/spire/sockets/spire-agent.sockIf everything was configured correctly, you should be able to see the similar output:
Received 1 svid after 12.811008ms
SPIFFE ID:        spiffe://sky.computing.ocp.one/ns/default/sa/default
SVID Valid After:    2025-12-03 08:21:53 +0000 UTC
SVID Valid Until:    2025-12-03 09:22:03 +0000 UTC
CA #1 Valid After:    2025-12-03 07:28:44 +0000 UTC
CA #1 Valid Until:    2025-12-04 07:28:54 +0000 UTC
Install Red Hat OpenShift Service Mesh
Define installation environment variables:
export ZTWIM_NS=zero-trust-workload-identity-manager
export TRUST_DOMAIN=sky.computing.ocp.one
export JWT_ISSUER="https://oidc-discovery.$(oc get ingresses.config/cluster -o jsonpath={.spec.domain})"
export OSSM_CNI=istio-cni
export EXTRA_ROOT_CA="$(oc get secret oidc-serving-cert \
                         -n ${ZTWIM_NS} -o json | \
                         jq -r '.data."tls.crt"' | \
                         base64 -d | \
                         sed 's/^/        /')"
export OSSM_NS=istio-system
export VERIFY_NS=verify-ossm-ztwim
Deploy OpenShift Service Mesh .x Operator:
# Install OSSM3.x operator
oc apply -f - <<EOF
apiVersion: operators.coreos.com/v1alpha1
kind: Subscription
metadata:
  name: servicemeshoperator3
  namespace: openshift-operators
spec:
  channel: stable
  installPlanApproval: Automatic
  name: servicemeshoperator3
  source: redhat-operators
  sourceNamespace: openshift-marketplace
EOF
# Wait till the OSSM operator has been installed successfully
until oc get deployment servicemesh-operator3 -n openshift-operators &> /dev/null; do sleep 3; done
oc wait --for=condition=Available deployment/servicemesh-operator3 -n openshift-operators --timeout=300s
Deploy IstioCNI:
# Create projects for istiod and istio-cni oc new-project "${OSSM_CNI}" # Create IstioCNI and wait till it successfully installed oc apply -f - <<EOF apiVersion: sailoperator.io/v1 kind: IstioCNI metadata: name: default spec: namespace: ${OSSM_CNI} EOF until oc get daemonset/istio-cni-node -n "${OSSM_CNI}" &> /dev/null; do sleep 3; done kubectl rollout status daemonset/istio-cni-node -n "${OSSM_CNI}" --timeout=300s- Define the trust domain. Note the trust domain must be exactly the same as was defined for the zero trust workload identity manager.
- Deploy Istiod. When installing Istio with the zero trust workload identity manager, three configuration options are crucial:
- The sidecar injector webhook template must define the Persistent Volume (PV) and mount points for the Spire Agent socket.
- Pilot needs to be configured to use a remote JSON Web Key Set (JWKS) server for validating JSON Web Token (JWT) SVIDs. The extra root CA is defined in previous step and stored inside the
EXTRA_ROOT_CAenvironment variable - Ensure the SPIRE workload identity SDS socket filename is set to spire-agent.sock. This value must correspond to the configuration in the Spire-Agent setup.
Create
Istioresource:oc new-project "${OSSM_NS}" 2>/dev/null || oc project "${OSSM_NS}" # Create Istiod cat <<EOF | oc apply -f - apiVersion: sailoperator.io/v1 kind: Istio metadata: name: default spec: namespace: istio-system updateStrategy: type: InPlace values: pilot: jwksResolverExtraRootCA: | ${EXTRA_ROOT_CA} env: PILOT_JWT_ENABLE_REMOTE_JWKS: "true" meshConfig: trustDomain: $TRUST_DOMAIN defaultConfig: proxyMetadata: WORKLOAD_IDENTITY_SOCKET_FILE: "spire-agent.sock" sidecarInjectorWebhook: templates: spire: | spec: initContainers: - name: istio-proxy volumeMounts: - name: workload-socket mountPath: /run/secrets/workload-spiffe-uds readOnly: true - name: spiffe-iam-broker image: dimssss/spiffe-iam-broker:latest args: - aws restartPolicy: Always ports: - containerPort: 9876 name: broker-http env: - name: SPIFFE_IAM_BROKER_AUDIENCE valueFrom: fieldRef: fieldPath: metadata.annotations['spiffe.io/audience'] - name: SPIFFE_IAM_BROKER_ROLE_ARN valueFrom: fieldRef: fieldPath: metadata.annotations['spiffe.io/roleArn'] volumeMounts: - name: workload-socket mountPath: /run/secrets/workload-spiffe-uds readOnly: true - name: envoy-jwt-auth-helper image: dimssss/envoy-jwt-auth-helper:latest restartPolicy: Always env: - name: SPIRE_ENVOY_JWT_HELPER_AUDIENCE valueFrom: fieldRef: fieldPath: metadata.annotations['spiffe.io/audience'] - name: SPIRE_ENVOY_JWT_HELPER_JWT_MODE value: jwt_injection - name: SPIRE_ENVOY_JWT_HELPER_SOCKET_PATH value: unix:///run/secrets/workload-spiffe-uds/socket volumeMounts: - name: workload-socket mountPath: /run/secrets/workload-spiffe-uds readOnly: true volumes: - name: workload-socket csi: driver: "csi.spiffe.io" readOnly: true EOF # Wait till it successfully installed until oc get deployment istiod -n "${OSSM_NS}" &> /dev/null; do sleep 3; done oc wait --for=condition=Available deployment/istiod -n "${OSSM_NS}" --timeout=300sA note about Istio deployment: The configuration for enabling remote JSON Web Key Set (JWKS) resolution and SPIRE integration involves several steps:
PILOT_JWT_ENABLE_REMOTE_JWKS: This setting instructs Istio to utilize a remote JWKS server for JWT validation.jwksResolverExtraRootCA: The Root CA of the OIDC Discovery provider must be supplied here. In this case, it's the Root CA for the Spire SPIFFE OIDC Discovery Provider, which was deployed previously.- SPIRE Sidecar Injection: The injection template includes two sidecar containers:
- The
istio-proxymounts the SPIFFE agent workload API socket so that it is accessible to the Envoy proxy. - The
envoy-jwt-auth-helperfunctions as an Envoy external authorization (ext-authz) filter. This component enables the injection of JWT SVIDs into requests based on the configured EnvoyFilter resource.
- The
WORKLOAD_IDENTITY_SOCKET_FILE: This settings instruct Istio to usespire-agent.sockas a socket name when connecting to the SpireAgent SDS server.
Verify OpenShift Service Mesh installation:
# create a project for verification
export VERIFY_NS=verify-ossm-ztwim
oc new-project ${VERIFY_NS}
# enable sidecar injection
oc label namespace ${VERIFY_NS} istio-injection=enabled
# create httpbin workload
cat <<EOF | oc apply -f -
apiVersion: apps/v1
kind: Deployment
metadata:
  name: httpbin
  namespace: ${VERIFY_NS}
spec:
  replicas: 1
  selector:
    matchLabels:
      app: httpbin
      version: v1
  template:
    metadata:
      annotations:
        inject.istio.io/templates: "sidecar,spire"
        spiffe.io/audience: "sky-computing-demo"
      labels:
        app: httpbin
        version: v1
    spec:
      containers:
      - image: docker.io/mccutchen/go-httpbin:v2.15.0
        imagePullPolicy: IfNotPresent
        name: httpbin
        ports:
        - containerPort: 8080
EOF
until oc get deployment httpbin -n ${VERIFY_NS} &> /dev/null; do sleep 3; done
oc wait --for=condition=Available deployment/httpbin -n ${VERIFY_NS} --timeout=300s
# Verify ZTWIM identity
HTTPBIN_POD=$(oc get pod -l app=httpbin -n ${VERIFY_NS} -o jsonpath="{.items[0].metadata.name}")
istioctl proxy-config secret "$HTTPBIN_POD" -n ${VERIFY_NS} -o json | jq -r  '.dynamicActiveSecrets[0].secret.tlsCertificate.certificateChain.inlineBytes' | base64  --decode > chain.pem
 openssl x509 -in chain.pem -text | grep SPIRE
If everything was configured correctly, you should be able to see the similar output:
Issuer: C=US, O=Sky Computing Corporation, CN=SPIRE Server CA/serialNumber=250779082656591811209950349554769274176
Subject: C=US, O=SPIRE
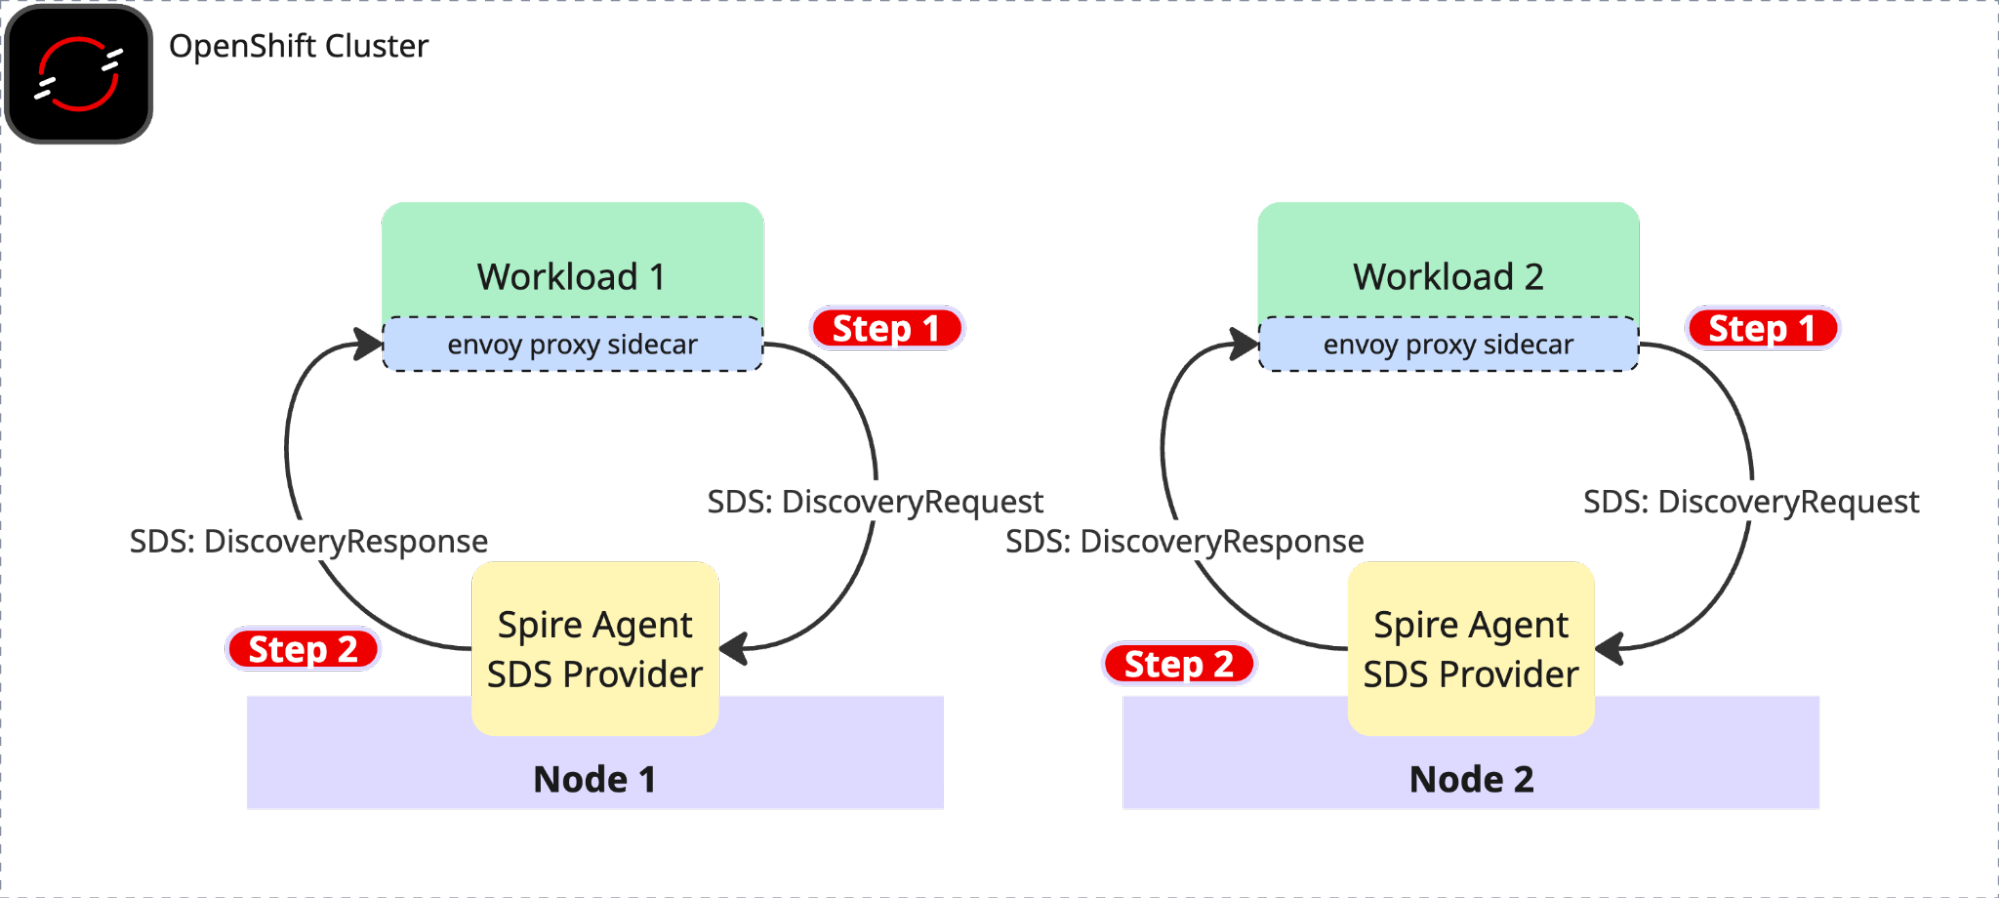
Protect the mesh with the zero trust workload identity manager and X.509 SVIDs (mTLS)
In this scenario we'll deploy client (curl) and server (httpbin) and validate mTLS connectivity between the two services.
How is this scenario different from the classic one?
- X.509 certificates are no longer managed by Istiod.
- X.509 certificates came in form of SPIFFE X.509 SVIDs based on workload attestation.
- SVIDs are rotated automatically each 5 minutes by default.
Create a new test project:
export TPJ=test-ossm-with-ztwim
oc create namespace ${TPJ}
oc label namespace ${TPJ} istio-injection=enabled
Create
httpbinservice:cat <<EOF | oc apply -f - apiVersion: v1 kind: ServiceAccount metadata: name: httpbin namespace: ${TPJ} --- apiVersion: v1 kind: Service metadata: name: httpbin namespace: ${TPJ} labels: app: httpbin service: httpbin spec: ports: - name: http-ex-spiffe port: 443 targetPort: 8080 - name: http port: 80 targetPort: 8080 selector: app: httpbin --- apiVersion: apps/v1 kind: Deployment metadata: name: httpbin namespace: ${TPJ} spec: replicas: 1 selector: matchLabels: app: httpbin version: v1 template: metadata: annotations: inject.istio.io/templates: "sidecar,spire" spiffe.io/audience: "sky-computing-demo" labels: app: httpbin version: v1 spec: serviceAccountName: httpbin containers: - image: docker.io/mccutchen/go-httpbin:v2.15.0 imagePullPolicy: IfNotPresent name: httpbin ports: - containerPort: 8080 EOF until oc get deployment httpbin -n ${TPJ} &> /dev/null; do sleep 3; done oc wait --for=condition=Available deployment/httpbin -n ${TPJ} --timeout=300sCreate
curlclient:cat <<EOF | oc apply -f - apiVersion: v1 kind: ServiceAccount metadata: name: curl namespace: ${TPJ} --- apiVersion: v1 kind: Service metadata: name: curl namespace: ${TPJ} labels: app: curl service: curl spec: ports: - port: 80 name: http selector: app: curl --- apiVersion: apps/v1 kind: Deployment metadata: name: curl namespace: ${TPJ} spec: replicas: 1 selector: matchLabels: app: curl template: metadata: annotations: inject.istio.io/templates: "sidecar,spire" spiffe.io/audience: "sky-computing-demo" labels: app: curl spec: terminationGracePeriodSeconds: 0 serviceAccountName: curl containers: - name: curl image: curlimages/curl:8.16.0 command: - /bin/sh - -c - sleep inf imagePullPolicy: IfNotPresent EOF until oc get deployment curl -n ${TPJ} &> /dev/null; do sleep 3; done oc wait --for=condition=Available deployment/curl -n ${TPJ} --timeout=300sMake a clear text http call. Currently, Istio is configured with default PERMISSIVE mode. Try to make http call without mTLS first:
CURL_POD=$(oc get pod -l app=curl -n ${TPJ} -o jsonpath="{.items[0].metadata.name}")
oc exec $CURL_POD -n ${TPJ} -it -- curl -s -o /dev/null -w "%{http_code}" http://httpbin
You should get the HTTP 200 status code.
Strict PeerAuthentication
Now, let's enable mTLS between two services.
We'll set PeerAuthentication to STRICT and will define two appropriate DestinationRules:
cat <<EOF | oc apply -f -
apiVersion: security.istio.io/v1beta1
kind: PeerAuthentication
metadata:
  name: default
  namespace: ${TPJ}
spec:
  mtls:
    mode: STRICT
---
apiVersion: networking.istio.io/v1
kind: DestinationRule
metadata:
  name: curl
  namespace: ${TPJ}
spec:
  host: curl
  trafficPolicy:
    tls:
      mode: ISTIO_MUTUAL
---
apiVersion: networking.istio.io/v1
kind: DestinationRule
metadata:
  name: httpbin
  namespace: ${TPJ}
spec:
  host: httpbin
  trafficPolicy:
    tls:
      mode: ISTIO_MUTUAL
---
EOF
If you repeat the curl request, you should receive an HTTP 200 OK response.
CURL_POD=$(oc get pod -l app=curl -n ${TPJ} -o jsonpath="{.items[0].metadata.name}")
oc exec $CURL_POD -n ${TPJ} -it -- curl -s -o /dev/null -w "%{http_code}" http://httpbin
Protect the mesh with SPIFFE X.509 and JWT SVIDs
Having previously covered mutual TLS (mTLS) connections using X.509 SVIDs, this section will now demonstrate how to protect services with JWT SVID tokens.
Prerequisites:
- Make sure the httpbin service and the curl client are deployed
- Make sure Istio strict peer authentication rules are set.
- Ensure you are able to make a successful request from
curltohttpbinservice
Add
RequestAuthenticationandAuthorizationPolicy:export JWT_ISSUER="https://oidc-discovery.$(oc get ingresses.config/cluster -o jsonpath={.spec.domain})" cat <<EOF | oc apply -f - apiVersion: security.istio.io/v1 kind: RequestAuthentication metadata: name: httpbin namespace: ${TPJ} spec: selector: matchLabels: app: httpbin jwtRules: - issuer: "${JWT_ISSUER}" jwksUri: https://spire-spiffe-oidc-discovery-provider.${ZTWIM_NS}.svc/keys audiences: - sky-computing-demo forwardOriginalToken: true --- apiVersion: security.istio.io/v1 kind: AuthorizationPolicy metadata: name: httpbin namespace: ${TPJ} spec: selector: matchLabels: app: httpbin rules: - from: - source: requestPrincipals: ["${JWT_ISSUER}/*"] EOFMake http request:
CURL_POD=$(oc get pod -l app=curl -n ${TPJ} -o jsonpath="{.items[0].metadata.name}")
oc exec $CURL_POD -n ${TPJ} -it -- curl http://httpbin
Verify the failed request
The request failed with the expected "RBAC: access denied" error (code 403). This confirms the desired effect of the AuthorizationPolicy applied in the preceding step. To make a call from curl to httpbin, an authorization Bearer token is now required.
Automatically inject the JWT SVID
Because the necessary authorization Bearer token is missing, you must now choose a method to obtain and inject it. There are two ways to obtain and inject this Bearer token:
- Application-side implementation (SPIFFE Native): This involves creating a SPIFFE native application that programmatically fetches the token, perhaps by implementing a SPIFFE SDK, and explicitly adding the authorization header with the token.
- Istio injection: Istio can automatically inject the token using Envoy ext-authz.
This tutorial will use Istio to inject the JWT SVID. This approach is more effective as it eliminates the need to modify existing application code, unlike the SPIFFE native application method.
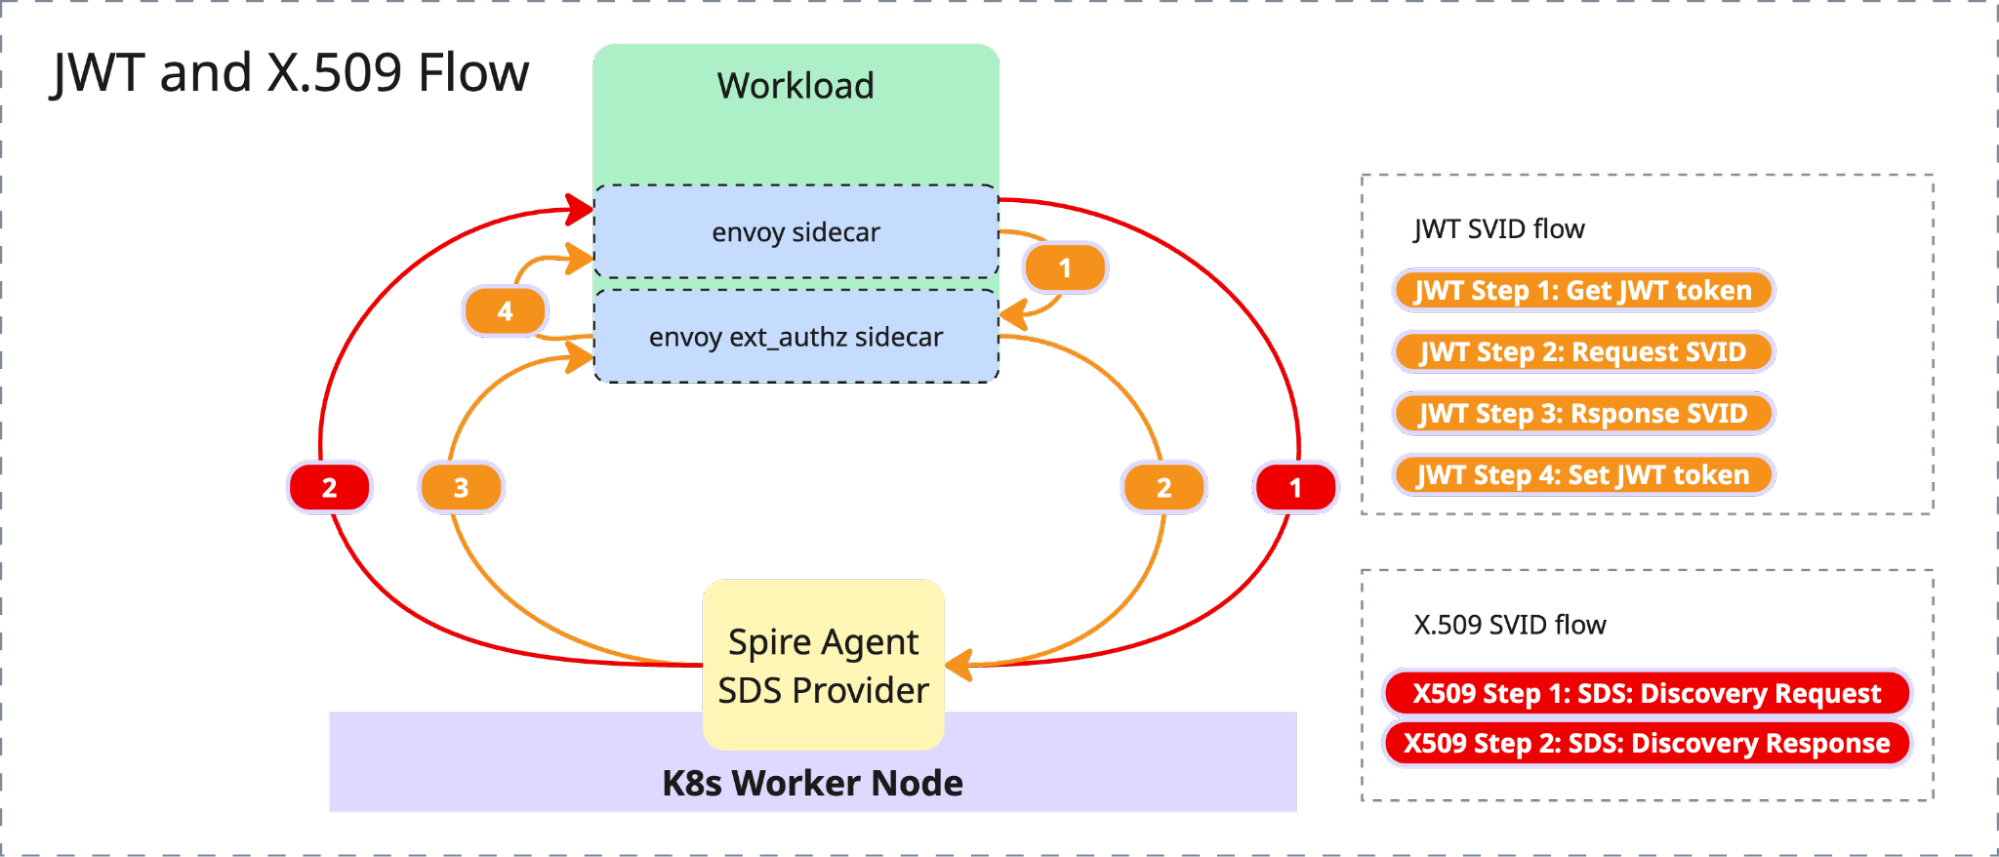
Enable JWT Bearer token injection
Deploy an EnvoyFilter to enable injection for the curl workload. In our implementation, the EnvoyFilter configures the Envoy ext_authz extension, which is responsible for automatically injecting the JWT token into each request.
cat <<EOF | oc apply -f -
apiVersion: networking.istio.io/v1alpha3
kind: EnvoyFilter
metadata:
  name: curl-ext-authz-sidecar
  namespace: ${TPJ}
spec:
  workloadSelector:
    labels:
      app: curl
  configPatches:
    - applyTo: HTTP_FILTER
      match:
        context: SIDECAR_OUTBOUND
        listener:
          filterChain:
            filter:
              name: "envoy.filters.network.http_connection_manager"
              subFilter:
                name: "envoy.filters.http.router"
      patch:
        operation: INSERT_BEFORE
        value:
          name: envoy.filters.http.ext_authz
          typed_config:
            "@type": type.googleapis.com/envoy.extensions.filters.http.ext_authz.v3.ExtAuthz
            transport_api_version: V3
            failure_mode_allow: false
            grpc_service:
              google_grpc:
                target_uri: 127.0.0.1:9010
                stat_prefix: "ext_authz"
              timeout: 0.5s
            include_peer_certificate: true
EOF
Make HTTP request:
CURL_POD=$(oc get pod -l app=curl -n ${TPJ} -o jsonpath="{.items[0].metadata.name}")
oc exec $CURL_POD -n ${TPJ} -it -- curl -s -o /dev/null -w "%{http_code}" http://httpbin
This time, the request should respond to HTTP 200 OK code.
Examine the JWT SVID by making another request:
CURL_POD=$(oc get pod -l app=curl -n ${TPJ} -o jsonpath="{.items[0].metadata.name}")
oc exec $CURL_POD -n ${TPJ} -it -- curl  http://httpbin/headers | jq .headers.Authorization
You can now copy/paste the token into JSON Web Token (JWT) Debugger and inspect the token details.
Summary
This article demonstrates the foundational steps to improve in-cluster workload security using x509 and JWT SVIDs. In part 2 of this series, we will extend this security model to external virtual machines and cloud services like AWS DynamoDB.