After being introduced to Linux containers and running a simple application, the next step seems obvious: How to get multiple containers running in order to put together an entire system. Although there are multiple solutions, the clear winner is Kubernetes. In this article, we'll look at how Kubernetes facilitates running multiple containers in a system.
- Build Your "Hello World" Container Using Java
- Build Your "Hello World" Container Using Node.js
- Build Your "Hello World" Container Using Ruby
- Build Your "Hello World" Container Using Go
- Build Your "Hello World" Container Using Python
- Build Your "Hello World" Container Using C#
For this article, we'll be running a web app that uses a service to determine your location based on your IP address. We'll run both apps in containers using Kubernetes, and we'll see how to make RESTful calls inside your cluster from one service (the web app) to another (the location app).
Prerequisites
Setting up your Kubernetes environment in MacOS was detailed in "How to set up your first Kubernetes environment on MacOS."
Setting up your Kubernetes environment in Windows was detailed in "How to set up your first Kubernetes environment on Windows."
Coders, start your engines
At the command line, run the following command to start Minishift and get a Kubernetes cluster on your local machine:
minishift start
...and, we're off.
Next, we'll establish a user account and give it a namespace in which to work. Rather than the more complicated Kubernetes method, we'll cheat a little bit and use Red Hat OpenShift for this:
oc login $(minishift ip):8443 -u admin -p admin
oc new-project test
Running Windows? Use these commands instead:
$m = minishift ip
oc login $m:8443 -u admin -p admin
oc new-project test
Start the microservice "locationms"
Get the first microservice, locationms, created and running by using the following command:
kubectl run locationms --image=quay.io/donschenck/locationms:v1 --label="app=locationms" --port=8080
This will take a few minutes to get running (based on your machine and internet speed). You can check on it by running the command kubectl get pods until you see that it's running.

Now that this is running inside our Kubernetes cluster, we need to make it into a service that can be scheduled, discovered and—ultimately—used by us.
kubectl --namespace=test expose deployment locationms --port=8080 --type=ClusterIP
This takes the microservice, which wants to run on port 8080, and maps it to a port on the node of our cluster. It creates a Kubernetes service. This allows multiple pods to run your image yet share the same port. You can see the service and the assigned port number by running the command kubectl get services:

In this example, our application's port 8080 is mapped to port 31482.
Without running kubectl proxy at the command line, we need to be able to access this service. Thus, we need the IP address of the node where it is running and the port where this service resides. The benefit of a service is that we can scale pods up and down and remove them and create new ones, yet this IP address:port combination will remain the same. That's good; that's how we can connect to it inside our cluster.
But we don't want an IP address in our code. We want a name. And we have one. Running the command kubectl describe service locationms will give us the information we need:
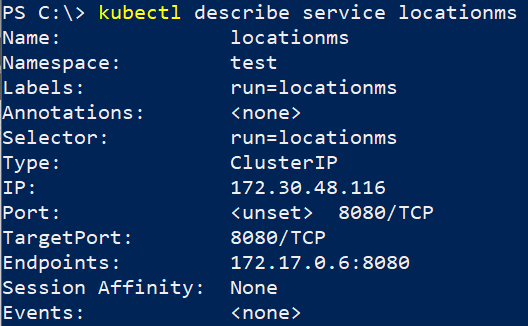
To get a resolvable name for inside of our Kubernetes cluster, we follow the format of <service-name>.<namespace>.svc. In this particular case, we end up with locationms.test.svc. This is the URI—well almost—we need for inside our web app. We will still need to specify the port of the locationms service, which is 8080. Given all that, here is our URI:
locationms.test.svc:8080/
Note that we do not need to be worried about the actual port—31482 in this case—because Kubernetes is nice enough to take care of the mapping. Regardless of whether the actual port changes, the name remains the same.
The web app
At this point, things are going to get more complicated and a bit deeper, but we'll find an easy path as well. Keep reading.
To deploy the web app, we're going to use a YAML file that describes the deployment. This file will contain, among other things, the URI we discovered in the previous section. Ever heard folks talk about "infrastructure as code"? This is an example. This (and other) configuration files should be stored in a version control system and should be treated as code. This is DevOps.
[Hint: Add that to your resume now.]
Here are the contents of mylocation-deployment.yaml:

Two things:
- That final line is the URI pointing to our locationms service inside of our Kubernetes cluster. You'll need to change that to match your case.
- I bet you'd rather not type all that. And that's why I put all the code in a GitHub repo: https://github.com/redhat-developer-demos/container-to-containers.git. You can download/fork/clone that.
- OK, I lied: three things. If you're a talented front-end designer, feel free to update the look of the web app and put in a pull request. It is open source, after all.
What's remaining?
We need to deploy the app and somehow get it exposed to the world so you can open it in your web browser. While this will run inside our Kubernetes cluster, we need to be able to access it outside of our cluster—in this example, from our host machine.
Deploy the web app
So, rather than use the kubectl run... command to start an image in a pod, we'll use the YAML file (above) to create this deployment. It includes the environment variable we need (locationms_url) to supply the proper URI for our location microservice.
Truth is, using YAML files is pretty much how you always want to manage your Kubernetes cluster.
Run this command to create a deployment and start a pod containing the web app:
kubectl apply -f mylocation-deployment.yaml
Next, we can make the web app into a service, much like we did with the location microservice:
kubectl expose deployment mylocation --port=80 --type=LoadBalancer
Then we get the port for the web app by running:
kubectl get services mylocation

In this case, the app's port 80 is mapped to port 32437.
Finally, we can get the public IP address of the web app by running this command:
kubectl cluster-info

Instead of running curl as before (but you can if you want to), we can open our browser to the IP address and port and see the web page. In this example, http://172.25.112.134:32437. That was not easy.
So, now we are running the web app and are using it in our browser, but it sure seemed like a huge amount of work. What's the payoff? Well, scaling and self-healing and rolling updates immediately come to mind.
Scale it
Kubernetes makes is simple to run multiple instances of the same app in pods. Run this command to run two pods of locationms:
kubectl scale deployment/locationms --replicas=2
Then see the second instance running with kubectl get pods

Of course, this is totally transparent to the web page. If you return and run the web app through multiple cycles, you won't see any changes.
Now scale it back to one: kubectl scale deployment/locationms --replicas=1
Delete it
Delete the web app by running the following commands:
kubectl get pods
(to get the name of the mylocation-* pod—which you'll use in the next command.)
kubectl delete pod/<pod-name>
Now you can refresh your browser and see that the site is down. But keep refreshing and—again, depending on your machine's speed—you'll see it come back. This self-healing feature is most helpful when you have several pods running the same microservice. If one of them dies, it will be replaced and you'll never see a change.
Update it
Now this is pretty cool: We're going to do a rolling update of the "locationms" microservice. We'll switch from locationms:v1 to locationms:v2. All we have to do is tell Kubernetes to use a different image, using this command:
kubectl set image deployment/locationms locationms=quay.io/donschenck/locationms:v2
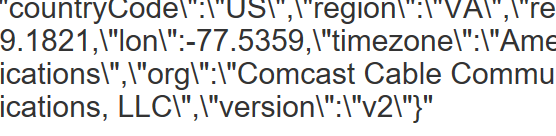
As you return and run the web app, in a short while you'll see new results. Version 2 appends a "version:v2" property to the JSON output:
An Easier Way?
Is there an easier way to do all this? Indeed, there is, including letting OpenShift do the heavy lifting. We'll discuss that in upcoming articles.
Last updated: August 1, 2023