You've probably already read about Quarkus, but you may not know that the superfast startup speed of Quarkus makes it the best candidate for working with Knative and serverless for your Function-as-a-Service (FaaS) projects.
Quarkus, also known as Supersonic, Subatomic Java, is a Kubernetes native Java stack tailored for GraalVM and OpenJDK HotSpot, crafted from the best-of-breed Java libraries and standards. Knative is a Kubernetes-based platform to build, deploy, and manage modern serverless workloads. You can learn more in this article series.
This article does not provide a full deep dive on Knative or Quarkus. Instead, I aim to give you a quick and easy way to start playing with both technologies so you can further explore on your own.
Prerequisites
In the following examples, I assume you've already installed a Minishift machine. Minishift is a tool that helps you run OKD locally by launching a single-node OKD cluster inside a virtual machine. With Minishift, you can try out OKD or develop with it, day-to-day, on your local machine (Linux, Windows, or Mac).
Please keep in mind that, in this example, I'm using the upstream version of Minishift; of course, you can replicate and run all the stuff on the Container Development Kit (CDK) by Red Hat.
I'll execute all the following commands as a cluster administrator in the Red Hat OpenShift environment. Thus, you should switch to an admin user before continuing.
Warm up the engines
To begin, we need to set up Knative on Minishift. To do this, we need to clone the Minishift add-ons for Knative by the OpenShift team:
$ git clone https://github.com/openshift-cloud-functions/minishift-addons
$ minishift addons install minishift-addons/knative-istio
$ minishift addons install minishift-addons/knative-build
$ minishift addons install minishift-addons/knative-serving
$ minishift addons install minishift-addons/knative-eventing
After that, we can start the installation process for the first add-on: knative-istio.
$ minishift addons apply knative-istio
Once that step is complete, you can install the Knative resources:
$ minishift addons apply knative-build
$ minishift addons apply knative-serving
$ minishift addons apply knative-eventing
When you've finished with all this setup, you should find a bunch of new pods running for enabling your Minishift to Knative:
$ oc get pods --all-namespaces
...
knative-build                          build-controller-85b9c8d7f-f6jj4                          1/1       Running     0          2m
knative-build                          build-webhook-66bfc7ffc8-8s9tq                            1/1       Running     0          2m
knative-eventing                       controller-manager-0                                      1/1       Running     0          1m
knative-eventing                       eventing-controller-7d69f6945b-mhrrj                      1/1       Running     0          1m
knative-eventing                       in-memory-channel-controller-569f959967-qkt96             1/1       Running     0          1m
knative-eventing                       in-memory-channel-dispatcher-c54844b75-5l7bv              1/1       Running     0          1m
knative-eventing                       webhook-667567bc86-fz4p7                                  1/1       Running     0          1m
knative-serving                        activator-5c8d4bbc9d-4mt6l                                1/1       Running     0          1m
knative-serving                        activator-5c8d4bbc9d-qw4jh                                1/1       Running     0          1m
knative-serving                        activator-5c8d4bbc9d-z65gt                                1/1       Running     0          1m
knative-serving                        autoscaler-5d6dcf98f8-pcmqb                               1/1       Running     0          1m
knative-serving                        controller-98c69fcc-xjwls                                 1/1       Running     0          1m
knative-serving                        webhook-68dc778cb5-xmgwm                                  1/1       Running     0          1m
Setting up a Containers Image Registry
Before playing with Knative Build, we should set up another prerequisite for this quickstart: a container image registry for our Quarkus Knative Build.
Unfortunately, as we'll see in few moments, the Quarkus quickstart example will generate (through Maven) Knative Build resources' files using Kaniko as the Knative Build template. I've tried to make Kaniko work with OpenShift internal registry but I had no luck with that. I also opened an issue on GitHub for reporting the behavior.
Unfortunately, Kaniko doesn't seem to play well with Quay.io Registry either. Another approach could be to move the Knative Build Template from Kaniko to Buildah.
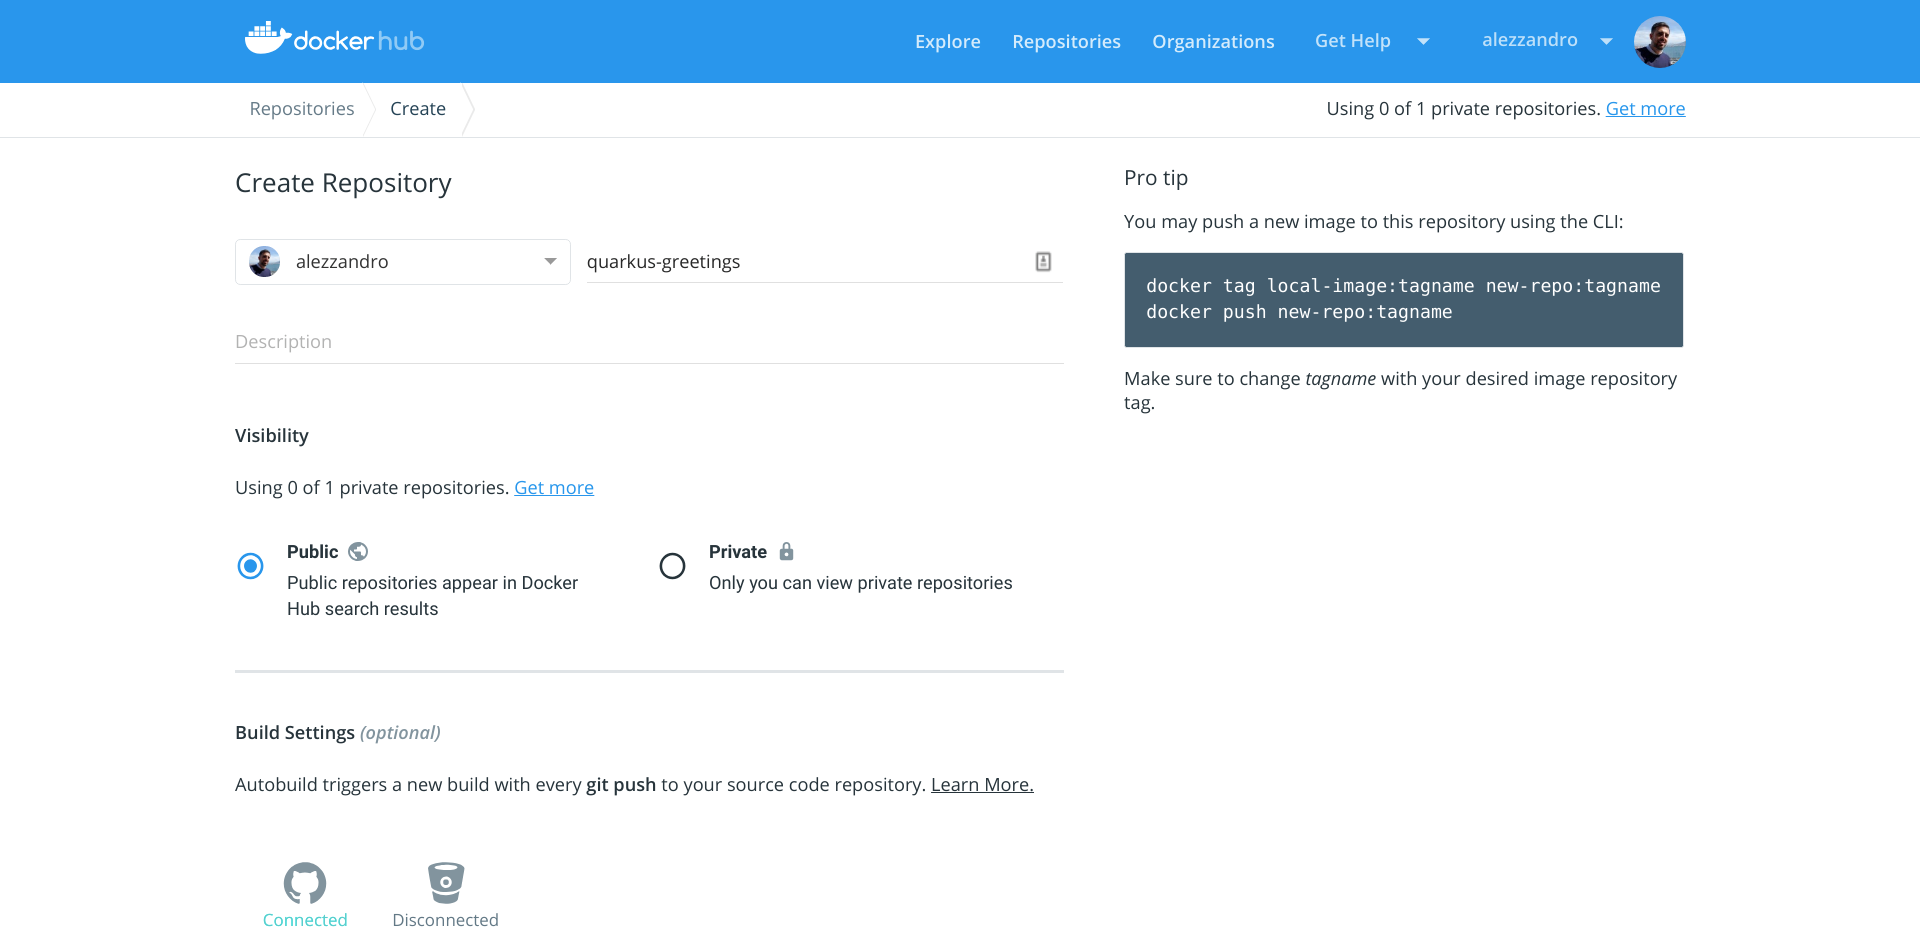
But, we want the easiest and fastest way for getting Knative and Quarkus up & running, for this reason, we'll use the Dockerhub online registry instead.
To start, log in or register to Dockerhub, and then you're ready to create your container repository, named quarkus-greetings.
We can now move forward with the Knative Build.
Quarkus Knative Build
We're now ready to check out the Quarkus quickstarts repo and start playing with Knative Build.
$ git clone https://github.com/quarkusio/quarkus-quickstarts
$ cd quarkus-quickstarts/getting-started-knative
Then we can execute the Maven command for building up the Kubernetes resources' files. We'll pass the following parameters to the Maven command:
- Container registry URL
- Container registry credentials
- Git source repo
- Target container image to push the build result
$ mvn -Dcontainer.registry.url='https://index.docker.io/v1/' \
> -Dcontainer.registry.user='alezzandro' \
> -Dcontainer.registry.password='XXXXXXXYYYYYYYZZZZZZZZ' \
> -Dgit.source.revision='master' \
> -Dgit.source.repo.url='https://github.com/quarkusio/quarkus-quickstarts.git' \
> -Dapp.container.image='quay.io/alezzandro/quarkus-greetings' \
> clean process-resources
[INFO] Scanning for projects...
[INFO]
[INFO] ----------------< org.acme:quarkus-quickstart-knative >-----------------
[INFO] Building quarkus-quickstart-knative 1.0-SNAPSHOT
[INFO] --------------------------------[ jar ]---------------------------------
[INFO]
[INFO] --- maven-clean-plugin:2.5:clean (default-clean) @ quarkus-quickstart-knative ---
[INFO] Deleting /home/alex/gitprojects/quarkus-quickstarts/getting-started-knative/target
[INFO]
[INFO] --- build-helper-maven-plugin:3.0.0:add-resource (add-resource) @ quarkus-quickstart-knative ---
[INFO]
[INFO] --- maven-resources-plugin:2.6:resources (default-resources) @ quarkus-quickstart-knative ---
[INFO] Using 'UTF-8' encoding to copy filtered resources.
[INFO] skip non existing resourceDirectory /home/alex/gitprojects/quarkus-quickstarts/getting-started-knative/src/main/resources
[INFO] Copying 6 resources to /home/alex/gitprojects/quarkus-quickstarts/getting-started-knative/target/knative
[INFO] ------------------------------------------------------------------------
[INFO] BUILD SUCCESS
[INFO] ------------------------------------------------------------------------
[INFO] Total time: 1.840 s
[INFO] Finished at: 2019-03-29T13:29:55+01:00
[INFO] ------------------------------------------------------------------------
The command creates the resource files in target/knative directory:
$ ls target/knative/
build-sa.yaml container-registry-secrets.yaml deploy-key.yaml kaniko-pvc.yaml m2-pvc.yaml service.yaml
By the way, the Maven command can also take as an input Git credentials for pulling down a private Git repo. In any case, we just used the public Quarkus quickstart repo, so we don't need the generated deploy-key.yaml file and its reference in the ServiceAccount contained in build-sa.yaml. We need to remove them:
$ rm target/knative/deploy-key.yaml
$ cat target/knative/build-sa.yaml
apiVersion: v1
kind: ServiceAccount
metadata:
name: build-bot
secrets:
  - name: container-registry-secrets
  - name: deploy-key  <- We need to remove this line
We can now create the OpenShift project that will hold all these prepared resources:
$ oc new-project quarkus-greetings
Now using project "quarkus-greetings" on server "https://minishift.inmyopenshift.cloud:8443".
Before going forward, let's set special permissions for the just-created namespace, as suggested by the Knative Minishift Addons GitHub repo:
$ oc adm policy add-scc-to-user anyuid -z default -n quarkus-greetings
$ oc adm policy add-scc-to-user privileged -z default -n quarkus-greetings
And finally, we can deploy our Kubernetes resources:
$ oc apply --recursive --filename target/knative/
serviceaccount/build-bot created
secret/container-registry-secrets created
persistentvolumeclaim/kaniko-cache created
persistentvolumeclaim/m2-cache created
service.serving.knative.dev/quarkus-quickstart-knative created
After that, Knative Build Controller will notice the new resource, quarkus-quickstart-knative, and will start the build:
$ oc get pods
NAME READY STATUS RESTARTS AGE
quarkus-quickstart-knative-00000-lrb2b 0/1 Init:0/3 0 4s
This pod is composed of three init-containers that will initialize the credentials, clone the Git repo, build it, and finally push the image to the remote registry:
- build-step-credential-initializer
- build-step-git-source
- build-step-docker-push
We can also take a look to the Dockerfile that Kaniko will use for building our image in the "build-step-docker-push" container.
The Dockerfile is a multi-stage one, containing three "FROM" instructions, so three containers will be used. This means Kaniko will run in sequence the first two containers for building the Quarkus app's binary and then it will copy to the latest container (the third) the binary build.
We can finally follow the status of the build with these simple commands:
$ oc get pods
NAME READY STATUS RESTARTS AGE
quarkus-quickstart-knative-00000-t8228 0/1 Running 0 1m

$ oc logs -f -c build-step-docker-push quarkus-quickstart-knative-00000-t8228
...
INFO[0695] EXPOSE 8080
INFO[0695] cmd: EXPOSE
INFO[0695] Adding exposed port: 8080/tcp
INFO[0695] WORKDIR /work/
INFO[0695] cmd: workdir
INFO[0695] Changed working directory to /work
INFO[0695] Taking snapshot of full filesystem...
INFO[0695] Skipping paths under /kaniko, as it is a whitelisted directory
INFO[0695] Skipping paths under /workspace, as it is a whitelisted directory
INFO[0695] Skipping paths under /cache, as it is a whitelisted directory
INFO[0695] Skipping paths under /builder/home, as it is a whitelisted directory
INFO[0695] Skipping paths under /run/secrets, as it is a whitelisted directory
INFO[0695] Skipping paths under /var/run, as it is a whitelisted directory
INFO[0695] Skipping paths under /dev, as it is a whitelisted directory
INFO[0695] Skipping paths under /sys, as it is a whitelisted directory
INFO[0695] Skipping paths under /proc, as it is a whitelisted directory
INFO[0696] No files were changed, appending empty layer to config. No layer added to image.
INFO[0696] ENTRYPOINT ["./application","-Dquarkus.http.host=0.0.0.0"]
2019/03/29 19:16:06 pushed blob sha256:72f1a1307b6f2f9dd158e31e62f06529b09652fffb2630a51c0f3e8fcdcb62ba
2019/03/29 19:16:06 pushed blob sha256:4b3c899486387dd62fe5c4a31eeb37a073dbd9e0ee0065d47bed98ffd8e0889b
2019/03/29 19:16:15 pushed blob sha256:040efd5dc88c66de8192eb1a9f9f764e49d5466381b04b1aaf528caeea156e40
2019/03/29 19:16:16 pushed blob sha256:f0034e1b296e24109590a6436bdfd4ad44500a3b8c76eb21f300861e22c40540
2019/03/29 19:16:18 pushed blob sha256:21d95e340ee05b20c5082eab8847957df806532886d34608fcf6f49e69a21360
2019/03/29 19:16:18 index.docker.io/alezzandro/quarkus-greetings:latest: digest: sha256:fe0ef7d5b8f4d7ac334a9d94d4c8a8ac9f51b884def36e6660d4c46d09ac743c size: 917
Once the build process is complete, we have all the tools in place for getting our serverless service up and running (if requested). I wrote "if requested" because we just built a serverless application that will be spawn up ONLY if a request comes to our service.
We can now take a look at the created Knative resources:
$ oc get ksvc
NAME DOMAIN LATESTCREATED LATESTREADY READY REASON
quarkus-quickstart-knative quarkus-quickstart-knative.quarkus-greetings.example.com quarkus-quickstart-knative-00000 quarkus-quickstart-knative-00000 False RevisionFailed

$ oc get configuration
NAME LATESTCREATED LATESTREADY READY REASON
quarkus-quickstart-knative quarkus-quickstart-knative-00000 quarkus-quickstart-knative-00000 False RevisionFailed

$ oc get revision
NAME SERVICE NAME READY REASON
quarkus-quickstart-knative-00000 quarkus-quickstart-knative-00000-service False NoTraffic

$ oc get route.serving.knative.dev
NAME DOMAIN READY REASON
quarkus-quickstart-knative quarkus-quickstart-knative.quarkus-greetings.example.com True
Don't worry about the various "False" and "RevisionFailed" status messages. They're just reporting that "NoTraffic" is coming to our service, so the controller and autoscaler placed our application in idle.
Moving forward, we're ready to launch the first request to our service. We'll use the curl binary for making the HTTP request, and we need to contact the Knative Ingress Gateway that we'll find in the istio-system namespace:
$ oc get pods -n istio-system | grep gateway
istio-egressgateway-7b46794587-c9mm8 1/1 Running 1 5h
istio-ingressgateway-57f76dc4db-7khgt 1/1 Running 1 5h
knative-ingressgateway-56d46fcb88-kmc4g 1/1 Running 1 2h
Keep in mind that Knative uses the HTTP "Host" header to route requests to its services. For this reason, we'll use some tricks to get the correct IP address and port to contact, and then we'll pass the correct hostname contained in the resource route.serving.knative.dev that we discovered before:
$ INGRESSGATEWAY=knative-ingressgateway
$ IP_ADDRESS="$(minishift ip):$(oc get svc $INGRESSGATEWAY --namespace istio-system --output 'jsonpath={.spec.ports[?(@.port==80)].nodePort}')"

$ curl -H 'Host: quarkus-quickstart-knative.quarkus-greetings.example.com' $IP_ADDRESS/greeting/alex
hello alex
Our service just replied to us! Let's see what that means in terms of Kubernetes resources:
$ oc get pods
NAME READY STATUS RESTARTS AGE
quarkus-quickstart-knative-00000-874sq 0/1 Completed 0 1h
quarkus-quickstart-knative-00000-deployment-688fcd9f4f-wccsf 2/2 Running 0 1m
As you can see our previously built pod is up and running and serving requests. Let's take a closer look:
$ oc describe pod quarkus-quickstart-knative-00000-deployment-688fcd9f4f-wccsf
Name: quarkus-quickstart-knative-00000-deployment-688fcd9f4f-wccsf
Namespace: quarkus-greetings
...
Status: Running
...
Containers:
user-container:
...
Image: index.docker.io/alezzandro/quarkus-greetings@sha256:fe0d37b98347a321769880030951cfd1a767a0cf1f105f4665ab3a70050a6d2c
...
queue-proxy:
Image: gcr.io/knative-releases/github.com/knative/serving/cmd/queue@sha256:ce66dd18f0d504e40e050f31b9de4315f8c225f308e9885eb4cbd82b2ba03c1a
...
Even if I filtered the output, running the previous command, you'll see that the running pod is composed of a user-container (the quarkus-greetings service) and queue-proxy (the sidecar container that will bridge our container to the Knative system).
Troubleshooting Knative in Minishift
I have tried this example many times on my Minishift appliance and, like any software, it can fail. If something doesn't work properly in the Serving part of this demo, the best way to start troubleshooting is to search in the "knative-serving" namespace:
$ oc get pods -n knative-serving
NAME READY STATUS RESTARTS AGE
activator-6677bbc9d6-2ql94 1/1 Running 0 51m
activator-6677bbc9d6-p6l7z 1/1 Running 0 51m
activator-6677bbc9d6-s84zk 1/1 Running 0 51m
autoscaler-5d87cc6b75-bjntw 1/1 Running 0 58m
controller-f4c59f474-z5x4n 1/1 Running 1 2h
webhook-5d9cbd46f7-q5rc6 1/1 Running 1 2h
Take a look at the logs of activator(s), autoscaler, and controller pods. If you see errors or failures in the logs, try to restart them with a simple command like this:
$ oc delete pod POD_NAME
Don't worry about the consequences. Kubernetes Deployments resources will spawn a brand new pod once you manually delete one.
That's all, folks. I hope you'll try this demo for yourself, and may the kube be with you!
Last updated: June 13, 2023