Image mode for Red Hat Enterprise Linux (RHEL) represents an alternative way to build, configure, install, deploy, and manage RHEL. In this tutorial, I will demonstrate the following:
- Building a bootc container image containing a Red Hat Enterprise Linux kernel and user space using
container-tools. - Using the RHEL 9.5 Boot ISO and a Kickstart file to deploy this RHEL bootc image to a virtual machine (VM).
- Managing image mode for RHEL, including how to update, roll back, and switch the image.
Image mode for RHEL
By using container-tools, a container image is created which includes the RHEL kernel, boot loader, firmware, drivers, and ~440 RPM packages. This RHEL container image (also called RHEL bootc image) can be used to deploy RHEL in the data center or in the cloud, on bare-metal servers, virtual machines, or edge devices.
To test the functionality, the RHEL bootc image can be run directly as a container. For deployment, it can be converted into a disk image for the corresponding target platform or deployed directly from a container registry. A deployed image will run natively on the hardware or the virtual machine and not as a container.
Figure 1 illustrates a comparison of image mode for RHEL and the traditional package mode.
| Package mode | Image mode | |
| Smallest unit | RPM package | OCI image |
| Updates | Package update (dnf update) | Image update (bootc upgrade) |
| Package installation | dnf install | Build OCI image with new package installed, then update (bootc upgrade) |
| System installation | Anaconda with %packages | Anaconda with ostreecontainer --url |
| Build raw, qcow2, AMI, GCP, VMware, Azure image | Image Builder | Bootc Image Builder |
Image mode for RHEL fits perfectly into your existing container workflow. It offers the ability to consolidate deployment processes by using the same tools to deploy RHEL that are used to deploy container images for applications. Figure 2 depicts an overview of the workflow.
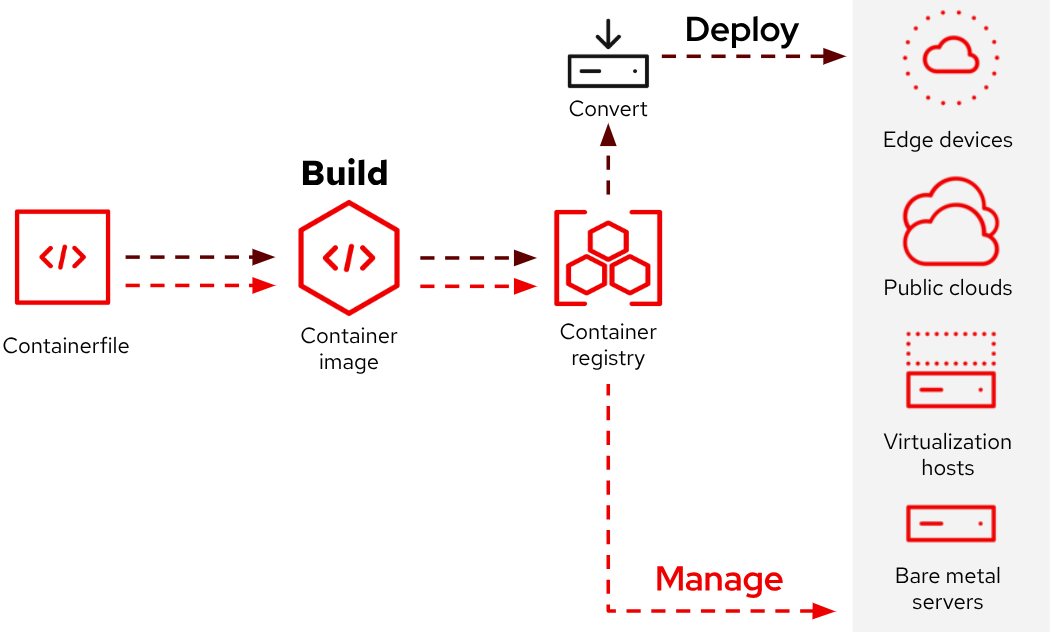
Image mode for RHEL makes it easy to configure which packages and services are included in a base image by using a well-known Containerfile(5). Red Hat provides you with RHEL Bootc Base Images on registry.redhat.io to build upon.
I like the idea of having an immutable operating system. Image mode for RHEL provides such a system, where only /etc and /var are writable to keep local state. A benefit provided by immutable operating systems are atomic updates and easy rollback functionality. To update your system, you stage and boot a new container image. In case something does not work as expected, you can easily roll back to the previous image.
Figure 3 shows how transactional updates (A → B model) work in image mode for RHEL.
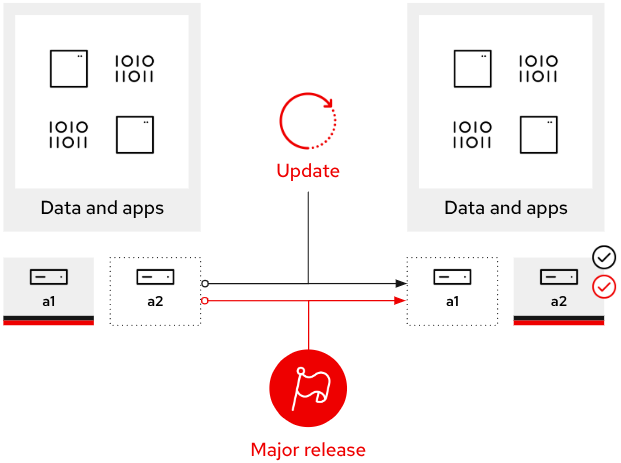
Image mode for RHEL offers the following features:
- OS binaries and libraries (
/usr*) are immutable and read-only. - Local State (read/write) is maintained in
/etcand/var. - Zero-drift infrastructure.
- Updates are staged in the background and applied upon reboot.
- Reboots scheduled with maintenance windows to ensure the highest possible uptime.
Prerequisites
You'll need to have some hands-on command-line interface (CLI) experience on RHEL to follow the steps in this tutorial.
To conduct the steps in this tutorial:
- Subscribe to the RHEL 9 system with a premium, standard, or no-cost developer subscription. For more information, refer to Getting Started with RHEL System Registration documentation.
- Create your container registry locally. I’ll show you how to do this. For more information, review How to implement a simple personal/private Linux container image registry for internal use.
- You can manage container images in Red Hat Satellite 6.16+.
- You can register a free account at Quay.io.
- Authenticate to
registry.redhat.io, refer to Red Hat Container Registry Authentication for detailed information.
Set up 2 virtual machines
For this tutorial I’m using two virtual machines:
podman.example.com- 2 vCPU, 4 GB memory, and 40 GB storage.
- Running RHEL 9.5 minimal install with
container-tools. - Running a simple container registry.
- I will build my container images on this host.
rhel-bootc.example.com- 2 vCPU, 4 GB memory, with a 40 GB and 60 GB virtual hard disk.
- On this host, I’ll deploy image mode for RHEL.
- Upgrade, rollback, and switch of the container image in use are demonstrated with this host.
I’m running both local machines as libvirt domains on my laptop. For the demo, name resolution of the VM’s hostnames needs to be working. This can be achieved by adding static entries to the virtual network or by setting the appropriate values in the /etc/hosts file of both machines.
Set up a simple container registry
If you already have a working container registry, feel free to move on to the next section.
The blog post, How to implement a simple personal/private Linux container image registry for internal use, describes how to set up a simple private container registry that is sufficient to conduct the steps in this tutorial. Please look there for further information if the following instructions are not sufficient.
To make it a bit easier to set up the registry, I use some variables defined in registry.vars and the script create_simple_container_registry.sh to perform the steps from the aforementioned blog. The script needs to be run as root or with sudo to set up the firewall access rules for the registry on podman.example.com. The content of both files is shown in the following code blocks (feel free to adjust the variables to your preferences):
$ cat registry.vars
packages=(container-tools httpd-tools)
reg_base_dir="/opt/registry"
reg_auth_dir=auth
reg_certs_dir=certs
reg_data_dir=data
registry_user=registryuser
registry_pass=registrypass
registry_name=myregistry
cert_domain=simple_private_registry
$ cat create_simple_container_registry.sh
#!/usr/bin/bash
# Description:
# - Creates a simple container registry
# - With login credentials
# - With TLS key pair
# - Source: How to implement a simple personal/private Linux container image registry for internal use
# - URL: https://www.redhat.com/en/blog/simple-container-registry
# - This script only needs to run once to create and setup the registy
# After creation it can be controled using well known podman commands
#
## Script options
set -e # Exit immediatley if any command has a non-zero exit status
# set -x # Enable debugging mode
set -u # Fail when referencing a variable that has not been defined
set -o pipefail # Fail if any command in a pipeline fails
## Source registry variables
source registry.vars
cat <<EOF >/tmp/req.cnf
[req]
distinguished_name = req_distinguished_name
x509_extensions = v3_req
prompt = no
[req_distinguished_name]
C = DE
ST = NRW
L = Cloud City
O = My Org
OU = My OU
CN = ${HOSTNAME}
[v3_req]
keyUsage = critical, keyEncipherment
extendedKeyUsage = serverAuth
subjectAltName = DNS:${HOSTNAME}
EOF
## Main
# Check for required packages
for package in ${packages[*]}; do
if ! rpm --quiet -q ${package}; then
dnf -y install ${package}
fi
done
# Create folders for the registry
mkdir -p ${reg_base_dir}/{${reg_auth_dir},${reg_certs_dir},${reg_data_dir}}
# Generate credentials for accessing the registry
htpasswd -bBc ${reg_base_dir}/${reg_auth_dir}/htpasswd \
${registry_user} \
${registry_pass}
# Generate the TLS key pair
openssl req -newkey rsa:4096 -nodes -sha256 \
-keyout ${reg_base_dir}/${reg_certs_dir}/${cert_domain}.key -x509 -days 365 \
-out ${reg_base_dir}/${reg_certs_dir}/${cert_domain}.crt \
-config /tmp/req.cnf
if ! [ -f /etc/pki/ca-trust/source/anchors/${cert_domain}.crt ]; then
cp ${reg_base_dir}/${reg_certs_dir}/${cert_domain}.crt /etc/pki/ca-trust/source/anchors/
update-ca-trust
fi
# Allow insecure connections to the registry
cat << EOF > /etc/containers/registries.conf.d/001-labregistry.conf
[[registry]]
location="${HOSTNAME}:5000"
insecure=true
EOF
# Start the registry
podman run --name ${registry_name} \
-p 5000:5000 \
-v ${reg_base_dir}/${reg_data_dir}:/var/lib/registry:z \
-v ${reg_base_dir}/${reg_auth_dir}:/auth:z \
-e "REGISTRY_AUTH=htpasswd" \
-e "REGISTRY_AUTH_HTPASSWD_REALM=Registry Realm" \
-e "REGISTRY_AUTH_HTPASSWD_PATH=/auth/htpasswd" \
-v ${reg_base_dir}/${reg_certs_dir}:/certs:z \
-e "REGISTRY_HTTP_TLS_CERTIFICATE=/certs/${cert_domain}.crt" \
-e "REGISTRY_HTTP_TLS_KEY=/certs/${cert_domain}.key" \
-e REGISTRY_COMPATIBILITY_SCHEMA1_ENABLED=true \
-d \
docker.io/library/registry:latest
# Configure the firewall
firewall-cmd --add-port=5000/tcp --zone=internal --permanent
firewall-cmd --add-port=5000/tcp --zone=public --permanent
firewall-cmd --reload
# Print verify info ot STDOUT
echo "Check whether ${HOSTNAME} is in trust list"
trust list | grep -i ${HOSTNAME}
echo "Verify access to registry"
echo "# curl -k -u ${registry_user}:${registry_pass} \
https://${HOSTNAME}:5000/v2/_catalog"
echo '{"repositories":[]}'
echo ""
echo "# openssl s_client -connect ${HOSTNAME}:5000 -servername ${HOSTNAME}"When the script successfully completed, my container registry is accessible at URL https://podman.example.com:5000. The curl command in the output of the previous script can be used to check the registry access.
Build
On podman.example.com, I’m operating in a rootless Podman environment using the following Containerfile(5) as a starting point for my RHEL configuration:
$ cat Containerfile
FROM registry.redhat.io/rhel9/rhel-bootc:9.5-1736459892
ADD index.html /var/www/html/index.html
RUN dnf -y install httpd \
    openssh-server \
    firewalld \
    bind-utils \
    net-tools \
    chrony \
    vim-enhanced \
    man-pages \
    man-db \
    bash-completion && \
    dnf clean all
RUN mandb
RUN systemctl enable httpd sshd firewalld
RUN bootc container lint
I'm using an older version of the rhel-bootc image on purpose to demonstrate how to update the image in a later step. I add firewalld, httpd, and other packages to the bootc base image to create an image for a simple web server with host firewall and some common utilities.
To access the resources I need to build my image, I need to log in to registry.redhat.io:
$ podman login registry.redhat.io
Username: My_Login_Token
Password:
Login Succeeded!
Now I can create a RHEL bootc image with my desired configuration:
$ time podman build -t podman.example.com:5000/rhel9.5-bootc:deploy .
STEP 1/5: FROM registry.redhat.io/rhel9/rhel-bootc:9.5-1736459892
STEP 2/5: ADD index.html /var/www/html/index.html
--> ff222cb3b682
…
STEP 5/5: RUN systemctl enable httpd sshd firewalld
Created symlink /etc/systemd/system/multi-user.target.wants/httpd.service → /usr/lib/systemd/system/httpd.service.
STEP 6/6: RUN bootc container lint
Checks passed: 3
COMMIT podman.example.com:5000/rhel9.5-bootc:deploy
--> c7e891a0f8ca
Successfully tagged podman.example.com:5000/rhel9.5-bootc:deploy
c7e891a0f8ca15e6dd89aacaba2a9463f218a76ee6324a0743acb3868059cba2
real	0m44.923s
user	0m23.834s
sys	    0m8.031s
As the image registry.redhat.io/rhel9/rhel-bootc:9.5-1736459892 was already cached on my local machine there, was no delay for downloading the base image. The build of my container image took less than 1 minute. Compared to creating golden images by installing RHEL to a VM, adding packages and configuration, and converting it to a template, this way of creating your image saves a lot of time.
I would like to discuss which settings and application installations to do at build time and what at runtime, but that would be too much for this tutorial. I might discuss this interesting topic in a later article—stay tuned.
Test
Before I push this image to the registry, I’m going to test its configuration and check whether the index.html file I added to it is served:
$ podman run -d --rm -p 127.0.0.1:8080:80 --name mybootc podman.example.com:5000/rhel9.5-bootc:deploy
e4ba6288666a724069eb901f441a81d1b4dd0f5bf12dc4903aec88b28c8c3907
[jkastnin@podman.example.com image-mode-demo]$ curl http://127.0.0.1:8080
<!DOCTYPE html>
<html lang="de">
  <head>
    <meta charset="utf-8">
    <meta name="viewport" content="width=device-width, initial-scale=1.0">
    <title>Bootc Demo Page</title>
  </head>
  <body>
                <p>This page is served from a webserver running on a RHEL Bootc Image Mode system.</p>
  </body>
</html>
$ podman stop mybootc
mybootc
$ podman run --rm podman.example.com:5000/rhel9.5-bootc:deploy rpm -qa | wc -l
471
The webserver is working and the current image contains ~470 packages.
I like that I can test the most important functionality of my image (check if my webpage is served) without the need to spin up a VM, assign an IP address and DNS name, and remove all of these config items after testing. All testing can be done on the build host or in a CI/CD environment.
Push the container image to the registry
The next step after testing is pushing the container image to my registry, so I can access it from other hosts on my network:
$ podman login podman.example.com:5000
Username: registryuser
Password:
Login Succeeded!
$ podman push podman.example.com:5000/rhel9.5-bootc:deploy
Getting image source signatures
Copying blob a536a8119d76 done   |
…
Writing manifest to image destination
At this point, my image does not contain any secrets, such as passwords, private SSH keys, access tokens, etc. It is safe to store it in the registry and redistribute it in my environment.
Deploy
I have multiple options to deploy a rhel-bootc image:
- Use the
bootc-image-buildertool to create a disk image suitable for the target environment. These are the currently supported image types:- ISO, suitable for disconnected installations.
- QEMU copy-on-write (QCOW2).
- Amazon Machine Image (AMI).
- Virtual Machine Image (VMI).
- Virtual Machine Disk (VMDK).
- Google Compute Engine (GCE).
- Raw disk images.
- Deploy a container image by using Anaconda and Kickstart.
- Deploy an ISO bootc image over PXE boot.
Please read the documentation for the latest information on available and supported deployment options.
I’m going to use the latest RHEL Boot ISO and the Kickstart file below to deploy my rhel9.5-bootc image to rhel-bootc.example.com.
The target host has two hard disks of different sizes. I would like to deploy the image to the smaller one. I take care of this in the following Kickstart file. The code block contains comments explaining what is happening in the different sections. Refer to the Kickstart commands and options reference for more information.
To pull the container image from the registry, name resolution needs to be working and I need to create a container pull secret in /etc/ostree/auth.json using a Base64-encoded string of <username>:<password>. This can be done by running echo -n ‘<username>:<password>’ | base64. I use this secret in the Kickstart file below:
$ cat ostreecontainer.ks
# Basic setup
text
network --bootproto=dhcp --device=link --activate
lang en_US.UTF-8
keyboard de
timezone CET
%pre
# In case you need to tweak your setup to get name resolution to work
# remove the comment from the following line and replace <ip-address>
# with the IP address of your podman.example.com
# echo "<ip-address> podman.example.com >>/etc/hosts"

# Find the smallest disk available to the host
SMALLEST_DISK=/dev/$(lsblk -d -b -o NAME,SIZE | grep -E 'sd?|vd?' | sort -k2 -n | head -n 2 | tail -n 1 | awk '{print $1}')
# Basic partitioning
cat <<EOF > /tmp/diskpart.cfg
ignoredisk --only-use=${SMALLEST_DISK}
clearpart --all --initlabel --disklabel=gpt
reqpart --add-boot
part / --grow --fstype xfs
EOF
# Configuring a pull secret to access registry at podman.example.com
# Source: https://docs.fedoraproject.org/en-US/bootc/bare-metal/#_accessing_registries
# See containers-auth.json(5) on how to create the auth token
mkdir -p /etc/ostree
cat <<EOF > /etc/ostree/auth.json
{
  "auths": {
    "podman.example.com:5000": {
      "auth": "cmVnaXN0cnl1c2VyOnJlZ2lzdHJ5cGFzcw=="
    }
  }
}
EOF
# Accessing insecure registry, e.g. with custom TLS certificate
mkdir -p /etc/containers/registries.conf.d/
cat <<EOF > /etc/containers/registries.conf.d/001-local-registry.conf
[[registry]]
location="podman.example.com:5000"
insecure=true
EOF
%end
%include /tmp/diskpart.cfg
# Reference the container image to install - The kickstart
# has no %packages section. A container image is being installed.
ostreecontainer --url podman.example.com:5000/rhel9.5-bootc:deploy
# Enable firewall and add some services
firewall --enabled --ssh --http --service=https
selinux --enforcing
skipx
syspurpose --role="Red Hat Enterprise Linux Server" --sla="Self-Support" --usage="Development/Test"
# Look root account and add an ansible user with password and SSH-Pub-Key
rootpw --lock
user --name ansible-user --password redhat --plaintext --groups wheel --homedir=/home/remote-ansible
sshkey --username ansible-user "ssh-ed25519 AAAAC3N_rest_of_the_key ansible-user@example.com"
reboot --eject
Since I don’t have a Red Hat Satellite server or any other PXE server available in my lab environment, I’m going to include the Kickstart file into the RHEL Boot ISO by using the command mkksiso from the lorax package. I run this command on my laptop where I’m going to create the second VM rhel-bootc.example.com:
$ mkksiso ostreecontainer.ks ~/Downloads/rhel-9.5-x86_64-boot.iso rhel-9.5-x86_64-ks-boot.iso
xorriso 1.5.6 : RockRidge filesystem manipulator, libburnia project.
…
Writing to '/home/demo-user/src/image-mode-demo/rhel-9.5-x86_64-ks-boot.iso' completed successfully.
In the datacenter I would use Red Hat Ansible Automation Platform, Satellite, or a third party software to create virtual machines or install bare-metal servers. In my simple lab I just use the following virt-install command to spin up a VM with two disks booting from the ISO I created in the previous step:
$ virt-install --connect qemu:///system \
--name rhel-bootc.example.com \
--memory 4096 \
--vcpus 2 \
--os-variant rhel9.5 \
--disk /home/demo-user/VirtualMachines/rhel-bootc-1.qcow2,size=40 \
--disk /home/demo-user/VirtualMachines/rhel-bootc-2.qcow2,size=60 \
--cdrom rhel-9.5-x86_64-ks-boot.iso
A common use case among my customers is installing the operating system to the smallest disk available on a target host. Further disks are used for custom mount points after the installation. I’m simulating this use case by creating two QCOW2 files for the VM rhel-bootc.example.com.
The deployment takes a couple of minutes while the container image is being fetched from the registry on podman.example.com and deployed to the VM.
After the deployment is complete, I check whether my webpage is served as expected (keep in mind that you need to set up name resolution for this):
$ curl http://rhel-bootc.example.com
<!DOCTYPE html>
<html lang="de">
  <head>
    <meta charset="utf-8">
    <meta name="viewport" content="width=device-width, initial-scale=1.0">
    <title>Bootc Demo Page</title>
  </head>
  <body>
                <p>This page is served from a webserver running on a RHEL Bootc Image Mode system.</p>
  </body>
</html>
Next, I log in to the new host with the deployed ansible-user, switch to root, and check the status of the services I configured in my Containerfile:
[root@localhost ~]# systemctl is-active sshd firewalld httpd
active
active
active

[root@localhost ~]# firewall-cmd --list-services
cockpit dhcpv6-client http https ssh

[root@localhost ~]# lsblk
NAME   MAJ:MIN RM  SIZE RO TYPE MOUNTPOINTS
loop0    7:0    0  9.2M  1 loop
sr0     11:0    1 1024M  0 rom
zram0  251:0    0  3.6G  0 disk [SWAP]
vda    252:0    0   40G  0 disk
├─vda1 252:1    0    1M  0 part
├─vda2 252:2    0    1G  0 part /boot
└─vda3 252:3    0   39G  0 part /var
                                /sysroot/ostree/deploy/default/var
                                /etc
                                /sysroot
vdb    252:16   0   60G  0 disk

[root@localhost ~]# mount | grep vda
/dev/vda3 on /sysroot type xfs (ro,relatime,seclabel,attr2,inode64,logbufs=8,logbsize=32k,noquota)
/dev/vda3 on /etc type xfs (rw,relatime,seclabel,attr2,inode64,logbufs=8,logbsize=32k,noquota)
/dev/vda3 on /sysroot/ostree/deploy/default/var type xfs (rw,relatime,seclabel,attr2,inode64,logbufs=8,logbsize=32k,noquota)
/dev/vda3 on /var type xfs (rw,relatime,seclabel,attr2,inode64,logbufs=8,logbsize=32k,noquota)
/dev/vda2 on /boot type xfs (rw,relatime,seclabel,attr2,inode64,logbufs=8,logbsize=32k,noquota)

[root@localhost ~]# mount | grep composefs
composefs on / type overlay (ro,relatime,seclabel,lowerdir=/run/ostree/.private/cfsroot-lower::/sysroot/ostree/repo/objects,redirect_dir=on,metacopy=on)
Did you notice that I haven’t set the hostname yet and allowed HTTPS in the hosts firewall, although it’s only serving HTTP? I’m going to change this at runtime. Because these settings are kept in /etc, they are persistent across updates:
[root@localhost ~]# hostnamectl set-hostname rhel-bootc
[root@localhost ~]# firewall-cmd --remove-service https
success
[root@localhost ~]# firewall-cmd --remove-service https --permanent
success
Another thing to notice is that some common directories, such as the HOME directories, have moved to /var to store data across updates and rollbacks:
[root@rhel-bootc ~]# ls -ld /root /home /srv /mnt
lrwxrwxrwx. 1 root root  8 Jan  1  1970 /home -> var/home
lrwxrwxrwx. 1 root root  7 Jan  1  1970 /mnt -> var/mnt
lrwxrwxrwx. 1 root root 12 Jan  1  1970 /root -> var/roothome
lrwxrwxrwx. 1 root root  7 Jan  1  1970 /srv -> var/srv
Read Managing file systems in image mode for RHEL for more information.
Next, I create a partition with file system on /dev/vdb and a custom mountpoint /var/backup to mount the new file system:
[root@rhel-bootc ~]# parted /dev/vdb mklabel gpt
Information: You may need to update /etc/fstab.
[root@rhel-bootc ~]# parted /dev/vdb mkpart ext4 0% 100%
Information: You may need to update /etc/fstab.
[root@rhel-bootc ~]# mkfs.ext4 /dev/vdb1
mke2fs 1.46.5 (30-Dec-2021)
Discarding device blocks: done
Creating filesystem with 15728128 4k blocks and 3932160 inodes
Filesystem UUID: a2b85ee4-9773-4c10-9e0a-f498804e2601
Superblock backups stored on blocks:
	32768, 98304, 163840, 229376, 294912, 819200, 884736, 1605632, 2654208,
	4096000, 7962624, 11239424
Allocating group tables: done
Writing inode tables: done
Creating journal (65536 blocks): done
Writing superblocks and filesystem accounting information: done
[root@rhel-bootc ~]# mkdir /var/backup
[root@rhel-bootc ~]# cat <<EOF >>/etc/fstab
> /dev/vdb1 /var/backup ext4 defaults 0 0
> EOF
[root@rhel-bootc ~]# mount /var/backup
mount: (hint) your fstab has been modified, but systemd still uses
       the old version; use 'systemctl daemon-reload' to reload.
[root@rhel-bootc ~]# systemctl daemon-reload
[root@rhel-bootc ~]# touch /var/backup/just_some_file
That’s it. Image mode for RHEL is running on rhel-bootc.example.com.
From here on I can manage configuration settings or deploy Podman containers and Quadlet units with Ansible just like I do with RHEL package mode systems.
In fact, next I’m going to run two Ansible commands to copy some configuration files that enables rhel-bootc.example.com to access my registry that uses a self-signed TLS certificate and requires authentication as follows:
$ cat 001-labregistry.conf
[[registry]]
location="podman.example.com:5000"
insecure=true

$ ansible rhel-bootc -i inventory -b -K -m copy -a'src=001-labregistry.conf dest=/etc/containers/registries.conf.d/'
BECOME password:
rhel-bootc | CHANGED => {
    "ansible_facts": {
        "discovered_interpreter_python": "/usr/bin/python3"
    },
    "changed": true,
    "checksum": "2952c93c6faedfad2b8dd17fb355b41ce553186a",
    "dest": "/etc/containers/registries.conf.d/001-labregistry.conf",
    "gid": 0,
    "group": "root",
    "md5sum": "8107ba8e8cdfbbc23809204501bf7441",
    "mode": "0644",
    "owner": "root",
    "secontext": "system_u:object_r:etc_t:s0",
    "size": 56,
    "src": "/home/remote-ansible/.ansible/tmp/ansible-tmp-1739393646.251611-46023-155308016066044/source",
    "state": "file",
    "uid": 0
}

$ cat auth.json
{
  "auths": {
    "podman.example.com:5000": {
      "auth": "cmVnaXN0cnl1c2VyOnJlZ2lzdHJ5cGFzcw=="
    }
  }
}

$ ansible rhel-bootc -i inventory -b -K -m copy -a'src=auth.json dest=/etc/ostree/'
BECOME password:
rhel-bootc | CHANGED => {
    "ansible_facts": {
        "discovered_interpreter_python": "/usr/bin/python3"
    },
    "changed": true,
    "checksum": "769e3be9557cd2c9caac022ce15ae2500e579e03",
    "dest": "/etc/ostree/auth.json",
    "gid": 0,
    "group": "root",
    "md5sum": "f3f45eea72867c181068edba25051963",
    "mode": "0644",
    "owner": "root",
    "secontext": "system_u:object_r:etc_t:s0",
    "size": 107,
    "src": "/home/remote-ansible/.ansible/tmp/ansible-tmp-1739394080.5419533-46132-181535107716351/source",
    "state": "file",
    "uid": 0
}
As an alternative to using Ansible, I could have added the files to the container image using the ADD command in my Containerfile, or create them manually on rhel-bootc.example.com. Personally, I prefer to do this with Ansible, as it offers me more flexibility and it’s easier to manage different configurations because you don’t have to build different images for each configuration. Instead, I can save the secrets in Ansible Vault and use the ansible.builtin.template together with Ansible variables to manage the configuration at runtime.
As mentioned earlier, what to put into the image and what to manage at runtime is a topic for another article.
Managing the system
Build and Deploy are Day 1 operations. Managing the system, updating it, rolling back updates, and switching the image in use are Day 2 operations, which I will tackle next.
Updating the system
Important:
Automatic updates are enabled by default.
This code block shows the service unit triggered by a corresponding timer unit:
[root@rhel-bootc ~]# cat /usr/lib/systemd/system/bootc-fetch-apply-updates.service
[Unit]
Description=Apply bootc updates
Documentation=man:bootc(8)
ConditionPathExists=/run/ostree-booted
[Service]
Type=oneshot
ExecStart=/usr/bin/bootc update --apply --quiet
The command after ExecStart= will check if a newer version of the rhel9.5-bootc:deploy image is available in the registry. If it is, it will download, stage, and boot the new image automatically.
I prefer to choose and schedule the time for booting a new image. So, I disable automatic updates with the following command:
[root@rhel-bootc ~]# systemctl mask bootc-fetch-apply-updates.timer
Created symlink /etc/systemd/system/bootc-fetch-apply-updates.timer → /dev/null.
To update rhel-bootc.example.com I perform the following steps:
- Build a new container image using a more recent bootc base image.
- Push the new image to the registry.
- Stage the image using the
bootctool onrhel-bootc.example.com. - Boot the updated image.
Build a new container image
The new Containerfile looks almost identical to the initial one. I changed only the version of the base image in the FROM line:
$ cat Containerfile
FROM registry.redhat.io/rhel9/rhel-bootc:9.5-1738698007
ADD index.html /var/www/html/index.html
RUN dnf -y install httpd \
    openssh-server \
    firewalld \
    bind-utils \
    net-tools \
    chrony \
    vim-enhanced \
    man-pages \
    man-db \
    bash-completion && \
    dnf clean all
RUN mandb
RUN systemctl enable httpd sshd firewalld
The following code block shows the build and push of the new image:
$ time podman build -t podman.example.com:5000/rhel9.5-bootc:deploy .
STEP 1/5: FROM registry.redhat.io/rhel9/rhel-bootc:9.5-1738698007
Trying to pull registry.redhat.io/rhel9/rhel-bootc:9.5-1738698007...
Getting image source signatures
Checking if image destination supports signatures
Copying blob 6bf39b4761be [====================>-] 20.0MiB / 21.1MiB | 3.0 MiB/s
Copying blob a5239c6d1c62 [===========>---------] 20.1MiB / 34.2MiB | 73.6 KiB/s
Copying blob d72350910969 skipped: already exists
…
COMMIT podman.example.com:5000/rhel9.5-bootc:deploy
--> 7665ee4a5585
Successfully tagged podman.example.com:5000/rhel9.5-bootc:deploy
7665ee4a5585c9c02aa4ad69d7cdda885eaada334369871222ec5273acfcaf1c
real	2m12.625s
user	1m12.913s
sys	0m33.648s
$ podman push podman.example.com:5000/rhel9.5-bootc:deploy
…
$ podman images
REPOSITORY                           TAG             IMAGE ID      CREATED        SIZE
podman.example.com:5000/rhel9.5-bootc      deploy          7665ee4a5585  2 minutes ago  1.69 GB
<none>                               <none>          c7e891a0f8ca  10 hours ago   1.69 GB
registry.redhat.io/rhel9/rhel-bootc  9.5-1738698007  a0b506e39e90  8 days ago     1.98 GB
registry.redhat.io/rhel9/rhel-bootc  9.5-1736459892  7cf5466a7756  4 weeks ago    1.56 GB
At the end of the code block you see the images in local storage. The image with the ID c7e891a0f8ca and a name and tag of <none> is the previous image. The image I just built has the ID 7665ee4a5585.
Update image mode for RHEL
Now that the new image is stored in the registry, I switch to rhel-bootc.example.com and issue the command bootc status to check the current status followed by the bootc upgrade --check command to check if an upgrade is available:
[root@rhel-bootc ~]# bootc status
No staged image present
Current booted image: podman.example.com:5000/rhel9.5-bootc:deploy
    Image version: 9.20250109.0 (2025-02-12 10:11:00.087146497 UTC)
    Image digest: sha256:5ee3d2f195708fb4b8e81a4e946cfbf9a6f296a0436f2d2585e92ce1f79045a6
No rollback image present

[root@rhel-bootc ~]# bootc upgrade --check
Update available for: docker://podman.example.com:5000/rhel9.5-bootc:deploy
  Version: 9.20250204.0
  Digest: sha256:b4eb4525c965ff7ff89d6a20881d8c53c9f05fddaaf459e39014c74712042927
Total new layers: 70    Size: 983.6 MB
Removed layers:   40    Size: 823.1 MB
Added layers:     40    Size: 825.9 MB
In the output of the first command, I see which image is currently running. Since I have deployed only one image, there is no rollback image available.
The second command output shows there is an upgrade available. Running the command again, omitting the --check option, shows the new image is downloaded and staged:
[root@rhel-bootc ~]# bootc upgrade
layers already present: 30; layers needed: 40 (825.9 MB)
Fetched layers: 787.67 MiB in 36 seconds (21.76 MiB/s)                            Deploying: done (3 seconds)
Queued for next boot: podman.example.com:5000/rhel9.5-bootc:deploy
  Version: 9.20250204.0
  Digest: sha256:b4eb4525c965ff7ff89d6a20881d8c53c9f05fddaaf459e39014c74712042927
Total new layers: 70    Size: 983.6 MB
Removed layers:   40    Size: 823.1 MB
Added layers:     40    Size: 825.9 MB
[root@rhel-bootc ~]# bootc status
Current staged image: podman.example.com:5000/rhel9.5-bootc:deploy
    Image version: 9.20250204.0 (2025-02-12 20:17:43.329819534 UTC)
    Image digest: sha256:b4eb4525c965ff7ff89d6a20881d8c53c9f05fddaaf459e39014c74712042927
Current booted image: podman.example.com:5000/rhel9.5-bootc:deploy
    Image version: 9.20250109.0 (2025-02-12 10:11:00.087146497 UTC)
    Image digest: sha256:5ee3d2f195708fb4b8e81a4e946cfbf9a6f296a0436f2d2585e92ce1f79045a6
No rollback image present
[root@rhel-bootc ~]# reboot NOW
After the reboot, rhel-bootc.example.com is running from the new image.
Rollback
After reboot I check the status again:
[root@rhel-bootc ~]# bootc status
No staged image present
Current booted image: podman.example.com:5000/rhel9.5-bootc:deploy
    Image version: 9.20250204.0 (2025-02-12 20:17:43.329819534 UTC)
    Image digest: sha256:b4eb4525c965ff7ff89d6a20881d8c53c9f05fddaaf459e39014c74712042927
Current rollback image: podman.example.com:5000/rhel9.5-bootc:deploy
    Image version: 9.20250109.0 (2025-02-12 10:11:00.087146497 UTC)
    Image digest: sha256:5ee3d2f195708fb4b8e81a4e946cfbf9a6f296a0436f2d2585e92ce1f79045a6
The previously staged image has become the current booted image and the previous current image has become the current rollback image. The following command followed by another reboot boots the rollback image and brings me back to the known good configuration:
[root@rhel-bootc ~]# bootc rollback
Next boot: rollback deployment
[root@rhel-bootc ~]# reboot NOW
By checking the status again, I confirm that both images switched places by comparing the SHA-256 checksums:
[root@rhel-bootc ~]# bootc status
No staged image present
Current booted image: podman.example.com:5000/rhel9.5-bootc:deploy
    Image version: 9.20250109.0 (2025-02-12 10:11:00.087146497 UTC)
    Image digest: sha256:5ee3d2f195708fb4b8e81a4e946cfbf9a6f296a0436f2d2585e92ce1f79045a6
Current rollback image: podman.example.com:5000/rhel9.5-bootc:deploy
    Image version: 9.20250204.0 (2025-02-12 20:17:43.329819534 UTC)
    Image digest: sha256:b4eb4525c965ff7ff89d6a20881d8c53c9f05fddaaf459e39014c74712042927
[root@rhel-bootc ~]# bootc upgrade --check
No changes in: docker://podman.example.com:5000/rhel9.5-bootc:deployWhile bootc upgrade --check recognizes that there is no new image available in the registry, be aware that with the current rollback image, a newer image is available on your host. When running bootc upgrade the current rollback image will become the current staged image too:
[root@rhel-bootc ~]# bootc upgrade
No changes in podman.example.com:5000/rhel9.5-bootc:deploy => sha256:b4eb4525c965ff7ff89d6a20881d8c53c9f05fddaaf459e39014c74712042927
  Deploying: done (2 seconds)                                                   Queued for next boot: podman.example.com:5000/rhel9.5-bootc:deploy
  Version: 9.20250204.0
  Digest: sha256:b4eb4525c965ff7ff89d6a20881d8c53c9f05fddaaf459e39014c74712042927
Total new layers: 70    Size: 983.6 MB
Removed layers:   40    Size: 823.1 MB
Added layers:     40    Size: 825.9 MB
[root@rhel-bootc ~]# bootc status
Current staged image: podman.example.com:5000/rhel9.5-bootc:deploy
    Image version: 9.20250204.0 (2025-02-12 20:17:43.329819534 UTC)
    Image digest: sha256:b4eb4525c965ff7ff89d6a20881d8c53c9f05fddaaf459e39014c74712042927
Current booted image: podman.example.com:5000/rhel9.5-bootc:deploy
    Image version: 9.20250109.0 (2025-02-12 10:11:00.087146497 UTC)
    Image digest: sha256:5ee3d2f195708fb4b8e81a4e946cfbf9a6f296a0436f2d2585e92ce1f79045a6
Current rollback image: podman.example.com:5000/rhel9.5-bootc:deploy
    Image version: 9.20250204.0 (2025-02-12 20:17:43.329819534 UTC)
    Image digest: sha256:b4eb4525c965ff7ff89d6a20881d8c53c9f05fddaaf459e39014c74712042927
With auto-updates turned on, the system will automatically update again. That’s the reason why I chose to turn automatic updates off.
I would like to point out that the rollback feature is my personal highlight in image mode for RHEL, as it enables me to roll back to a previous state where I can be sure to have the same and not only a similar environment. It reminds me of the boot environments available in FreeBSD or Solaris, and I’m happy to have a similar functionality in Linux today.
Switching images
The last topic I'd like to cover in this tutorial is how to switch images. Reasons to switch images include:
- To use an image with another tag.
- To use an image hosted in another registry.
- To use an image containing the next RHEL major release.
Prepare a new image
The following code block shows the modified Containerfile and the commands to build and push the image to my registry:
$ cat Containerfile
FROM registry.redhat.io/rhel10-beta/rhel-bootc:10.0-beta-1737064208
ADD index.html /var/www/html/index.html
RUN dnf -y install httpd \
    openssh-server \
    firewalld \
    bind-utils \
    net-tools \
    chrony \
    vim-enhanced \
    man-pages \
    man-db \
    bash-completion && \
    dnf clean all
RUN mandb
RUN systemctl enable httpd sshd firewalld
$ time podman build -t podman.example.com:5000/rhel10-beta-bootc:beta .
STEP 1/5: FROM registry.redhat.io/rhel10-beta/rhel-bootc:10.0-beta-1737064208
…
COMMIT podman.example.com:5000/rhel10-beta-bootc:beta
--> cc2180d7e5f6
Successfully tagged podman.example.com:5000/rhel10-beta-bootc:beta
cc2180d7e5f66340677b660ab276c78d6718b15271333cd1cb918d7efa123c7d
real	2m21.941s
user	1m5.595s
sys	0m22.753s
$ podman push podman.example.com:5000/rhel10-beta-bootc:beta
Switch the image
On rhel-bootc.example.com, I use the command bootc switch podman.example.com:5000/rhel10-beta-bootc:beta to download and stage the new image that I’m going to activate with just one reboot as follows:
[root@rhel-bootc ~]# bootc switch podman.example.com:5000/rhel10-beta-bootc:beta
layers already present: 2; layers needed: 68 (916.3 MB)
Fetching layers ███████████████████░ 67/68
 └ Fetching ████████████████████ 247 B/247 B (0 B/s) layer 445edbb5797d3bb2cfb64Regex version mismatch, expected: 10.40 2022-04-14 actual: 10.44 2024-06-07
Fetched layers: 873.84 MiB in 30 seconds (29.10 MiB/s)                          ⠤ Deploying                                                                     Regex version mismatch, expected: 10.40 2022-04-14 actual: 10.44 2024-06-07
Regex version mismatch, expected: 10.40 2022-04-14 actual: 10.44 2024-06-07
⠄ Deploying                                                                     Regex version mismatch, expected: 10.40 2022-04-14 actual: 10.44 2024-06-07
Regex version mismatch, expected: 10.40 2022-04-14 actual: 10.44 2024-06-07
  Deploying: done (2 seconds)                                                   Queued for next boot: podman.example.com:5000/rhel10-beta-bootc:beta
  Version: 10.20250116.0
  Digest: sha256:9a525772000777a6ee550e50fdfcc6f671df28e5d6c07afbe21b03cfcd7717a0

[root@rhel-bootc ~]# bootc status
Current staged image: podman.example.com:5000/rhel10-beta-bootc:beta
    Image version: 10.20250116.0 (2025-02-13 12:26:33.052057238 UTC)
    Image digest: sha256:9a525772000777a6ee550e50fdfcc6f671df28e5d6c07afbe21b03cfcd7717a0
Current booted image: podman.example.com:5000/rhel9.5-bootc:deploy
    Image version: 9.20250109.0 (2025-02-12 10:11:00.087146497 UTC)
    Image digest: sha256:5ee3d2f195708fb4b8e81a4e946cfbf9a6f296a0436f2d2585e92ce1f79045a6
Current rollback image: podman.example.com:5000/rhel9.5-bootc:deploy
    Image version: 9.20250204.0 (2025-02-12 20:17:43.329819534 UTC)
    Image digest: sha256:b4eb4525c965ff7ff89d6a20881d8c53c9f05fddaaf459e39014c74712042927

[root@rhel-bootc ~]# reboot NOW
…
[root@rhel-bootc ~]# cat /etc/redhat-release
Red Hat Enterprise Linux release 10.0 Beta (Coughlan)
In less than five minutes, I upgraded from RHEL 9 to RHEL 10.0-beta. Compared to a LEAPP in-place upgrade of a RHEL package mode system, this looks amazingly fast to me.
Of course, I might encounter some serious issues after an upgrade to a new major release. My application might not be running due to dependency issues. When I encounter these issues after a LEAPP upgrade, I usually need to revert an external snapshot or do a restore of my host. In image mode for RHEL, I just run bootc rollback && reboot NOW, and a moment later, I’m back on RHEL 9.5.
Important:
As I'm using BETA software for the previous example, you might expect a slightly different behavior depending on the RHEL 10-beta version you are using.
Summary
Thank you for your time. I hope I was able to spark your interest in image mode for RHEL. Please feel free to run the steps described in this tutorial in your own lab to gather first-hand experience.
If you don’t have a suitable lab environment available at the moment, you could try our interactive labs: