Redhat Developers  Logo
  • AI

    Get started with AI

    • Red Hat AI
      Accelerate the development and deployment of enterprise AI solutions.
    • AI learning hub
      Explore learning materials and tools, organized by task.
    • AI interactive demos
      Click through scenarios with Red Hat AI, including training LLMs and more.
    • AI/ML learning paths
      Expand your OpenShift AI knowledge using these learning resources.
    • AI quickstarts
      Focused AI use cases designed for fast deployment on Red Hat AI platforms.
    • No-cost AI training
      Foundational Red Hat AI training.

    Featured resources

    • OpenShift AI learning
    • Open source AI for developers
    • AI product application development
    • Open source-powered AI/ML for hybrid cloud
    • AI and Node.js cheat sheet

    Red Hat AI Factory with NVIDIA

    • Red Hat AI Factory with NVIDIA is a co-engineered, enterprise-grade AI solution for building, deploying, and managing AI at scale across hybrid cloud environments.
    • Explore the solution
  • Learn

    Self-guided

    • Documentation
      Find answers, get step-by-step guidance, and learn how to use Red Hat products.
    • Learning paths
      Explore curated walkthroughs for common development tasks.
    • Guided learning
      Receive custom learning paths powered by our AI assistant.
    • See all learning

    Hands-on

    • Developer Sandbox
      Spin up Red Hat's products and technologies without setup or configuration.
    • Interactive labs
      Learn by doing in these hands-on, browser-based experiences.
    • Interactive demos
      Click through product features in these guided tours.

    Browse by topic

    • AI/ML
    • Automation
    • Java
    • Kubernetes
    • Linux
    • See all topics

    Training & certifications

    • Courses and exams
    • Certifications
    • Skills assessments
    • Red Hat Academy
    • Learning subscription
    • Explore training
  • Build

    Get started

    • Red Hat build of Podman Desktop
      A downloadable, local development hub to experiment with our products and builds.
    • Developer Sandbox
      Spin up Red Hat's products and technologies without setup or configuration.

    Download products

    • Access product downloads to start building and testing right away.
    • Red Hat Enterprise Linux
    • Red Hat AI
    • Red Hat OpenShift
    • Red Hat Ansible Automation Platform
    • See all products

    Featured

    • Red Hat build of OpenJDK
    • Red Hat JBoss Enterprise Application Platform
    • Red Hat OpenShift Dev Spaces
    • Red Hat Developer Toolset

    References

    • E-books
    • Documentation
    • Cheat sheets
    • Architecture center
  • Community

    Get involved

    • Events
    • Live AI events
    • Red Hat Summit
    • Red Hat Accelerators
    • Community discussions

    Follow along

    • Articles & blogs
    • Developer newsletter
    • Videos
    • Github

    Get help

    • Customer service
    • Customer support
    • Regional contacts
    • Find a partner

    Join the Red Hat Developer program

    • Download Red Hat products and project builds, access support documentation, learning content, and more.
    • Explore the benefits

How to install Ansible Tower on Red Hat OpenShift

<p>&nbsp;</p> <quillbot-extension-portal></quillbot-extension-portal>

October 26, 2018
Michele Naldini
Related topics:
ContainersDevOpsLinuxKubernetes
Related products:
Streams for Apache KafkaRed Hat OpenShift Container PlatformRed Hat Enterprise Linux

    In this article, I will show how to install and manage Red Hat Ansible Tower on Red Hat OpenShift Container Platform. Ansible Tower helps you scale IT automation, manage complex deployments, and improve productivity. You can centralize and control your IT infrastructure with a visual dashboard, and it provides role-based access control, job scheduling, integrated notifications, graphical inventory management, and more.

    As you may know, Ansible Tower 3.3, the latest release of this automation platform, was released a few weeks ago and added new features. From the release notes you'll see that Ansible Tower 3.3 added support for a container-based installation on top of OpenShift

    In this blog, we'll see how easy it is to set up Ansible Tower 3.3 on OpenShift and have it running as a container in just a few minutes.

    Overview of the process

    We'll follow these steps:

    1. Log in on an existing OpenShift installation.
    2. Create a dedicated project where Ansible Tower will be installed.
    3. Create a persistent volume claim (PVC) and, if it's not already present, create a physical volume (PV).
    4. Start the installation process.
    5. Finally, use Ansible Tower as a service and perform a scale-out.

    Resources and requirements

    Refer to the following resources:

    • OpenShift Deployment and Configuration
    • Download Ansible tower OpenShift setup script

    The requirements mentioned in OpenShift Deployment and Configuration for Ansible Tower on OpenShift are:

    • Red Hat OpenShift 3.6+
    • Per-pod default resource requirements:
      • 6GB RAM
      • 3 CPU cores
    • OpenShift command-line tool (oc) on the machine running the installer
    • A set-up and running OpenShift cluster
    • Admin privileges for the account running the OpenShift installer

    Procedure

    So let's start to create the Ansible Tower prerequisites on OpenShift. First, let's log in:

    $ oc login myamazingopenshiftcluster -u myuser -p mypassword
    Username: myuser
    Password:
    Login successful.
    
    You have access to the following projects and can switch between them with 'oc project <projectname>':
    
    *default
    kube-public
    kube-service-catalog
    kube-system
    management-infra
    ocp-workshop
    openshift
    openshift-ansible-service-broker
    openshift-infra
    openshift-logging
    openshift-node
    openshift-sdn
    openshift-template-service-broker
    openshift-web-console
    
    Using project "default".
    
    The server uses a certificate signed by an unknown authority.
    You can bypass the certificate check, but any data you send to the server could be intercepted by others.
    Use insecure connections? (y/n): y
    
    Login successful.

    Let's create a new project called tower:

    $ oc new-project tower
    
    Now using project "tower" on server "https://myamazingopenshiftcluster :443".
    
    You can add applications to this project with the 'new-app' command. For example, try:
    
    $ oc new-app centos/ruby-22-centos7~https://github.com/openshift/ruby-ex.git
    
    to build a new example application in Ruby.
    

    As additional prerequisites, Ansible Tower requires a PVC to be used by a Postgres database to persist its data.

    In our case, we are going to create a 10 GB PVC using this YAML file:

    $ cat postgres-nfs-pvc
    apiVersion: v1
    kind: PersistentVolumeClaim
    metadata:
    name: postgresql
    spec:
    accessModes:
    - ReadWriteOnce
    resources:
    requests:
    storage: 10Gi

    Now we can ask OpenShift to create the PVC for us:

    $ oc create -f postgres-nfs-pvc
    
    persistentvolumeclaim "postgresql" created

    Our PVC will be bound to a PV that matches the access method and size.

    If you don't have a PV that will be claimed by our PVC, you can follow the official OpenShift documentation to create it.

    $ oc get pvc
    
    NAME         STATUS VOLUME    CAPACITY ACCESS MODES   STORAGECLASS AGE
    postgresql   Bound  vol118    10Gi     RWO,RWX        2s


    Last, you have to download the installation setup tar file,  untar it, and then execute the following:

    $ ./setup_openshift.sh -e openshift_host=https://myamazingopenshiftcluster:443 -e openshift_project=tower -e openshift_user=myuser -e openshift_password=mypassword -e admin_password=toweradminpwd-e secret_key=mysecret -e pg_username=postgresuser -e pg_password=postgrespwd -e rabbitmq_password=rabbitpwd -e rabbitmq_erlang_cookie=rabbiterlangpwd

    The setup_openshift.sh script will execute some Ansible playbooks and those will manage for you the entire installation by creating your pods, services, and routes.

    That's all! In a few minutes, Ansible Tower will be up and running.

    Ansible Tower set up in Red Hat OpenShift Container Platform


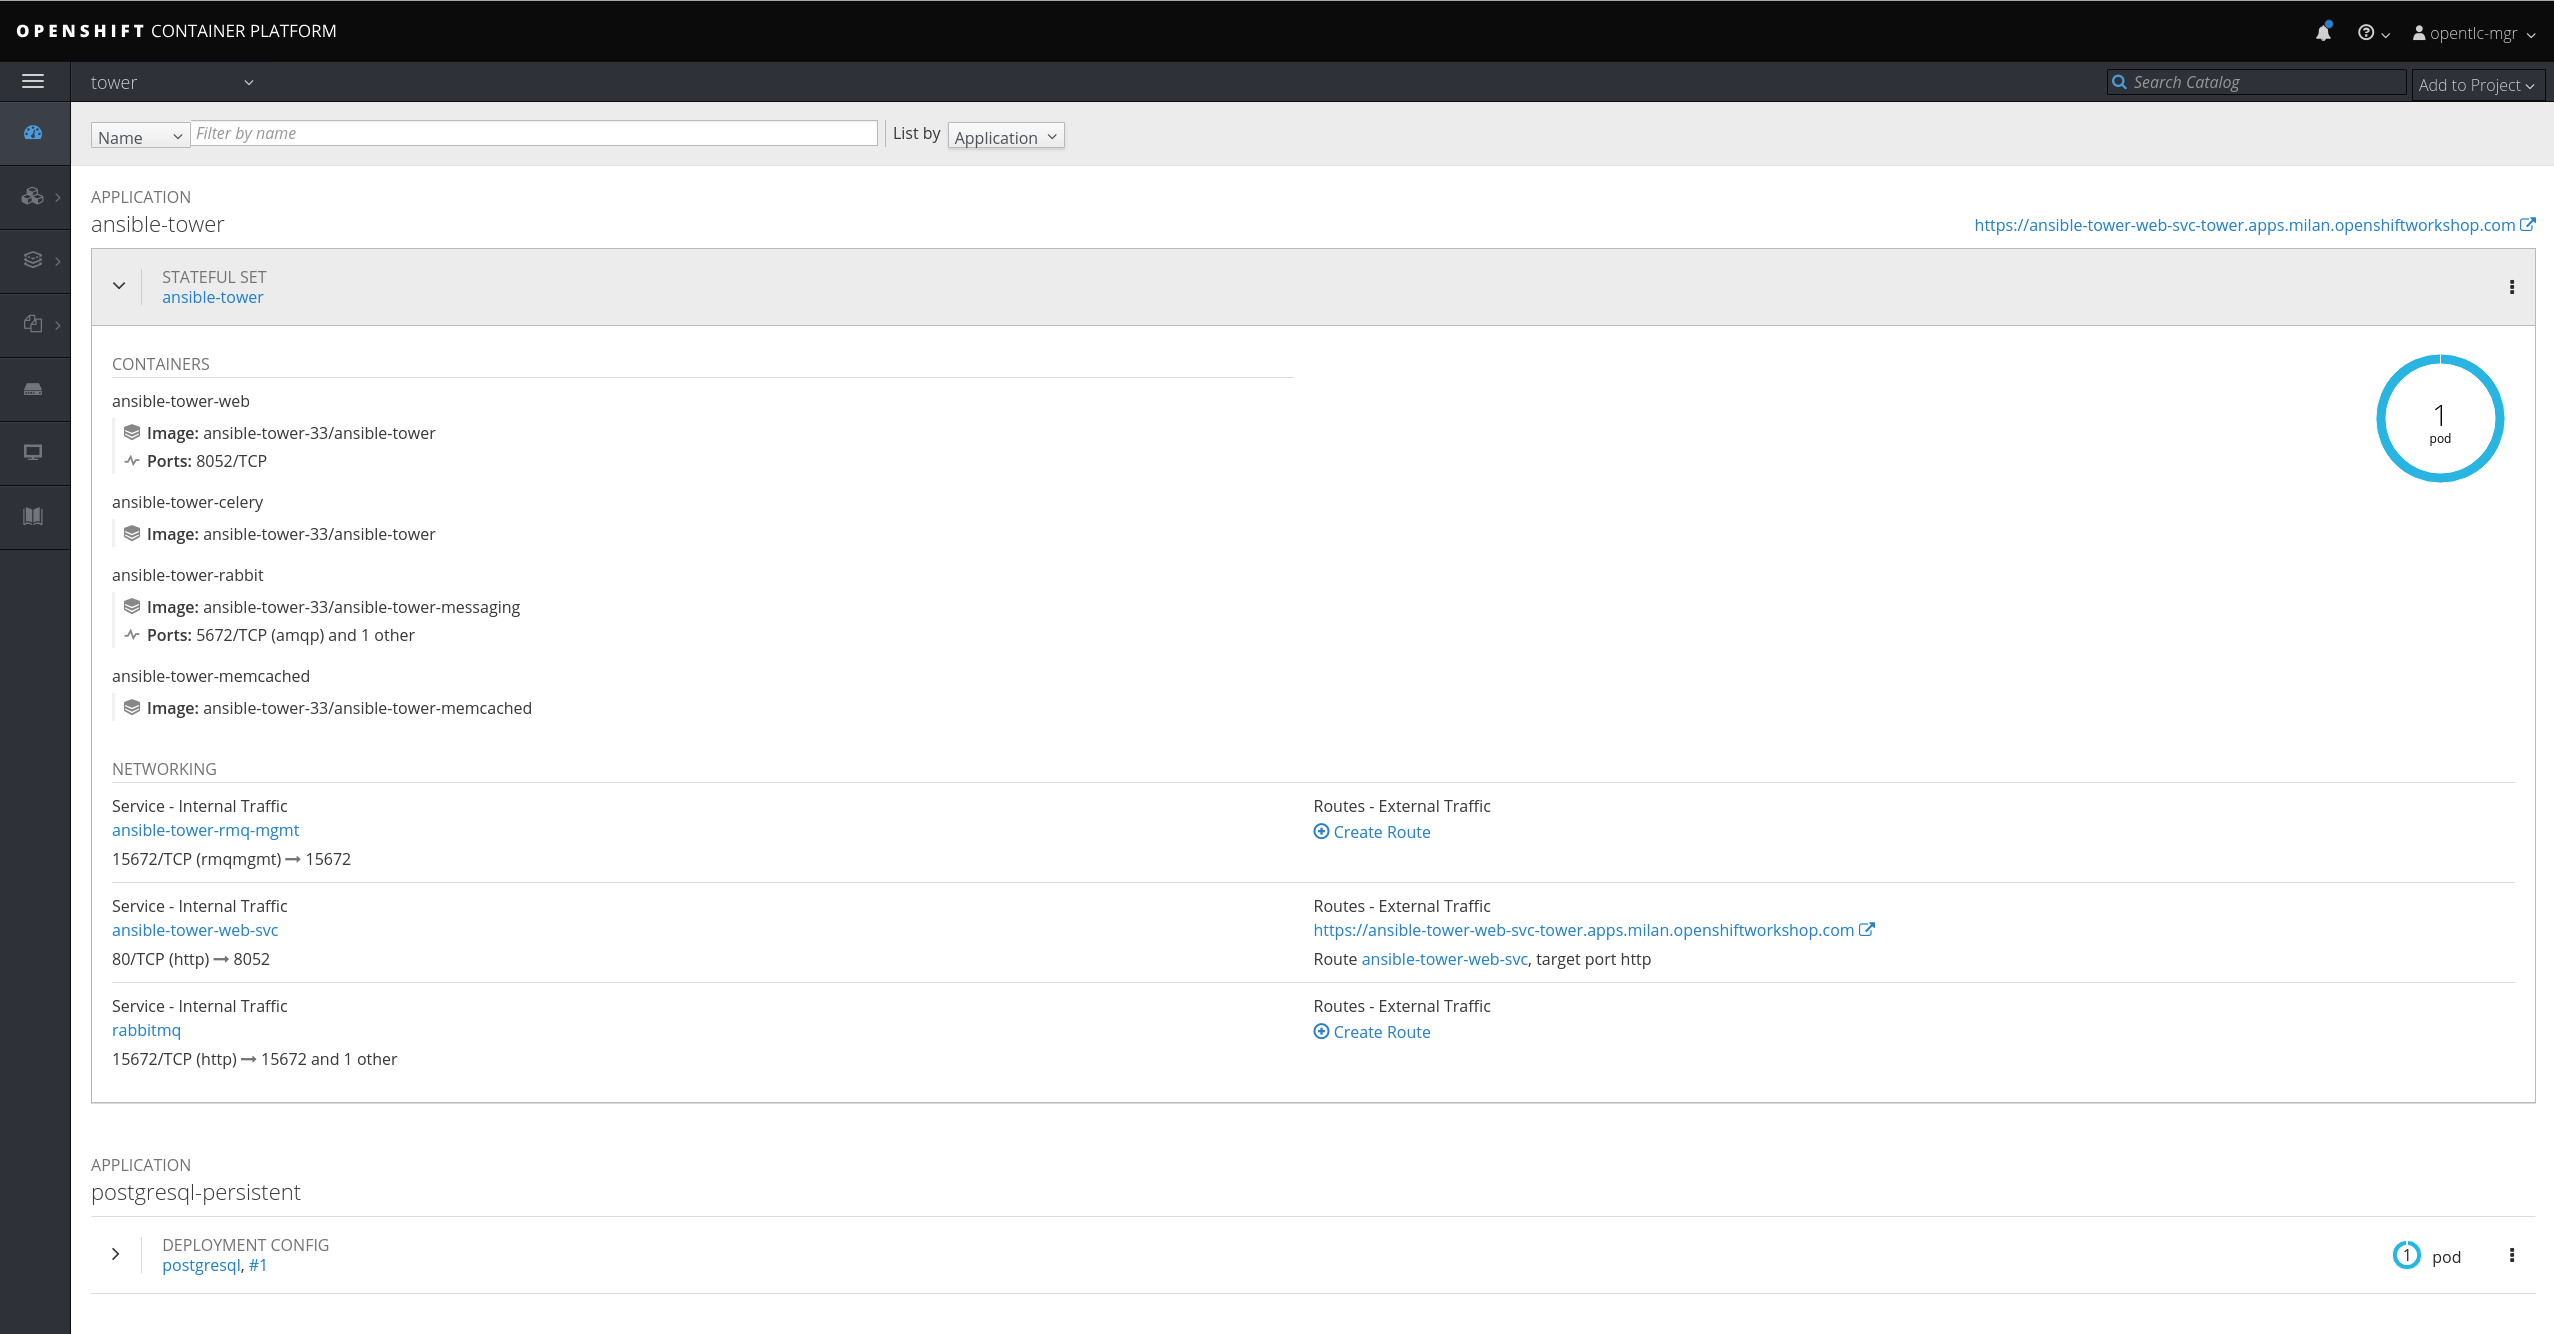
    Let's now investigate how Ansible Tower was installed. As you may notice from the UI, there is one pod composed of four containers managed through a StatefulSet.

    Run the following command from the CLI:

    $ oc describe sts ansible-tower
    Name: ansible-tower
    Namespace: tower
    CreationTimestamp: Tue, 09 Oct 2018 17:14:51 +0200
    Selector: app=ansible-tower,name=ansible-tower-web-deploy,service=django
    Labels: app=ansible-tower
    name=ansible-tower-web-deploy
    service=django
    Annotations: kubectl.kubernetes.io/last-applied-configuration={"apiVersion":"apps/v1beta1","kind":"StatefulSet","metadata":{"annotations":{},"name":"ansible-tower","namespace":"tower"},"spec":{"replicas":1,"templa...
    Replicas: 1 desired | 1 total
    Pods Status: 1 Running / 0 Waiting / 0 Succeeded / 0 Failed
    Pod Template:
    Labels: app=ansible-tower
    name=ansible-tower-web-deploy
    service=django
    Service Account: awx
    Containers:
    
    output truncated

    As you may notice, the Replicas value is 1, so one pod (that is, one Ansible Tower instance) will be running.

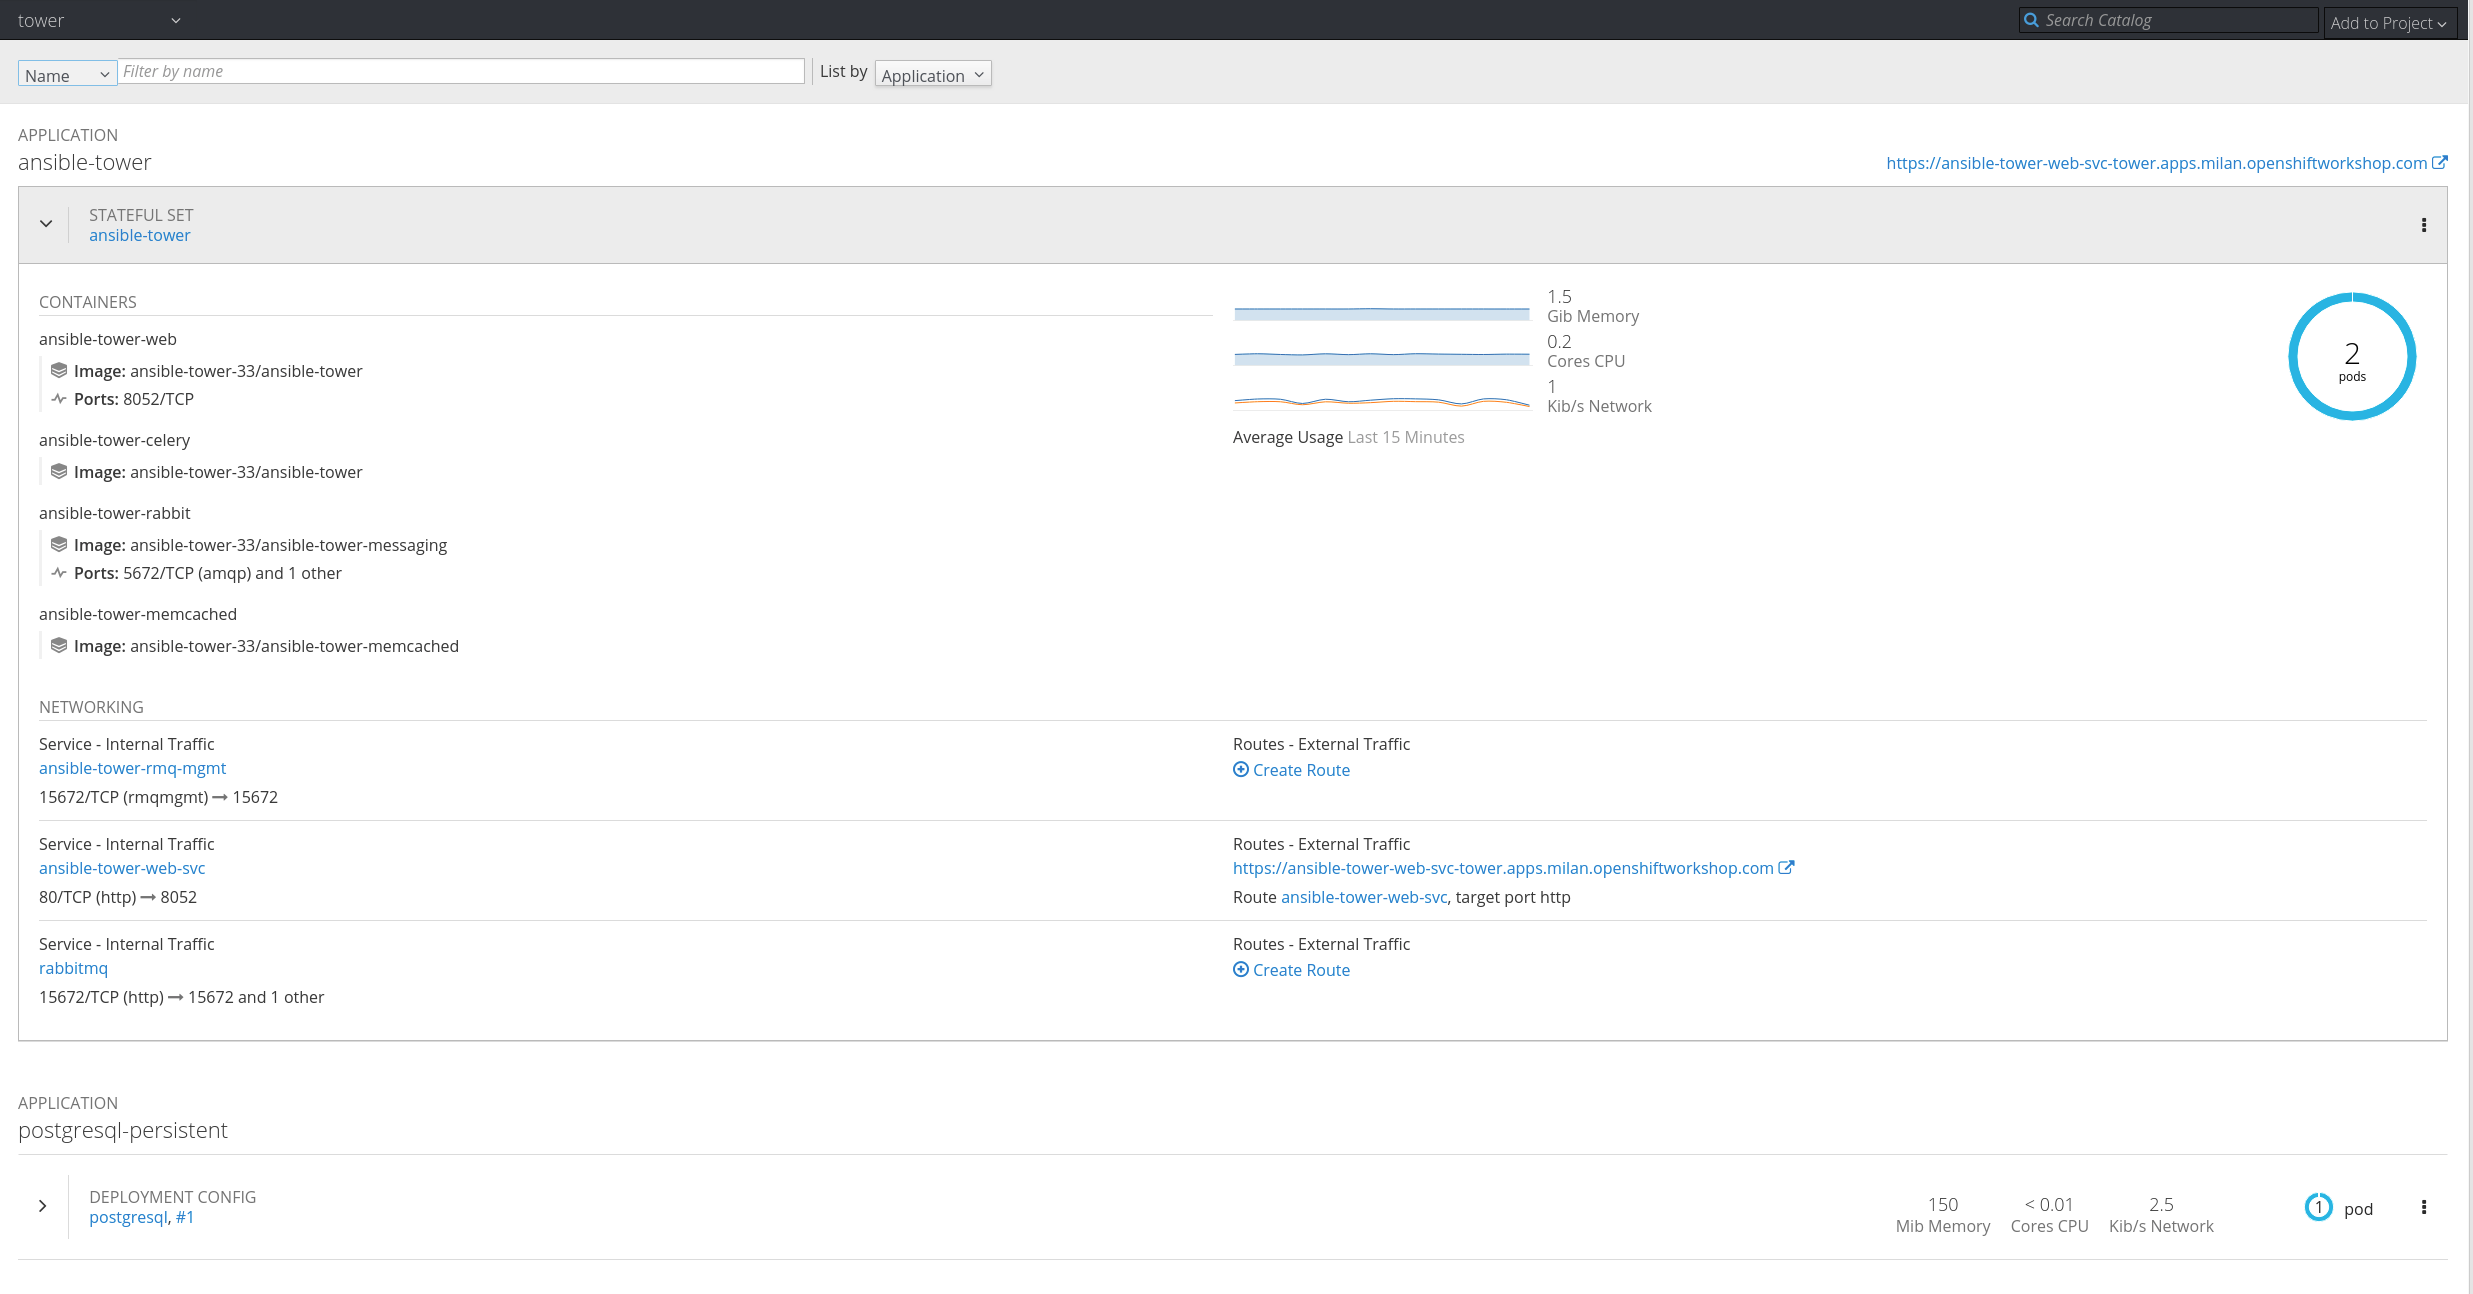
    The good thing is that if you can scale up your StatefulSet replica count, Ansible Tower will be scaled accordingly!

    You can manage this change by using the UI and editing the YAML file or by using oc.

    Take a look at the current status:

    $ oc get sts
    NAME          DESIRED CURRENT AGE
    ansible-tower 1       1       3d

    Here's how to scale up:

    $ oc scale --replicas=2 sts ansible-tower
    statefulset "ansible-tower" scaled

    Now check the running configuration again:

    $ oc get sts
    NAME          DESIRED CURRENT AGE
    ansible-tower 2       2       3d

    Here's what the web console shows now:

    The result after scaling up


    That's all! If you want to see a short demo of the process, check out this video:


    Last updated: March 24, 2023

    Recent Posts

    • Every layer counts: Defense in depth for AI agents with Red Hat AI

    • Fun in the RUN instruction: Why container builds with distroless images can surprise you

    • Trusted software factory: Building trust in the agentic AI era

    • Build a zero trust AI pipeline with OpenShift and RHEL CVMs

    • Red Hat Hardened Images: Top 5 benefits for software developers

    What’s up next?


    Red Hat Developers logo LinkedIn YouTube Twitter Facebook

    Platforms

    • Red Hat AI
    • Red Hat Enterprise Linux
    • Red Hat OpenShift
    • Red Hat Ansible Automation Platform
    • See all products

    Build

    • Developer Sandbox
    • Developer tools
    • Interactive tutorials
    • API catalog

    Quicklinks

    • Learning resources
    • E-books
    • Cheat sheets
    • Blog
    • Events
    • Newsletter

    Communicate

    • About us
    • Contact sales
    • Find a partner
    • Report a website issue
    • Site status dashboard
    • Report a security problem

    RED HAT DEVELOPER

    Build here. Go anywhere.

    We serve the builders. The problem solvers who create careers with code.

    Join us if you’re a developer, software engineer, web designer, front-end designer, UX designer, computer scientist, architect, tester, product manager, project manager or team lead.

    Sign me up

    Red Hat legal and privacy links

    • About Red Hat
    • Jobs
    • Events
    • Locations
    • Contact Red Hat
    • Red Hat Blog
    • Inclusion at Red Hat
    • Cool Stuff Store
    • Red Hat Summit
    © 2026 Red Hat

    Red Hat legal and privacy links

    • Privacy statement
    • Terms of use
    • All policies and guidelines
    • Digital accessibility

    Chat Support

    Please log in with your Red Hat account to access chat support.