Some background
For those unfamiliar, Open Virtual Network (OVN) is a subproject of OpenVswitch (OVS), a performant programmable multi-platform virtual switch. OVN provides the ability to express an overlay network as a series of virtual routers and switches. OVN also provides native methods for setting up Access Control Lists (ACLs), and it functions as an OpenFlow switch, providing services such as DHCP. The components of OVN program OVS on each of the hypervisors in the network. Many of Red Hat's products, such as Red Hat OpenStack Platform and Red Hat Virtualization, are now using OVN. Red Hat OpenShift Container Platform will be using OVN soon.
Looking around the internet, it's pretty easy to find high-quality tutorials on the basics of OVN. However, when it comes to more-advanced topics, it sometimes feels like the amount of information is lacking. In this tutorial, we'll examine dynamic addressing in OVN. You will learn about IP address management (IPAM) options in OVN and how to apply them.
Static addressing
One of the first things you'll learn when starting with OVN is how to create logical switches and logical switch ports. You'll probably see something like this:
$ ovn-nbctl ls-add sw
$ ovn-nbctl lsp-add sw sw-p1
$ ovn-nbctl lsp-set-addresses sw-p1 00:ac:00:ff:01:01 192.168.0.1
The first line creates a logical switch called sw. The second line adds a switch port called sw-p1 to sw. The final line sets the MAC and IP address of sw-p1. It's pretty simple, but it requires you to manually keep track of IP addresses for the switch ports. Is there a way we could create a switch port without having to manually add the MAC and IP addresses?
Dynamic addressing
If you dig a bit deeper, you can find tutorials on the web that describe how to set up OVN to provide IP addresses using DHCP. This saves you some configuration steps on the VMs, but it doesn't help any on the OVN side. You still have to specify an IP address on the logical switch port.
But is there some way that you can actually have OVN dynamically assign addresses to switch ports? If you scour the ovn-nb manpage, you might be able to piece together the way to do it.
This tutorial seeks to clear the air, so you can know exactly what tools are available to you and how to use them.
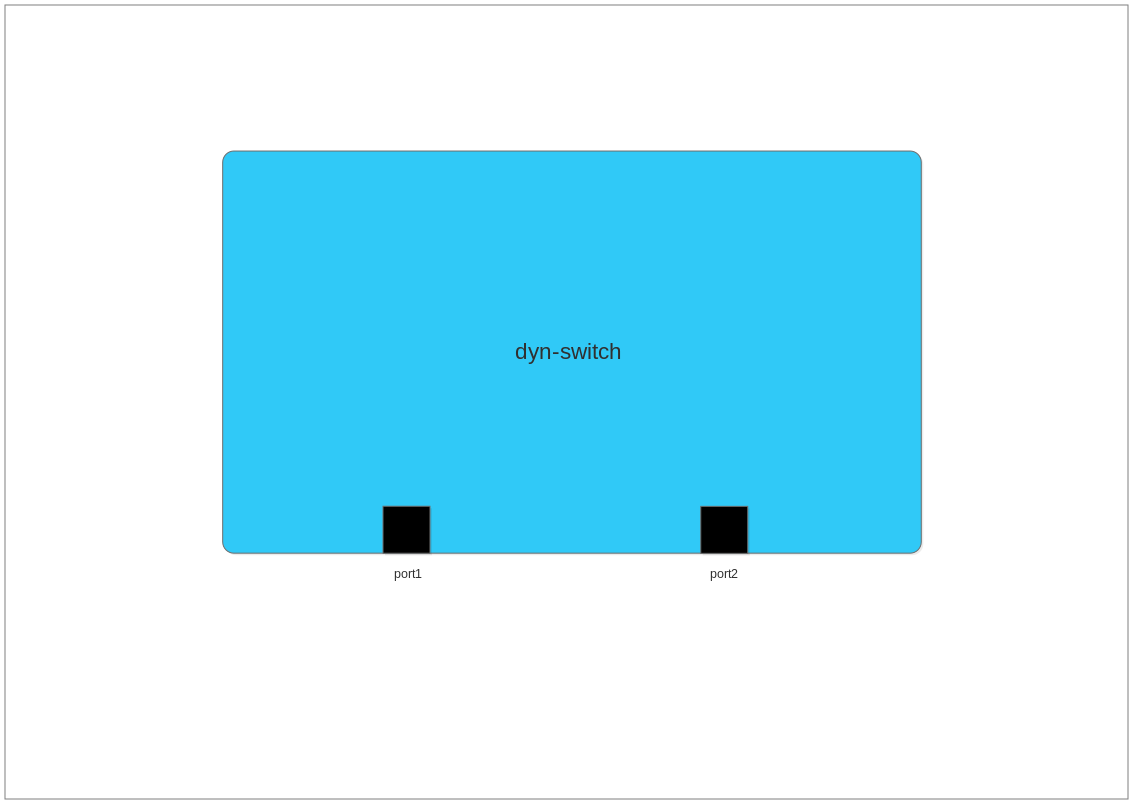
For our demonstration, we will use a very simple logical switch with two ports:
Switch configuration
Let's start with the relevant options you can set, and then we'll look at some examples that use these options. All of these are set as other_config on logical switches.
subnet: This is an IPv4 subnet, specified as a network address and mask. For example,10.0.0.0/8or10.0.0.0/255.0.0.0.exclude_ips: This is a list of IPv4 addresses that should not be assigned to switch ports. You can either comma-separate individual addresses, or you can specify a range of addresses using...ipv6_prefix: This is an IPv6 network address of 64 bits. If you provide a longer address size than 64 bits, those bits past the first 64 are ignored. The IPv6 address provided on each switch port is an EUI-64 address using the specified prefix and the MAC address of the port.
Once you have these options set on your switch, it's then a matter of setting your switch ports up to make use of these options. You can do this in one of two ways.
Method #1:
$ ovn-nbctl lsp-set-addresses port 00:ac:00:ff:01:01 dynamic
Method #2:
$ ovn-nbctl lsp-set-addresses port dynamic
With method #1, you specify the MAC address, and with method #2, you allow OVN to allocate the MAC address for you.
Demonstration
So let's go forth with an example where we do some basic setup:
$ ovn-nbctl ls-add dyn-switch
$ ovn-nbctl set Logical_Switch dyn-switch other_config:subnet=192.168.0.0/24 \
other_config:ipv6_prefix=fdd6:8cf5:9dc2:c30a::
$ ovn-nbctl lsp-add dyn-switch port1
$ ovn-nbctl lsp-set-addresses port1 dynamic
$ ovn-nbctl lsp-add dyn-switch port2
$ ovn-nbctl lsp-set-addresses port2 "00:ac:00:ff:01:01 dynamic"
With this setup, we've created a logical switch called dyn-switch and created two ports called (inventively) port1 and port2.
So what happens when you do this? Let's take a look at the database contents for the logical switch ports at the moment:
$ ovn-nbctl list logical_switch_port
_uuid : 2d1fe408-f119-48d6-88c9-dff237c92856
addresses : [dynamic]
dhcpv4_options : []
dhcpv6_options : []
dynamic_addresses : "0a:00:00:00:00:01 192.168.0.2 fdd6:8cf5:9dc2:c30a:800:ff:fe00:1"
enabled : []
external_ids : {}
name : "port1"
options : {}
parent_name : []
port_security : []
tag : []
tag_request : []
type : ""
up : false

_uuid : 43867394-8d3b-4e36-a90d-5f635d6a084c
addresses : ["00:ac:00:ff:01:01 dynamic"]
dhcpv4_options : []
dhcpv6_options : []
dynamic_addresses : "00:ac:00:ff:01:01 192.168.0.3 fdd6:8cf5:9dc2:c30a:2ac:ff:feff:101"
enabled : []
external_ids : {}
name : "port2"
options : {}
parent_name : []
port_security : []
tag : []
tag_request : []
type : ""
up : false
Notice the dynamic_addresses for the two switch ports. This database column is automatically populated by ovn-northd based on IPAM configuration on the logical switch. For port1, we specified dynamic for the addresses, so OVN created a MAC address and IP address for us. You can recognize OVN-allocated MAC addresses because they always start with 0a.
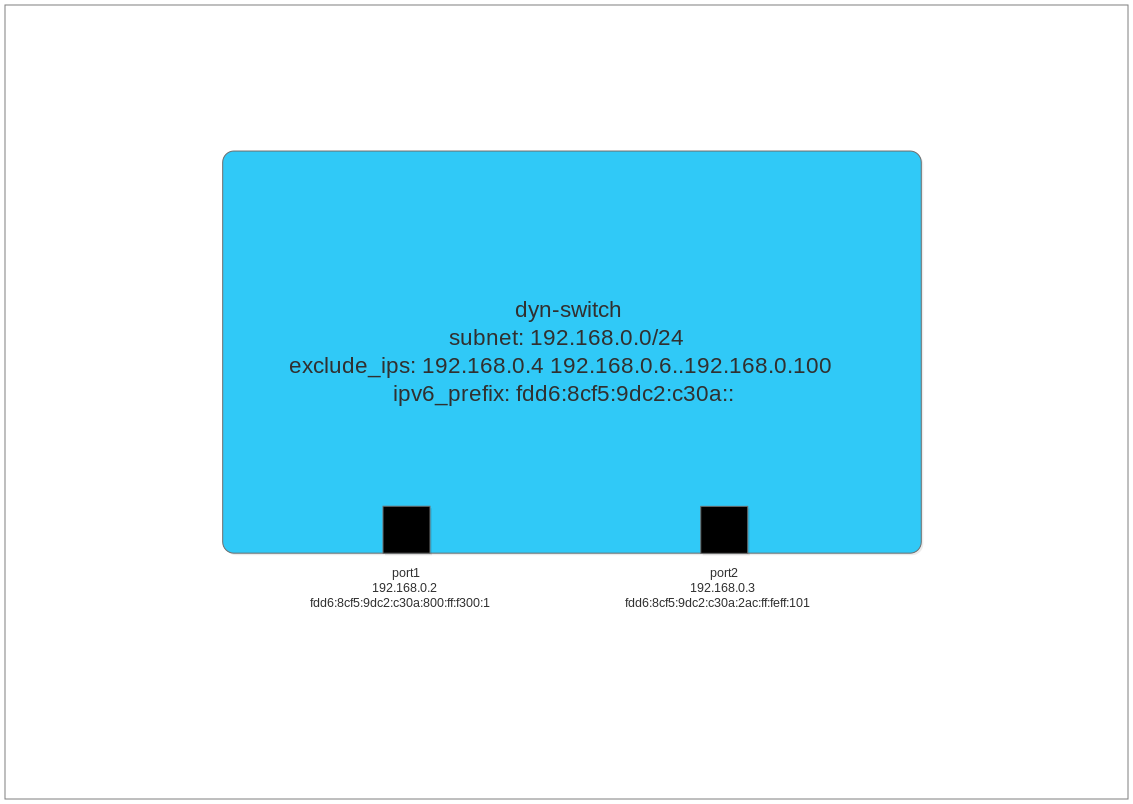
In picture form, our switch now looks like this:

port1 was assigned the IPv4 address 192.168.0.2, and port2 was assigned the address 192.168.0.3. Why does the addressing start with .2 instead of .1? OVN reserves the first address of a subnet for the router that the switch attaches to. In our case, there is no router, so no switch port was assigned 192.168.0.1. The current algorithm of ovn-northd assigns addresses consecutively within the subnet.
For the rest of this tutorial, we will work knowing that this is how ovn-northd operates. However, since the documentation does not state that this is how dynamic IPv4 addressing works, it may be risky to rely on this behavior in your application. A change in OVS versions may result in a change in addressing.
The IPv6 addresses for each port are EUI-64 addresses. The first 64 bits of the address are the ipv6_prefix that we configured. The rest of the address is derived from the MAC address. When configuring an ipv6_prefix, keep in mind that even though only the first 64 bits of the address are used, OVN expects a valid IPv6 address to be provided. Therefore, if you are providing 64 bits, be sure to end the address with :: so that OVN will process it as expected.
Excluding IP addresses
Let's take a closer look at the exclude_ips option. Let's set up exclude_ips and then set up additional ports to see what happens.
$ ovn-nbctl set Logical_Switch dyn-switch other_config:exclude_ips="192.168.0.4 \
192.168.0.6..192.168.0.100"
Before continuing, let's take a closer look at the syntax. First, we specified one IP address: 192.168.0.4. This means that this individual IP address will not be dynamically assigned. Next, we specified a range of IP addresses using ... This is a lot more practical than spelling out the 95 IP addresses from 192.168.0.6 to 192.168.0.100. The quotation marks around the string are necessary so that the shell does not interpret the spaces between addresses as separate arguments to ovn-nbctl.
Only IPv4 addresses can be specified in exclude_ips. Since IPv6 addresses are derived from the port's MAC address, there is no point in specifying any excluded addresses.
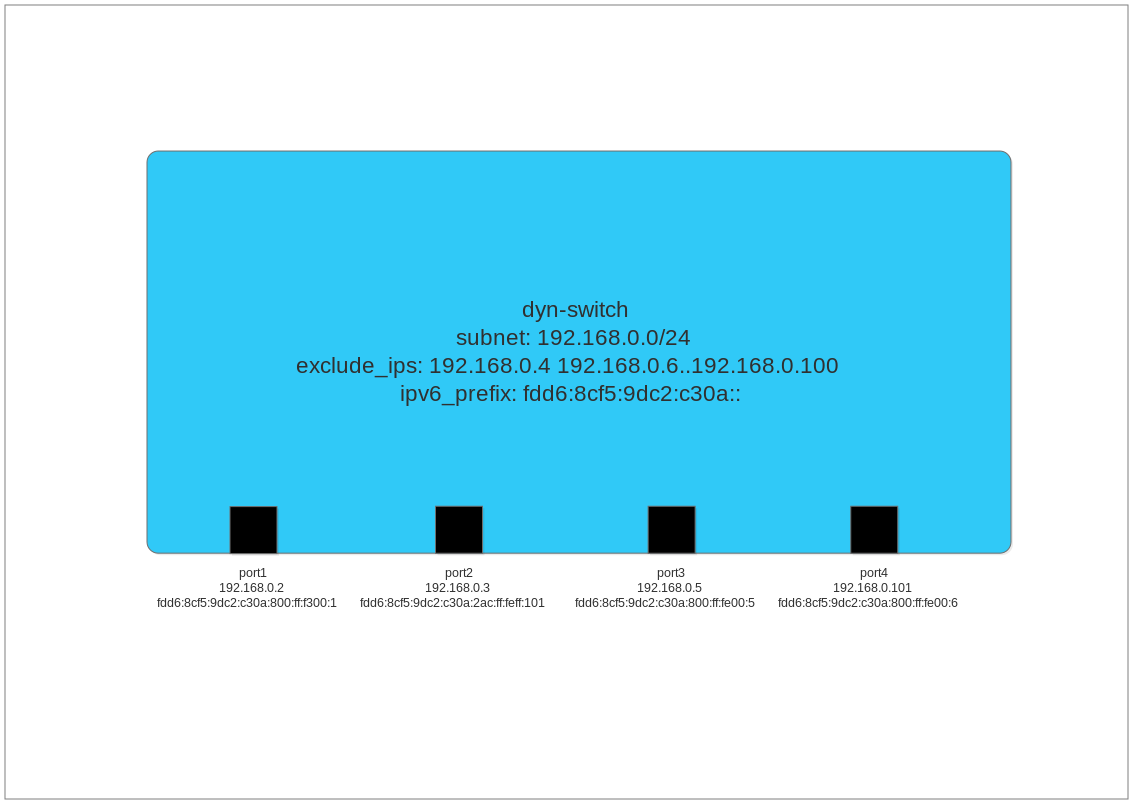
And now let's set up two more ports on the switch.
$ ovn-nbctl lsp-add dyn-switch port3
$ ovn-nbctl lsp-set-addresses port3 dynamic
$ ovn-nbctl lsp-add dyn-switch port4
$ ovn-nbctl lsp-set-addresses port4 dynamic
Based on the pattern we had previously seen, we might expect for port3 to have IP address 192.168.0.4. However, that address is in our excluded set of IP addresses. Let's see what port3 has been assigned:
$ ovn-nbctl list logical_switch_port port3
_uuid : 9dfee1d5-a279-4a06-a66e-5178b6f2f3e0
addresses : [dynamic]
dhcpv4_options : []
dhcpv6_options : []
dynamic_addresses : "0a:00:00:00:00:05 192.168.0.5 fdd6:8cf5:9dc2:c30a:800:ff:fe00:5"
enabled : []
external_ids : {}
name : "port3"
options : {}
parent_name : []
port_security : []
tag : []
tag_request : []
type : ""
up : false
It got assigned 192.168.0.5. And let's see what IP address got assigned to port4:
$ ovn-nbctl list logical_switch_port port4
_uuid : d7d20a60-2720-4056-904f-2f4ad3be4b0b
addresses : [dynamic]
dhcpv4_options : []
dhcpv6_options : []
dynamic_addresses : "0a:00:00:00:00:06 192.168.0.101 fdd6:8cf5:9dc2:c30a:800:ff:fe00:6"
enabled : []
external_ids : {}
name : "port4"
options : {}
parent_name : []
port_security : []
tag : []
tag_request : []
type : ""
up: false
It got assigned 192.168.0.101 since all addresses between 192.168.0.6 and 192.168.0.100 are in our excluded set.
Here is our final logical switch:
What's to come
With all this, you should have the tools you need to set up IP addresses on your logical switches without the need to keep track of assigned addresses in your application.
But there's more to this than what I have presented here. In part 2 of this blog series, we'll look at some of the downsides in the IPAM implementation of OVN, and we will delve into improvements that are coming in an upcoming version of OVN.
Last updated: September 27, 2018