The aim of this tutorial is to configure Red Hat Single Sign On (RH-SSO) to work as an Identity Provider (IdP) for Liferay DXP through SAML.
Liferay DXP supports functionalities for Single Sign On (SSO) such as NTLM, OpenID, and Token-based and integration with IdPs like Google and Facebook. But when it comes to enterprise environments, the requirements may be stricter, especially regarding integration with externals IdPs.
Red Hat Single Sign On (RH-SSO), which is the enterprise version of Keycloak, can be an identity provider in a company with restrictions to externals IdPs. It is a common scenario to use RH-SSO for identity management, backed up by a LDAP server. In scenarios like this, the other company's applications will require integration with RH-SSO in order to implement Single Sign On capabilities across the environment.
One way to implement integration with RH-SSO is using SAML, which is an open source standard for exchanging authentication and authorization data between two actors. The data exchanged is in the XML format, containing user information encrypted with certificates using a secure connection (HTTPS). Fortunately, Liferay DXP provides integration with SAML.
Common Use Case
Following is a summarized flow exemplifying a sample authentication use case between Liferay DXP and RH-SSO.
- The user requests a page on the company portal.
- The portal identifies that the user is not authenticated and redirects the user to the Identity Provider, in this case RH-SSO.
- RH-SSO authenticates the user via one of the methods configured to it (Basic Auth, Forms, Kerberos, etc).
- The user is redirected back to the portal with SAML data.
- Finally, the portal uses the SAML data to authorize the user based on his/her information (email, screen name, full name, group, etc.). If it is a new user, the portal creates the user on its own database.
Steps to use SAML as an SSO mechanism
The first step is to set up RH-SSO as the SAML Identity Provider and then map the user data to be dispatched once the user is authenticated.
The final step is to set up Liferay DXP as a SAML Service Provider (SP). There is official documentation from Liferay explaining how to do this (used as reference on this guide).
Configure Red Hat Single Sign On as a SAML Identity Provider
At this stage, it is expected that there is a fully functional RH-SSO server with LDAP or other User Federation pre-configured . This RH-SSO installation guide can be used for this task.
Follow the steps below to set up RH-SSO as a SAML Identity Provider.
1) Log in to the RH-SSO administration console. In the left menu under the “Configure” section, click on “Clients”.
2) Click “Create” and fill in the “Client ID” property with the ID that is going to be used later to configure the Liferay Portal. Select the option “saml” in the “Client Protocol” property. The image below illustrates this process.

3) Click “Save” to create the new client and more options appears. The default options should work fine in standard configurations. The redirect URLs from the Service Provider are updated later when the Liferay DXP configuration finishes.
4) Click on “Installation” tab, choose the option “SAML Metadata IDPSSODescriptor” and download it. This file contains information about the RH-SSO Identity Provider and should be used to link with Liferay DXP.

Mapping the RH-SSO User Model to the SAML Client
Liferay DXP needs data about the user who is logging in, such as email, first name, last name and so on. It is necessary to provide this information in order to map the user model from RH-SSO to the SAML client. After RH-SSO authenticates the user, the user information is passed through XML to Liferay.
The following instructions require that an LDAP User Federation have already been set up in the RH-SSO. There are detailed instructions about this process in the RH-SSO manual, in the User Storage Federation section
The process to map the user properties from LDAP to SAML clients is explained below. Follow these steps to create the mappers that are needed to provide user attributes required for Liferay DXP in the authentication process. At minimum, the username attribute should be provided for the process to work correctly.
1) Add a LDAP mapper to the attribute in the User Federation. For some attributes, a mapper is already created (last name, first name, and some other basic attributes). In the console, under the User Federation, select the LDAP provider and then the Mappers tab.
Create a new user-attribute-ldap-mapper for all LDAP attributes required. For example, the email attribute is created like this:
Name: email
Type: user-attribute-ldap-mapper
User Model Attribute: email (attribute name in RH-SSO)
LDAP Attribute: mail (attribute name in LDAP)
Read Only: ON/OFF
Always Read Value From LDAP: ON/OFF
Is Mandatory In LDAP: ON/OFF
Is Binary Attribute: OFF

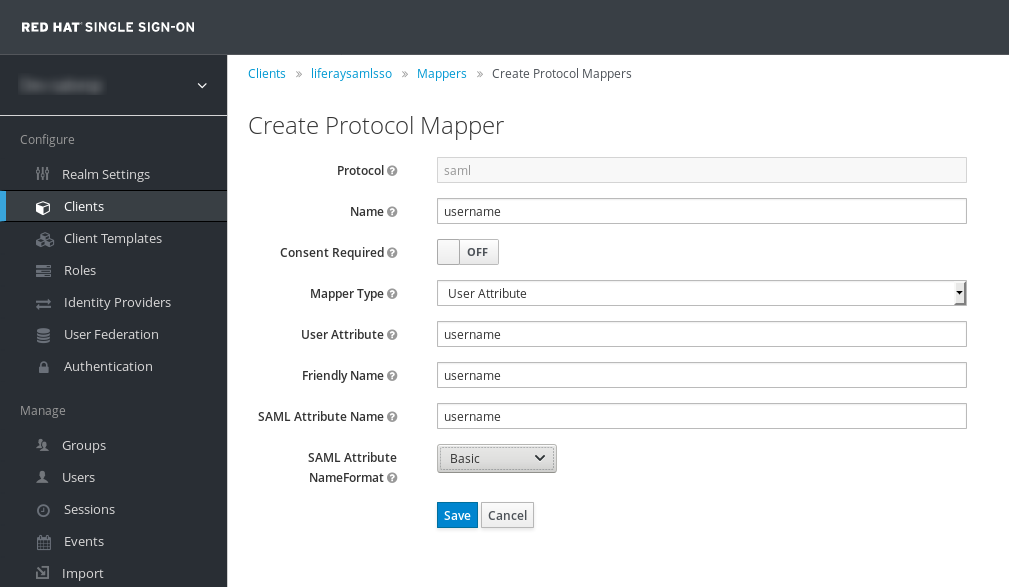
2) Add a protocol mapper. The mapper moves the attribute from the RH-SSO User Model to the SAML protocol assertion. In the console, under Clients, select the SAML client and then select Mappers. Add a User Property mapper. Following the previous email example:

Name: email
Consent Required: OFF
Mapper Type: User Property
Property: email (This is the "User Model Attribute" in the previous mapper, name of the attribute in RH-SSO)
Friendly Name: email
SAML Attribute Name: email
Name Format: Basic
Setting up Liferay DXP as SAML Service Provider
Now it’s time to configure Liferay to perform the Service Provider role. Following is the summary of some steps from Liferay’s official documentation.
1) Install the SAML 2.0 Provider EE app, either using the Control Panel’s Marketplace interface or manually.
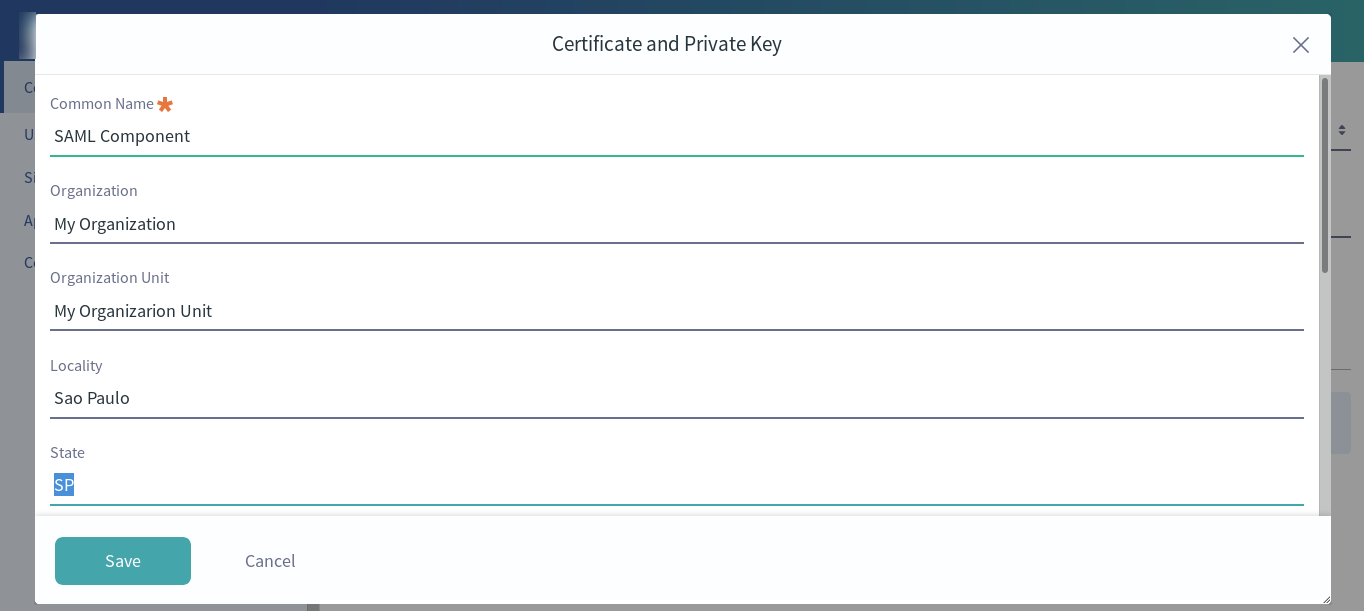
2) Set Liferay as a Service Provider SAML role by selecting this option on the “SAML Admin” menu. Enter the service provider name and then click “Save”.

A new section entitled “Certificate and Private Key” appears.
3) The Certificate and Private Key section allows you to enter information that is used to create a keystore for SAML.
Enter the following information:
- A common name (may be an administrator first and last name)
- Name of the organization
- Name of the organizational unit
- The city or locality
- The state or province
- Country
- The length in days that the keystore will remain valid (how long before the keystore expires)
- Key algorithm (RSA is the default)
- The key length in bits (2048 is the default)
- Key password
After entered all the required information, click Save.
4) Now it’s possible to view information about the certificate or to download it. Download it and if doesn’t fail, the keystore creation was successful. After you have created a keystore, additional options appear in the SAML Admin Control Panel:
- General
- Service Provider
- Identity Provider Connection
5) The certificate downloaded in the previous step is used as the input to finish the RH-SSO configuration. Save it in a safe location.
Linking Liferay DXP and RH-SSO
The last piece of configuration that is required to complete the integration between Liferay DXP and RH SSO via SAML is to define the IdP options on the “SAML Admin” configuration page:
1) Log in to the Liferay DXP and click in the “SAML Admin” menu.
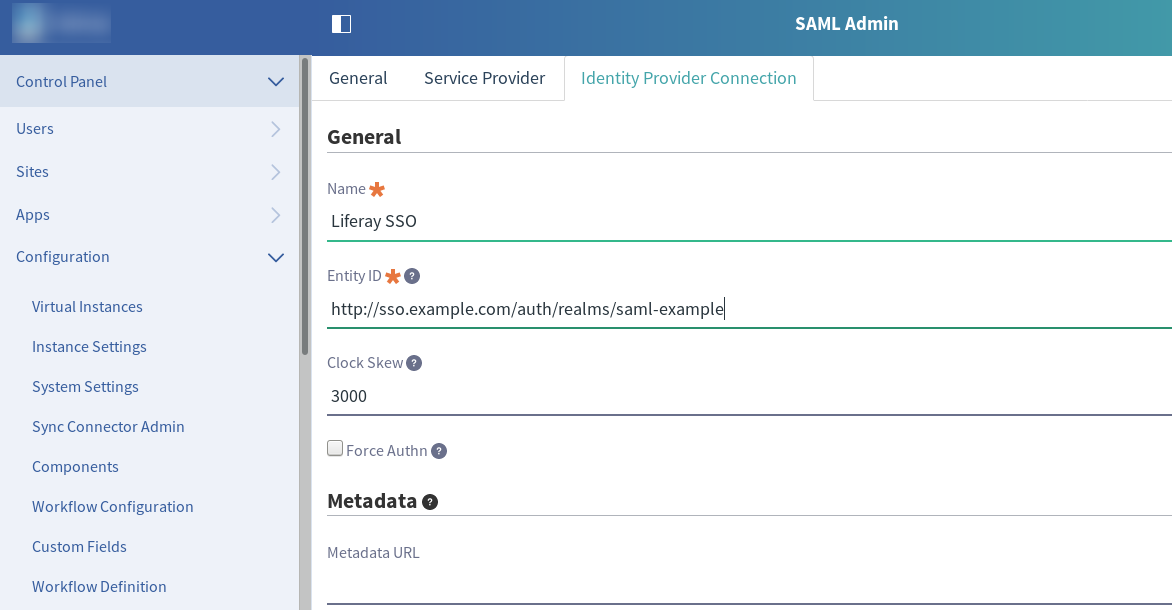
2) Click on “Identity Provider Connection” tab and enter a name for your configuration.
3) Enter the RH-SSO Realm URL at the “EntityID” field, for example: http://rhsso.mycorporate.com/auth/realms/myrealm. This information is provided by the XML downloaded from RH-SSO in the “entityID” attribute.
4) Leave “Name Identifier” as “Unspecified”.
5) Upload the metadata XML file that was downloaded from RH-SSO in the previous section, “Configure Red Hat Single Sign On as SAML Identity Provider”.
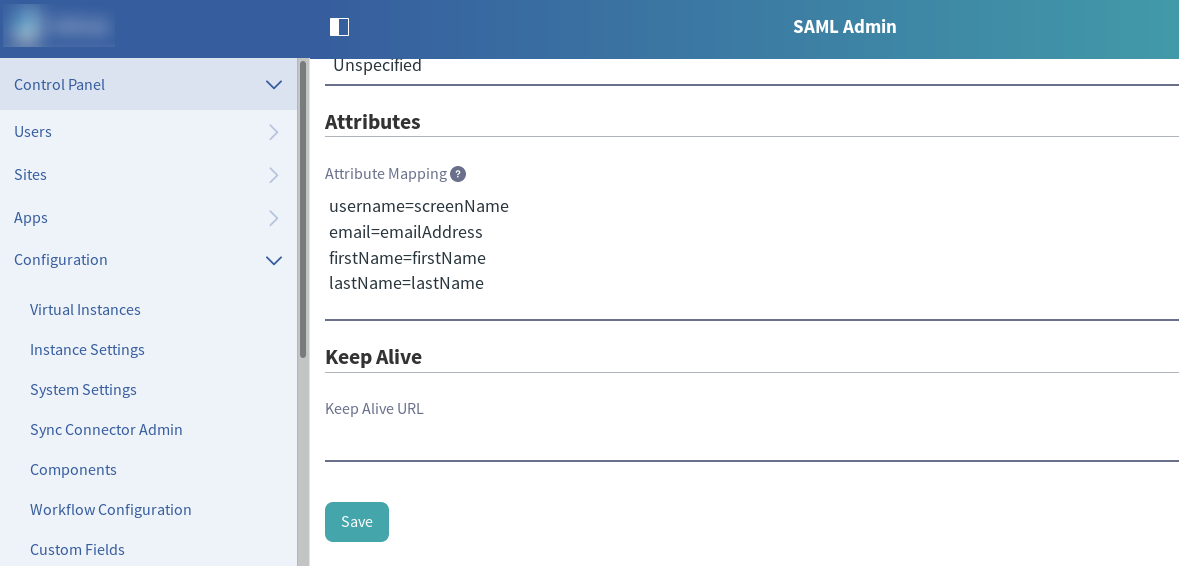
6) In the “Attributes” section, map the Liferay user attributes with those created at the previously section, “Mapping RH-SSO User Model to SAML Client”. The “SAML Attribute Name” field created there is the property name that should be used during mapping.
The Liferay attributes are: emailAddress, screenName, firstName, lastName and uuid.
Make sure to map at least the screenName and email attributes because it’s required for Liferay to create the user during the authentication process. The format is the SAML attribute following by Liferay’s. One attribute per line:
username=screenName
email=emailAddress
7) Click in “Save” to update the configuration.
8) Go back to “General” tab and enable the SAML (click on “Enable” checkbox).
9) Login into RH-SSO and go to Clients, the configured Liferay SAML client, and then to SAML Keys. Click on “Import” and import the certificate previously downloaded from Liferay Portal. Check if the certificate was correctly updated:

After performing those steps the configuration should be ready to use. To verify, try to sign off and log back in again. Liferay should redirect the user to the RH-SSO authentication mechanism and then get back to the portal already authenticated.
Troubleshooting SAML integration
First thing you have to do to test this integration is set up a clear environment with network access to both Liferay DXP and RH-SSO. After that, follow the procedures below to overcome common issues that may arise during SAML configuration.
I’m receiving “Redirect Error” from RH-SSO console after authenticating
Check if the URLs are corrected mapped in “Clients” tab on the RH-SSO console. The hostname must match with the Liferay’s and the URL accessed through the browser. Also, check if RH-SSO has access to the hostname specified. Tip: if the servers aren’t in the same location, “localhost” as a redirect URL won’t work.
I’m facing message sign issues during SAML request to RH-SSO
Check if the Liferay’s certificate was successfully imported into the RH-SSO client configuration. See the tab “SAML Keys”; the certificate field must contain the certificate file from Liferay. Open the certificate file in a text editor and check if the content matches what is in this field.
Liferay is complaining about required fields during authentication of a new user
Another common issue is Liferay complaining about missing user attributes during SAML parsing. Liferay’s logs displays messages like this:
17:42:07,023 ERROR [http-nio-8080-exec-4][BaseSamlStrutsAction:46] com.liferay.portal.kernel.exception.ContactNameException$MustHaveFirstName: Contacts must have a first name
Check if the SAML mapper attributes in RH-SSO are correctly defined according to section Mapping RH SSO User Model to SAML Client (add anchor) in this post. Also, check if the User Model in RH-SSO, has the missing attribute complained by Liferay. For example, does the LDAP user have an email associated with it?
Lastly, verify that the attribute mapper in Liferay SAML settings is correct. It is a key value pair separated by an equal sign (=), one per line: “username=screenName”. The key is SAML attribute first, followed by Liferay’s user property.
To debug SAML responses, please check this article. Decode the SAML response using this online tool and check the user attributes.
References
- Setting up Liferay as a SAML Service Provider from Liferay’s official documentation
- OIDC Token and SAML Assertion Mappings
- LDAP/Federation mappers from Red Hat Single Sign On manual
- How to map user attributes from LDAP User Federation to SAML Client in Red Hat Single Sign-On 7.x?
- How to View a SAML Response in Your Browser for Troubleshooting
