We hear about Microservices a lot nowadays. Its implementation requires us to deal with new challenges. A key question that comes with using microservices is how to handle interactions in an asynchronous way. The answer to that is messaging.
Among other things, messaging features the following:
- Loose coupling since it decouples client from services.
- Improved availability since the message broker buffers messages until the consumer is able to process them.
- Supports a variety of communication patterns including request/reply, notifications, request/async response, publish/subscribe, publish/async response and more.
One of the most famous products in messaging is JBoss A-MQ. Among the questions I receive from customers is whether it’s possible to run Red Hat JBoss A-MQ on Red Hat OpenShift. The answer is yes, Red Hat JBoss A-MQ (A-MQ) is available as a containerized image that is designed for use with OpenShift. It allows developers to quickly deploy an A-MQ message broker in a hybrid cloud environment.
The configuration of the broker can be performed two ways:
- using the S2I (Source-to-image) tool. A complete example here that you can follow step by step: amq62-basic-s2i.
- using parameters specified in the A-MQ application template.
Before we proceed with how to deploy A-MQ on OpenShift, let's take a look at different A-MQ architectures in high availability environment.
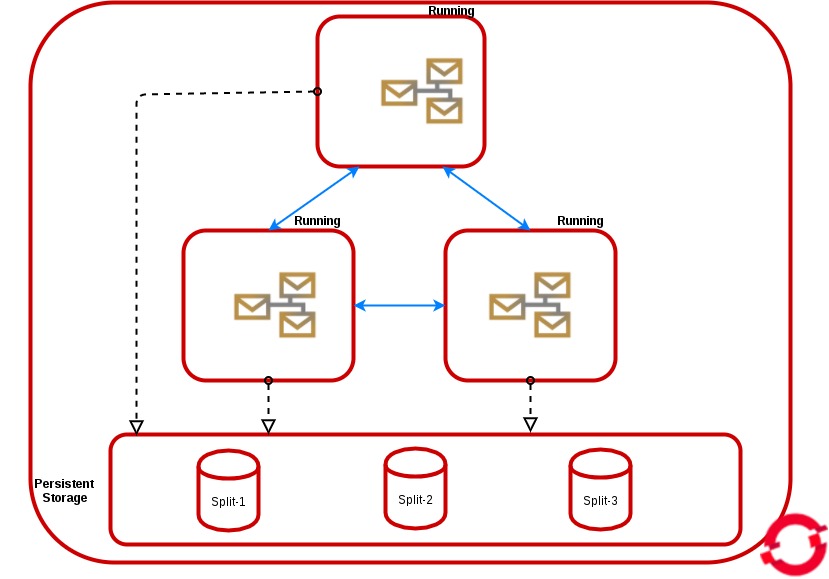
A-MQ in HA (High Availability) environment
Horizontal Scaling: Load Balancing
We can get this HA architecture by scaling a pod in persistent or non persistent storage. In the non-persistent mode, all instances don't have a persistentVolumeClaim but they share the same service.
In persistent mode, all instances share the same service and they have a persistent volume claim bound to the available persistent volume.
In both modes, the messages will be dispatched to the active consumer and the producers will be distributed across all of the available brokers, All the brokers will be discovered and automatically networked together in a mesh configuration, the discovery is based on the Kubernetes Service abstraction that you can configure also from the environment variable MESH_SERVICE_NAME. All the pods are in "Running status" and share the load.
To realize this HA architecture, you only have to specify the parameter "AMQ_SPLIT=true" in the configuration. This will result in the server creating independent split-n directories for each instance within the Persistent Volume which can then be used as their data store. This is now the default setting in all persistent templates.
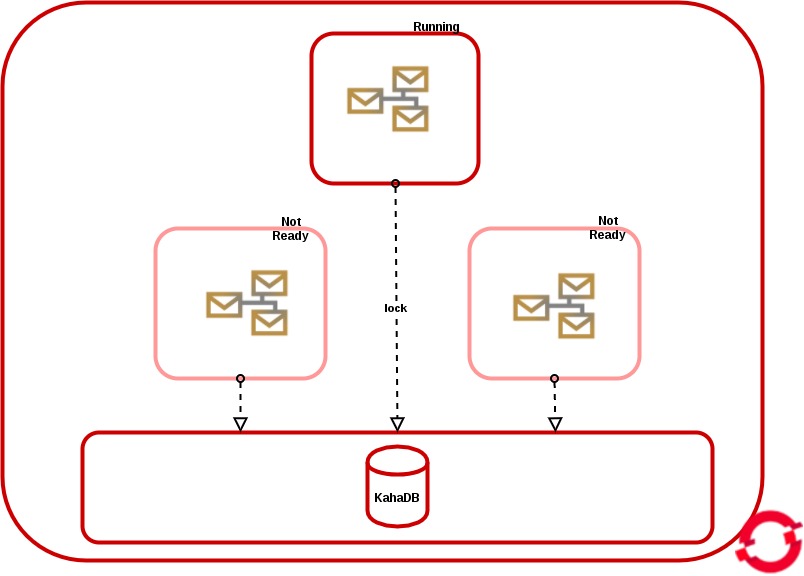
Vertical Scaling: Master/Slave
The Master/Slave setup is realized only by setting the parameter “AMQ_SPLIT=false” in the configuration and only in persistent mode.
The “master” instance gets the file lock and if we scale up, all the new pods will be in “Not Ready” status, and their brokers will be “slave” and polling until the lock is released.
Deploy A-MQ on OpenShift
The rest of this post will be based on A-MQ Application templates, and especially on on amq-persistent-ssl template, since it's the way to access to the broker from external clients via its SSL transports.
Before we get started, you must create a persistent volume in OpenShfit and it should be in available status.
Install A-MQ Image Stream:
To update to the latest xPaaS image run the following steps to pull in the content:
1. On your master host(s), ensure you are logged into the CLI as a cluster administrator or user that has project administrator access to the global “openshift” project. For example:
$ oc login -u system:admin
2. Run the following commands to update the core AMQ OpenShift image stream in the “openshift” project, note that it is normal to see error messages saying some image streams already exist while issuing the create:
$ oc create -n openshift -f \
 https://raw.githubusercontent.com/jboss-openshift/application-templates/ose-v1.4.5/jboss-image-streams.json

$ oc replace -n openshift -f \
 https://raw.githubusercontent.com/jboss-openshift/application-templates/ose-v1.4.5/jboss-image-streams.json

$ oc -n openshift import-image jboss-amq-62
$ oc -n openshift import-image jboss-amq-63
3. Run the following commands to update the AMQ templates:
$ for template in amq62-basic.json \
 amq62-ssl.json \
 amq63-persistent-ssl.json \
 amq62-persistent.json \
 amq63-basic.json \
 amq63-ssl.json \
 amq62-persistent-ssl.json \
 amq63-persistent.json;
 do
 oc replace -n openshift -f \
 https://raw.githubusercontent.com/jboss-openshift/application-templates/ose-v1.4.5/amq/${template}
 done
Deploy A-MQ:
You can deploy your A-MQ Broker directly from the Web Console, by using the URL (Adding as suffix /console/create?template=amq63-persistent-ssl):
e.g;
https://openshift.amqocp.redhat.com/console/create?template=amq63-persistent-ssl
Or you can use oc (openshift client):
 oc project amq-demo

 echo '{"kind": "ServiceAccount", "apiVersion": "v1", "metadata": {"name": "amq-service-account"}}' | oc create -f -

 oc policy add-role-to-user view system:serviceaccount:amq-demo:amq-service-account
You must create a set of keys to run A-MQ inside of Openshift. If you do not have an enterprise one, you can follow the steps below to create a set of SSL Keys.
The rest of commands in order to create secret, the amq service account, create the broker and create routes to expose the transport connector to the external clients:
keytool -genkey -noprompt -trustcacerts -alias broker -keyalg RSA -keystore broker.ks -keypass password -storepass password -dname "cn=Abel, ou=engineering, o=company, c=US"
keytool -export -noprompt -alias broker -keystore broker.ks -file broker_cert -storepass password
keytool -genkey -noprompt -trustcacerts -alias client -keyalg RSA -keystore client.ks -keypass password -storepass password -dname "cn=Abel, ou=engineering, o=company, c=US"
keytool -import -noprompt -trustcacerts -alias broker -keystore client.ts -file broker_cert -storepass password

oc secrets new amq-app-secret broker.ks
oc secrets add sa/amq-service-account secret/amq-app-secret

oc process amq63-persistent-ssl -p APPLICATION_NAME=amq63 -p MQ_USERNAME=admin -p MQ_PASSWORD=admin -p AMQ_STORAGE_USAGE_LIMIT=1gb -p IMAGE_STREAM_NAMESPACE=openshift -p AMQ_TRUSTSTORE_PASSWORD=password -p AMQ_KEYSTORE_PASSWORD=password -p AMQ_SECRET=amq-app-secret -p AMQ_KEYSTORE=broker.ks -p AMQ_TRUSTSTORE=broker.ks -n amq-demo | oc create -f -

oc create route passthrough --service amq63-amq-tcp-ssl
oc create route passthrough --service amq63-amq-stomp-ssl
oc create route passthrough --service amq63-amq-amqp-ssl
oc create route passthrough --service amq63-amq-mqtt-ssl
At the end, you should run (watch oc get pods) until the 2 pods were in Running status, like the following:
[cloud-user@master-0 ~]$ oc get pods
NAME                    READY     STATUS    RESTARTS   AGE
amq63-amq-2-m8fdh       1/1       Running   0          2m
amq63-drainer-1-3rpgx   1/1       Running   0          8m
From the Web Console, you should see the following:
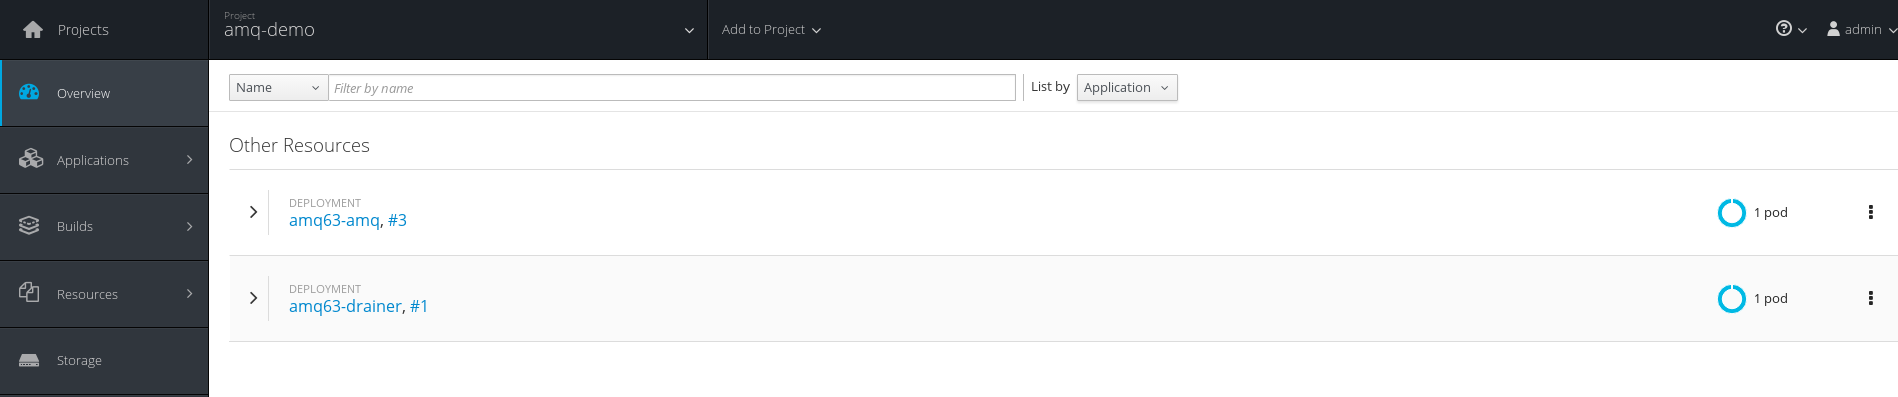
NB: If you wonder why 2 pods? and what's the role of this new drainer pod? The answer is here: Chapter 4. Get Started - Red Hat Customer Portal
Client Access to Broker
Your client needs to use an SSL transport. To configure your local JMS client to talk to the A-MQ broker instance on OpenShift:
1. Connect to the OpenShift and query the address of the OpenShift route.
$ oc get routes
 NAME                HOST/PORT                                                                 PATH      SERVICES            PORT      TERMINATION   WILDCARD
 amq63-amq-tcp-ssl   amq63-amq-tcp-ssl-amq-demo.apps.redhat.com             amq63-amq-tcp-ssl   <all>     passthrough   None
Note the HOST of the route, in this example: amq63-amq-tcp-ssl-amq-demo.apps.redhat.com.
2. You should copy the three files broker.ks, client.ks and client.ts to your local computer.
3. Configure your JMS client to use broker URL as obtained from step 1 and use SSL keystore client.ks and trustore client.ts from step 2.
e.g.
brokerUrl:
failover:(ssl://amq63-amq-tcp-ssl-amq-demo.apps.redhat.com:443)
SSL options:
-Djavax.net.ssl.keyStore=./client.ks

-Djavax.net.ssl.keyStorePassword=password

-Djavax.net.ssl.trustStore=./client.ts

-Djavax.net.ssl.trustStorePassword=password
That's all !!
Enjoy ;-)
Last updated: October 5, 2017