Red Hat JBoss Fuse provides an open source, lightweight, modular platform that enables you to connect a variety of services and systems across your application environment. And, included with Red Hat JBoss Developer Studio, is the Fuse Tooling that helps you take advantage of that platform.
The route editor initially focused on the parts of the Camel configuration inside the route or Camel context element, but in version 8.0.0, we began adding support for global elements such as data formats and endpoints on the Configurations tab. With the 10.0 release, we add support for beans that are outside the route.
This tutorial shows how to create a customizable service that uses a global Java bean and Camel XML. By the end, you will have a simple Fuse integration project, which includes a Camel test that verifies the bean logic.
The main steps in this tutorial are:
- Create a Fuse integration project.
- Create a bean in the project.
- Finish the bean class.
- Create a route.
- Create a test.
- Finish the generated test.
Prerequisites: Eclipse Oxygen is required. During installation of Red Hat Developer Studio 11.0, you should have selected installation of JBoss Fuse Tooling.
Step 1: Create a Project
 First, we have to create a project for where we can put our code.
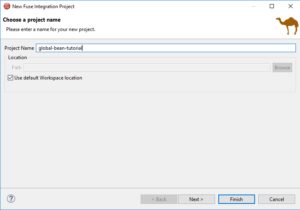
- In the Developer Studio menu bar, click File->New->Fuse Integration Project.
- In the new project wizard, in the Project Name field, enter
global-bean-tutorial. - Accept all defaults to create a new, empty Fuse project.
- Click Finish.
Fuse tooling will then build a new Blueprint Camel project, which can take a few moments.
Step 2: Create our Global Bean
 Create a simple Java bean to use in the Camel route:
- In the route editor, click the Configurations tab and then click Add.
- In the “Create new global element...” dialog, click Bean and then click OK.
- In the “Add Bean” dialog, in the Id field, enter
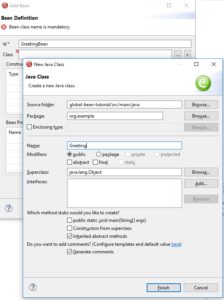
GreetingBean. - To the right of the Class field, click the + button to create a new class.
- In the “New Java Class” wizard:
- In the Package field, enter
org.example. - In the Name field, enter
Greeting. - Click Finish.
- In the Package field, enter
- In the “Add Bean” dialog, click Finish.
Step 3: Finish the Bean Class
The previous step created a rough outline for the Java bean. To finish the bean class and make it do something, change the code to something like this:
package org.example;

import java.util.ArrayList;
import java.util.List;

public class Greeting {

   private List messageCache = new ArrayList<>();
   private String greetingText = "Hello";

   public Greeting() {
      // empty
   }

   public Greeting(String newGreeting) {
      greetingText = newGreeting;
   }

   public String hello(String msg) {
      String helloMsg = greetingText + " " + msg;
      messageCache.add(helloMsg);
      return helloMsg;
   }

   public String toString() {
      return messageCache.toString();
   }
}
This simple bean has one method, hello(String);, that
- Attaches a greeting string to the beginning of the method argument.
- Caches the modified string.
- Returns the modified string.
The hello(String) method provides a way to customize the greeting in the constructor and to retrieve the cache. A Camel route can use these various points of entry into the bean code.
Step 4: Create a Route
 Create a route that will use the bean:
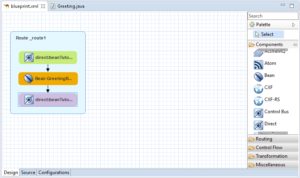
- In the route editor, click the Design tab.
- In the Palette, under Components, click and drag Direct onto the Route_route1 container. This tutorial uses the Direct component to keep the example simple. You can, of course, use a File component, JMS component, or some other component.
- With the new “direct” component in the route selected:
- Open the Properties view.
- Click the Details tab.
- In the Uri field, change the value to
direct:beanTutorial.
- In the Palette, under Components, click and drag the Bean component onto the direct component.
- With the Bean_bean1 component selected, in the Properties view:
- Select the Details tab.
- In the Ref field, display the dropdown list.
- Select the GreetingBean, which appears here because you previously added it as a global bean. This creates a reference to the global bean and inserts it into the route.
- In the Palette, drag another Direct component onto the Bean in the route.
- With the second “direct” component in the route selected, in the Properties view:
- In the Uri field, change the value to direct:beanTutorialOut. This creates the final destination for the route.
- Save the route.
Step 5: Create a Test
 In the project you created in step 1, create a test:
- In the Project Explorer view, in the src folder, create a new folder named
test. - In the test folder, create a new folder named
java. - In the Developer Studio menu bar, select File -> New -> Camel Test Case.
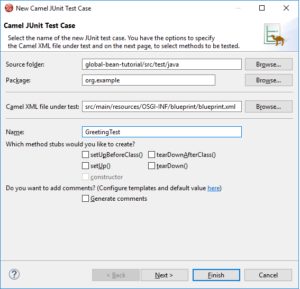
- In the New Camel JUnit Test Case wizard:
- Make sure the Source Folder path is
global-bean-tutorial/src/test/java. - In the Package field, enter
org.example. - To the right of the Camel XML file under test field, click Browse.
- Select the blueprint.xml file and click OK.
- In the Name field, enter
GreetingTest. - Click Finish.
- Make sure the Source Folder path is
Step 6: Finish the Generated Test
The Camel Test Case wizard generates a test class that extends CamelBlueprintTestSupport and provides some templated code. To finish the generated test, provide some sample input and output messages and then send them to the project’s Camel route.
Change your class to resemble the following:
package org.example;

import org.apache.camel.EndpointInject;
import org.apache.camel.Produce;
import org.apache.camel.ProducerTemplate;
import org.apache.camel.builder.RouteBuilder;
import org.apache.camel.component.mock.MockEndpoint;
import org.apache.camel.test.blueprint.CamelBlueprintTestSupport;
import org.junit.Test;

public class GreetingTest extends CamelBlueprintTestSupport {

  // Input message bodies to test with
  protected Object[] inputBodies =
    { "This is one bean example.",
      "This is another bean example." };

  // Expected message bodies
  protected Object[] expectedBodies =
    { "Hello This is one bean example.",
      "Hello This is another bean example."};

  // Templates to send to input endpoints
  @Produce(uri = "direct:beanTutorial")
  protected ProducerTemplate inputEndpoint;

  // Mock endpoints used to consume messages from the output
  // endpoints and then perform assertions
  @EndpointInject(uri = "mock:output")
  protected MockEndpoint outputEndpoint;

  @Test
  public void testCamelRoute() throws Exception {
     // Create routes from the output endpoints to our mock
     // endpoints so we can assert expectations
     context.addRoutes(new RouteBuilder() {
          @Override
          public void configure() throws Exception {
               from("direct:beanTutorialOut").to(outputEndpoint);
          }
     });

     // Define some expectations
     outputEndpoint.expectedBodiesReceivedInAnyOrder(expectedBodies);

     // Send some messages to input endpoints
     for (Object inputBody : inputBodies) {
          inputEndpoint.sendBody(inputBody);
     }

     // Validate our expectations
     assertMockEndpointsSatisfied();
  }

  @Override
  protected String getBlueprintDescriptor() {
     return "OSGI-INF/blueprint/blueprint.xml";
  }
}
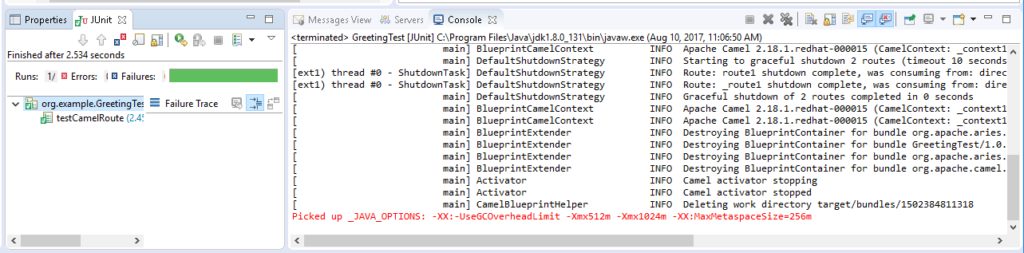
With these changes in place, in the Project Explorer view, right-click the GreetingTest class and select Run As -> JUnit Test. Your test should pass.
The next route editor bean tutorial article in this series will show how to:
- Update the route to be more specific about which bean method to call.
- Customize the greeting by passing a constructor argument.
- Update the test according to the route and bean updates.
Click here to for an overview of Red Hat JBoss Fuse a lightweight and modular integration platform.
Last updated: November 9, 2023