After Unlock your Hadoop data with Hortonworks and Red Hat JBoss Data Virtualization episode, let's continue the journey with another "Apache Hadoop" episode of the series: "Unlock your [….] data with Red Hat JBoss Data Virtualization." Through this blog series, we will look at how to connect Red Hat JBoss Data Virtualization (JDV) to different and heterogeneous data sources.
JDV is a lean, virtual data integration solution that unlocks trapped data and delivers it as easily consumable, unified, and actionable information. It makes data spread across physically diverse systems — such as multiple databases, XML files, and Hadoop systems — appear as a set of tables in a local database. By providing the following functionality, JDV enables agile data use:
- Connect: Access data from multiple, heterogeneous data sources.
- Compose: Easily combine and transform data into reusable, business-friendly virtual data models and views.
- Consume: Makes unified data easily consumable through open standards interfaces.
It hides complexities, like the true locations of data or the mechanisms required to access or merge it. Data becomes easier for developers and users to work with.
This post will guide you step-by-step on how to connect JDV to Cloudera Distribution Hadoop (CDH) via Cloudera JDBC Driver for Impala, using Teiid Designer. We will connect to a Cloudera Distribution Hadoop (CDH) using the Cloudera Impala Translator. A translator acts as the bridge between JBoss Data Virtualization and an external system.
Prerequisites
-
JDV 6.3 Environment
Download: https://developers.redhat.com/products/datavirt/overview
Install: https://developers.redhat.com/products/datavirt/overviewWe will refer to the installation directory of JDV 6.3 as $JDV_HOME.
-
Red Hat JBoss Developer Studio (JBDS) 9.1.0 with Teiid Designer plugins
Download: https://developers.redhat.com/download-manager/file/jboss-devstudio-9.1.0.GA-installer-eap.jar
Install: https://developers.redhat.com/products/datavirt/overview -
Cloudera JDBC Driver for Impala
Download: https://www.cloudera.com/downloads/connectors/impala/jdbc/2-5-37.html
Install: Follow the installation instructions.In this example, we will connect to a database called "unlockdata" with the username/password "cloudera_dev/cloudera_dev".
We will refer to the directory with this jar file as $DRIVER_HOME. -
Cloudera Impala Translator
The Cloudera Impala Translator is provided with JDV. No installation needed.
Note: Please visit to discover all the translators available with JDV. If you cannot find a suitable translator for your system then you can develop a custom one.
Install & Configure the Cloudera JDBC Driver for Impala on JDV
-
Create a JBoss module directory for the Cloudera JDBC Driver for Impala
$ mkdir -p $JDV_HOME/modules/system/layers/dv/com/cloudera/impala/main
-
Copy the Cloudera JDBC jar files into the new JBoss module directory created
$ cp $DRIVER_HOME/*.jar $JDV_HOME/modules/system/layers/dv/com/cloudera/impala/main
-
Create a module.xml file with content seen below, in the new JBoss modules directory created
<?xml version="1.0"?> <module xmlns="urn:jboss:module:1.1" name="com.cloudera.impala"> <resources> <resource-root path="commons-codec-1.3.jar"/> <resource-root path="commons-logging-1.1.1.jar"/> <resource-root path="hive_metastore.jar"/> <resource-root path="hive_service.jar"/> <resource-root path="httpclient-4.1.3.jar"/> <resource-root path="httpcore-4.1.3.jar"/> <resource-root path="ImpalaJDBC41.jar"/> <resource-root path="libfb303-0.9.0.jar"/> <resource-root path="libthrift-0.9.0.jar"/> <resource-root path="log4j-1.2.14.jar"/> <resource-root path="ql.jar"/> <resource-root path="slf4j-api-1.5.11.jar"/> <resource-root path="slf4j-log4j12-1.5.11.jar"/> <resource-root path="TCLIServiceClient.jar"/> <resource-root path="zookeeper-3.4.6.jar"/> </resources> <dependencies> <module name="javax.api"/> <module name="javax.transaction.api"/> </dependencies> </module> -
Start your local JDV 6.3 environment
$ $JDV_HOME/bin/standalone.sh
-
Add Cloudera JDBC Driver for Impala
$ $JDV_HOME/bin/jboss-cli.sh --connect
[standalone@localhost:9999 /] /subsystem=datasources/jdbc-driver=impala:add(driver-name=impala,driver-module-name=com.cloudera.impala,driver-class-name=com.cloudera.impala.jdbc41.Driver,driver-xa-datasource-class-name=com.cloudera.impala.jdbc41.DataSource)
-
Add Cloudera Datasource and enable it
[standalone@localhost:9999 /] data-source add --name=UnlockData_Cloudera_DS --jndi-name=java:/UnlockData_Cloudera_DS --connection-url=jdbc:impala://localhost:21050/unlockdata --driver-name=impala --user-name=cloudera_dev --password=cloudera_dev
[standalone@localhost:9999 /] data-source enable --name=UnlockData_Cloudera_DS
Start Your Development Environment
-
-
Start your local JDV 6.3 environment
$ $JDV_HOME/bin/standalone.sh
-
Start your local JBDS environment
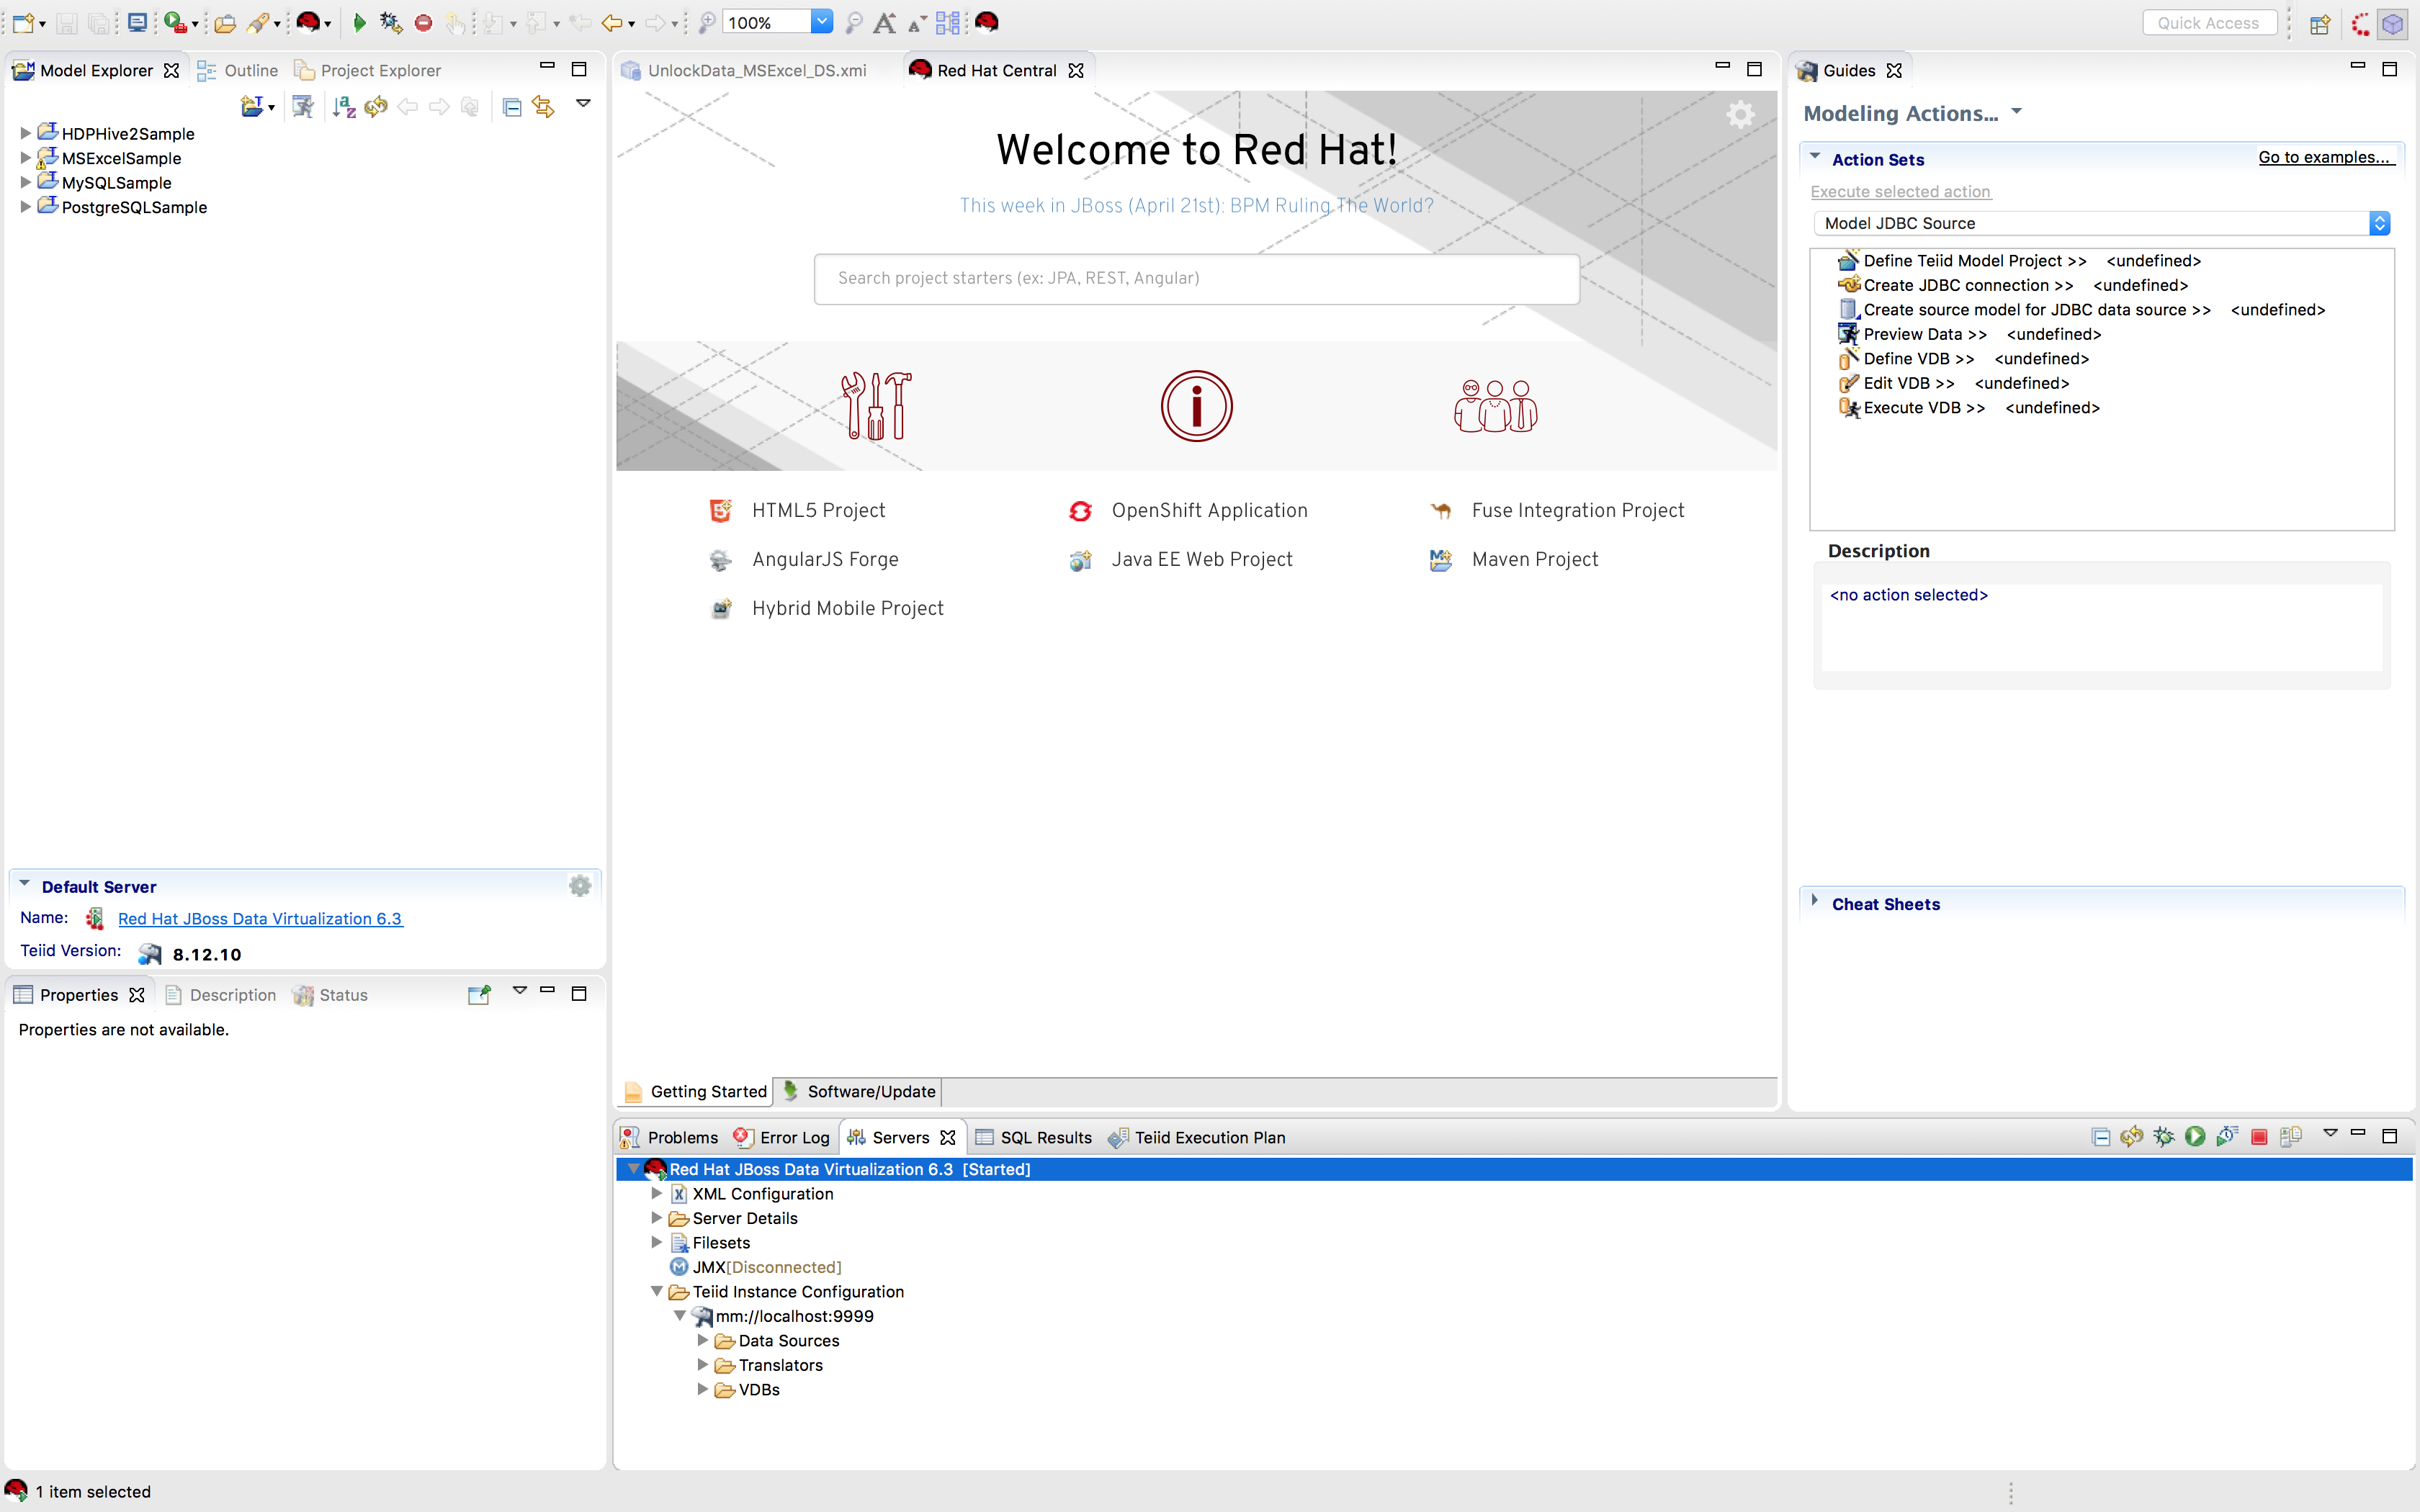
Start JBDS 9.1.0 and open the Teiid Designer Perspective as shown below:
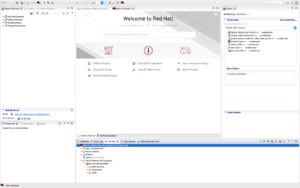
Note: Use the following menu options "Window" > "Perspective" > "Open Perspective" > "Other..." > "Teiid Designer" to set JBDS in Teiid Designer perspective
-
Create Your Teiid Project
-
-
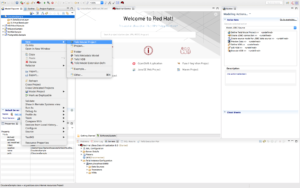
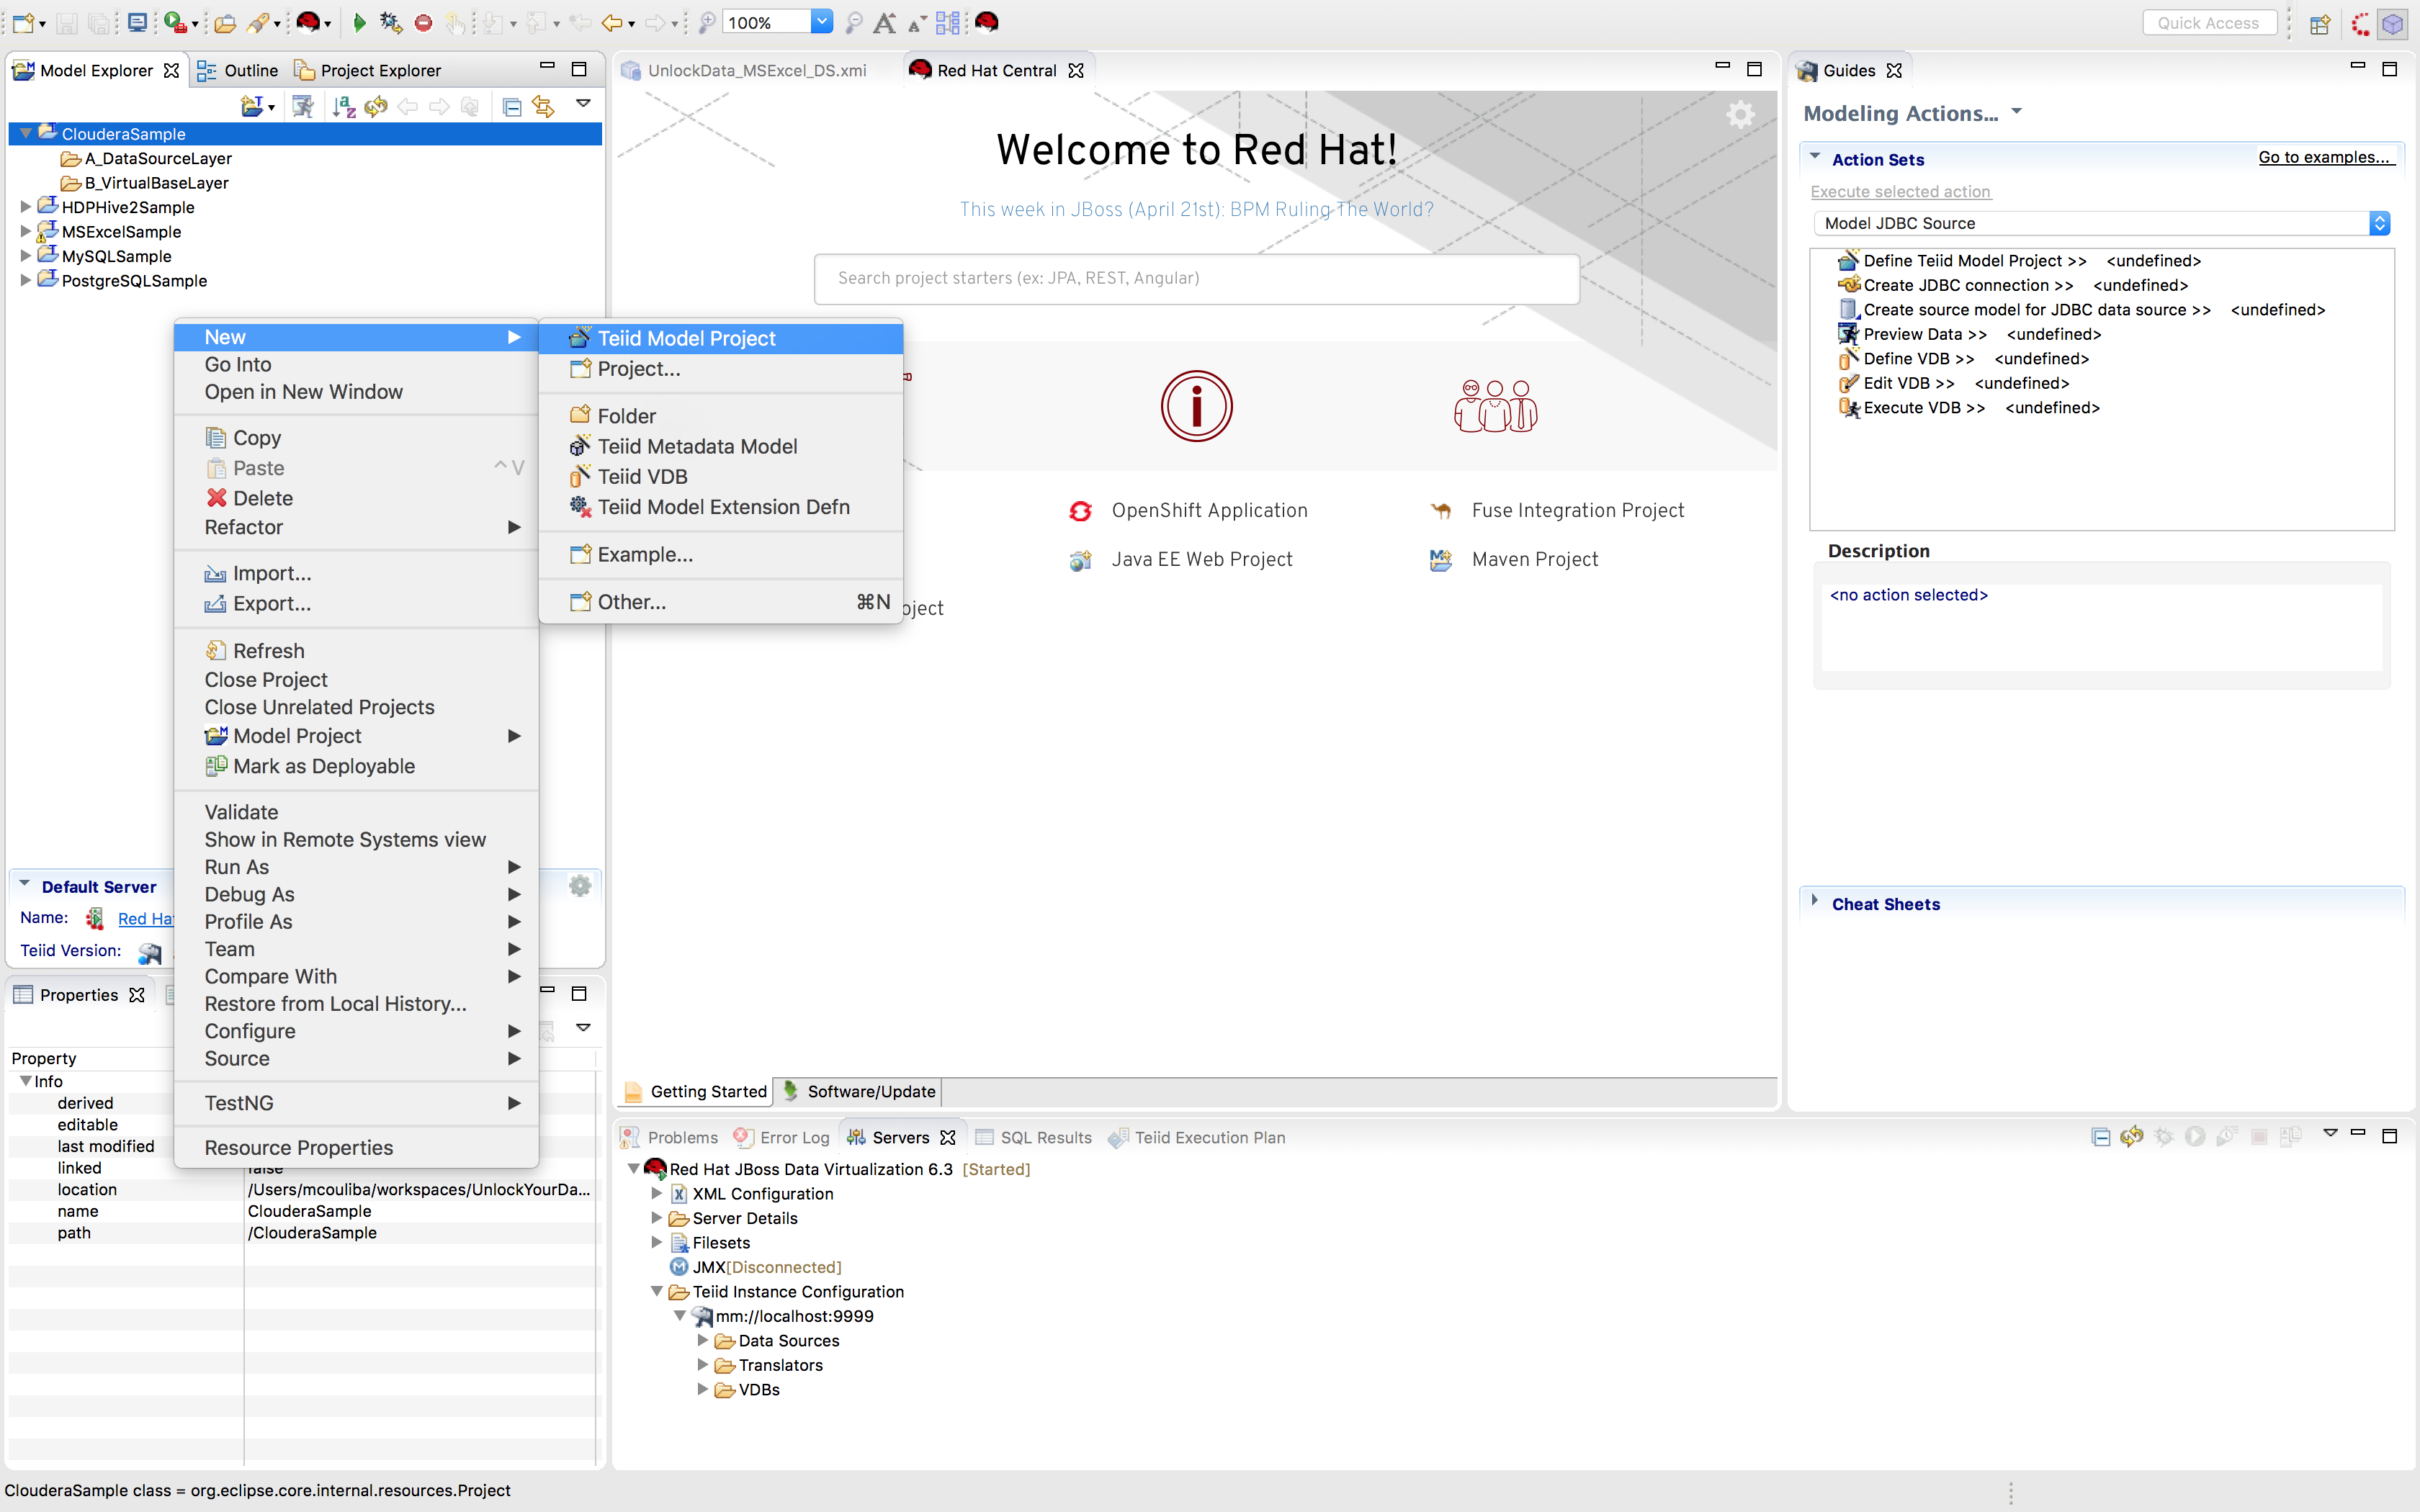
Create Teiid Model Project called "ClouderaSample"
Create a new Teiid Model project using right-click "New" > "Teiid Model Project" in the Model Explorer window as shown below:
-
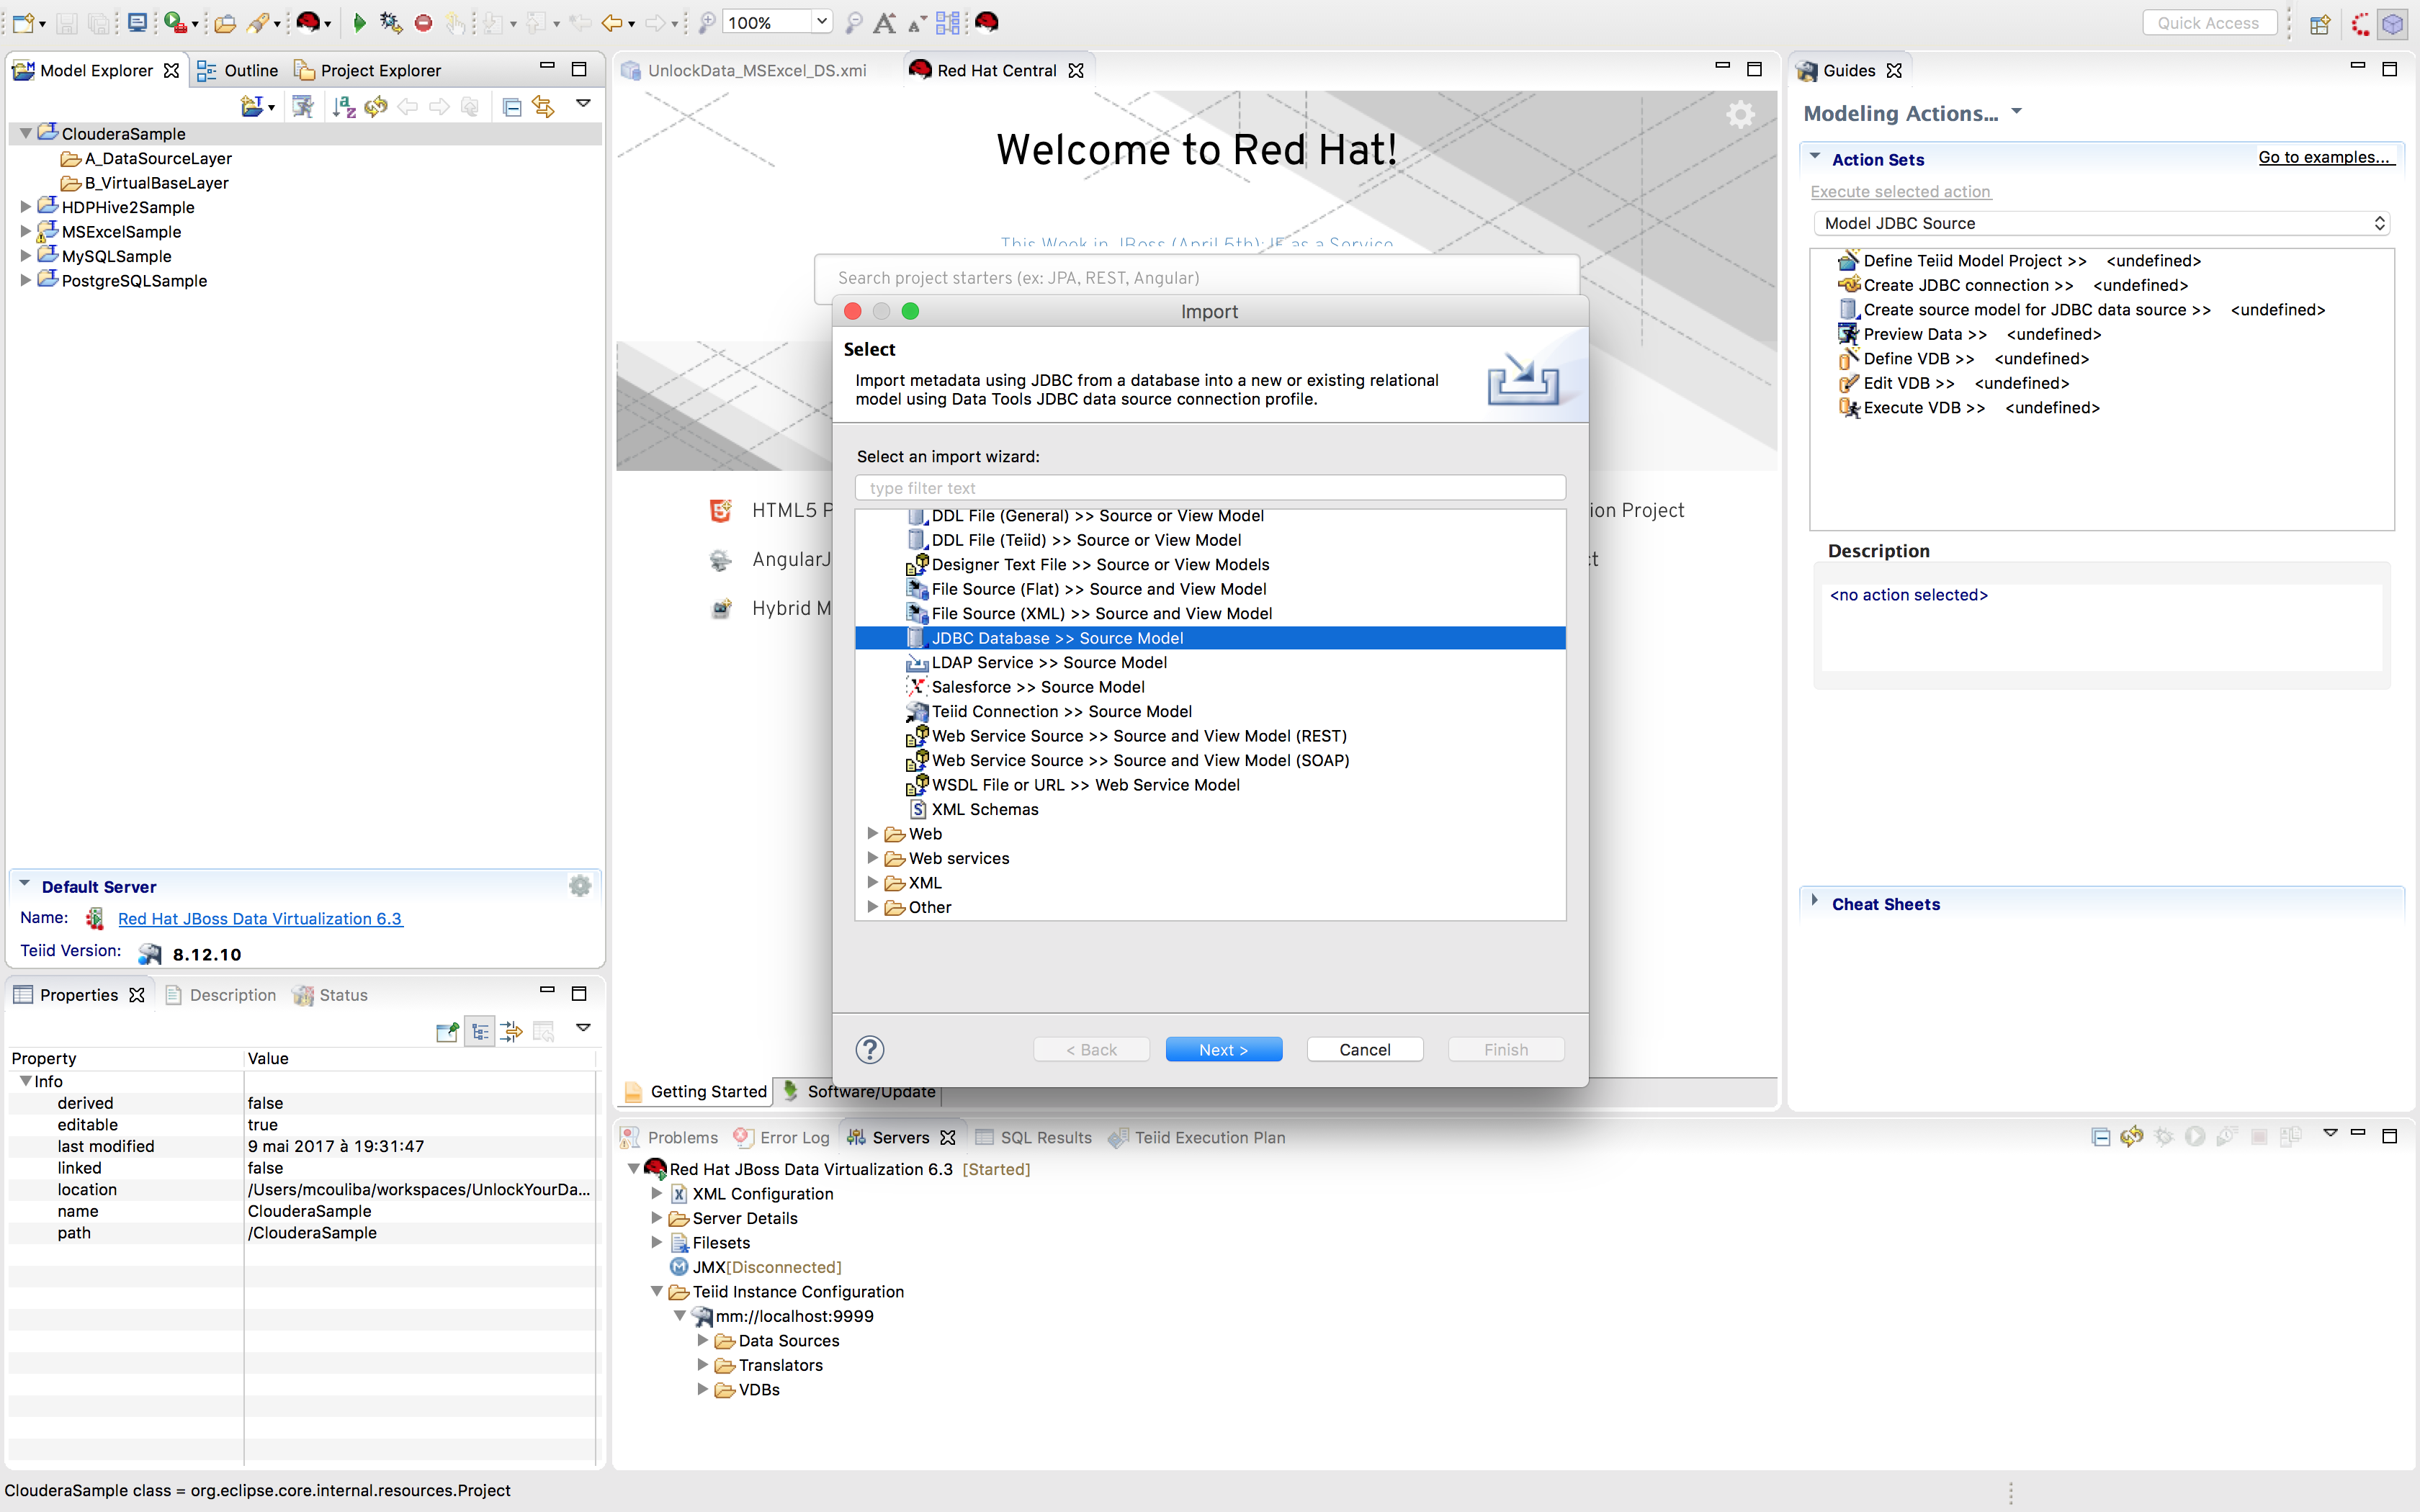
Import Metadata using Teiid importer
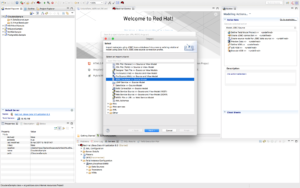
We are now going to import metadata directly using the Teiid importer. Right-click the project "ClouderaSample" and select Import and select "JDBC Database >> Source Model" as shown above and click "Next >".
-
What about automating configuration? (Optional)

Ansible, by Red Hat, is a radically simple IT automation engine that automates cloud provisioning, configuration management, application deployment, intra-service orchestration, and many other IT needs. It uses no agents and no additional custom security infrastructure, so it’s easy to deploy – and most importantly, it uses a very simple language (YAML, in the form of Ansible Playbooks) that allow you to describe your automation jobs in a way that approaches plain English. For your convenience, most of the steps are automated in an ansible playbook called cloudera on github and to run you only need to run one command and you should see similar output as shown below:
$ cd unlock-your-data/cloudera
$ ansible-playbook local.yml
PLAY [Configure local JBoss Data Virtualization with Cloudera JDBC driver for Impala] ***

TASK [Gathering Facts] ******************************************************************
ok: [localhost]

TASK [Create JBoss module directory for the Cloudera JDBC driver for Impala] ************
changed: [localhost]

TASK [Download and Unarchive the Cloudera JDBC zip file] ********************************
changed: [localhost]

TASK [Unarchive the Sub Cloudera JDBC zip file] *****************************************
changed: [localhost]

TASK [Remove Cloudera JDBC unarchived directory] ****************************************
changed: [localhost]

TASK [Copy module.xml into JBoss modules directory] *************************************
changed: [localhost]

TASK [Execute Management CLI file(s)] ***************************************************
changed: [localhost] => (item=add_datasource.cli)
changed: [localhost] => (item=add_driver.cli)

PLAY RECAP ******************************************************************************
localhost                  : ok=7    changed=6    unreachable=0    failed=0
Note: See https://github.com/cvanball/unlock-your-data/tree/master/cloudera for more information.
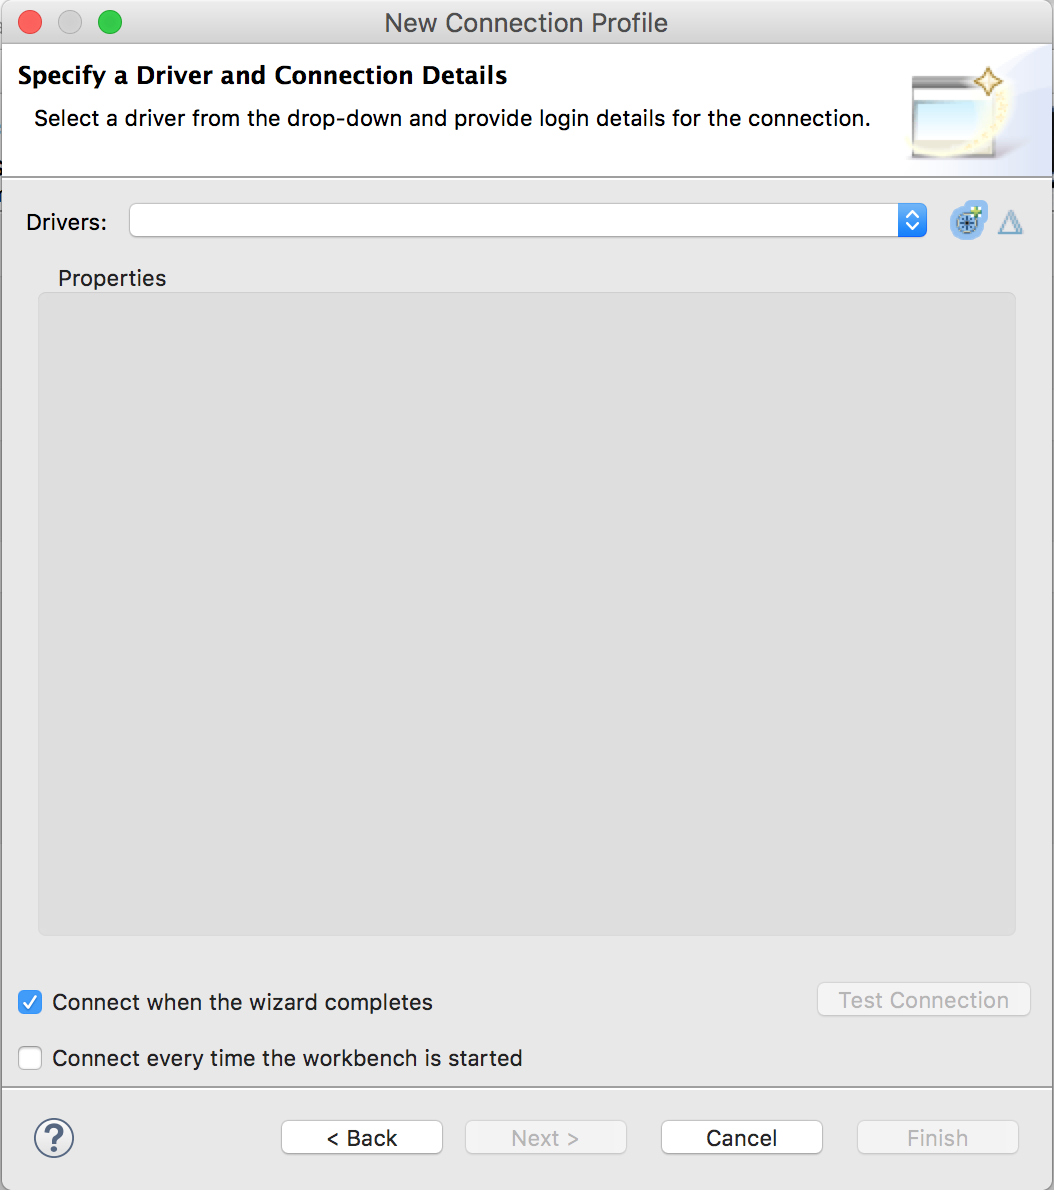
Create Your Connection Profile
-
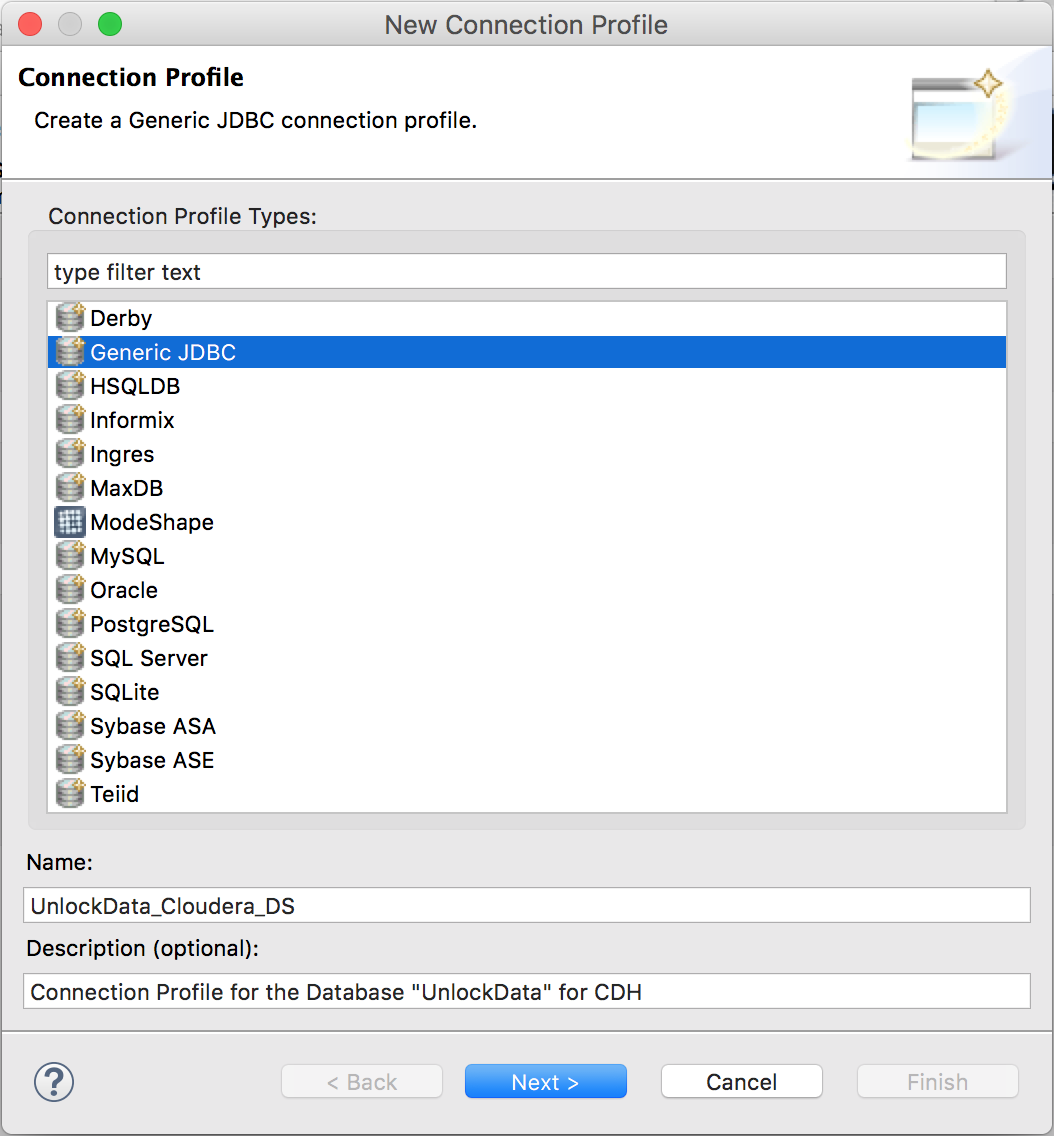
Create the connection profile
On the first page of the wizard, click "New..." to create a new Connection Profile. Before we can proceed, we need to setup a new connection profile to be able to connect to the CDH using the JDBC jars previously downloaded.
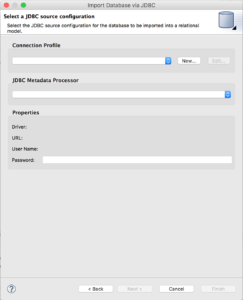
Select "Generic" for the Connection Profile Type and name the Connection Profile “UnlockData_Cloudera_DS”. Click "Next >".

-
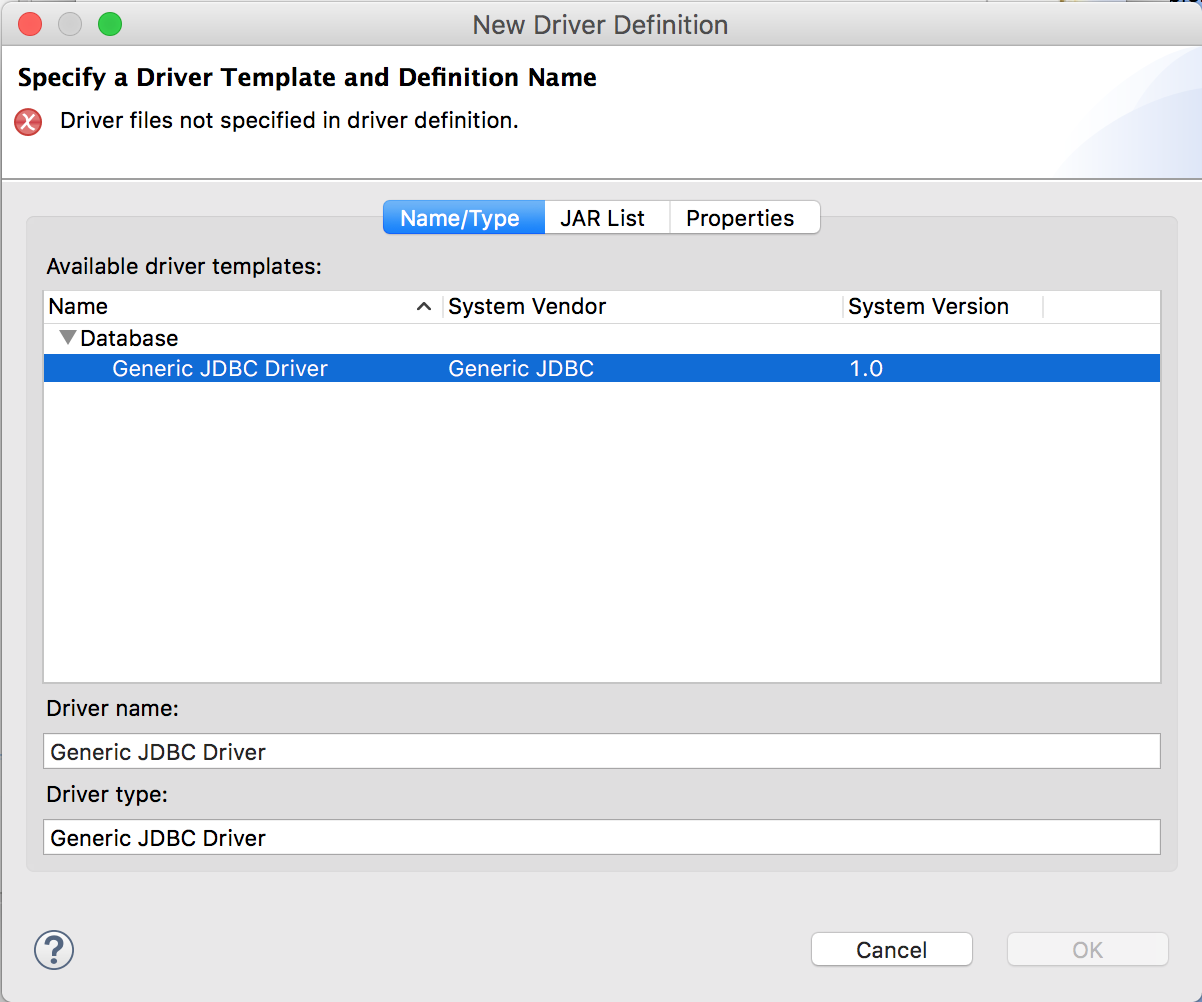
Add and configure the JDBC driver
Click the “Add Driver Definition” button
 .
.

In the "Name/Type" tab, select the right driver template ("Generic JDBC Driver").
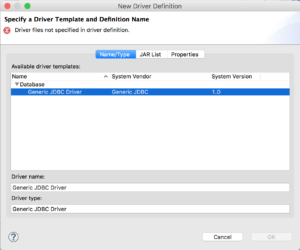
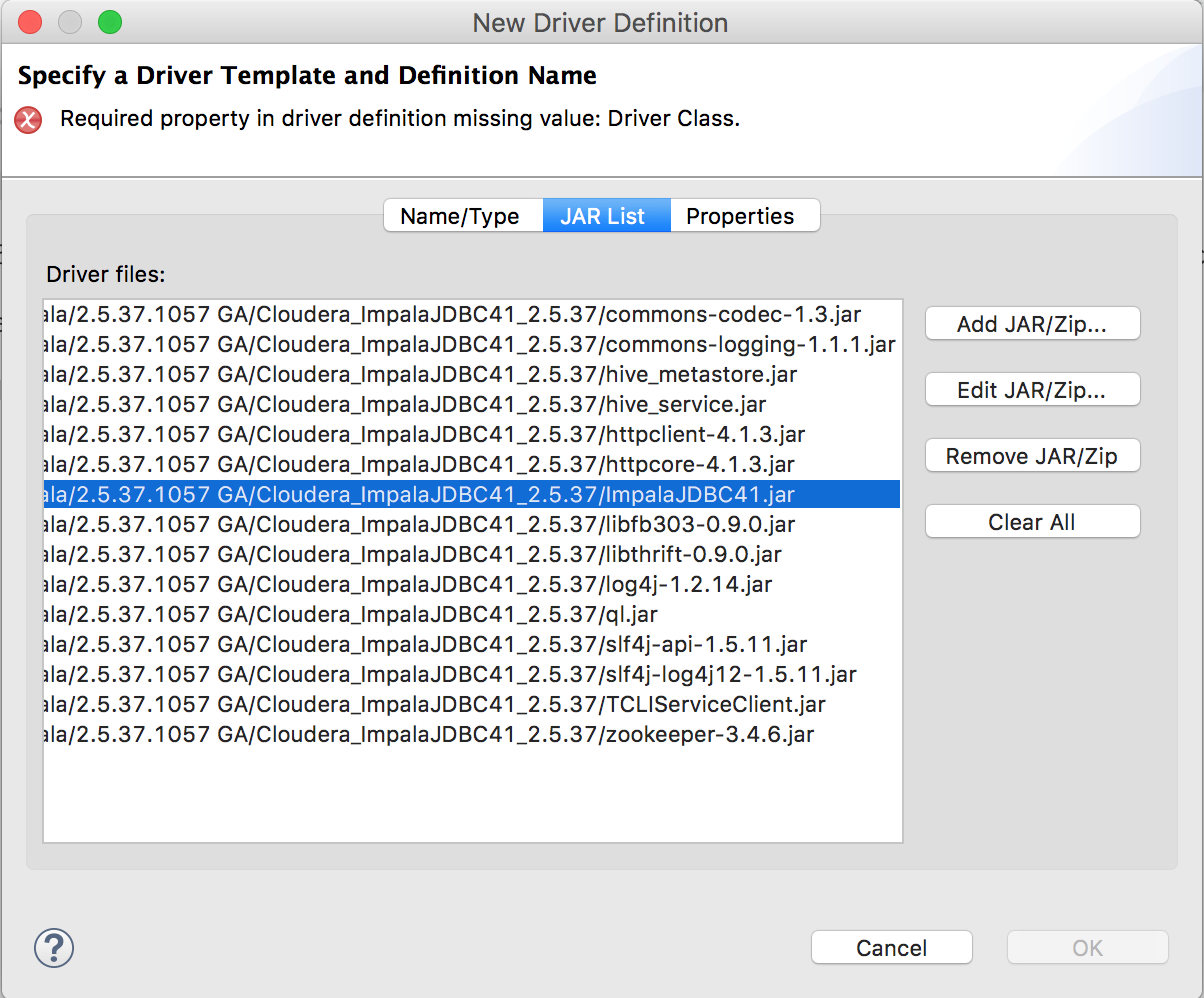
In the "JAR List" tab, click "Clear All" and click "Add JAR/Zip..." to add the JDBC driver jar files, $DRIVER_HOME/*.

In the "Properties" tab, specify the parameters as following:
Connection URL = jdbc:impala://server:host/database
Database Name = database
Driver Class = com.cloudera.impala.jdbc41.Driver
User ID = user
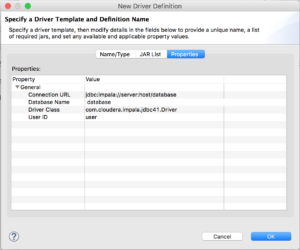
Click "Ok" and now we are ready to connect to the CDH via Impala by providing the correct connection details.
The PostgreSQL JDBC URL is a string with the following syntax:
jdbc:impala://host:port/database
where
host
is the host name of the server.
port
is the port number the server is listening on. The default port number is 21050.
database
is the database name.
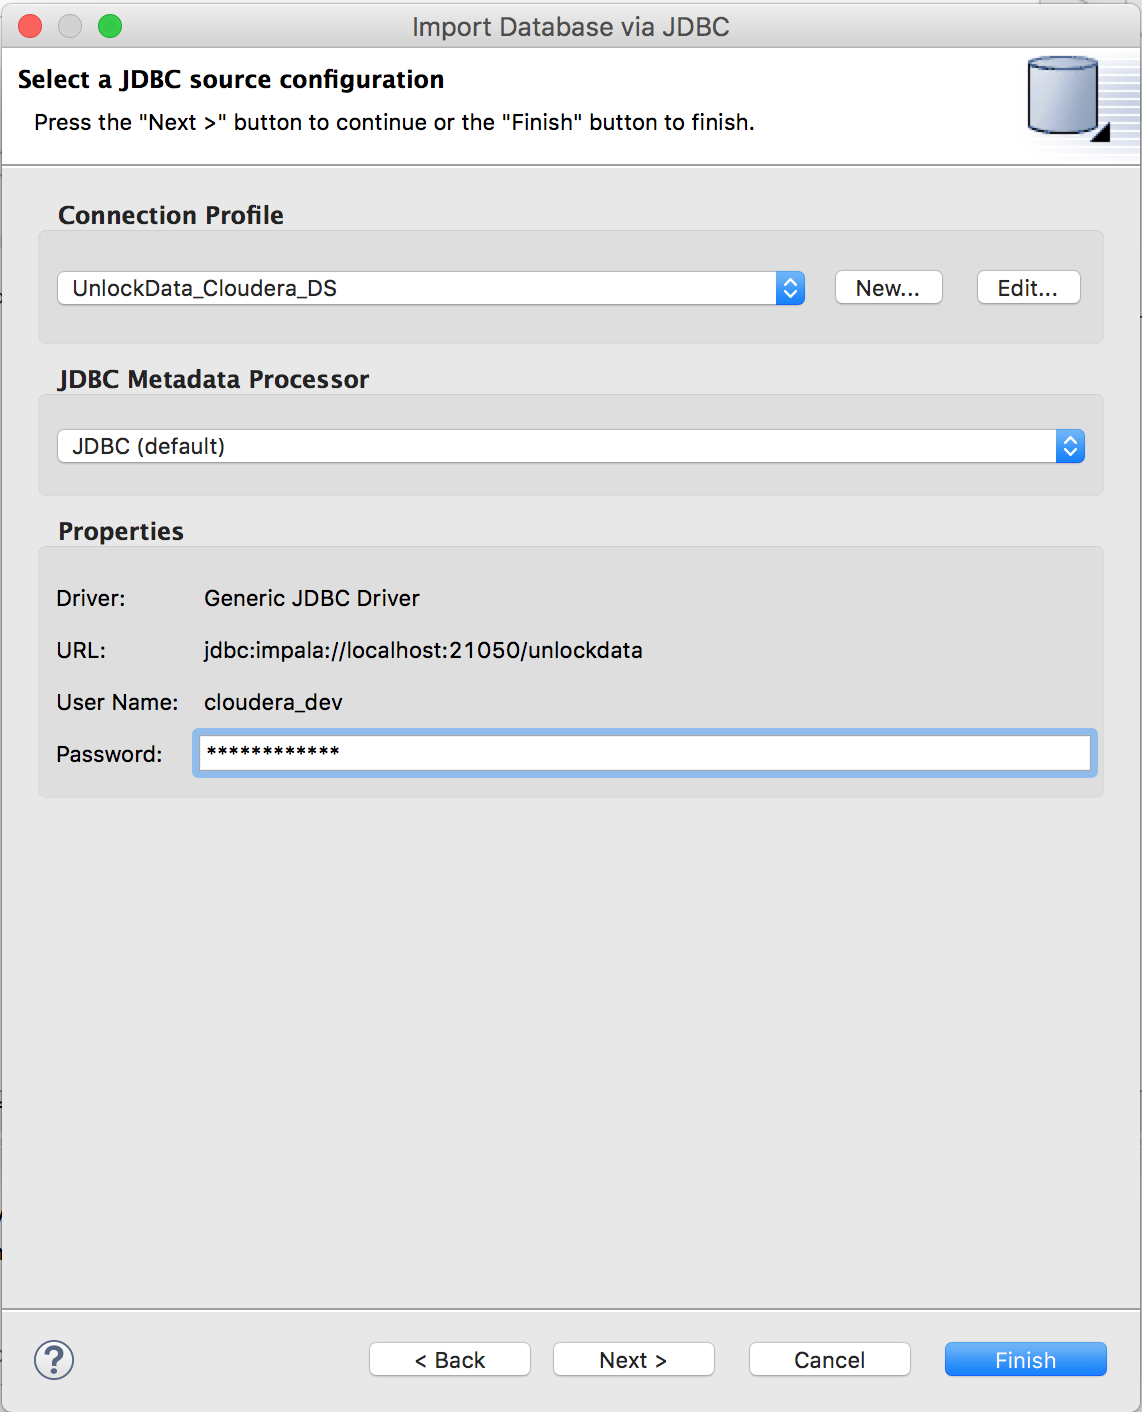
Here we will use the following connection details:
Username = cloudera_dev
Password = cloudera_dev
Database = unlockdata
URL = jdbc:impala://localhost:21050/unlockdata
Check “Save password” box and Click "Test Connection" to validate if the connection to the server can ping successfully.
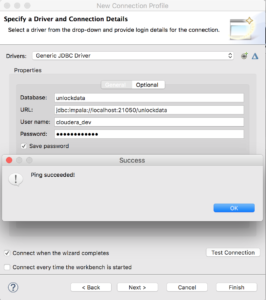
Since the connection can ping successfully, we are ready to select tables from the CDH and create a source model out of it. Click "OK" then "Finish".


Create Your Source Model
-
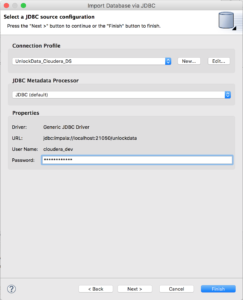
Import the metadata from the database
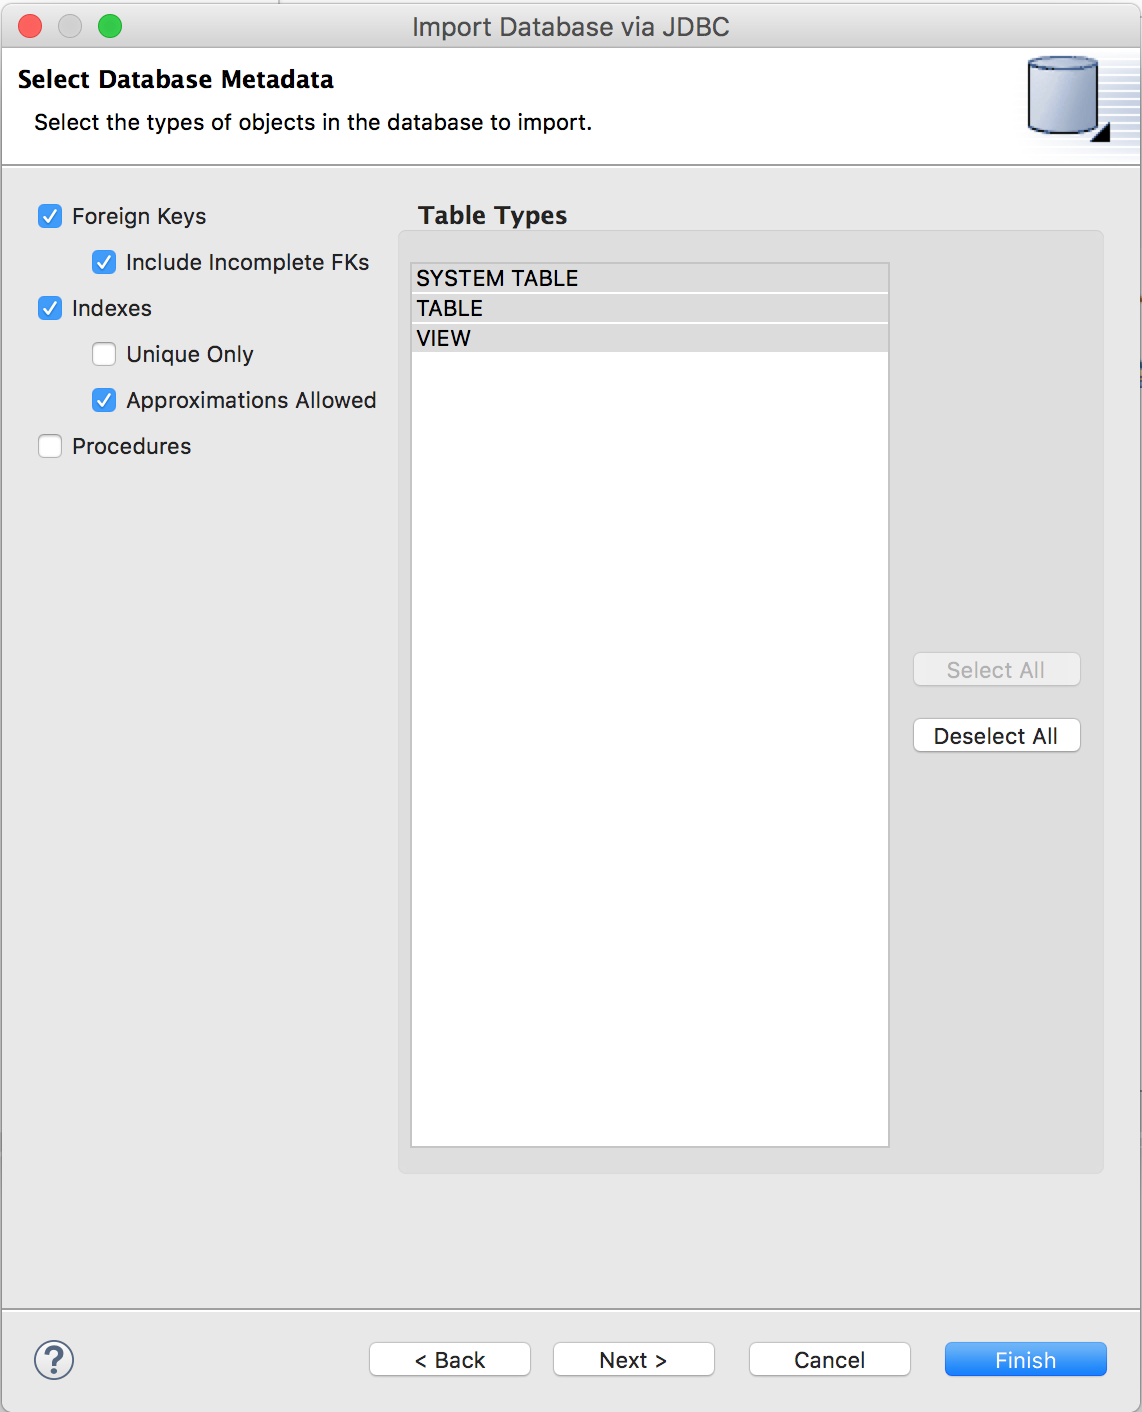
Click "Next >" twice to select database objects.

Select all database objects you want to import then click "Next >".
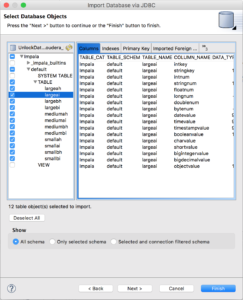
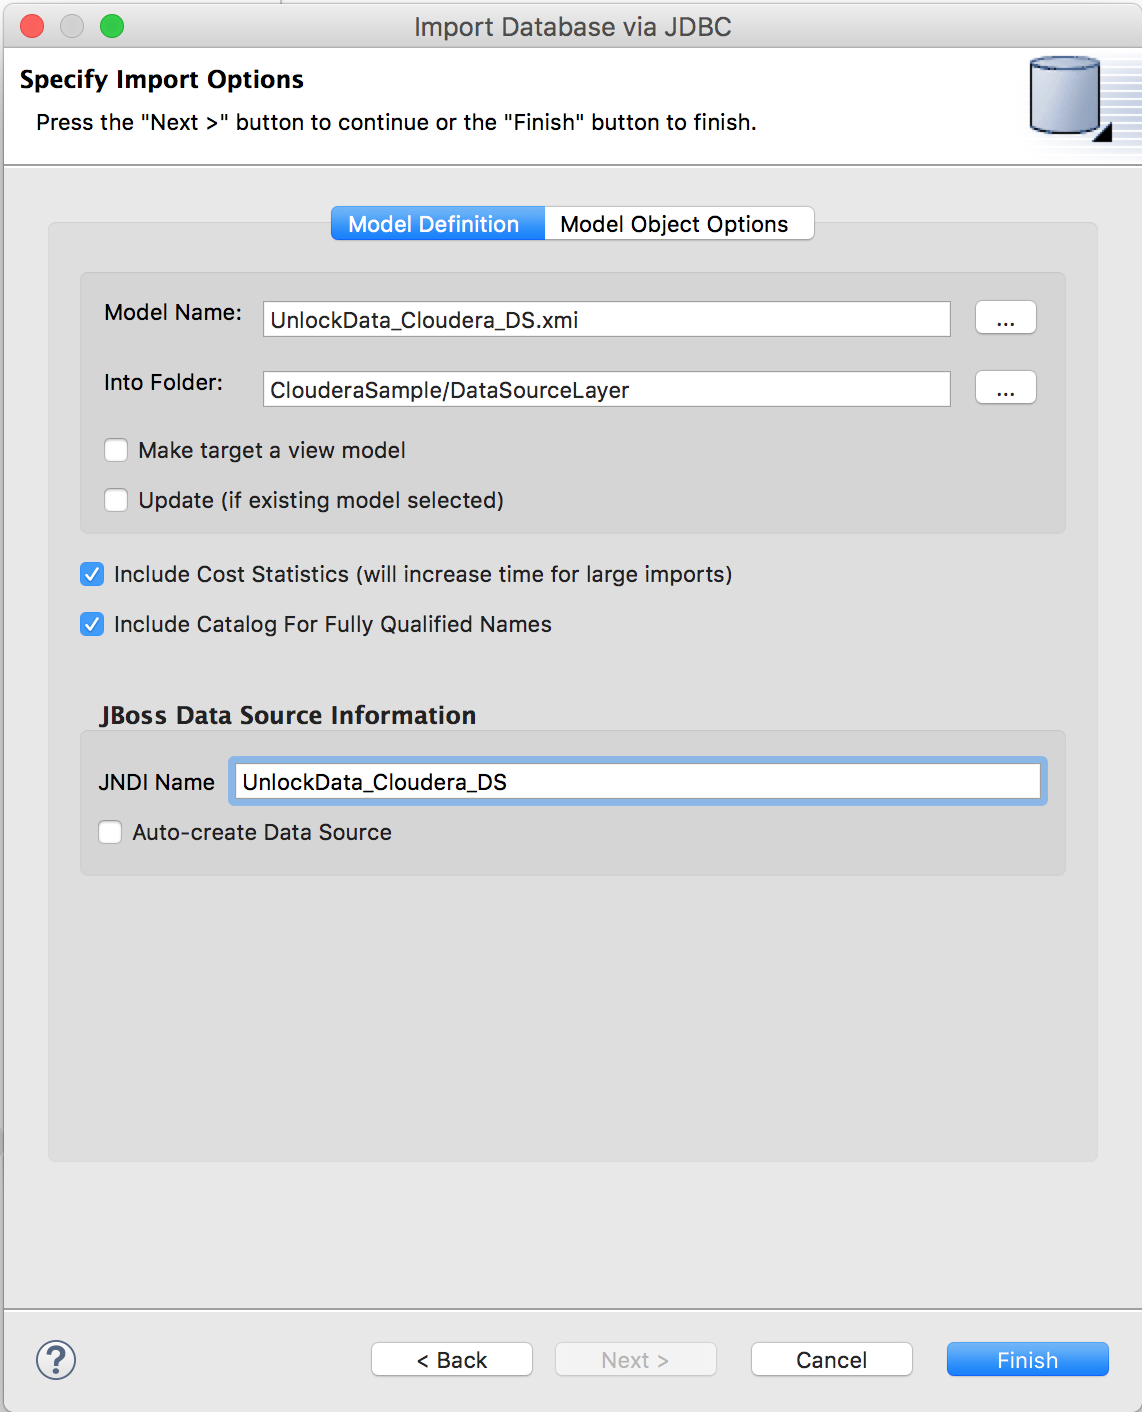
Specify the target folder for the source models (here "ClouderaSample/DataSourceLayer"). Make sure that the JNDI name corresponds to the one we created in the JDV environment (Hint: UnlockData_Cloudera_DS) and that Auto-create Data Source is not selected. Click “Finish” to create the source models.

-
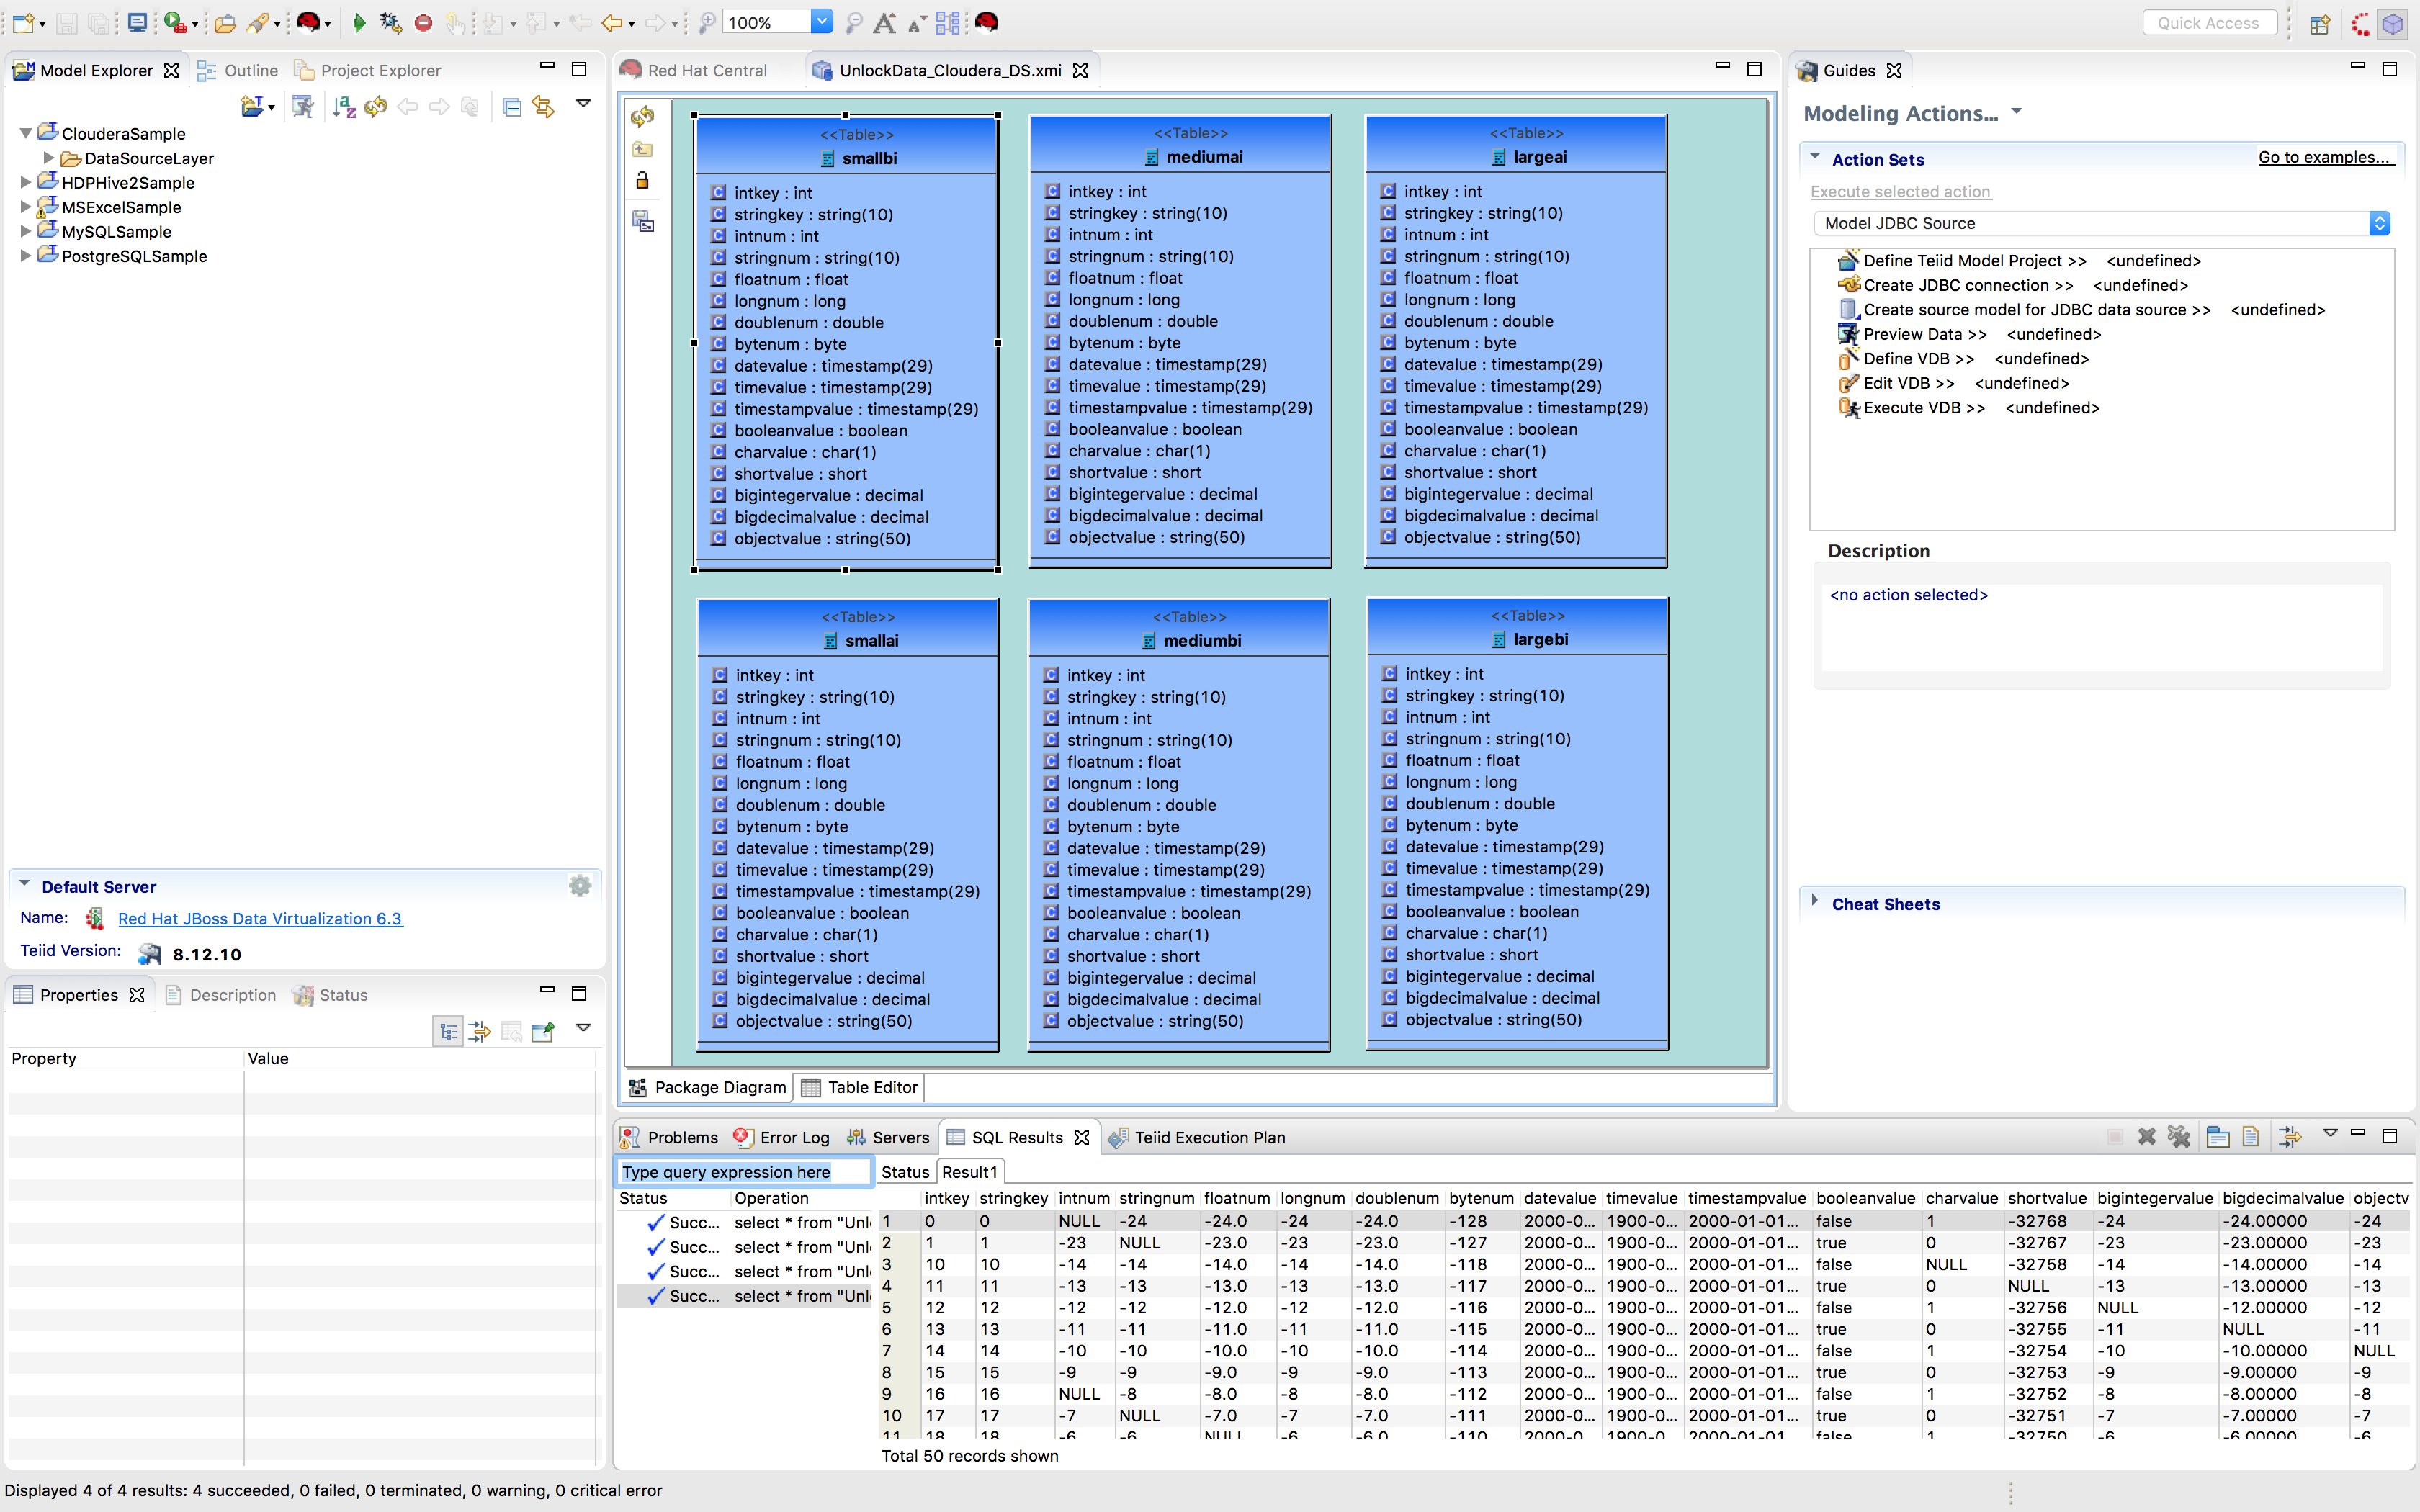
Preview the data through JDV
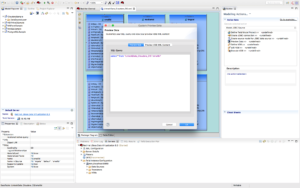
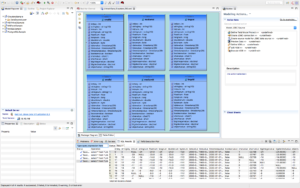
Select any model and click the running man icon
 to preview the data as depicted below:


Conclusion
In this post, we've shown the configuration steps needed to perform in order to unlock your Cloudera data using Cloudera JDBC driver for Impala with Red Hat JBoss Data Virtualization.
Now we are ready to federate this data with other data sources from physically distinct systems into such as other SQL databases, XML/Excel files, NoSQL databases, enterprise applications and web services etc.
For more information about Cloudera, Ansible and Red Hat JBoss Data Virtualization please refer to the following websites:
- https://www.cloudera.com
- https://www.ansible.com
- https://developers.redhat.com/products/datavirt/overview
Click here to download JBoss Data Virtualization and accept the terms and conditions of the Red Hat Developer Program, which provides no-cost subscriptions for development use only.
Last updated: November 9, 2023