In previous blogs, I talked about the the critical role of the IoT gateway in the enterprise Internet of Things (IoT) as it enables real time decision-making at the edge, secures downstream devices and optimizes network utilization. So how does one go about building this gateway? In this blog, you’ll learn how to build an intelligent IoT gateway in a few simple steps - you can find the code at GitHub.
To automate the gateway provisioning, we’ll using Ansible by Red Hat. Why? Because it is the simplest and best tool out there for this job. Besides, it can also be used for configuration management and application deployment. Once you’re ready to provision and deploy thousands of gateways in a production environment, you can use this same Ansible tool. This is how IT departments provision the systems securely across the network.
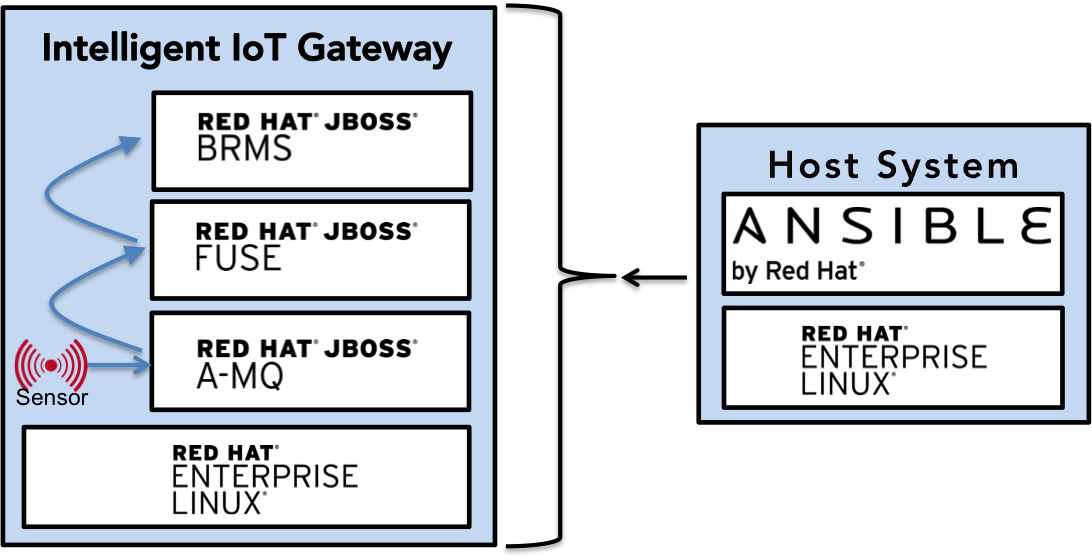
The gateway we are building here can run on physical hardware or in a virtual machine as long as they’re running Red Hat Enterprise Linux 7.2.
The main components of the gateway are:
- Red Hat Enterprise Linux: Provides enterprise-class foundation
- Red Hat JBoss A-MQ: Arbitrates sensor data
- Red Hat JBoss Fuse: Transforms sensor data and routes it to end points
- Red Hat JBoss BRMS: Enables real-time decision making at the edge
Once the gateway is provisioned, we’ll put it into action by starting Red Hat JBoss Fuse and building and deploying the routing and business rules services. We’ll then start a sensor application that sends temperature data using MQTT to the Red Hat JBoss A-MQ broker. These messages will be forwarded to the services that we started earlier. Finally, we’ll be creating the business rules to trigger the desired action when the sensor value reaches a threshold.
Note: Before you get started, you need to have Red Hat JBoss Fuse 6.2.1 in the Downloads folder of the gateway. You can download it from the Red Hat Customer Portal.
Step 1 - Prepare the Host system with Ansible
Clone the project repo on the host machine.
- Open a terminal and enter the following commands:
[user@localhost ~]$ git clone -b Virtual-Lab-1-Host https://github.com/RedHat-IoT/Virtual_IoT_Gateway.git
- Update the host file [Virtual-IoT-Gateway/Ansible/host] with he tIP address of the gateway and place the public key of the host on the remote gateway (Ansible uses ssh to communicate with the remote system). You can learn how to set up Ansible here.
- Update the Ansible playbook BuildGW file [Virtual-IoT-Gateway/Ansible/BuildGW] for the username for your gateway: set_fact: user='user name'
- Launch the Ansible playbook by entering the following commands:
[user@localhost ~]$ cd Virtual_IoT_Gateway/Ansible
[user@localhost ~]$ ansible-playbook BuildGW
Let Ansible run through the tasks in the playbook. Once Ansible is finished, we’re ready to start work directly on the gateway.
Step 2 - Login to the Gateway
Note: For my gateway, I’m using username = 'demo-user' and password = 'change12_me'.
Step 3 - Start the Red Hat JBoss Fuse Server
- Open a new shell and enter the following commands:
[demo-user@localhost ~]$ cd
[demo-user@localhost ~]$ cd IoT_Summit_Lab
[demo-user@iotlab IoT_Summit_Lab]$ ./runJBossFuse.sh
- Wait for the Red Hat JBoss Fuse server to complete the start procedure.
Red Hat JBoss Fuse needs to install the 'camel-mqtt' OSGi features to process MQTT messages.
- Enter the following simple command on the 'JBossFuse' command prompt:
JBossFuse:karaf@root> features:install camel-mqtt
- Minimize this shell to keep the Fuse server running in the background:
Step 4 - Build and Deploy the Camel Route
The sensor data will be transformed and routed by a camel route provided in this project. Now we need to build the Red Hat JBoss Fuse project and deploy it to our running Fuse server. We’ll use the provided script to build and deploy the project.
- In a terminal, perform the following commands:
[demo-user@iotlab Software_Sensor]$ cd
[demo-user@iotlab ~]$ cd IoT_Summit_Lab/
[demo-user@iotlab IoT_Summit_Lab]$ ./runRoutingService.sh
We can verify that the Camel route has been deployed by logging into JBOSS Fuse admin console see details
Step 5 - Create Business Rules
One of the important functions of an intelligent IoT gateway is to trigger action if the sensor data meets certain conditions defined by business rules. In this section we’ll learn how to create a business rules service. This service will work the following way:
- Sensor data is read from a Message queue.
- Sensor data is handed over to the rules execution engine that triggers action per defined rules.
- Altered data is placed into another defined Message queue.
We’ll use an MS Excel decision table to define the business rules. The following image shows an example of a decision table where each row represents a rule. The blue columns are 'conditions' and the yellow column defines an 'action'.
Rules syntax is pretty simple: If some condition, then some action
The rules system is capable of reading the rules from a spreadsheet and compile them into rules in the above syntax. For this lab, a sample business rule spreadsheet is provided that can be used to create new rules.
The columns in this table represent the following:
Alerting Rule: Name of the rule. It is an optional field but very useful for debugging
Device Type: Type of device reported by the sensor
Payload: Number-range this rule will need to match with
Result: Action triggered by the rule i.e. changing value to 0 or 1
- Open the sample rules spreadsheet: 'DecisionTable.xls'
- Create two rules by filling in the following information:
- Rule 1: If we get a temperature reading between 0 and 60, change the result field to 0
- Rule 2: If we get a temperature reading between 61 and 100, change the result field to 1
Note: In the 2nd rule Payload column, add a space between “61,” and “100”
Note: Save the spreadsheet in MS Excel format.
The details on the Business Rules Service are here.
Step 6: Build and Run the Business Rules Service
Now that we have added a few rules to our decision table, we need to build a new version of the service and start it.
- Enter the following commands in a terminal:
[demo-user@localhost IoT_Summit_Lab]$ cd
[demo-user@localhost ~]$ cd IoT_Summit_Lab/
[demo-user@localhost IoT_Summit_Lab]$ ./runRulesService.sh
It should display following output:
 < output truncated > AMQ-Broker tcp://localhost:61616 ready to work!

Device-Type = temperature
Device-ID   = 4711
Payload     = 70
Result      = 1
----------------------
Sending 18.05.2016 10:46:22 766temperature47117000.01
Step 7: Test the Rules Service
We will try this service by sending a test message via the software sensor to our setup. The following should happen:
- Software sensor sends a message with a high value via MQTT.
- Routing service will pick it up, transform the message and send it to an AMQP message queue.
- Business rules service will take the transformed message from the queue and will put it in another AMQP message queue, but only if it meets the business rule condition.
- Enter the following commands in a new terminal:
[demo-user@localhost Desktop]$ cd
[demo-user@localhost ~]$ cd IoT_Summit_Lab/
[demo-user@localhost IoT_Summit_Lab]$ ./runHighSensor.sh
It should display following output:
Starting the producer to send messages
Sending '70,0'

AMQ-Broker tcp://localhost:61616 ready to work!
Device-Type = temperature
Device-ID   = 4711
Payload     = 70
Result      = 1
----------------------
Sending 17.05.2016 15:08:59 265temperature47117000.01
----------------------
Another way to verify that the message was properly processed is to take a look at Red Hat JBoss Fuse console via 'http://localhost:8181'. The count of messages enqueued and dequeued should now show that one message has been taken from 'message.to.rules' and placed into 'message.to.datacenter'.
Note: The Fuse console login/password is admin/change12_me
Conclusion
Building an intelligent IoT gateway is a very simple process with the Ansible by Red Hat automation tool. The enterprise-grade intelligent IoT gateway based on open source technologies is built with Red Hat Enterprise Linux, Red Hat JBoss Fuse, Red Hat JBoss BRMS and Red Hat JBoss A-MQ.
We have provided the example code to put the intelligent IoT gateway to use by deploying the routing and business rules services. The sensor application is used to send temperature data to the A-MQ broker. These MQTT messages were processed by the services that we started earlier. Finally, we created the business rules to trigger desired action when the sensor value reaches a threshold.
The source code for for building the Intelligent IoT Gateway including the video walkthrough is available at GitHub.
Last updated: September 3, 2019