In complex enterprise environments, testing and migration scenarios from virtualized workload on physical hardware are often time-critical and resource-intensive. With Red Hat OpenShift Virtualization, NetApp Trident, and FlexClone technology, a virtual machine (VM) running in Red Hat OpenShift can be seamlessly migrated to a physical server in seconds, which is ideal for performance testing, error analysis, or hardware benchmarks. To enable this flexibility, the VMs must have its root, and therefore its boot LUN, on NetApp ONTAP and be connected over the iSCSI protocol. This blog encompasses:
- Configuring your Red Hat OpenShift cluster
- Installing and configuring NetApp Trident
- Creating an FC LUN out of an iSCSI VM root disk, and booting the physical server
SAP does not support installations on Red Hat OpenShift Virtualization. This article demonstrates how to boot a virtualized server on OpenShift Virtualization, with SAP HANA and AnyDB (or any other application), with an identical operating system configuration on a spare physical server. This can be useful for investigating potential support issues on the virtualized platform, and ensuring performance parity of applications between virtualized and physical machines.
Red Hat OpenShift Virtualization
Red Hat OpenShift Virtualization is included with Red Hat OpenShift, and offers a modern platform for running and deploying both new and existing virtual machine (VM) workloads. It enables organizations to easily migrate and manage traditional VMs on a reliable, consistent, and fully integrated hybrid cloud application platform. By streamlining VM migration, OpenShift Virtualization supports infrastructure modernization while leveraging the speed and simplicity of a cloud-native environment. It protects existing virtualization investments, embraces modern management practices, and serves as the cornerstone of Red Hat's complete virtualization offering.
NetApp Trident
NetApp is a global leader in innovative data management and storage solutions. NetApp is committed to helping companies maximize the value of their data, in the cloud, on-premises, and in hybrid environments.
With the NetApp ONTAP storage operating system, modern all-flash and hybrid storage systems, and integrated cloud data services, NetApp enables efficient, secure, and scalable data management. NetApp solutions deliver performance, reliability, and seamless integration into multi-cloud strategies.
Trident is an open source storage orchestrator from NetApp, specifically designed for container platforms such as Kubernetes and OpenShift. Trident integrates seamlessly with OpenShift and enables the automated provisioning and management of persistent storage, whether for containers, databases, or VMs. Trident is a CSI driver that comes at no extra cost and is fully supported and maintained by NetApp.
All NetApp storage platforms are supported, including ONTAP, Element OS, and more. Trident supports both block (iSCSI, FC, NVMe-TCP) and file protocols (NFS, SMB), meeting the needs of DevOps teams as well as VM administrators who want to run traditional enterprise workloads such as databases and ERP systems on OpenShift Virtualization.
Prerequisites
To follow along with this article, we assume you understand and have access to:
- OpenShift and OpenShift Virtualization (version 4.18 or greater)
- NetApp Trident and supported NetApp Storage Solutions
- Core NetApp ONTAP concepts like Storage Virtual Machines (SVM), Snapshot, and FlexClone technology
- iSCSI and FC block protocol
- NFS protocol
- Storage Network (Ethernet or FC)
NetApp reference architecture for running applications and databases inside a VM
Databases can run in a VM in a variety of ways, with a variety of storage backends. Two common options:
- "In-guest" NFS mount (for example, NFS within the VM)
- Logical Volume on block storage (for example, LVM on iSCSI/FC/virtual block device)
For application workload, NetApp recommends running them using in-guest NFS mounts. When using an in-guest NFS mount, the application and database runs in the VM, and one or more NFS volumes (from the NetApp storage system ) are mounted directly within the virtualized guest operating system. See Figure 1.

Let's look at an in-guest NFS mount from an operating system level. According to NetApp's best practices, an in-guest NFS mount is mounted over a dedicated storage LAN configured with end-to-end jumbo frames for the ethernet protocol. To check whether jumbo frames are configured properly end-to-end, use the ping command (replace the <IP address> value with the address of your NetApp system exporting NFS volumes):
ping -M do -s 8960If you get an error that the message is too long, then jumbo frames have not been configured properly.
# ip addr show eth2
3: eth2: <UP,BROADCAST,RUNNING,MULTICAST> mtu 9000
    link/ether 04:2a:21:4f:35:68
    inet 192.168.20.34/16 brd 192.168.255.255 scope global eth2
    inet6 fe80::184d:c0d9:b1ab:b0d3/64 scope link
       valid_lft forever preferred_lft forever
# df -h
Filesystem                    Size  Used  Avail  Use%  Mounted on
/dev/sda1                     3.0G  1.4G  2.8G    5%   /
192.168.10.14:/HOS_data/data  159G  128G   20G   81%   /data
192.168.10.14:/HOS_log/log    9.1G  2.8G  6.8G   29%   /log
For different applications and databases running as in-guest NFS mounts, NetApp offers best practices to cover all aspects of configuring the NetApp storage system, parameterization of the operating system, and the respective database, to ensure the best possible performance for the application. For example:
An in-guest NFS mount offers several advantages compared to a traditional file system for applications residing on block storage:
- Flexibility and simplicity: Mounts can be easily customized within the VM without requiring intervention at the hypervisor or storage level.
- Storage-level snapshots and backups: NetApp offers unique Snapshots-based backups, restore, and cloning mechanisms. These mechanisms are extremely fast (backup, restore, and cloning within minutes, independent of volume size) and can be used directly for consistent backups when using appropriate application integrations.
- Scalability: Volumes can be resized (expanded and shrunk) dynamically, without application impact on the VM level.
- Reusability: An NFS share can be easily remounted on another VM or on a physical server for testing, error analysis, high availability, or disaster recovery scenarios.
- Hypervisor independence: No special storage driver or integration is required. It works seamlessly on any hypervisor.
- Physical to virtual or virtual to physical: Applications can be moved between virtual machines and physical servers without having the need for operating system reconfiguration (assuming that the Linux kernel and TCP/IP parameters have been configured appropriately, and the correct mount options are used).
When moving applications from a virtual machine to a physical server (for performance or error analysis, for example) it is very important to use identical kernel parameterization. This ensures that the application runs equally in both environments, meaning that they exhibit identical behavior, and that you have not introduced any new errors, or that failures don't occur due to environmental differences.
Why dual boot on bare metal?
The most reliable way to ensure consistent configuration between an operating system running in a virtual machine and one running on a physical server (for performance tests and error analysis) is to boot the physical server using the same root disk as the virtual machine.
A complex migration or troubleshooting scenario becomes a fast, secure, and repeatable process with the combination of OpenShift Virtualization, NetApp Trident, NetApp Snapshot and FlexClone technologies. This saves time, simplifies processes, and increases flexibility for your team.
Because all application data is stored on NetApp volumes mounted over NFS into the guest operating systems, it's only necessary for operators to create the iSCSI root LUN for VMs through the Container Storage Interface (CSI) using NetApp Trident. The volumes for application data, with static configurations, are created traditionally using either the NetApp UI (System Manager), command-line interface, or automation tools (such as Red Hat Ansible Automation Platform).
Configure an OpenShift cluster for SAP workloads with Ansible
This section provides the basic installation and configuration steps to allow NetApp Trident to be used as a storage provisioner in OpenShift. There are a number of settings required to configure an OpenShift cluster for a SAP workload, and the Ansible role named sap_hypervisor_node_preconfigure can automate the steps for you. Here's what it does:
- Sets the tuned profile to virtual-host
- Installs these operators:
- CNV
- SRIOV
- nmstate
- Netapp Trident
- Sets up worker nodes by executing the following steps:
- Sets kernel parameters
- Enables CPU Manager
- Configures network
- Sets up and configures Netapp Trident Storage
Use the role sap_vm_provision to create virtual machines incorporating the settings and tunings prepared by the sap_hypervisor_node_preconfigure role.
Read this Red Hat Knowledgebase article to learn how to use these Ansible roles.
NetApp Trident installation
Trident allows the deployment of both file-based and block-based persistent volume claims (PVC). In this blog, we only consider the deployment of block-based PVCs as iSCSI LUNs, because only iSCSI LUNs can be mapped to physical servers as FC LUNs and booted from them. It is possible to boot the LUNs over iSCSI on the bare metal server, too. This is dependent upon the target environment.
Trident can be installed in OpenShift with an operator, which has the following advantages:
- Trident is available as a Red Hat certified operator
- Automated lifecycle management
- Better integration with OpenShift (for example, easy upgrades)
- Clearly defined states through custom resource definitions (CRD)
Trident installation
This article provides a brief overview of the necessary installation steps for NetApp Trident in OpenShift. For more information about installing and configuring NetApp Trident, read the official Trident 25.10 documentation.
- In the OpenShift web console, navigate to the Administrator view and select Operators, and then OperatorHub.
- Enter "Trident" in the search field, and select the Red Hat certified Trident Operator.
- Configure the installation:
- Select a namespace (this example uses
trident) - Set installation mode to All namespaces on the cluster (default)
- Click Install
- Select a namespace (this example uses
Trident Orchestrator configuration
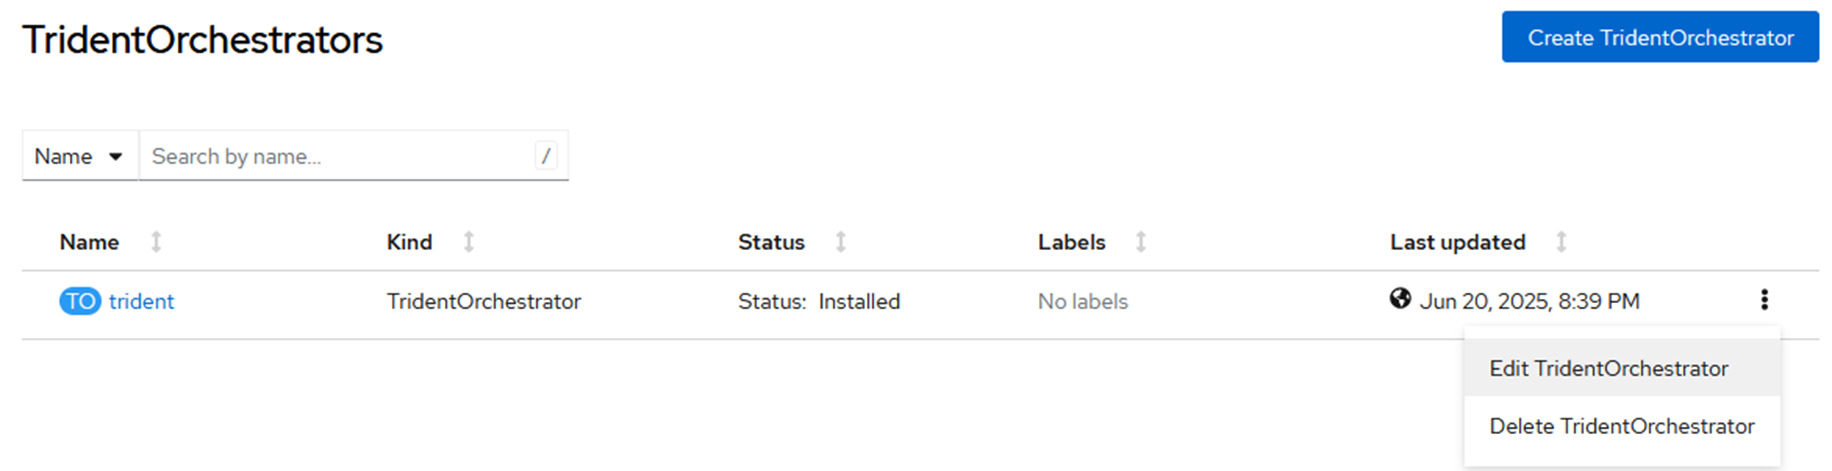
Once the operator has been installed, you must deploy the TridentOrchestrator. Go to the Trident Orchestrator tab in the operator details and click Create TridentOrchestrator.
Select the kebab menu on the right, and select Edit TridentOrchestrator from the context menu that appears (Figure 2).
Add this YAML to the configuration to eliminate the need to apply machine configurations for enabling and configuring the iSCSI and multipath services on worker nodes:
nodePrep:
    - iscsi
Trident configuration
In case you want to perform the steps manually or in case of troubleshooting, the steps are (replace ):
- Define the Trident backend (ONTAP, Azure NetApp Files, and so on).
- Create a StorageClass that points to the Trident back end.
Here is an example YAML file that creates a secret:
---
apiVersion: v1
kind: Secret
metadata:
  name: <secret name>
  namespace: <trident namespace>
type: Opaque
stringData:
  username: <username>
  password: <password>
The YAML to configure an ONTAP backend:
---
version: 1
storageDriverName: "ontap-san"
managementLIF: <SVM managment LIF IP>
svm: <SVM name>
backendName: <backend name>
credentials:
  name: <secret name>
storagePrefix: trident_
defaults:
  snapshotPolicy: default-1weekly
  snapshotReserve: '20'
The YAML to create a default iSCSI storage class:
---
apiVersion: storage.k8s.io/v1
kind: StorageClass
metadata:
  name: <storage class name>
  annotations:
    storageclass.kubernetes.io/is-default-class: "true"
    storageclass.kubevirt.io/is-default-virt-class: 'true'
provisioner: csi.trident.netapp.io
parameters:
  backendType: ontap-san
volumeBindingMode: Immediate
allowVolumeExpansion: true
reclaimPolicy: Delete
Create a bootable LUN out of an iSCSI VM root disk and boot your physical server
It's recommended to test this sample workflow so that you're sure it works for your environment and the hardware and software involved. Depending on the storage protocol (fibre channel or iSCSI) and hardware adapters used in the bare metal setup, additional steps (such as building an initramfs with appropriate drivers) might be necessary. It's possible to boot the LUN either over iSCSI or fibre channel. In most cases, the kernel drivers are sufficient and support a variety of hardware.
Make sure that the VM you plan to clone to bare metal has the following network interfaces:
nic-172: Application data LANnic-192: Storage LAN
After starting the VM, assign a fixed IP addresses for nic-172 (172.30.20.34) and nic-192 (192.168.20.34):
# nmcli connection add type ethernet ifname eth0 \
con-name nic-172 \
    ipv4.addresses 172.30.20.34/16 \
    ipv4.method manual \
    ipv6.method ignore
# nmcli connection add type ethernet ifname eth1 \
con-name nic-192 \
    ipv4.addresses 192.168.20.34/16 \
    ipv4.method manual \
    ipv6.method ignore \
    802-3-ethernet.mtu 9000
Another option is to use the text user interface of Network Manager (nmtui) to configure your network interactively.
As a final step, mount two NFS volumes into the VM. Refer back to the NetApp reference architecture for running applications and databases inside VMs section to see the resulting file system.
Install SAP HANA or another workload, and make sure the data for the application is residing on the NFS volumes. Read Deploying SAP Workloads with OpenShift Virtualization for more information.
Updating the initramfs
If your VM boot disk image does not automatically boot on your bare metal server and gets stuck in an emergency console, this might be due to missing drivers in the initramfs.
To fix this problem, you must figure out which driver is missing. Review the console output, and the output of the dmesg command, for error messages. Also, verify that the storage adapter you're using is supported by your kernel.
Assuming you are missing a driver, you must add the missing module to a custom startup file. For example, open /etc/dracut.conf.d/10-custom.conf and add a line containing the kernel modules that support your interface:
add_drivers+=" ixgbe lpfc "You might also require dracut modules:
add_dracutmodules+=" iscsi multipath crypt nfs "Or a file can be included:
install_items+=" /path/to/file "Save the file and run the following command to rebuild the initramfs for all installed kernels:
# dracut --regenerate-all -fIf you need to build in multipath, read How do I rebuild the initramfs with multipath in Red Hat Enterprise Linux.
Boot LUN with iSCSI
For booting the image via iSCSI a couple of things need to be configured. Typically, Red Hat OpenShift Virtualization VMs are booted via UEFI, hence the bare metal server also has to boot via UEFI. Then there are multiple ways to boot the root LUN via iSCSI.
- iBFT (iSCSI Boot Firmware Table)
- iPXE
iBFT requires the hardware to support this mechanism, whereas iPXE is more versatile but can require you to build your own iPXE boot file to embed a chainload script tailored to your environment. Use DHCP to provide the data on how to find the iPXE file on an TFTP server.
Changes to boot on bare metal
These changes must be implemented in the VM in order to boot on bare metal:
First, install iscsi-initiator-utils package:
# dnf install iscsi-initiator-utilsAdd or create the iSCSI initiator /etc/iscsi/initiatorname.iscsi:
InitiatorName=iqn.1994-05.com.redhat:5ce9dff856Add the iSCSI configuration to the init ramdisk using dracut. Add this to your /etc/dracut.conf.d/iscsi.conf:
add_dracutmodules+=" iscsi network "
force_drivers+=" tg3 "
install_items+=" /etc/fstab /etc/iscsi/initiatorname.iscsi /etc/iscsi/iscsid.conf "
Then rebuild the init ramdisk:
# dracut --forceModify the GRUB kernel line (add this to the kernel .conf file in /boot/loader/entries/):
options rd.neednet=1 loglevel=7 rd.iscsi.lun=0 rd.debug rd.iscsi.debug=7 iscsid.startup=manual iscsi_timeout=160 ip=dhcp netroot=iscsi:10.76.35.63:::0:iqn.1992-08.com.netapp:sn.bf362a40c91211f0a9fc00a098fb62ce:vs.16 Finally, shut down the VM.
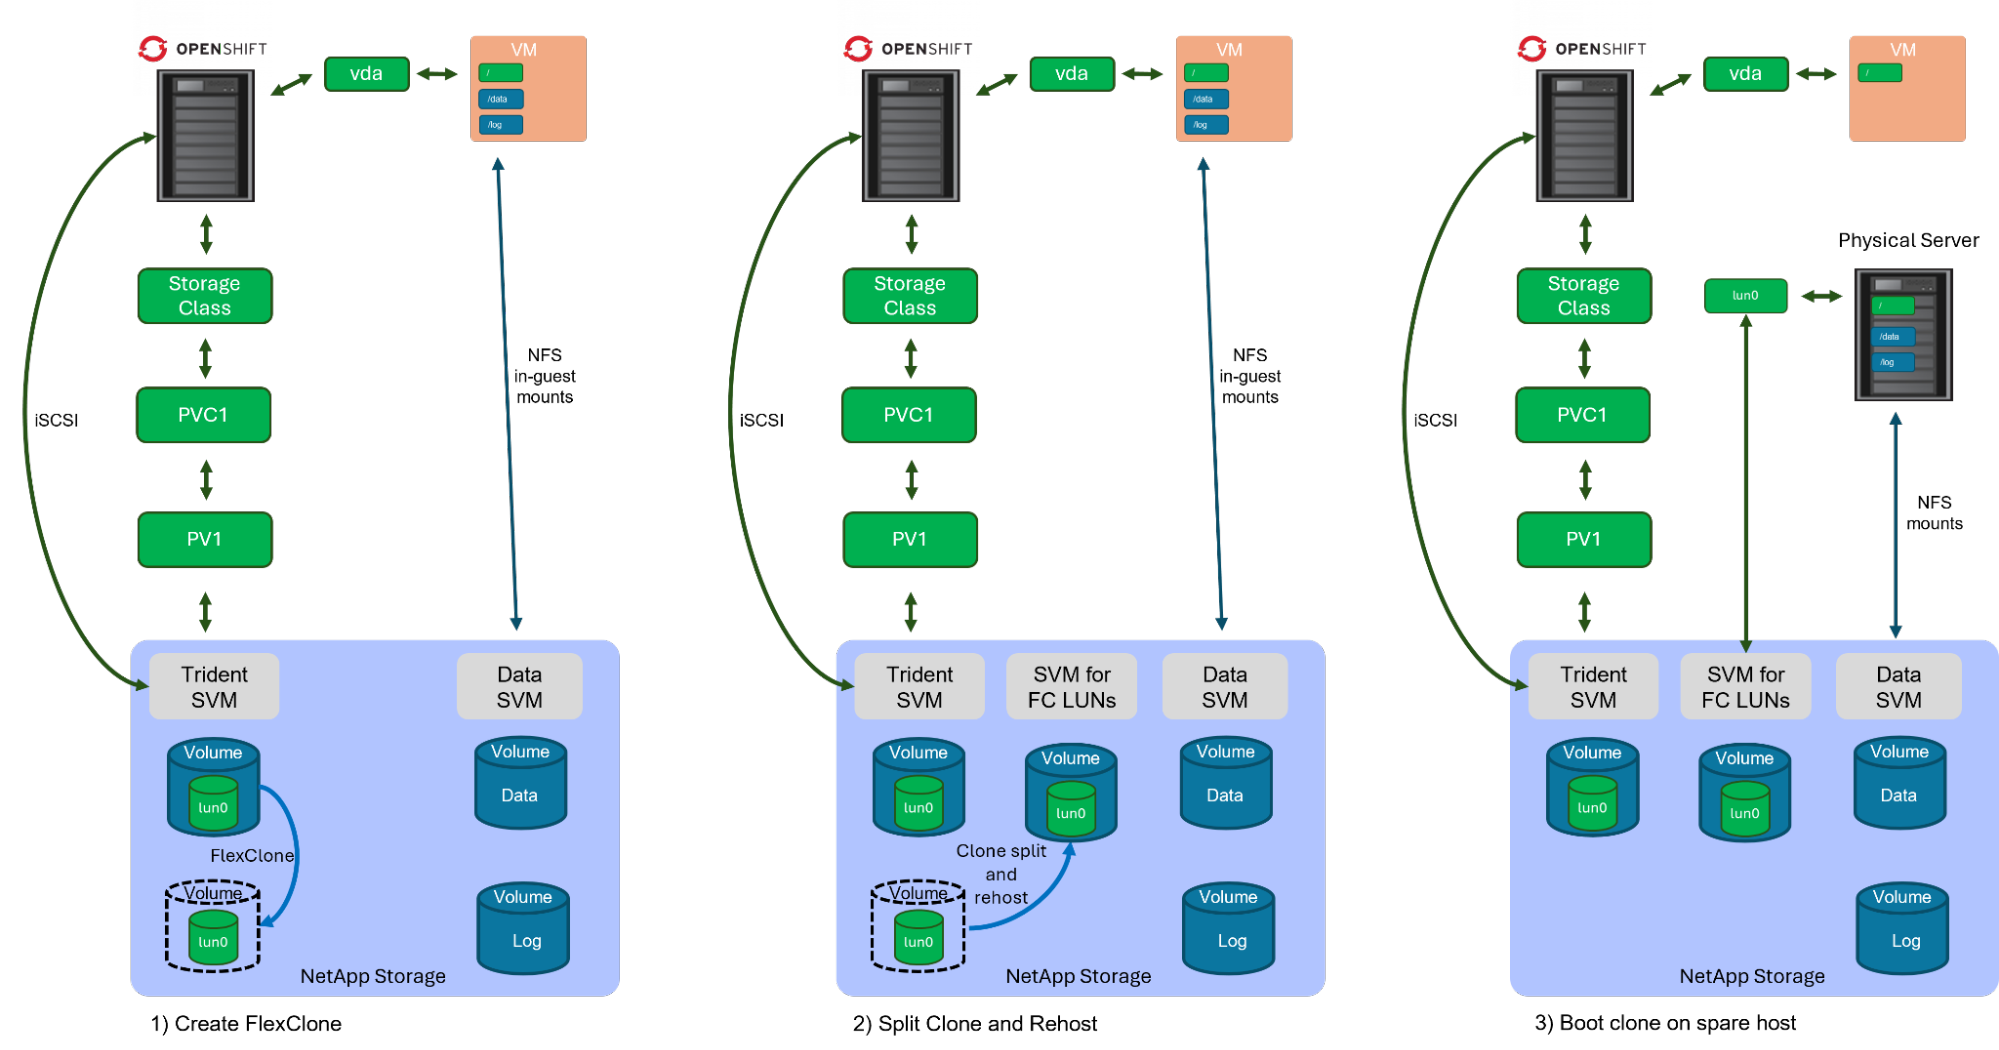
Workflow overview
The workflow consists of the following steps, which are described in more detail later. Before you begin, you must identify the PVC of the VM, and then shut down the VM to ensure all NFS filesystems are properly unmounted, and that the iSCSI root disk that's going to be cloned doesn't have inconsistencies, and that we don't have duplicate IP addresses when booting the physical server afterwards.
- Create a FlexClone from the iSCSI root volume from which the VM is booting.
- Split the clone from its original volume and rehost the volume to the SVM from which the physical host does booting from LUNs.
- Boot a spare physical host from the newly created LUN, adjust network configuration to the new device names, mount the NFS volumes, and do your application testing.
Detailed workflow steps
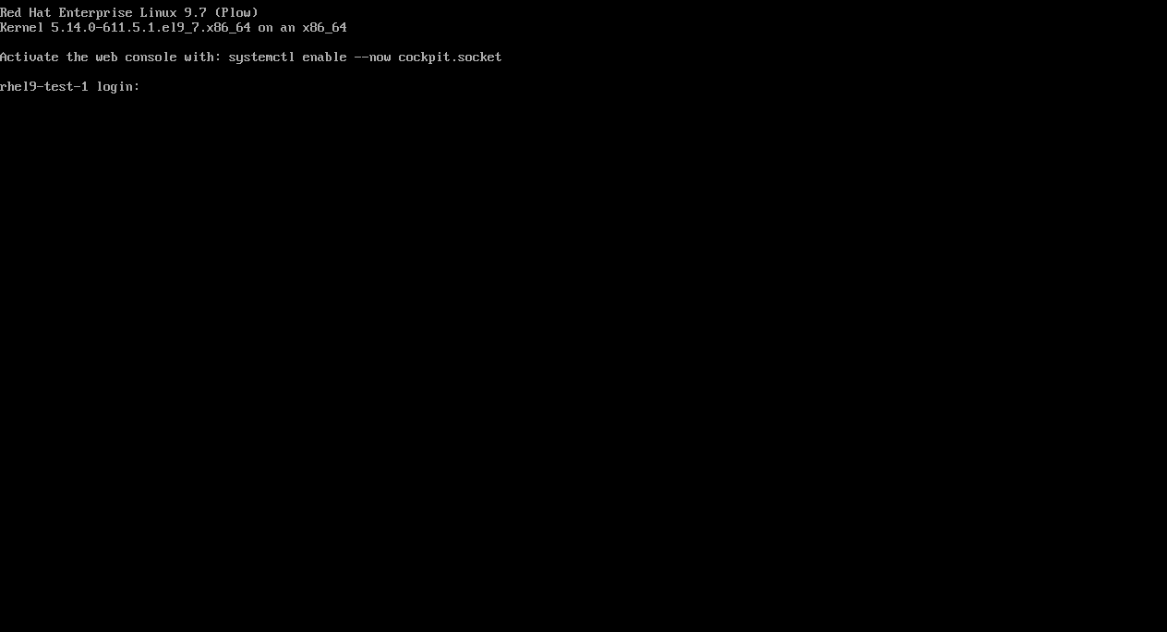
To create a FlexClone, you must identify the PVC name and the corresponding Trident LUN and its volume. To identify the PVC, open the VM (in this example, rhel9-test-1) in the OpenShift web UI (Figure 4). Then select Configuration and view the storage details.
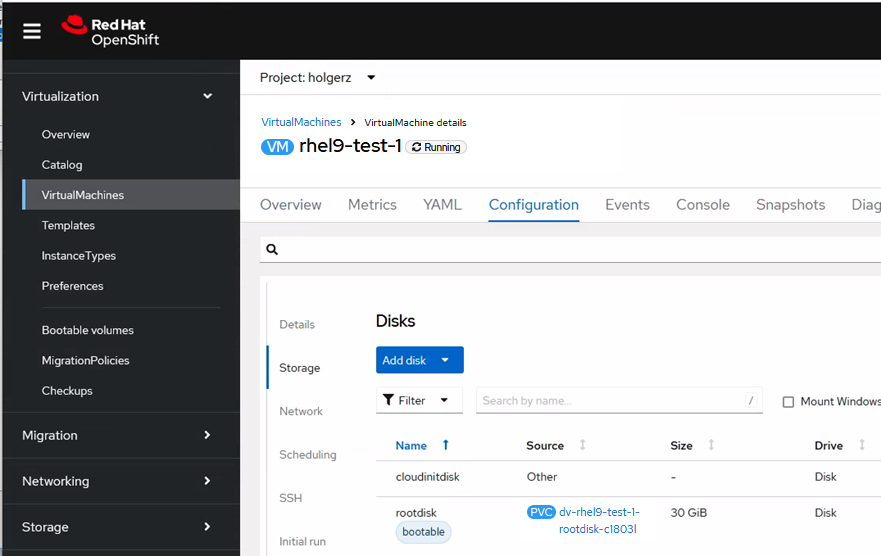
In this example, the root disk is called dv-rhel9-test-1-rootdisk-c1803l. Open the PVC details (Figure 5).
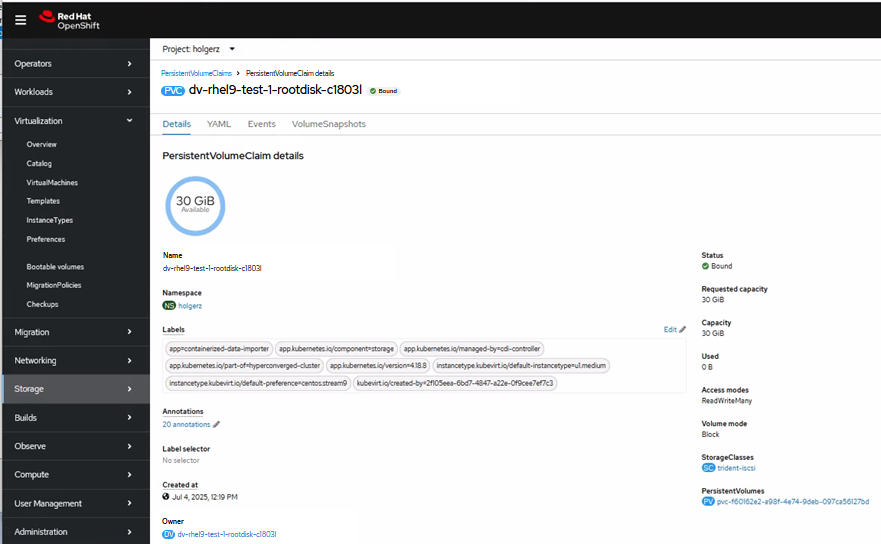
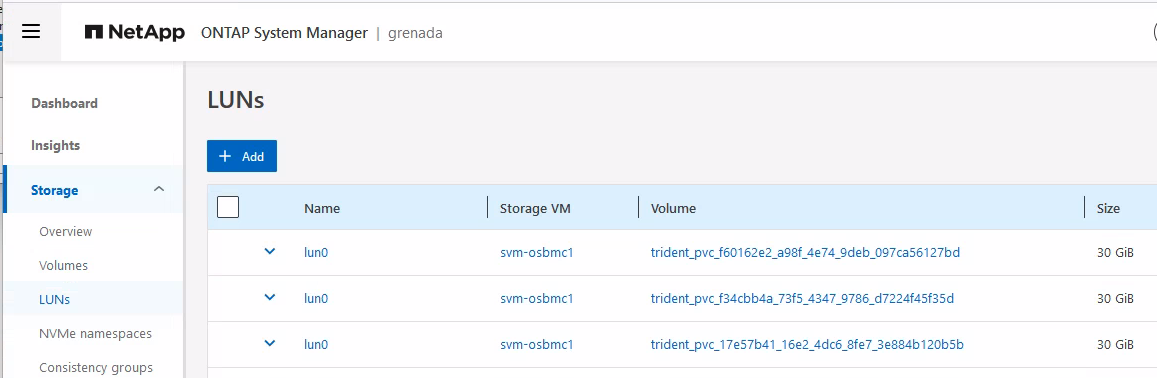
In this example, the PVC name is pvc-f60162e2-a98f-4e74-9deb-097ca56127bd.
Next, click the Stop icon to shut down the VM.
NetApp Snapshot, SnapRestore, and FlexClone operations are always done at the volume level. In NetApp System Manager, you must identify the correct volume that stores the LUN. From an NetApp ONTAP point of view, a LUN (FC or iSCSI) is a file residing inside a volume. This file is then presented as a block device, either over the iSCSI or FC protocol.
According to the Trident secret YAML provided earlier in this article, the volume name has the prefix trident_, so the correct volume name is trident_pvc_f60162e2_a98f_4e74_9deb_097ca56127bd because the dash character (-) in a PVC name is translated into an underscore (_) in ONTAP volume names. System Manager shows that a LUN with name lun0 is stored on the volume trident_pvc_f60162e2_a98f_4e74_9deb_097ca56127bd (Figure 6).
Splitting and rehosting a clone
Technically, splitting a clone from its original volume and rehosting it to another SVM is not required for the volume to function or be accessible. A cloned volume can be used as is, without splitting or rehosting, as long as the necessary permissions and mappings (for example, LUN mappings, initiator groups) are correctly configured.
However, in most enterprise environments, these steps are commonly performed because:
- Splitting the clone ensures it becomes a fully independent volume, avoiding dependency on the source volume.
- A different storage virtual machine (SVM) is typically used to separate workloads or functional domains.
- Physical hosts boots from FC LUNs presented by a specific SVM, to maintain clean logical separation.
Split the cloned volume
In this example environment, the cloned volume must be rehosted because:
- Kubernetes and container data created using Trident are deployed on a dedicated SVM
- FC boot (in this case) takes place in a different SVM
To rehost, you must first split the clone. Select the menu of the cloned volume, and select Split clone (Figure 7).
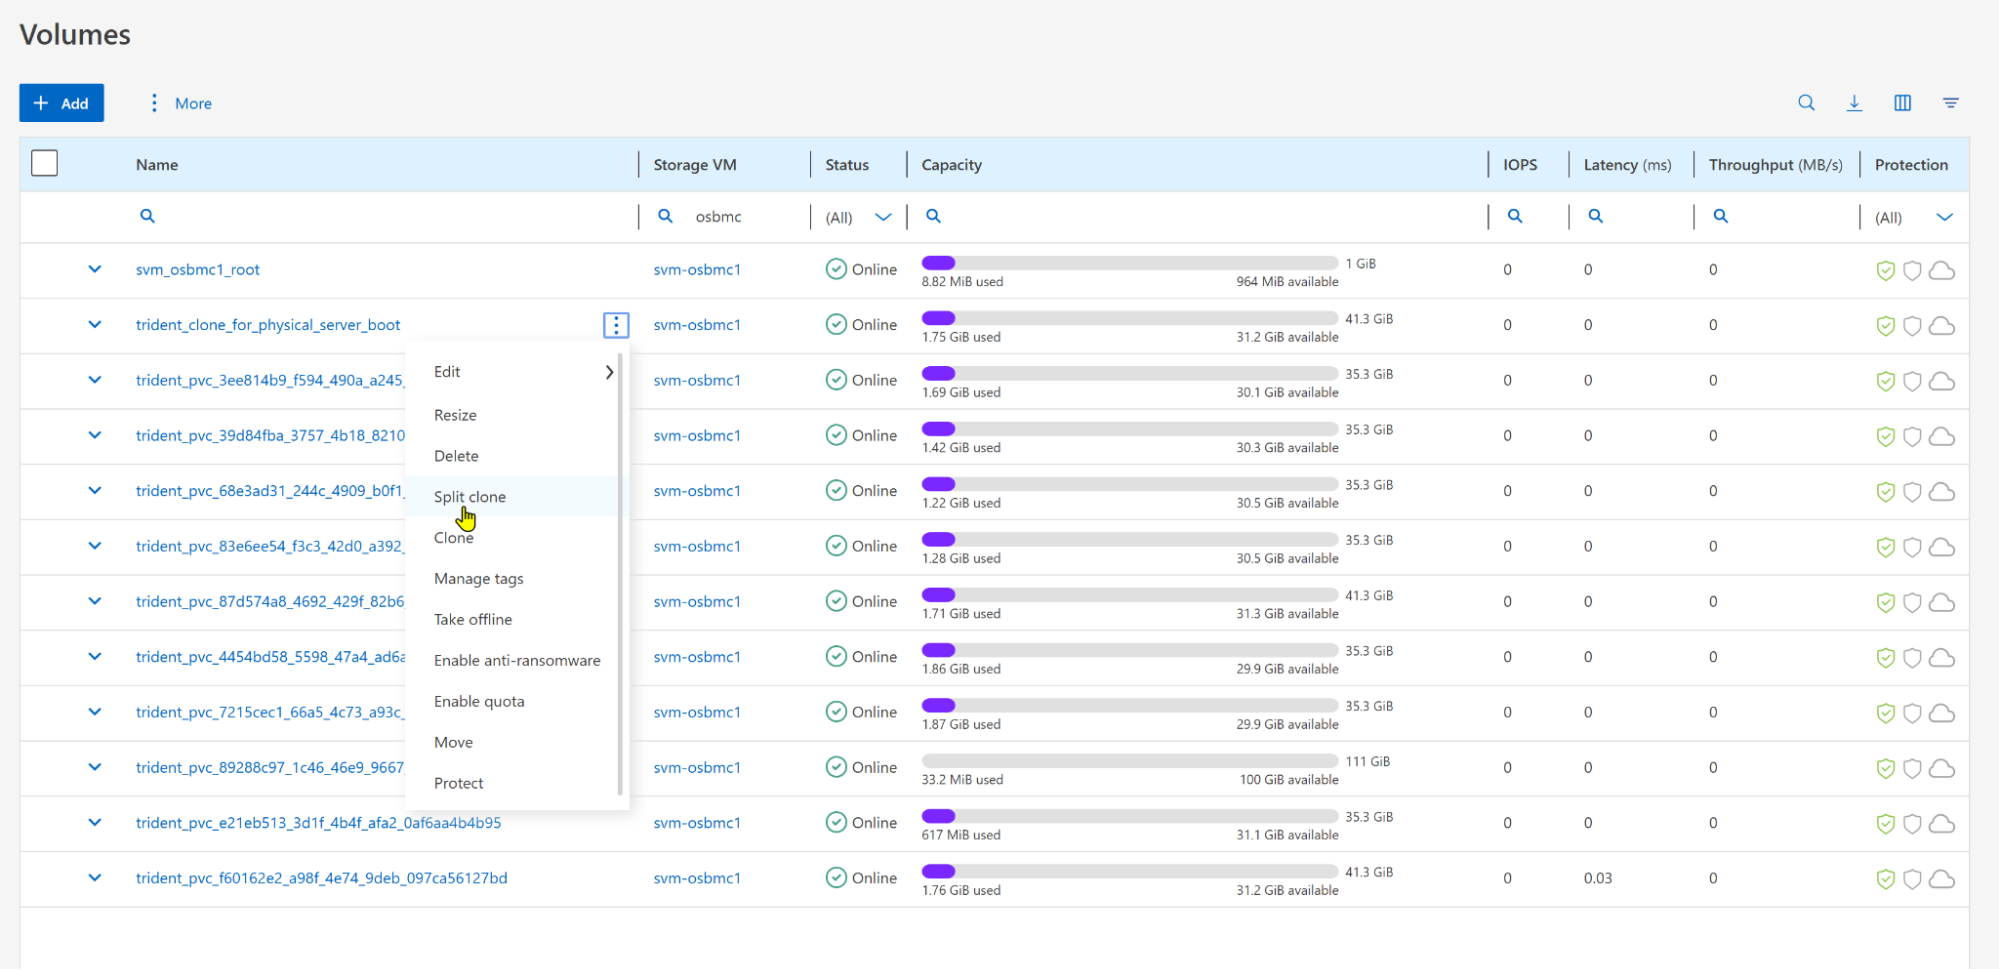
It is safe to select Delete snapshots and split the clone because no snapshots exist on the newly created clone.
Next, click Split.
Pay attention to the progress bar and wait for the cloning to be finished.
Rehost the cloned volume
To rehost the cloned volume using the command-line interface, log in to the cluster as the admin user.
grenada::> volume rehost -volume trident_clone_for_physical_server_boot -vserver svm-osbmc1 -destination-vserver svm-grenada-san
Warning: Rehosting a volume from one Vserver to another Vserver does not change the security information about that volume.
If the security domains of the Vservers are not identical, unwanted access might be permitted, and desired access might be denied. An attempt to rehost a volume will disassociate the volume from all volume policies and policy rules. The volume must be reconfigured after a successful or unsuccessful rehost operation.
Do you want to continue? {y|n}: y
[Job 621557] Job succeeded: Successful
Info: volume is rehosted on the target Vserver.
Be sure to set the desired volume configuration, such as the export policy and QoS policy, on the target Vserver.
Map the boot LUN
Next, map the new LUN as the boot LUN on the physical server. If a boot LUN has already been assigned to the physical server using the FC protocol, then this assignment must first be unmapped. Also make sure that the server has the LUN as primary boot source and not something else (such as a local disk).
In the NetApp ONTAP interface, choose the new boot LUN and click Edit (Figure 8).
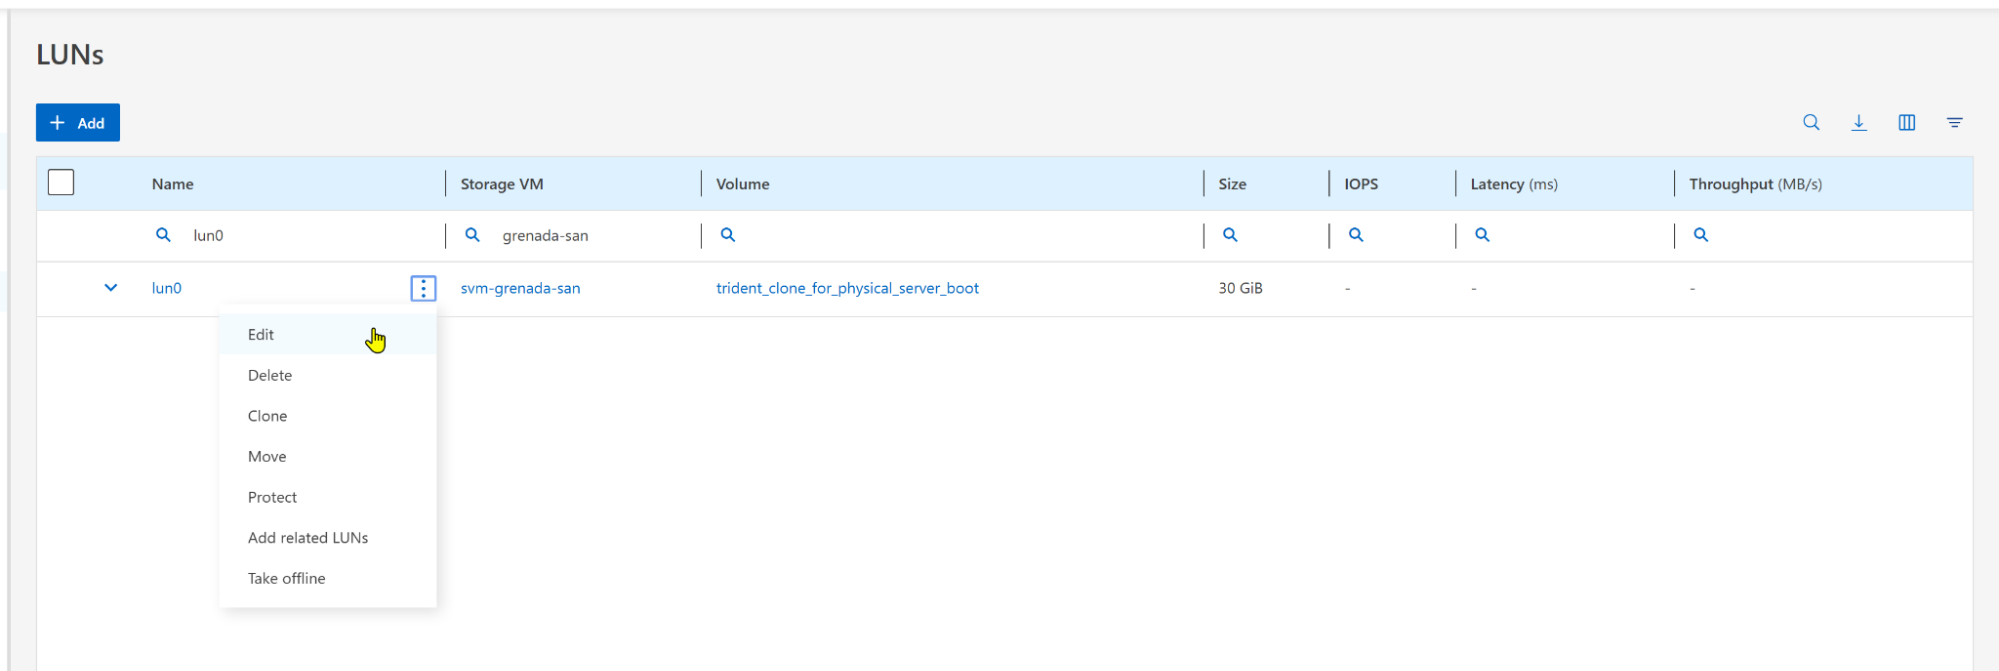
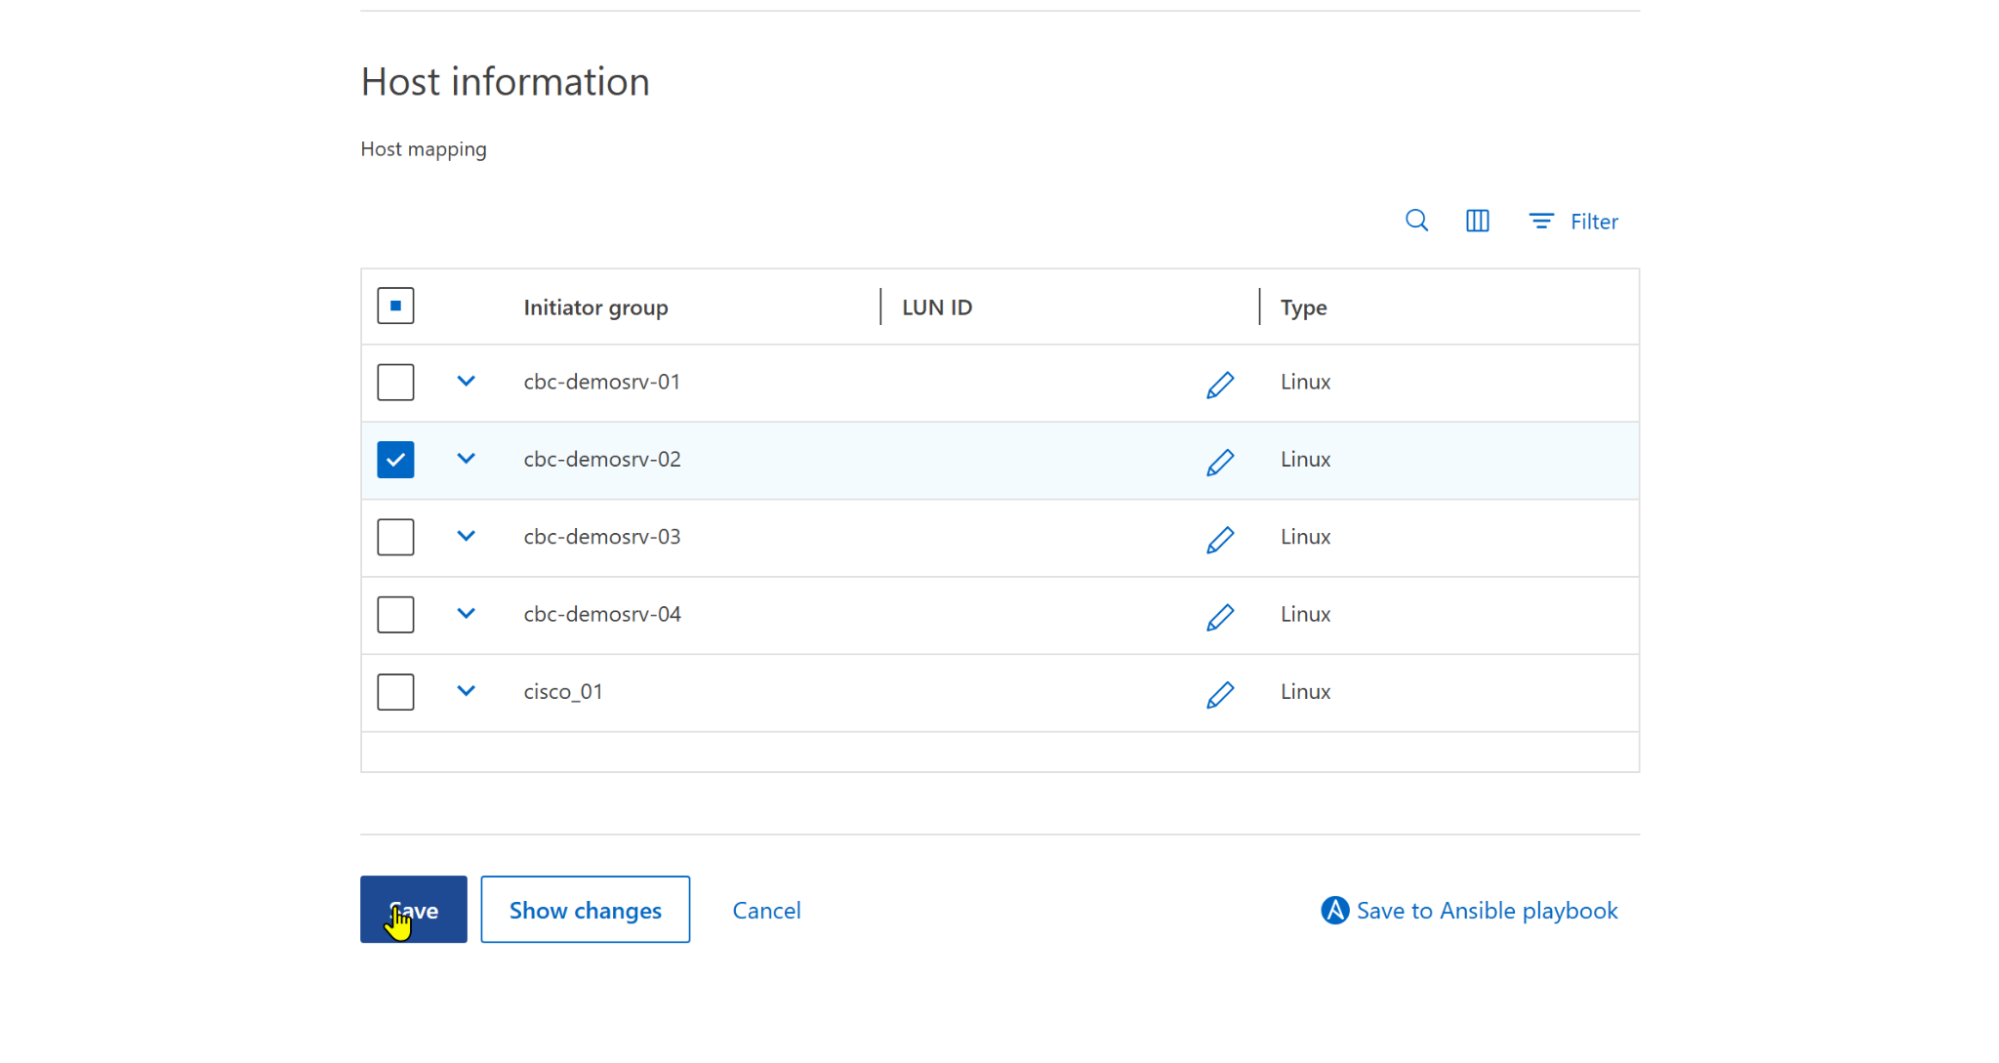
Enable mapping the boot LUN to the initiator group of the physical server (Figure 9).
Boot the server
Finally, power on the server and watch the console to ensure that the server boots from the new LUN (Figure 10). For this article, we used a server with a Broadcom FC card, and the new boot LUN was automatically detected. However, in other environments you may need to enter BIOS to specify the new boot LUN.
Once the operating system has been booted, you must adjust its network configuration (the names of NICs have changed, for example eth2 is now ens49f0np0), and also mount application volumes using NFS. On NetApp, volume access is typically restricted to a single IP address, so assign the same IP addresses you used on your virtual machine to the physical interface.
After you've edited the configuration of your network device, use mount -a or df -h to verify your mount points.
# df -h
Filesystem                   Size  Used Avail  Use%   Mounted on
...
192.168.10.14:/HOS_data/data 159G  128G   20G   81%   /data
192.168.10.14:/HOS_log/log   9.1G  2.8G  6.8G   29%   /log
Now that you can see your application filesystems, you can start your application on your spare physical server and continue with error analysis or performance tests.
Watch a video of the entire process:
Conclusion
The method presented here demonstrates how to boot a VM running on Red Hat OpenShift Virtualization as a bare metal system. This can be useful for debugging and investigating potential issues found on that system.
Last updated: December 16, 2025