Protecting sensitive data and applications is more critical now than ever before. For example, the Digital Operational Resilience Act (DORA) mandates encrypting data in use. For virtual machines (VMs) in the cloud, this means ensuring your data remains private and secure, even from the underlying cloud infrastructure. This is where confidential VMs come in, using a trusted execution environment (TEE).
This is the second article in a series that demonstrates how to enable confidential computing for Red Hat OpenShift Virtualization using various confidential computing technologies. Our previous article covered AMD’s SEV-SNP. Here, we will explain how to configure OpenShift Virtualization to launch these confidential VMs using Intel Trust Domain Extensions (TDX) technology. We'll also demonstrate how to attest to the security of these VMs using a tool called Trustee. Specifically, we'll use trustee-attester when the VM boots up to securely decrypt the VM's disk, ensuring that sensitive data is only accessible when the VM is proven trustworthy.
Note: This article describes a proof of concept (PoC) — an experimental setup built on KubeVirt (base for OpenShift Virtualization). Enabling this support in Kubevirt is in progress. You can read ongoing discussions about the proposal document at github enhancement pull request and the changes that implement the support at kubevirt pull request.
Preparing the host
For this experimental setup, we’ll configure our host with Red Hat OpenShift Container Platform in a single-node arrangement. To use Intel TDX, update the host's operating system kernel to support this advanced security feature.
The support for the TDX feature merged into the Linux kernel since the 6.16 version. QEMU has supported TDX since 9.* version and Libvirt since 9.* version. You can download these packages with TDX support.
For TDX to work, enable SGX from the BIOS by following these instructions. In addition, we also need to enable a specific setting in the BIOS called the SGX Auto MP Registration Agent, and in some cases, update the system's firmware.
After the host has booted up with the updated kernel, we can verify enabled TDX by running the dmesg | grep -i tdx command.
Once you have completed these prerequisites, deploy KubeVirt from our experimental branch, which includes the necessary TDX and attestation capabilities.
Software components
Figure 1 illustrates the software components deployed. Keep in mind that this is a PoC. Discussions are ongoing in the open-source community, which might lead to a different design in the future.
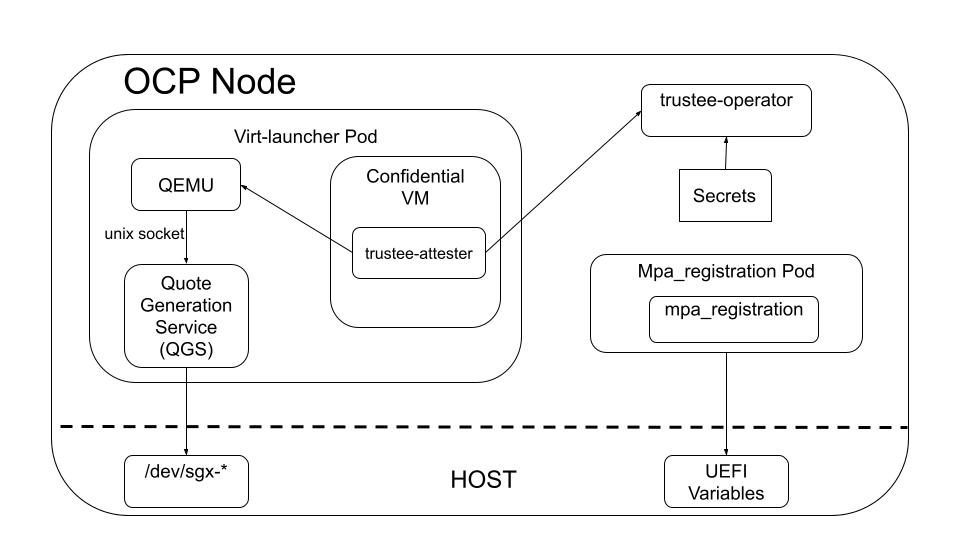
In this PoC, we rely on underlying virtualization software like QEMU and Libvirt, configured to work with TDX. The system integrates these configurations when it builds KubeVirt. To signify that a VM should be treated as confidential, a helper program is deployed through a sidecar container. This sidecar makes a specific change to the VM's configuration, essentially telling QEMU to apply the confidential VM protections. The use of this sidecar is specific to this PoC.
In KubeVirt, the virt-launcher pod is where the QEMU process for your VM runs. We extend this pod by adding a quote generation service (QGS). This service communicates with QEMU whenever the confidential VM needs to prove its identity or verify its secure state—a process called attestation. When the VM requests this verification, QGS creates a quote blob, which is a secure digital fingerprint or attestation report of the VM's current state. To do its job, QGS needs direct access to specific hardware devices, as shown in Figure 1.
Another important component is the multi-package registration agent (MPA). This service runs only once when the host system starts up. Its purpose is to securely register the host hardware with an Intel server. This registration is a vital step that allows QGS to function correctly and generate valid attestation reports. In our setup, the MPA service runs within a specially configured, privileged pod.
When the confidential VM wants to generate its attestation blob (i.e., its secure digital fingerprint), it executes a series of internal commands, including the following:
mkdir /sys/kernel/config/tsm/report/report0
cd /sys/kernel/config/tsm/report/report0
dd if=/dev/urandom bs=64 count=1 > inblob
hexdump -C outblob
The request of a blob relies on a Linux standard interface named configfs-tsm. The interface allows a standardized way to interact with trusted security modules (TSMs) through the configuration filesystem (configfs). This interface is common through all confidential technologies (e.g., AMD sev-snp, ARM cca, INTEL tdx). The reading of the outblob file outputs the quote blob. For the generation of the blob, QEMU interacts with QGS to generate this secure digital fingerprint and sends it back to the VM.
While this PoC focuses on the local generation of the attestation report, in real-world scenarios, this generated blob would be sent to a remote server for verification. This is crucial because the host system itself might be compromised. Only a trusted remote verifier can securely validate the attestation report and then decide whether to release critical secrets, such as a decryption password for the VM’s disk.
To support this broader process, we introduce two components from the Trustee project: trustee-attester and trustee-operator. The trustee-attester runs inside the confidential VM and acts as a client, requesting secrets. The trustee-operator is deployed in the OpenShift cluster and serves as the server. The attester collects the secure blob from the VM and sends it to the operator. The operator then verifies the validity of this attestation. If the VM proves trustworthy, the operator returns a set of secrets (i.e., decryption keys) to the VM.
To demonstrate this setup, we have created a simple video. In this demo, the trustee-attester installs as a system service within the VM. When the VM boots up, the attester automatically sends its attestation blob to the trustee-operator. The operator verifies the attestation and, upon successful verification, releases the necessary password to decrypt the VM’s disk. This allows the VM to access its protected data and fully boot.
This snippet shows how we create a confidential VM with an encrypted disk.
mvaralar@fedora:~/Desktop/confclusters $ oc apply -f openshift/cnv/fedora_vm_encrypted.yaml
virtualmachine.kubevirt.io/tdx-encrypted created
In the following snippet, we show the virt-launcher pod, which contains the QEMU process responsible for running the confidential VM.
NAME                                             READY   STATUS           RESTARTS   AGE
virt-launcher-tdx-encrypted-b2hjh                0/4     PodInitializing  0          8s
virt-launcher-tdx7-xs7rp                         4/4     Running          0          27d
virtlab2401virtengrdu2dcredhatcom-debug-nx7lc    0/1     Completed        0          47d
This VM has a system service configured to retrieve the decryption secret from the trustee-operator.
In the next snippet, you can see the confidential VM attempting to boot. It tries to connect to the trustee-operator and then to the QGS service.
See "systemctl status 'systemd-cryptsetup@\x2ddc03b9744a03.service'" for details
[DEPEND] Dependency failed for cryptsetup.target - Local Encrypted Volumes.
[  OK  ] Reached target sysinit.target - System Initialization.
[  OK  ] Reached target basic.target - Basic System.
[   28.904027] dracut: ATTESTATION SERVICE: Trying to fetch passphrase from http://172.30.19.138:8080: 1
[   28.910971] dracut: Executing: /usr/bin/trustee-attester --url http://172.30.19.138:8080 get-resource --path default/kbsres1/key1
[   43.178599] dracut: ATTESTATION SERVICE: Trying to fetch passphrase from http://172.30.19.138:8080: 2
[   43.182141] dracut: Executing: /usr/bin/trustee-attester --url http://172.30.19.138:8080 get-resource --path default/kbsres1/key1
[   57.443960] dracut: ATTESTATION SERVICE: Trying to fetch passphrase from http://172.30.19.138:8080: 3
[   57.455281] dracut: Executing: /usr/bin/trustee-attester --url http://172.30.19.138:8080 get-resource --path default/kbsres1/key1
[   71.722762] dracut: ATTESTATION SERVICE: Trying to fetch passphrase from http://172.30.19.138:8080
The VM will continue to request the attestation blob until the QGS service is up and running.
In this PoC, you need to start the QGS service manually, as follows:
mvaralar@fedora:~/Desktop/confclusters $ watch oc get pods
mvaralar@fedora:~/Desktop/confclusters $ oc rsh virt-launcher-tdx-encrypted-b2hjh
sh-5.1$ cp /etc/sgx_default_qcnl.conf /tmp/conf
sh-5.1$ sed -i "s/\"use_secure_cert\": true/\"use_secure_cert\": false/g" /tmp/conf
sh-5.1$ export QCNL_CONF_PATH=/tmp/conf
sh-5.1$ /usr/sbin/qgs --debug --no-daemon --verbose
Once the VM successfully obtains the decryption secret, it uses it to decrypt its disk. After the VM fully boots, we can confirm that we are indeed running confidential VMs with Intel TDX. The next snippet shows the confidential VM booting up.
[  OK  ] Started gssproxy.service - GSSAPI Proxy Daemon.
[  OK  ] Started nfs-client.target - NFS client services.
[  OK  ] Reached target remote-fs-pre.target - Preparation for Remote File Systems.
[  OK  ] Reached target remote-cryptsetup.target - Remote Encrypted Volumes.
[  OK  ] Reached target remote-fs.target - Remote File Systems.
[  OK  ] Starting systemd-user-sessions.service - Permit User Sessions...
[  OK  ] Finished systemd-user-sessions.service - Permit User Sessions.
[  OK  ] Started extd.service - Deferred execution scheduler.
[  OK  ] Started crond.service - Command Scheduler.
[  OK  ] Starting plymouth-quit-wait.service - Wait until boot process finishes up...
[  OK  ] Starting plymouth-quit.service - Terminate Plymouth Boot Screen...
105.155912] fbcon: Taking over console
Fedora Linux 42 (Server Edition)
Kernel 6.14.0-63.fc42.x86_64 on x86_64 (ttyS0)
Web console: https://example-u6viovlxt17wv2b7:9090/ or https://10.0.2.2:9090/
example-u6viovlxt17wv2b7 login: root
Password:
Last login: Wed May 21 12:01:40 on ttyS0
[root@example-u6viovlxt17wv2b7 ~]# dmesg | grep tdx
[    0.000000] tdx: Guest detected
[    0.000000] tdx: Attributes: SEPT_VE_DISABLE
[    0.000000] tdx: TD_CTLS: PENDING_VE_DISABLE ENUM_TOPOLOGY
[   37.941673] systemd[1]: Detected confidential virtualization tdx.
[   37.941697] systemd[1]: Detected confidential virtualization tdx.
We can verify that QGS has correctly responded to QEMU’s request.
The following is the QGS response during blob generation.
tee_att_get_quote return Success
About to write response in thread [7fd79b0fc640]
About to shutdown and close socket
Erased a connection, now [0]
Final thoughts
This article has demonstrated a Proof of Concept (PoC) for running secure confidential VMs on Red Hat OpenShift Virtualization, leveraging Intel TDX technology. We've shown how these VMs can protect sensitive data from the underlying cloud infrastructure by using a TEE, and how to validate platform authenticity using attestation.
By integrating Trustee, we’ve demonstrated how a VM can securely verify its identity. Once confirming the VM's identity through a remote trustee server, it automatically unlocks its encrypted disk, making sure sensitive data is only accessible when the VM is in a secure, verified state. Although this is an experimental setup, it highlights the significant potential of confidential computing to enhance data privacy and security for critical workloads in cloud environments like OpenShift.
