Deploying large language models (LLMs) on Red Hat OpenShift AI enables on-premise inference for Red Hat Ansible Lightspeed intelligent assistant. With OpenShift AI, you can containerize, scale, and integrate LLM workloads directly into enterprise environments. This ensures better control over data, compliance with organizational policies, and the ability to optimize resource utilization. The deployment also creates a flexible platform for evaluating model performance, customizing workflows, and extending Ansible Lightspeed with domain-specific intelligence.
Note: Installing OpenShift AI is a prerequisite for this model deployment.
Powering the Ansible Lightspeed intelligent assistant with your own inference service
Ansible Lightspeed intelligent assistant lets you bring your own AI service to power the inference that helps generate answers. These answers are based on the enhanced context from the retrieval-augmented generation (RAG) requests that the intelligent assistant uses.
The core of these AI services is typically an LLM. An LLM is a type of AI model that uses natural language processing (NLP) to understand and generate human-like text. Trained on massive amounts of text data using transformer architectures, these models learn the deep patterns and nuances of language.
OpenShift AI provides the necessary interface for this is through an inference service. An inference service is a standardized API endpoint that provides access to a deployed LLM, allowing applications like the intelligent assistant to simply send its RAG-enhanced prompt and receive the generated response.
Key components of an inference server deployment
Deploying an inference service involves several critical components:
- Model storage: KServe supports Amazon S3, PVC, or OCI-based model storage. We have chosen an S3-compatible location where the large LLM files are stored. The service pulls the model from here on startup.
- A serving runtime: A specialized container image that contains the necessary libraries and server software (like vLLM) to load the model from storage and serve requests.
- Accelerated compute infrastructure: An underlying worker node equipped with a compatible GPU. We have chosen instances with NVIDIA GPUs, so we need to install the NVIDIA GPU Operator in OpenShift to make this hardware's processing power available to our serving runtime. This is essential for performant inference. Alternatively, OpenShift AI supports AMD GPUs, but we will not cover this in our example.
Evaluating inference server performance
How do we know if our inference service is good enough for a real-time, interactive tool like the Ansible Lightspeed intelligent assistant? A slow, lagging assistant provides a poor user experience. To quantify performance, we focus on two key performance indicators (KPIs):
- Time to First Token (TTFT): This measures the latency from when a user sends a prompt to when the very first piece (token) of the response is generated. A low TTFT is crucial for making the assistant feel responsive and not "stuck."
- Inter-Token Latency (ITL): This measures the average time delay between each subsequent token in the response. A low ITL ensures the response is streamed smoothly and quickly, rather than appearing in slow, jerky bursts.
To ensure a quality user experience, we must define service-level objectives (SLOs) for these KPIs. For the purpose of this guide, we'll establish the following SLOs:
- 99th percentile TTFT: Fewer than 1,500 milliseconds.
- 99th percentile ITL: Fewer than 200 milliseconds.
Deployment overview
This blog post guides you through the following high-level steps:
- Configure storage: We will deploy MinIO to create an on-cluster, S3-compatible bucket for our model files.
- Prepare the serving runtime: We will build a custom vLLM container image compatible with our GPU infrastructure.
- Deploy the model: Using the OpenShift AI interface, we will create the InferenceService, connecting our storage and runtime to launch a live API endpoint.
- Benchmark and validate: We will use the guidellm tool to test our service against the SLOs we defined, ensuring it's ready for integration.
Successfully completing these steps will set the stage perfectly for the next blog post in this series, where we will connect this proven, performant inference service to the Ansible Lightspeed intelligent assistant and measure the end-to-end user experience.
Before you begin
We recommend having an OpenShift user with cluster-admin privileges. Refer to this article for more details.
Serving a model
This section walks through storage setup, serving runtime preparation, and deployment.
Set up storage for the model with MinIO
Setting up the storage for handling the LLM model files is required, as OpenShift doesn't support large-file storage. One option is to connect an external S3-compatible service such as MinIO or a public cloud S3 provider. I went with MinIO because it offers a practical way to set up, manage, and upload the model within the cluster.
Deploy the MinIO instance in the given namespace using the following file: minio-setup.yaml
Either clone the repo or copy the file to your local system.
Check the current project in OpenShift using the following CLI command:
oc projectIf needed, switch to the desired namespace using the following command:
oc project <namespace-name>Run the following command to deploy a pod with the given configurations in the file:
oc apply -f minio-setup.yaml- Note the
minio_root_userandminio_root_passwordand store them securely. The username and password are required to access the MinIO user dashboard. - After setting up MinIO, you can discover routes to access it in the OpenShift dashboard.
- From the OpenShift homepage, navigate to Networking → Routes, which has routes to minio-api and minio-ui.
- Use the minio-ui route to access the Minio UI (Figure 1) and the
minio_root_userandminio_root_passwordfrom step 5 to log in.

With that, our storage for models is ready for use.
Disabling SSL verification
A possible obstacle is that if the MinIO Route is deployed with the default self-signed certificate, KServe (the underlying model serving platform) will fail to pull the model because it cannot verify the SSL certificate. The KServe InferenceService does not expose a simple verify_ssl: false option.
As a workaround, you must manually modify the data connection secret to disable SSL verification. Follow these steps:
- Create the initial connection for MinIO in the OpenShift AI dashboard.
- Create the
InferenceServicethat will use this connection. This triggers an operator to create a secret named storage-config in your project namespace. - Follow the steps outlined in the Red Hat Knowledgebase article, Disable SSL verification for a data connection.This process involves adding an annotation to the secret to prevent the operator from overwriting your changes and then updating the secret's data to include the SSL verification flag.
Note
If you have multiple data connections, you might need to manually base64 decode the secret's contents, edit the specific connection, and re-encode it, as the sed command in the article might not work correctly for multiple entries.
Upload the model to MinIO
Before moving ahead with uploading the model, you will need to download it from the Hugging Face library. LLM model sizes are generally large, so you can't download them directly. To download the model, you can either enable Git LFS (Large File Storage) or use the Hugging Face CLI, which aids in downloading the large files. In this setup, I used Git with Git LFS enabled to download the Llama model.
Once Git LFS is installed, downloading the model is just like cloning any repository:
git clone https://huggingface.co/<organization>/<repository_name>
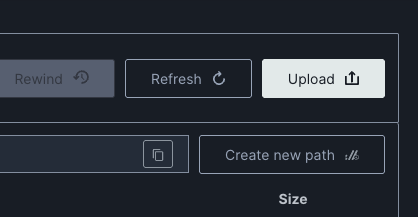
Example: git clone https://huggingface.co/meta-llama/Llama-3.1-8BUpload the downloaded model to MinIO using the MinIO UI Upload button in the dashboard, shown in Figure 2.
Ensure you have GPU nodes on your cluster
For the inference service, we need to make sure we have GPU nodes available on our cluster. Follow this guide to create a GPU-enabled node with OpenShift 4.2 in Amazon EC2.
Install and configure the Node Feature Discovery operator
Just adding a worker node with a GPU is not enough to use the GPU-enabled nodes for model serving. The Node Feature Discovery (NFD) operator in OpenShift automates the process of detecting hardware features and system configurations within an OpenShift cluster. Its primary function is to label nodes with hardware-specific information. It helps us label our GPU node and manage resources for workloads.
To install the Node Feature Discovery operator, follow the Red Hat documentation guidance.
To verify and configure NFD, follow this reference documentation.
Install and configure the NVIDIA GPU operator
The Node Feature Discovery operator helps properly discover and label the capabilities of nodes, but nodes still require additional configuration to be able to run GPU-accelerated workloads. This is where we use the NVIDIA GPU operator for OpenShift to automatically deploy, configure, and manage the NVIDIA software stack needed to run GPU-accelerated workloads.
- From the OpenShift homepage, go to Operators → OperatorHub. You can select the namespace where you want to deploy the GPU operator; we suggest
nvidia-gpu-operator. - Search for the NVIDIA GPU Operator. Select the operator and click Install.
- To verify and configure the NVIDIA GPU operator, follow the instructions in the reference documentation.
Deploy and debug the InferenceService
Once you've configured the storage and the Node Feature Discovery and NVIDIA GPU operators are in place, you can now deploy the model in a ServingRuntime on the GPU node we provisioned.
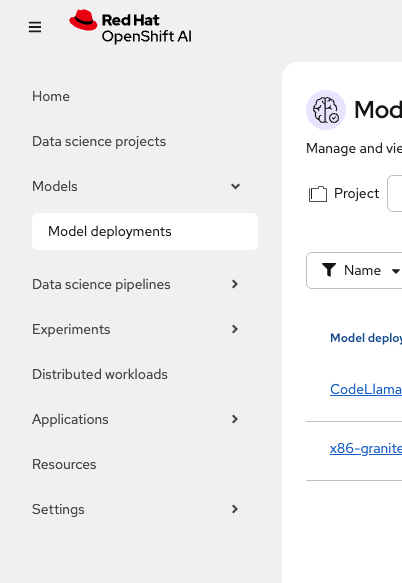
Log in to the OpenShift AI dashboard as the new clusteradmin user (Figure 3).
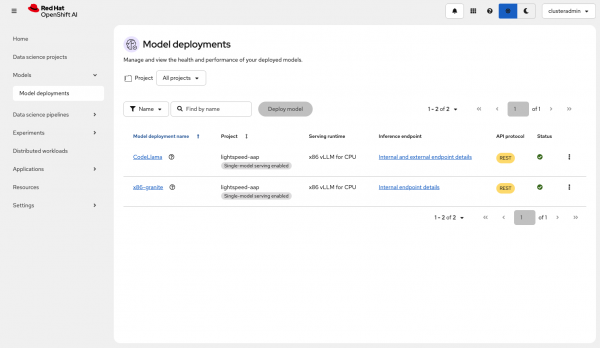
Figure 3: OpenShift AI dashboard. From the left-hand menu, select Models → Model deployments (Figure 4).

Figure 4: Navigate to the Model deployments overview in OpenShift AI. - Select the project in which you want to deploy the model.
Click Deploy model (Figure 5).
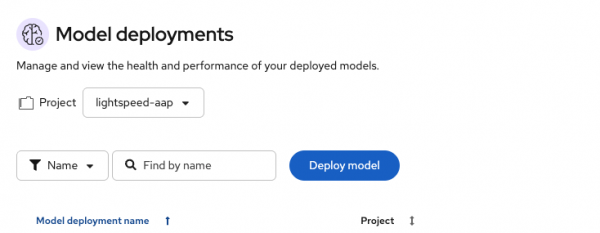
Figure 5: Deploy model option available. Fill in the required details (Figure 6):
- Add the serving runtime as vLLM NVIDIA GPU ServingRuntime for KServe.
- In the Connection drop-down menu (Figure 7), locate the MinIO setup and select that.
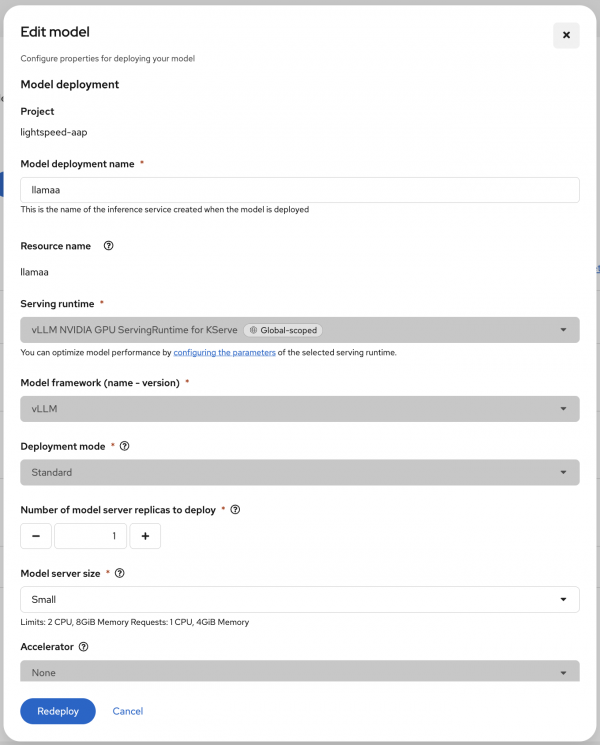
Figure 6: Configure the model deployment properties: name, serving runtime, model framework, and more. 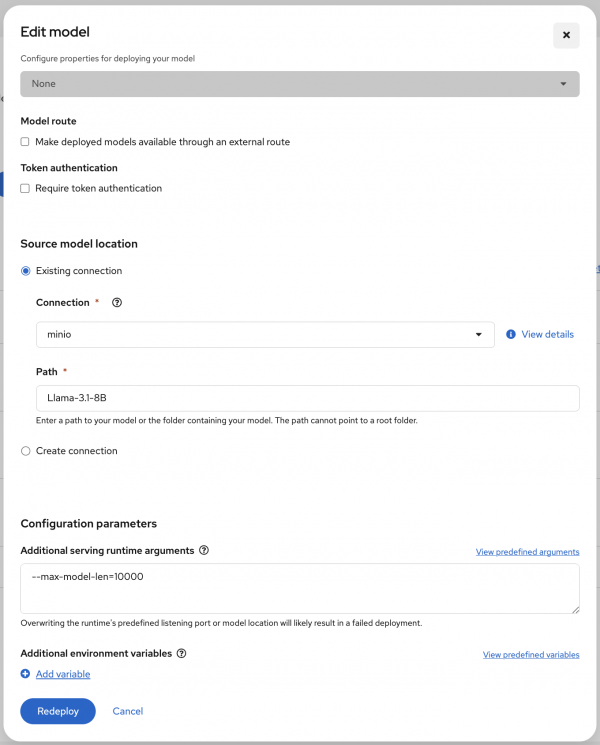
Figure 7: Select the minio connection when configuring the source model location. - Click Deploy to create the
InferenceService, pointing to the model artifacts in the MinIO storage.


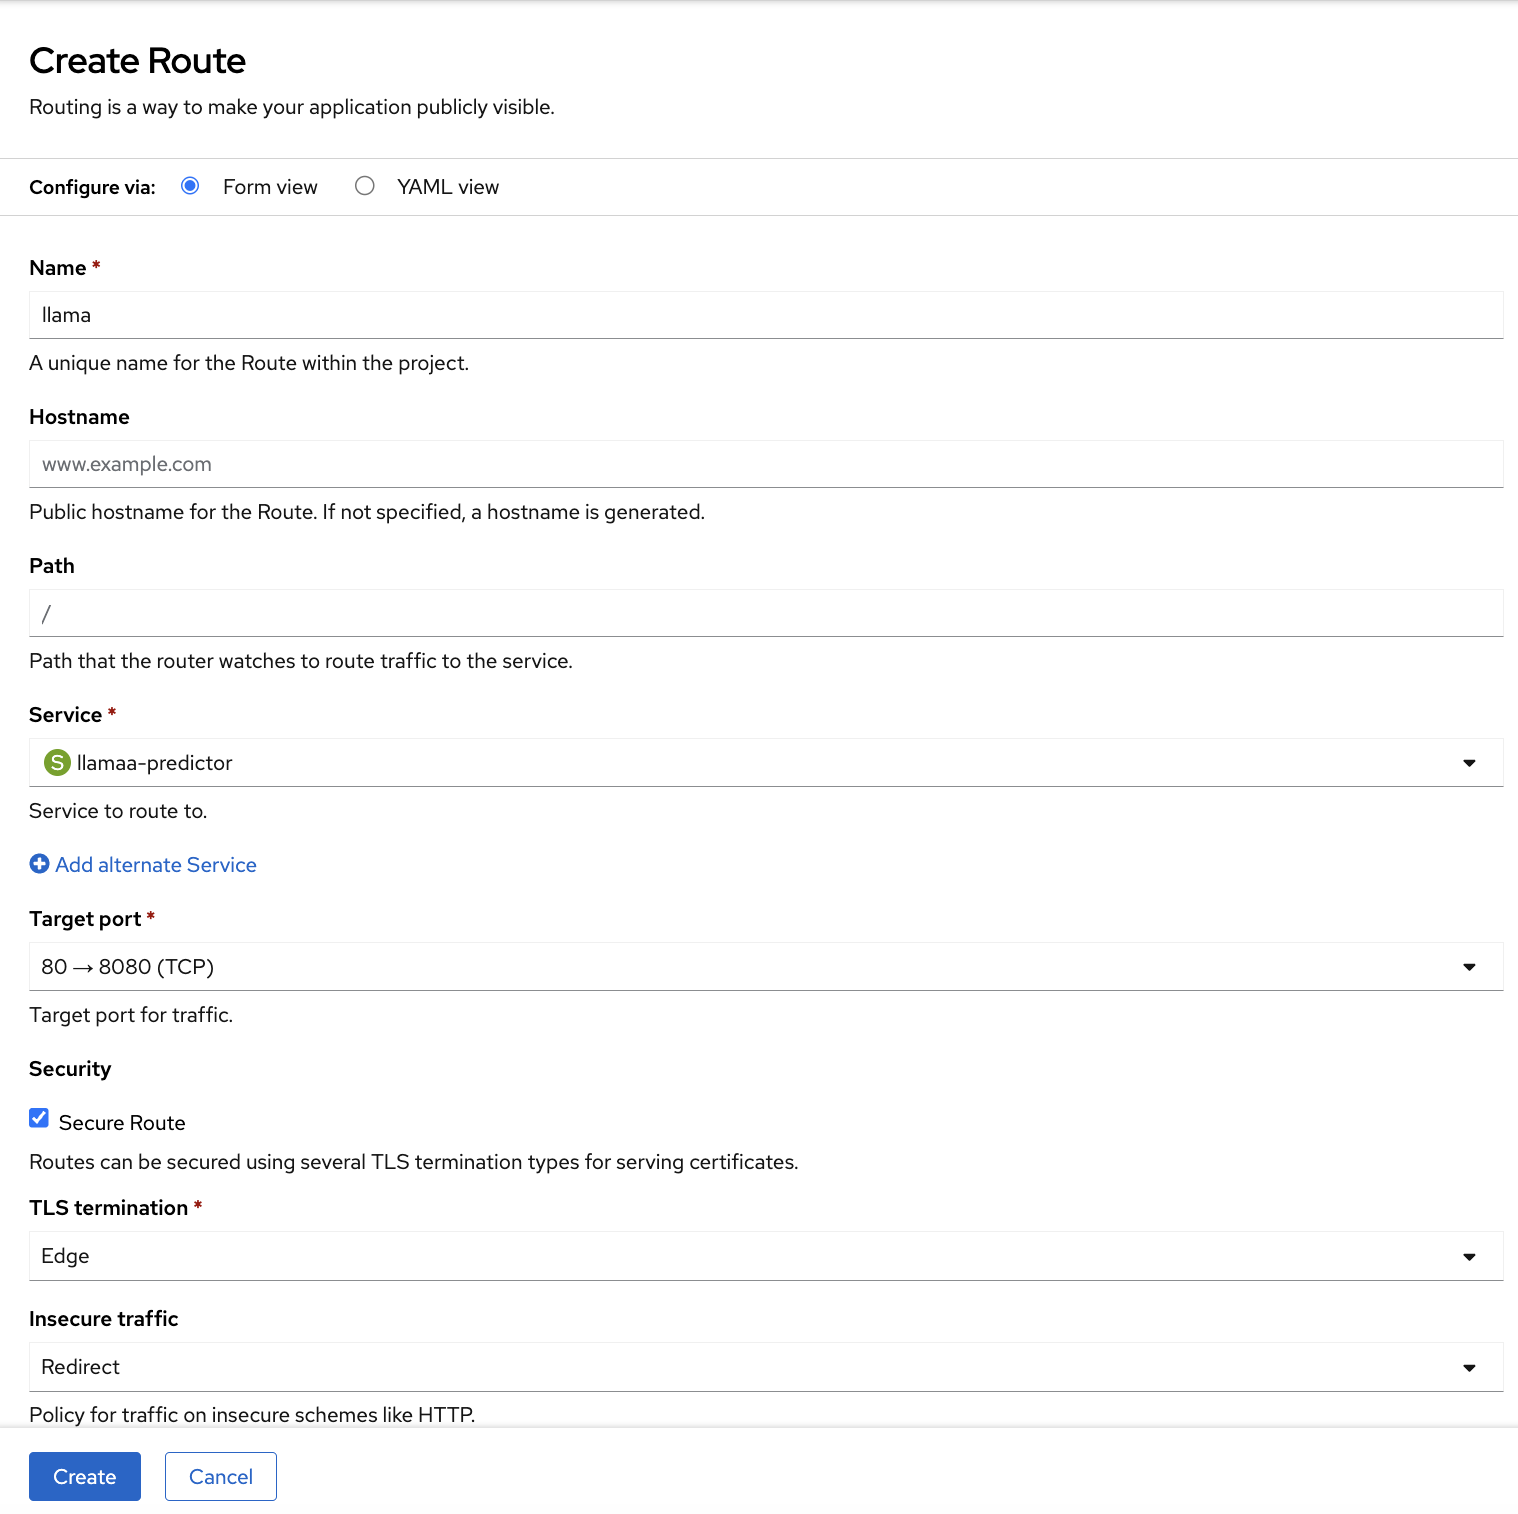
Create an external route
To interact with the service, you need to create an external route.
- From the OpenShift, select Networking → Routes → Create Route.
- Select the Form view option and fill the details accordingly (Figure 8).
- Name: llama
- Service: llamas-predictor
- Target port: 80 → 8080 (TCP)
- Secure Route: Enabled
- TLS termination: Edge
- Insecure traffic: Redirect
Evaluating our inference server's performance
GuideLLM is a tool for analyzing and evaluating LLM deployments. By simulating real-world inference workloads, GuideLLM enables users to assess the performance, resource requirements, and cost implications of deploying LLMs on various hardware configurations. It is Python-based and can be easily installed with pip:
pip install guidellmGuideLLM offers a rich set of command-line options, enabling users to customize prompt and output lengths in terms of tokens for precise control over benchmarking scenarios. One particularly useful feature is its ability to begin with synchronous requests and gradually scale up to maximum concurrency. This helps you evaluate the inference server's performance under varying, stepwise throughput loads.
Here is the command I used to kick off the benchmarking in my setup:
guidellm benchmark run \
--target "http://localhost:8000" \
--backend-args '{"verify": false}' \
--processor ./local_tokenizer \
--data='{"prompt_tokens": 128, "output_tokens": 2000}' \
--rate-type synchronous \
--max-seconds 200
Results
We ran a few tests and found that the p99 (99th percentile) Time to First Token (TTFT) was fewer than 1,000 milliseconds and that the p99 of the Inter-Token Latency (ITL) was fewer than 52 milliseconds, which met our SLOs for these KPIs (fewer than 1,500 and 200 milliseconds, respectively). Here are the detailed results:
"metadata_benchmark": {
	"synchronous1": {
		"reques_stats": {
			"per_second": 0.13,
"concurrency": 1,
},
"output_tokpersec": {
	"mean": 17.2,
},
"tot_tokpersec": {
	"mean": 34.6,
},
"req_latency": {
	"mean": 7.41,
	"median": 7.41,
	"p99": 7.42,
},
"ttft_in_ms": {
	"mean": 860,
	"median": 866,
	"p99": 909,
},
"itl_in_ms": {
	"mean": 51.6,
	"median": 51.8,
	"p99": 51.8,
},
"tpot_in_ms": {
	"mean": 51.2,
	"median": 51.2,
	"p99": 51.4,
},
	},
	"synchronous2": {
		"reques_stats": {
			"per_second": 0.14,
"concurrency": 1,
},
"output_tokpersec": {
	"mean": 17.3,
},
"tot_tokpersec": {
	"mean": 34.7,
},
"req_latency": {
	"mean": 7.39,
	"median": 7.4,
	"p99": 7.4,
},
"ttft_in_ms": {
	"mean": 837.7,
	"median": 838.4,
	"p99": 854.6,
},
"itl_in_ms": {
	"mean": 51.6,
	"median": 51.6,
	"p99": 52,
},
"tpot_in_ms": {
	"mean": 51.2,
	"median": 51.2,
	"p99": 51.6,
},
	},
	"synchronous3": {
		"reques_stats": {
			"per_second": 0.13,
"concurrency": 1,
},
"output_tokpersec": {
	"mean": 17.2,
},
"tot_tokpersec": {
	"mean": 34.6,
},
"req_latency": {
	"mean": 7.41,
	"median": 7.38,
	"p99": 7.56,
},
"ttft_in_ms": {
	"mean": 861.2,
	"median": 842.2,
	"p99": 999,
},
"itl_in_ms": {
	"mean": 51.6,
	"median": 51.5,
	"p99": 51.9,
},
"tpot_in_ms": {
	"mean": 51.2,
	"median": 51.1,
	"p99": 51.5,
},
	},
}
Next steps
In this article, we demonstrated how to set up storage for large language models. We then used it to deploy an LLM with OpenShift AI to provide an inference service. Finally, we evaluated the inference service's performance in terms of our key performance indicators.
Further resources: