The goal of Open Platform for Enterprise AI (OPEA) is to provide an open ecosystem for enterprise level generative AI (gen AI) solutions with a focus on retrieval-augmented generative AI. Red Hat OpenShift AI provides an open ecosystem of software and hardware for model serving and hardware acceleration as well as manages the lifecycle of gen AI models. Red Hat OpenShift Container Platform allows for building (if needed) and deploying or scaling of various components of an application.
OPEA's platform provides various microservices that are building blocks for gen AI systems, such as:
- Dataprep
- Retrieval
- Embedding
- Reranking
- LLM Text Generation Inference (TGI)
OPEA has various megaservices that make use of these microservices to showcase certain combined capabilities (e.g., chatbot, text-to-image generation, code generator, etc.) AMD Instinct GPU acceleration and ROCm software stack provide optimization for high-performance computing needs typical of gen AI workloads.
This article will guide you through deployment of OPEA’s ChatQnA megaservice to Red Hat OpenShift, along with the various microservices that are required for the megaservice to work.
Deployment process
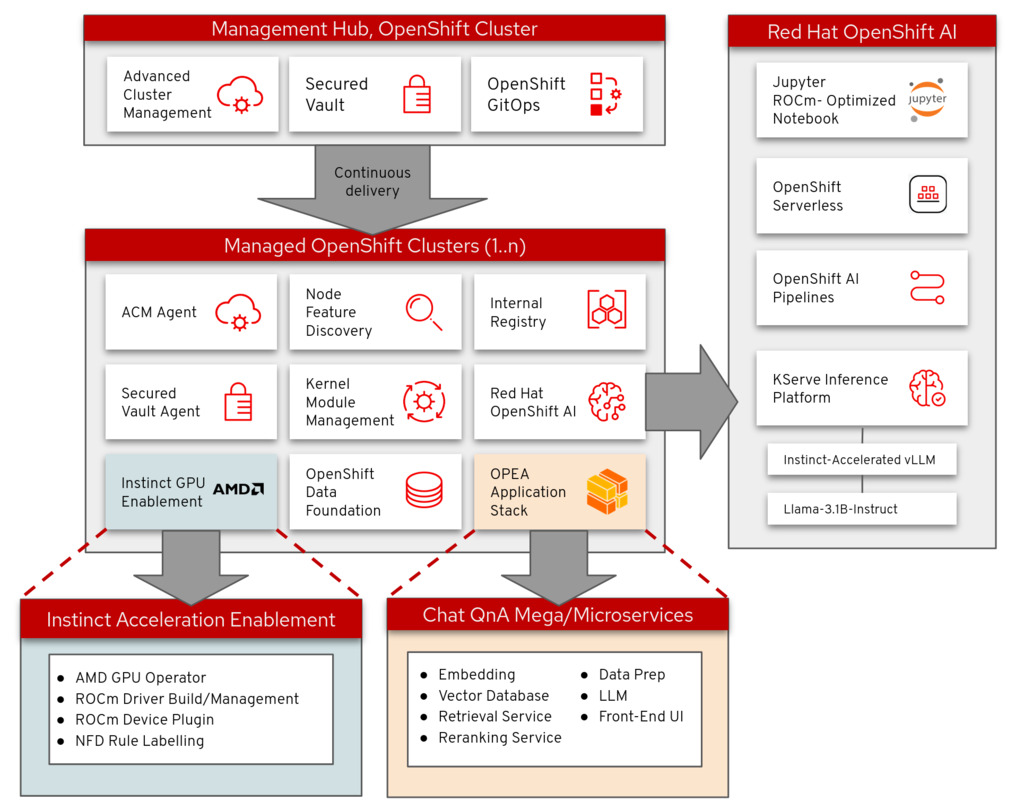
The deployment process makes use of a validated pattern to install and set up various resources in an enterprise-ready, GitOps-capable manner. Figure 1 shows the overall architecture used in this article.
Prerequisites
The following prerequisites must be satisfied before you can successfully deploy and use the ChatQnA application:
Install and set up Red Hat OpenShift Container Platform.
Install OpenShift client.
Install Podman.
Install Git.
Set up a Hugging Face account and acquire necessary model permissions by following these steps:
Create an account at Hugging Face or log in if you already have an account.
Create a read access token.
Share your contact information to access meta-llama/Llama-3.1-8B-Instruct model.
Set up MinIO or AWS S3:
Before serving the model in OpenShift AI, upload the model to either MinIO or Amazon Web Services (AWS) S3. This guide does not go into the details regarding setting up MinIO or AWS S3, so please ensure to set up either MinIO or AWS S3.
Install Red Hat OpenShift AI by following these instructions if it is not already installed in the OpenShift Container Platform cluster. Follow the given steps to deploy the model for this article:
Open up OpenShift AI by selecting it from the OpenShift Application Launcher. This will open up OpenShift AI in a new tab.
In the OpenShift AI window, select Data Science projects in the sidebar and click the Create project button.
Name the project
chatqna-llm.
Create a connection
Follow these steps to create a connection that will be used by the init-container to fetch the model uploaded in the next step when deploying the mode for inferencing:
- Click the Create connection button in the Connections tab in your newly created project.
- Select S3 compatible object storage - v1 in the Connection type dropdown, as shown in Figure 2.
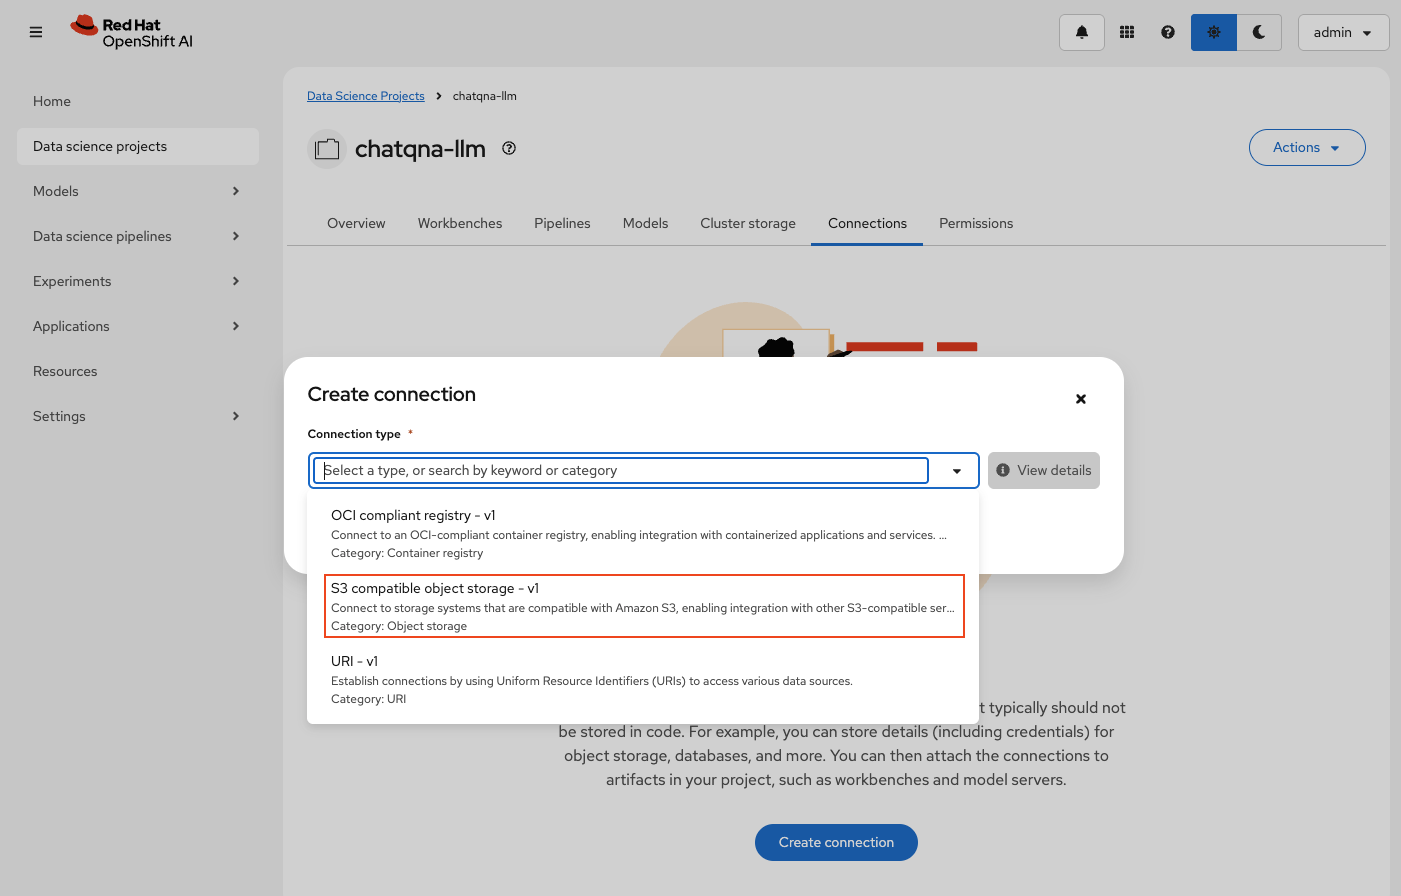
- Use the following values for this data connection, as shown in Figure 3:
- Connection name: model-store
- Connection description: Connection that points to the model store (provide any relevant description here).
- Access key: MinIO username if using MinIO else use AWS credentials.
- Secret key: MinIO password if using MinIO else use AWS credentials.
- Endpoint: minio-api route location from the OpenShift Container Platform cluster if using MinIO. Otherwise, use AWS S3 endpoint that is in the format of
https://s3.<REGION>.amazonaws.com. - Region: us-east-1 if using MinIO otherwise use the correct AWS region.
- Bucket: models
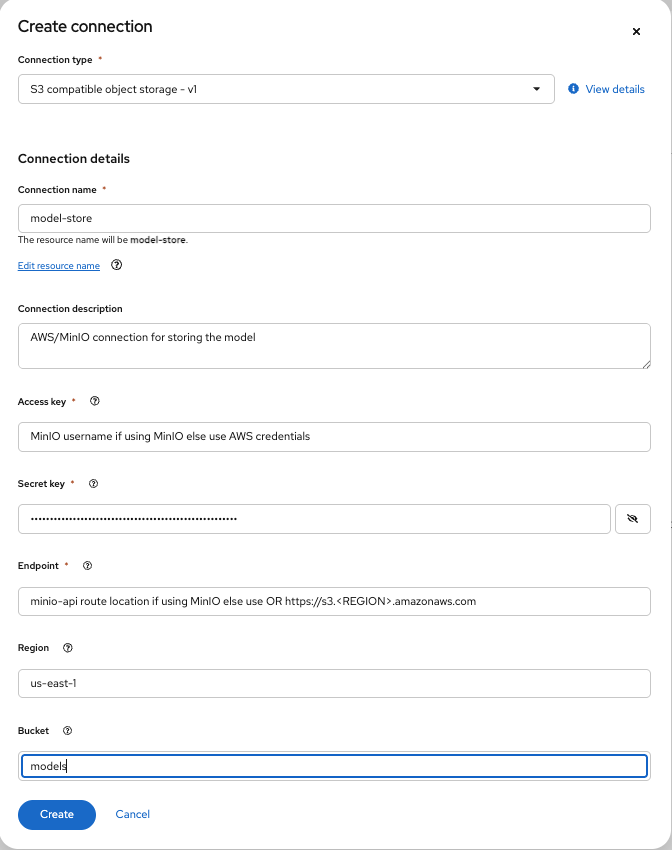
This bucket will be created by the Jupyter notebook, if it does not exist, when uploading the model. If you are using AWS S3 and the bucket does not exist, make sure to assign the correct permissions to the IAM user for creating the bucket.
Create the workbench
To upload the model needed for this article, create a workbench first:
In the
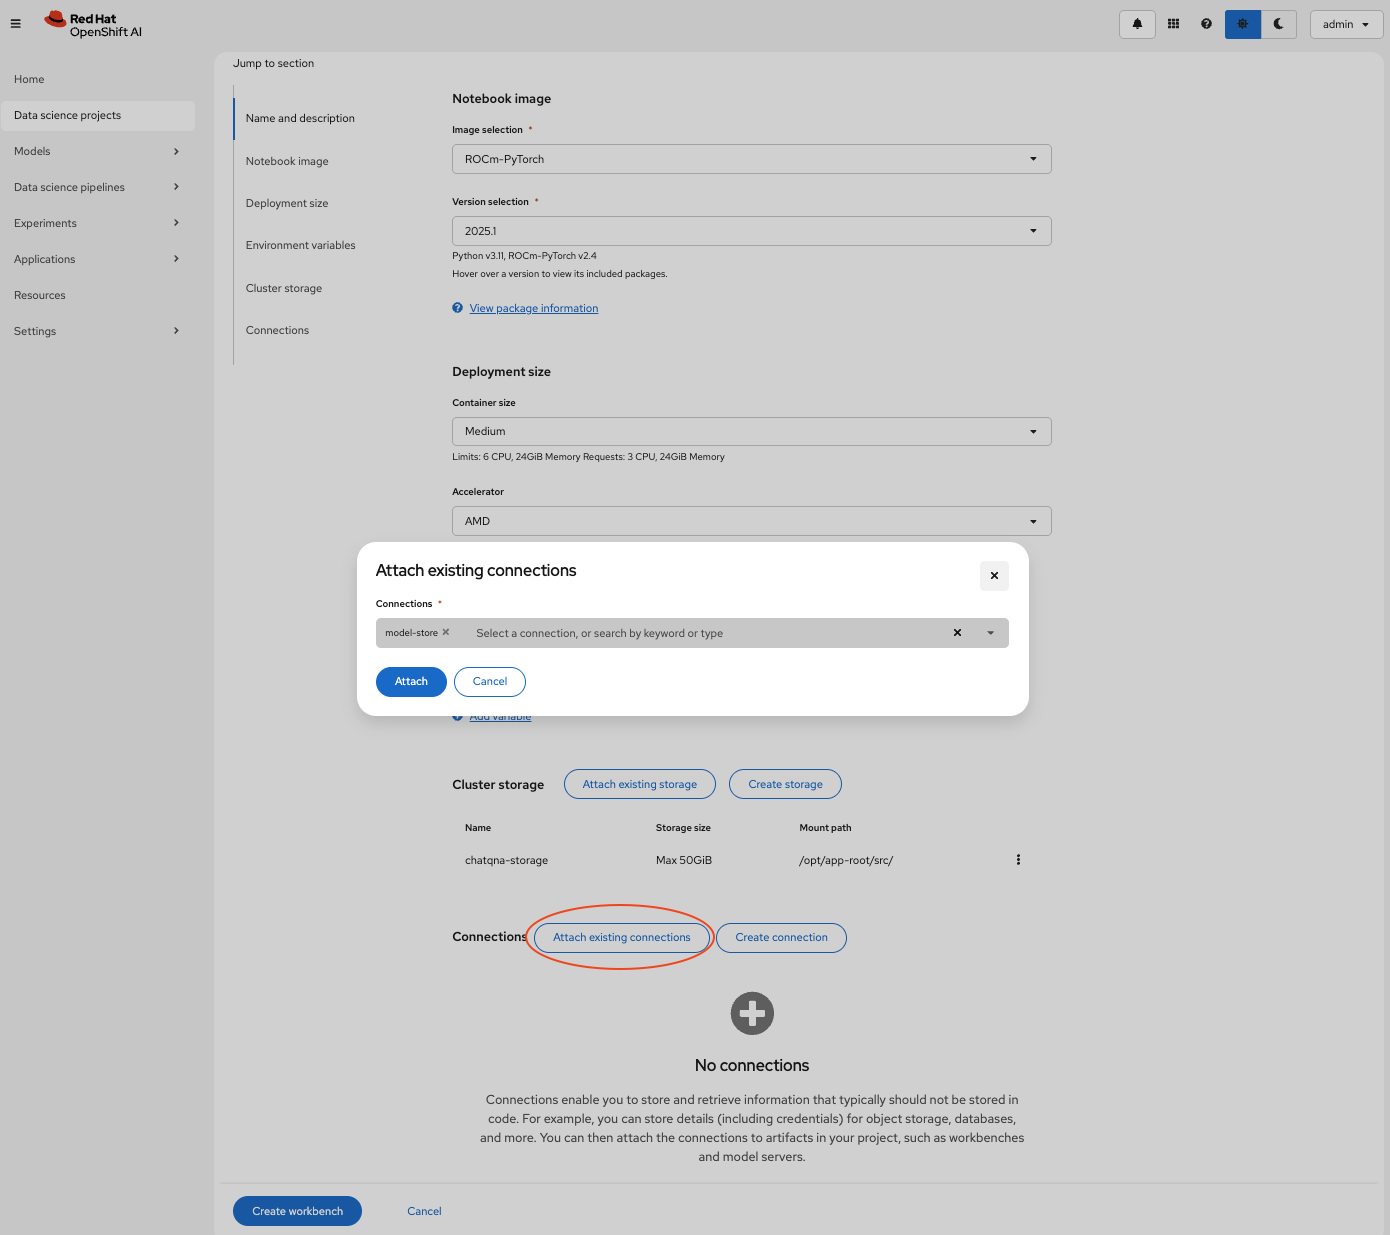
chatqna-llmdata science project, create a new workbench by clicking the Create workbench button in the Workbenches tab.Enter the following values to create the workbench:
- Name: chatqna
- Image selection: ROCm-PyTorch
- Version selection: 2025.1
- Container size: Medium
- Accelerator: AMD
- Cluster storage: Make sure the storage is at least 50GB.
- Connection: Click the Attach existing connections button and attach the connection named model-store created in the previous step (Figure 4). This will pass on the connection values to the workbench when it is started, which will be used to upload the model.
Create the workbench by clicking the Create workbench button. The workbench will start and move to running status soon.
Upload the model using OpenShift AI
To serve the model, we will first need to download it using the workbench created in the previous step as well as upload it to either MinIO or AWS S3, using the connection named model-store created in one of the previous steps. Follow the steps in this section to serve the model.
Open the workbench
Open the workbench named chatqna by following these steps:
Once the chatqna workbench is in running status, open it by clicking its name in Workbenches tab.
The workbench will open up in a new tab. When the workbench is opened for the first time, you will be shown an Authorize Access page.
- Click the Allow selected permissions button on the Authorize Access page.
Clone the repo
Now that the workbench is created and running, follow these steps to set up the project:
- In the open workbench, click the Terminal icon in the Launcher tab.
Run the following command in the terminal to clone the repository containing code to upload the model:
git clone https://github.com/validatedpatterns-sandbox/qna-chat-amd.git
Run Jupyter notebook
Use the notebook mentioned in this section to download the meta-llama/Llama-3.1-8B-Instruct model and upload it to either MinIO or AWS S3. Follow these steps to run the notebook:
- After cloning the repository, select the folder where you cloned the repository (in the sidebar) and open the
scripts/model-setup/upload-model.ipynbJupyter notebook. - Run this notebook by running each cell one by one. When prompted for the Hugging Face token, provide your Read Access token and click the Login button, as shown in Figure 5.
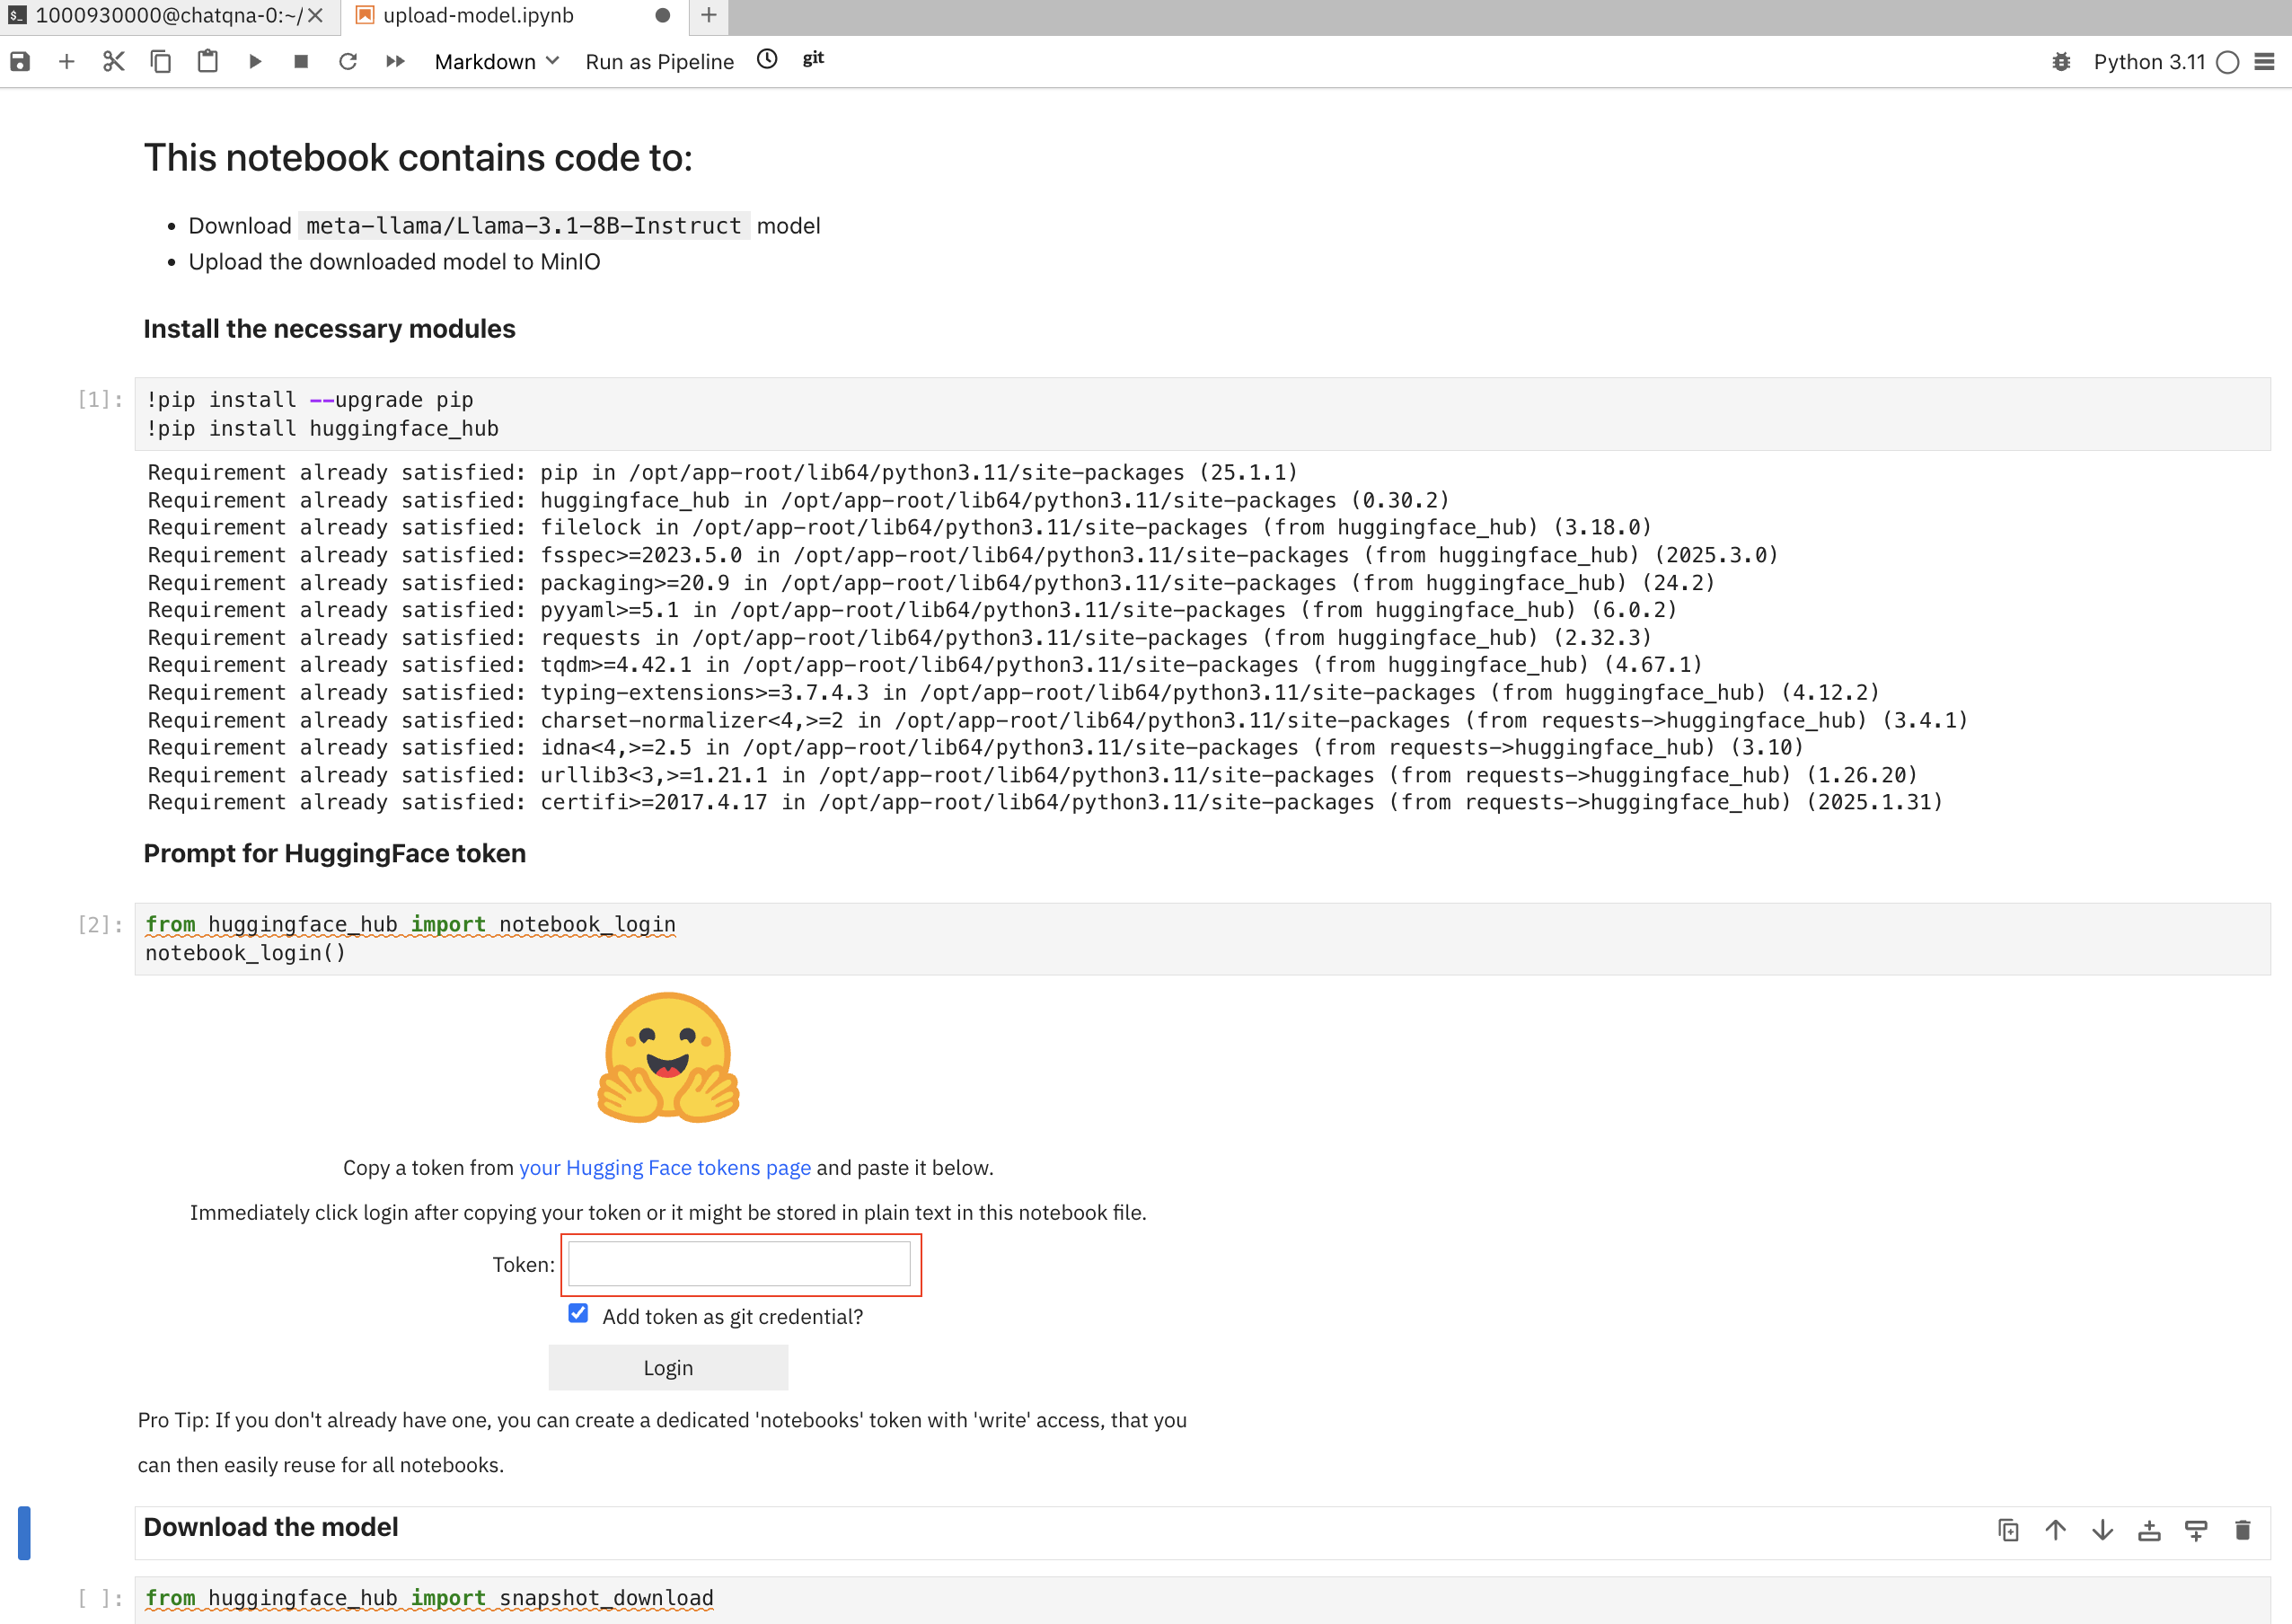
Once all the cells in the notebook complete successfully, the Llama model should have been uploaded to either MinIO or AWS S3 under Llama-3.1-8B-Instruct directory in models bucket.
By default, this notebook will upload the model to MinIO. To choose AWS S3, modify the last cell in the notebook by changing the value of XFER_LOCATION to AWS as follows:
XFER_LOCATION = 'MINIO'  # <= current value
XFER_LOCATION = 'AWS'    # <= modify to "AWS" to upload to AWS S3
Deploy the model
Once the initial notebook has run successfully and the model uploaded, you can deploy the model by following these steps:
In the
chatqna-llmdata science project, select Models tab and click the Deploy model button and fill in the blank fields as follows:- Model name:
llama-31b - SServing runtime: vLLM AMD GPU ServingRuntime for KServe
- Model framework: vLLM
- Deployment mode: Advanced
- Model server size: Small
- Accelerator: AMD
- Model route: Enable the Make deployed models available through an external route checkbox.
- Source Model location: Select the Existing connection option.
- Name: model-store (This is the name we used when we created the connection in the Create Connection step.)
- Path: Llama-3.1-8B-Instruct (This is where the model copied to in the previous step.)
- Model name:
Click Deploy to deploy the model.
Once the model is successfully deployed, copy the inference endpoint to use it in the ChatQnA application (it will take a few minutes to deploy the model).
Make sure the model name is set to "llama-31b" as this is the value used in the deployment of llm microservice that invokes the inference endpoint.
Deploy the ChatQnA application
This section provides details on installing the ChatQnA application as well as verifying the deployment and configuration by querying the application.
Install ChatQnA application
After meeting all the prerequisites, we can install the ChatQnA application by following these steps in a terminal:
Clone the repository by running the following commands:
git clone https://github.com/validatedpatterns-sandbox/qna-chat-amd.git
cd qna-chat-amd
Configure secrets for Hugging Face and the inference endpoint by running the following command:
cp values-secret.yaml.template ~/values-secret-qna-chat-amd.yamlModify the value field in the
~/values-secret-qna-chat-amd.yamlfile as shown here:secrets: - name: huggingface fields: - name: token value: null <- CHANGE THIS TO YOUR HUGGING_FACE TOKEN vaultPolicy: validatePatternDefaultPolicy - name: rhoai_model fields: - name: inference_endpoint value: null <- CHANGE THIS TO YOUR MODEL'S INFERENCE ENDPOINT
Deploy the application by running the following command:
./pattern.sh make installThis command will install the application by deploying the ChatQnA megaservice along with the following required microservices:
- Dataprep
- LLM text generation
- Retriever
- Hugging Face Text Embedding Inference
- Embedding service
- Reranker service
- ChatQnA backend
- ChatQnA UI
The processes for the build and installation of all the required services can take some time to complete. To monitor progress via the Argo CD application dashboard, follow these steps:
Open the Argo CD dashboard in a browser using the URI returned by running the following command:
echo https://$(oc get route hub-gitops-server -n qna-chat-amd-hub -o jsonpath="{.spec.host}")Get the password by running the following command:
echo $(oc get secret hub-gitops-cluster -n qna-chat-amd-hub -o jsonpath="{.data['admin\.password']}" | base64 -d)- Log in to the Argo CD dashboard using the following information:
- Username: admin
- Password: password from the previous step
Verify the ChatQnA application
After deploying the application, and it is running successfully, we can connect to the UI and query the application by following these steps:
Run the following command to get the ChatQnA UI URI:
echo https://$(oc get route chatqna-ui-secure -n amd-llm -o jsonpath="{.spec.host}")- Open the ChatQnA UI in a browser by using the URI returned from this command.
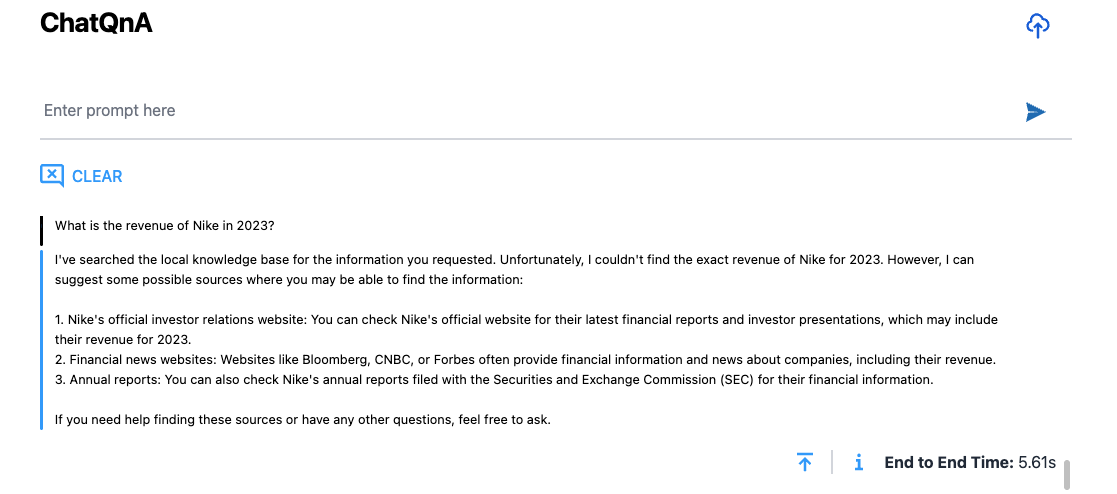
Query ChatQnA without RAG
Type the following query in the prompt: "What is the revenue of Nike inc in 2023?"
Since we have not yet provided an external knowledge base regarding this query to the application, it does not return the correct answer to this query and instead returns a generic response shown in Figure 6.
Query ChatQnA in RAG mode
In the ChatQnA UI, follow these steps to add an external knowledge base (a Nike PDF) to perform the above query using RAG:
- Click the upload icon (cloud with an arrow) in the top right corner.
Click the Choose File button and select nke-10k-2023.pdf from the scripts directory (Figure 7).
When you select the PDF and close the dialog box, the upload will start automatically.

- Allow a few minutes for the file to be ingested, processed, and uploaded to the Redis vector database.
- Refresh the page after a few minutes to verify the file has been uploaded.
- Type the following query at the prompt: "What is the revenue of Nike inc in 2023?"
The response for this query now makes use of the Nike knowledge base added in previous step, as shown in Figure 8.

ChatQnA: Remove external knowledge base
Follow the steps in this section to remove the external knowledge base that was added to the app:
- Click the upload icon in the top right corner.
- Move your cursor on top of the file in the Data Source section and click the trashcan icon that pops up in the top right corner of the file icon, as shown in Figure 9.
- Select Yes, I'm sure when prompted in Confirm file deletion? dialog box.

Query ChatQnA: General questions
When the knowledge base is not added to the application, you can also query the application to ask general questions (Figure 10). For example, you could ask:
- Tell me more about Red Hat.
- What services does Red Hat provide?
- What is deep learning?
- What is a neural network?

Wrap up
In this article, we deployed Open Platform for Enterprise AI’s ChatQnA megaservice in Red Hat OpenShift Container Platform using Red Hat OpenShift AI and AMD hardware acceleration. The ChatQnA application makes use of OPEA’s microservices to return RAG responses using an external knowledge base (in this case, the Nike PDF) as well as invokes Llama LLM when there is no external knowledge base present.
Installing and setting up the application was made easy with the use of a validated pattern that in turn uses Argo CD for the continuous integration/continuous delivery (CI/CD) pipeline to deploy various components of the application as well as to keep them in sync with the Git repository in case of any config changes.
Learn more about the various technologies used in this article: