Hosted control planes (HCP) is the name of the Red Hat product for the upstream HyperShift project. It allows you to deploy the control plane of a Red Hat OpenShift cluster into an OpenShift project instead of requiring dedicated (master) nodes and attach worker nodes managed via the nodePool API to it.
Hosted control planes architecture has several advantages when managing a fleet of clusters. It allows you to save infrastructure compute resources that would have been necessary for a standalone OpenShift topology and boosts the hosted OpenShift cluster provisioning time and day 2 automation (the provisioning time of a complete hosted cluster lasted 13 minutes in the lab used in this article, including the nodepools virtual machines (VMs) provisioning on Red Hat OpenShift Virtualization).
Some blog posts have already been written on this technology; you should read them to complement what you will read here (see the final Learn More section). We will dive deep into provisioning multiple virtualized OpenShift clusters on OpenShift Virtualization (based on the KubeVirt project) using public cloud infrastructure to quickly set up a fully functional environment and gain confidence with this technology.
Background information
Today, many companies wonder how to find an alternative for on-premises OpenShift deployment using hypervisor technology. While installing Red Hat OpenShift on bare metal infrastructure is a viable alternative that also supports automation for the installation process via the installer-provisioned infrastructure (IPI) mode, many customers appreciate both the automation experience and the flexibility of using a hypervisor to decouple the provisioning and management of the hardware layer from that of the application platform layer.
So, how do we find an alternative to the current solutions?
Having an OpenShift cluster installed on a bare metal infrastructure that uses hosted control planes together with OpenShift Virtualization to run the nodepools (the worker nodes) is the Red Hat answer to run OpenShift clusters on premises with the flexibility and automation capabilities of a typical hypervisor-based topology leveraging the mature and well-known KVM technology.
Since we are talking about a typical on-premises deployment and the prerequisites to setting up a test environment are not trivial, it is very interesting to have the possibility to test this architecture using public cloud infrastructure. This article will explain how to use Amazon Web Services (AWS) to set up a fully functional OpenShift architecture with an OpenShift cluster with OpenShift Virtualization and bare metal nodes (the hosting cluster) that we will use to provision two guest OpenShift clusters with hosted control planes form factor and KubeVirt-provided worker nodes (the hosted clusters).
Core components
To provision an OpenShift cluster via IPI mode and set up the entire solution, you need one AWS account and a DNS domain. You must also log in to the OpenShift cluster manager portal and download the pull secret required for the installation.
The OpenShift cluster will have three nodes for each kind: master, infrastructure, and bare metal. The last will host the worker nodes of the HCP cluster as virtual machines on OpenShift Virtualization.
On the OpenShift cluster’s bare metal nodes, we will add local disks that we will use via the LVM operator to simulate the scenario of bare metal clusters with directly attached disks.
On the OpenShift cluster’s infrastructure nodes, we will deploy Red Hat OpenShift Data Foundation, the software-defined storage solution provided by Red Hat, to have the ReadWriteMany access mode for the volumes that will host the virtual machines on OpenShift virtualization. This mode is required for live migration and is a best practice for better managing failure scenarios.
We will also install the multicluster engine operator to create hosted clusters with the hosted control plane form factor.
Workflows and processes
Let's dive into the workflows for each of these components.
OpenShift cluster creation
To create the OpenShift cluster on AWS, the prerequisites are to:
- Have properly configured the AWS client environment.
- Have met the requirements described in the Red Hat documentation for the AWS account, particularly the DNS domain configuration required to provision an OpenShift cluster on AWS.
- Prepare the local environment for the installation as described in the Red Hat documentation by obtaining the installation program, downloading your installation pull secret from Red Hat OpenShift Cluster Manager, and installing the OpenShift CLI.
This is the install-config.yaml file used to install the OpenShift cluster with three worker nodes that will be used for the initial setup:
apiVersion: v1
baseDomain: <YOUR_DOMAIN>
controlPlane:
  hyperthreading: Enabled
  name: master
  platform:
    aws:
      type: m5.xlarge
  replicas: 3
compute:
- hyperthreading: Enabled
  name: worker
  platform:
    aws:
      type: m5.4xlarge
  replicas: 3
metadata:
  name: <YOUR_CLUSTER_NAME>
platform:
  aws:
    region: <YOUR_REGION>
pullSecret: <YOUR_PULL_SECRET>
sshKey: |
  <YOUR_SSH_PUBKEY>
After completing install-config.yaml file, this is the command used to install the cluster:
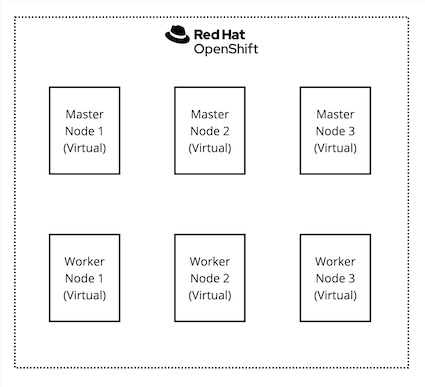
./openshift-install create cluster --dir ./ --log-level=infoAfter installing the cluster, we will get the topology represented in Figure 1.
In the following steps, those three worker nodes will become the infrastructure nodes and will be used to deploy the hosted control planes and Red Hat OpenShift Data Foundation without charging those worker cores toward the Red Hat OpenShift Container Platform subscription. So, let’s configure them with the appropriate labels:
for NODE in $(oc get nodes -l node-role.kubernetes.io/worker \
-o go-template='{{range .items}}{{.metadata.name}}{{"\n"}}{{end}}') ; \
do oc label node $NODE node-role.kubernetes.io/infra="" ; \
oc label node $NODE cluster.ocs.openshift.io/openshift-storage="" ; \
done
Bare metal nodes addition
To add bare metal nodes, we will create three new machinesets starting from the existing ones.
First of all, assuming that you have properly configured the AWS CLI environment, let’s get the manifest for the machineset of the AWS availability zone A:
AZ=$(grep region ~/.aws/config | cut -d' ' -f3)
AZ_a_MachineSet=$(oc get -n openshift-machine-api machineset \
-o go-template='{{range .items}}{{.metadata.name}}{{"\n"}}{{end}}' \
| grep ${AZ}a)
oc -n openshift-machine-api get machineset $AZ_a_MachineSet \
-o yaml > ${AZ_a_MachineSet}.yaml
For example, let’s consider a machineset named ocp-cluster-h5ffp-worker-us-east-2a.yaml (yours will be different).
That machineset must be modified to create the bare metal nodes as we desire for this testing purpose. The result is something like the following manifest; please check the sections that have been modified or added below.
As you can see, we are:
- Changing the name of the machineset.
- Adding a custom label, which we will use after.
- Adding a local disk that we will use to configure the LVM Cluster.
- Modifying the instanceType to
m5.metal.
apiVersion: machine.openshift.io/v1beta1
kind: MachineSet
metadata:
  labels:
    machine.openshift.io/cluster-api-cluster: ocp-cluster-h5ffp
  name: ocp-cluster-h5ffp-metal-us-east-2a
  namespace: openshift-machine-api
spec:
  replicas: 1
  selector:
    matchLabels:
      machine.openshift.io/cluster-api-cluster: ocp-cluster-h5ffp
      machine.openshift.io/cluster-api-machineset: ocp-cluster-h5ffp-metal-us-east-2a
  template:
    metadata:
      labels:
        machine.openshift.io/cluster-api-cluster: ocp-cluster-h5ffp
        machine.openshift.io/cluster-api-machine-role: worker
        machine.openshift.io/cluster-api-machine-type: worker
        machine.openshift.io/cluster-api-machineset: ocp-cluster-h5ffp-metal-us-east-2a
    spec:
      lifecycleHooks: {}
      metadata:
        labels:
          ocpvirt: host
      providerSpec:
        value:
          ami:
            id: ami-08bb6907b96d2a024
          apiVersion: machine.openshift.io/v1beta1
          blockDevices:
          - ebs:
              encrypted: true
              iops: 0
              kmsKey:
                arn: ""
              volumeSize: 120
              volumeType: gp3
          - deviceName: /dev/xvdb
            ebs:
              encrypted: true
              iops: 10000
              volumeSize: 1000
              volumeType: gp3
          credentialsSecret:
            name: aws-cloud-credentials
          deviceIndex: 0
          iamInstanceProfile:
            id: ocp-cluster-h5ffp-worker-profile
          instanceType: m5.metal
          kind: AWSMachineProviderConfig
          metadata:
            creationTimestamp: null
          metadataServiceOptions: {}
          placement:
            availabilityZone: us-east-2a
            region: us-east-2
          securityGroups:
          - filters:
            - name: tag:Name
              values:
              - ocp-cluster-h5ffp-node
          - filters:
            - name: tag:Name
              values:
              - ocp-cluster-h5ffp-lb
          subnet:
            filters:
            - name: tag:Name
              values:
              - ocp-cluster-h5ffp-subnet-private-us-east-2a
          tags:
          - name: kubernetes.io/cluster/ocp-cluster-h5ffp
            value: owned
          userDataSecret:
            name: worker-user-data
We need three bare metal nodes for our lab environment (at least two to perform failure tests), so we have two possibilities to get two other bare metal nodes:
- Either copy this manifest and replace the zone to have bare metal nodes in different availability zones:
cp ocp-cluster-h5ffp-worker-us-east-2a.yaml \
ocp-cluster-h5ffp-worker-us-east-2b.yaml
sed -i "s/-2a/-2b/" ocp-cluster-h5ffp-worker-us-east-2b.yaml
cp ocp-cluster-h5ffp-worker-us-east-2a.yaml \
ocp-cluster-h5ffp-worker-us-east-2c.yaml
sed -i "s/-2a/-2c/" ocp-cluster-h5ffp-worker-us-east-2c.yaml- OR Change the number of replicas in the first machineset to 3.
We can then create the bare metal nodes by applying the manifests with oc apply -f <filename> as usual. This is a parametric way to quickly do it if you did not change the machineset manifest file name:
infrastructure_id=$(oc get -o \
jsonpath='{.status.infrastructureName}{"\n"}' infrastructure cluster)
for manifest in $(ls . | grep ${infrastructure_id}) ; do oc apply -f $manifest ; done
You can monitor the progress of your machinesets creation by running:
oc -n openshift-machine-api get machinesetStorage setup
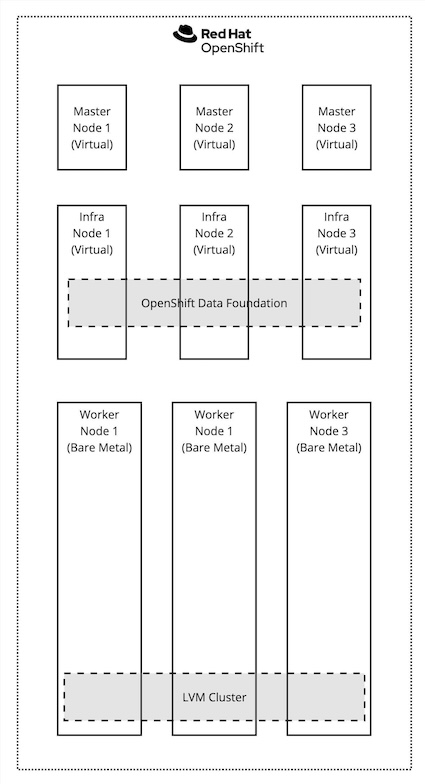
The next step is to install the OpenShift Data Foundation and LVM Storage operators with default options to provide two different storage solutions for our laboratory environment to provide volumes to virtual worker nodes attached via nodepools to the hosted clusters. As explained, in one case, we will use OpenShift Data Foundation to provide RWX volumes supporting live migration. In contrast, we will use local disks via an LVM cluster to simulate an infrastructure with directly attached storage disks.
Figure 2 shows the architecture we will get.
For this lab, we installed the operators and provisioned the OpenShift Data Foundation storage system and LVMCluster custom resources (CRs) using the OpenShift web console—doing it declaratively is possible, but it is outside the purpose of this article.
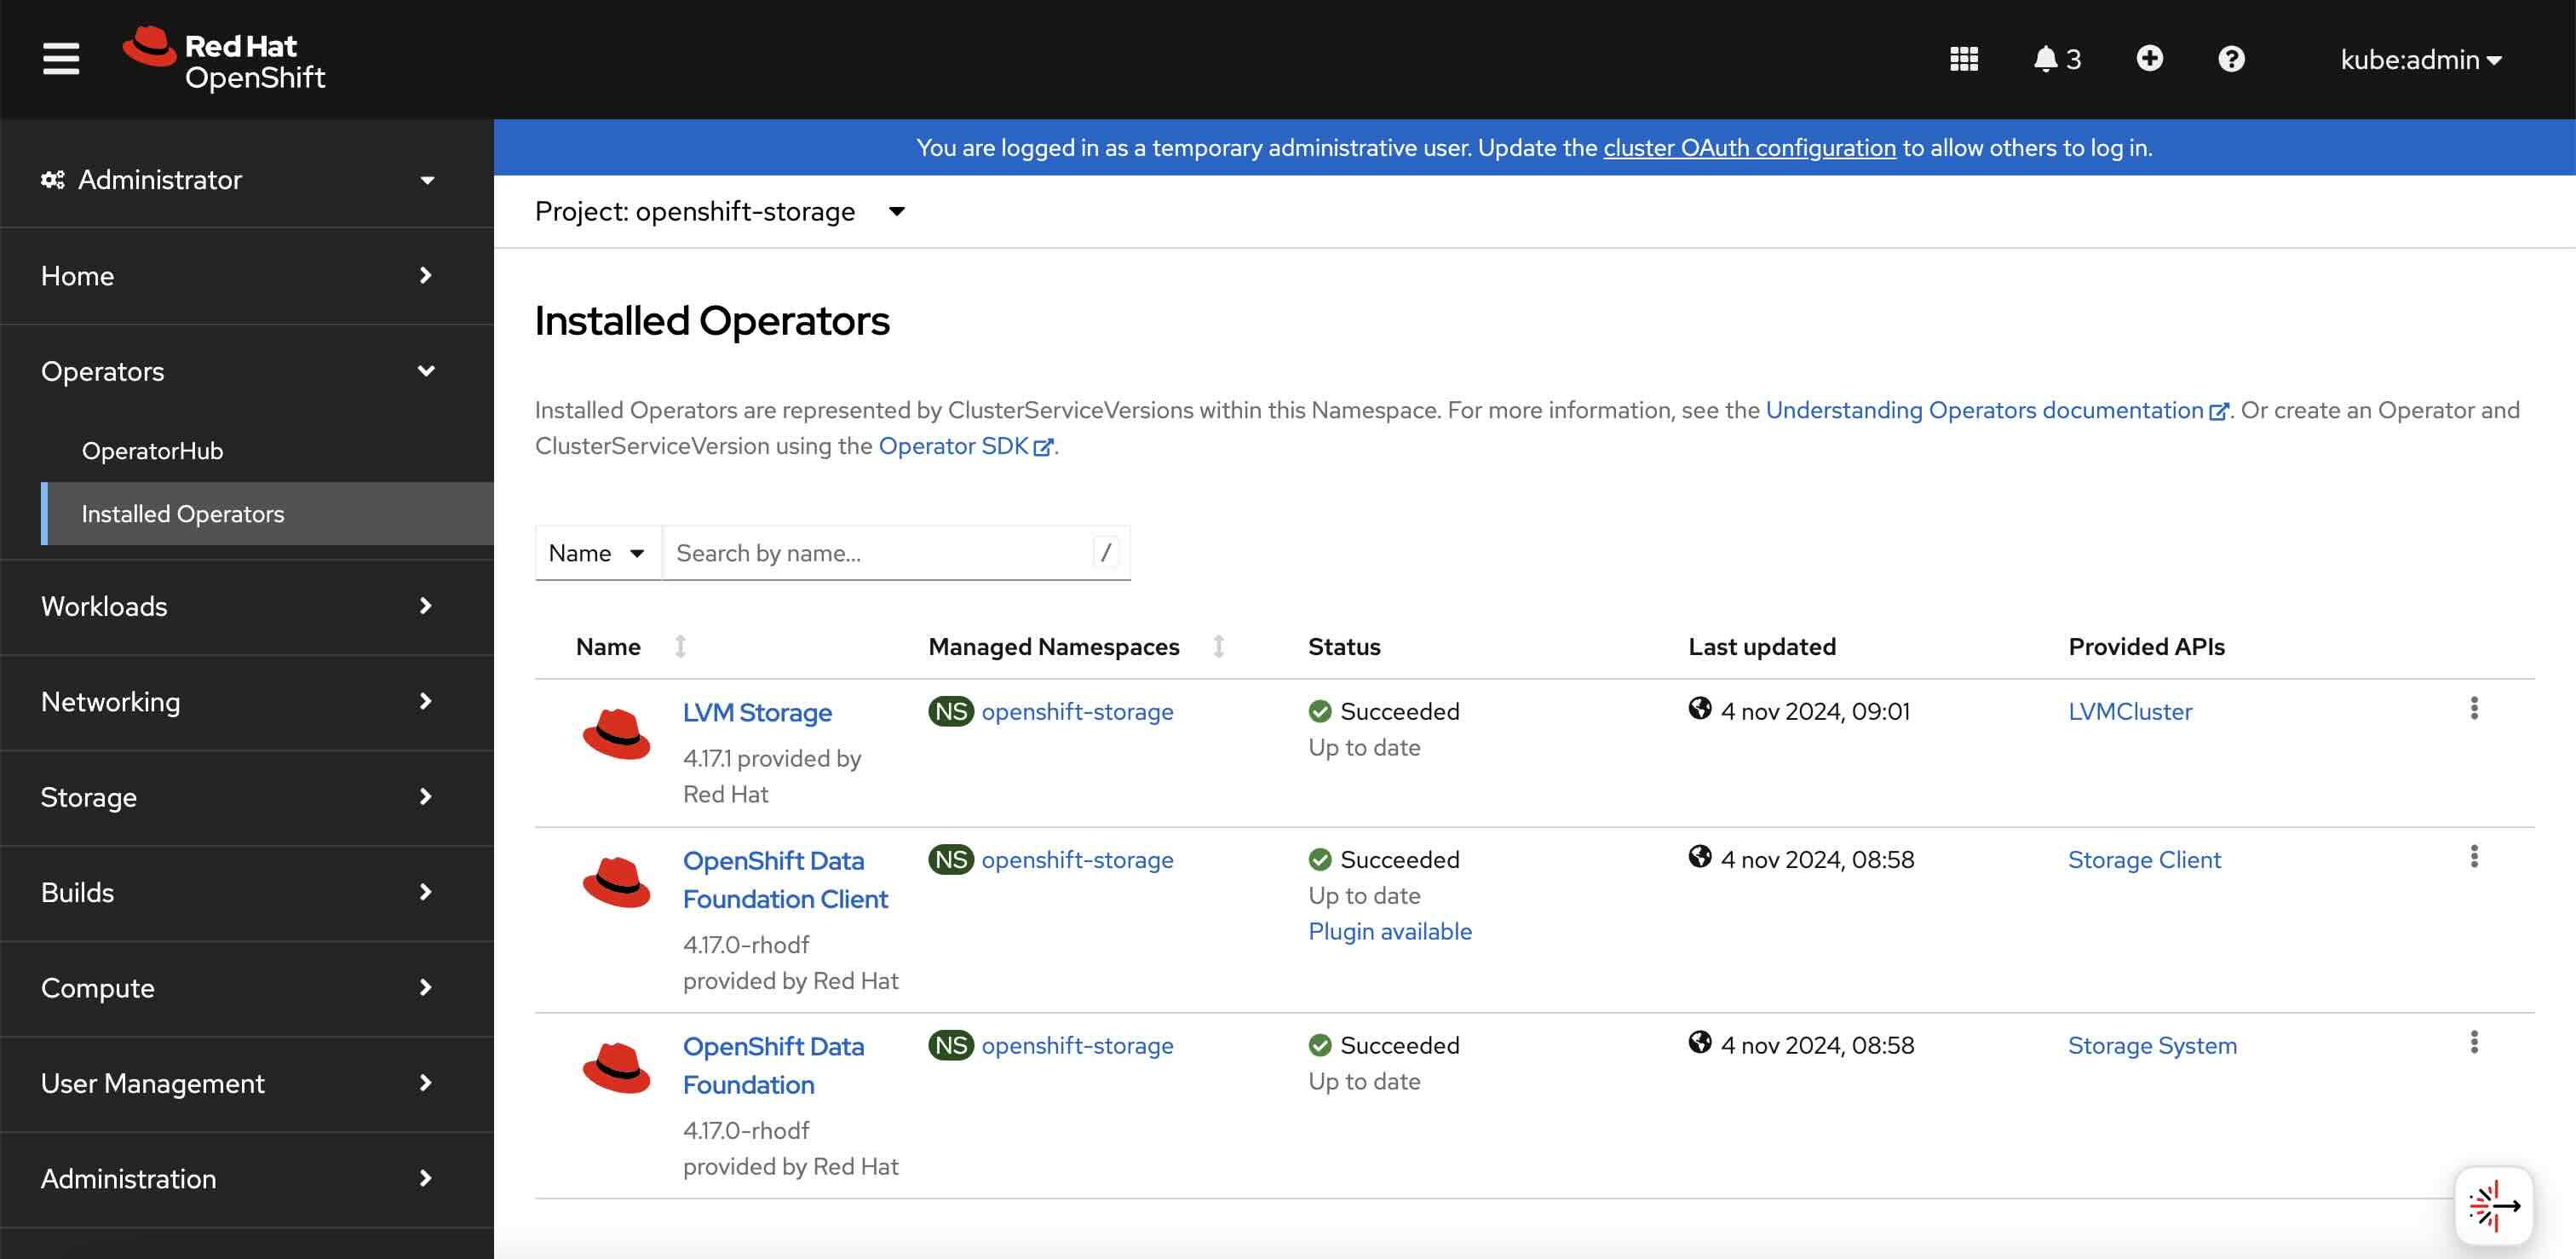
To install the required operators, go to the Operator Hub menu, search for them, and install them using the default options to obtain the situation shown in Figure 3.
After installing the operators, we must create the StorageSystem custom resource the OpenShift Data Foundation operator manages. Some screenshots will guide you through the process using the OpenShift web console. We will use default options, and the nodes will be automatically selected thanks to the labels we set in the previous paragraph.
Figure 4 shows the first step of the StorageSystem creation via web UI.
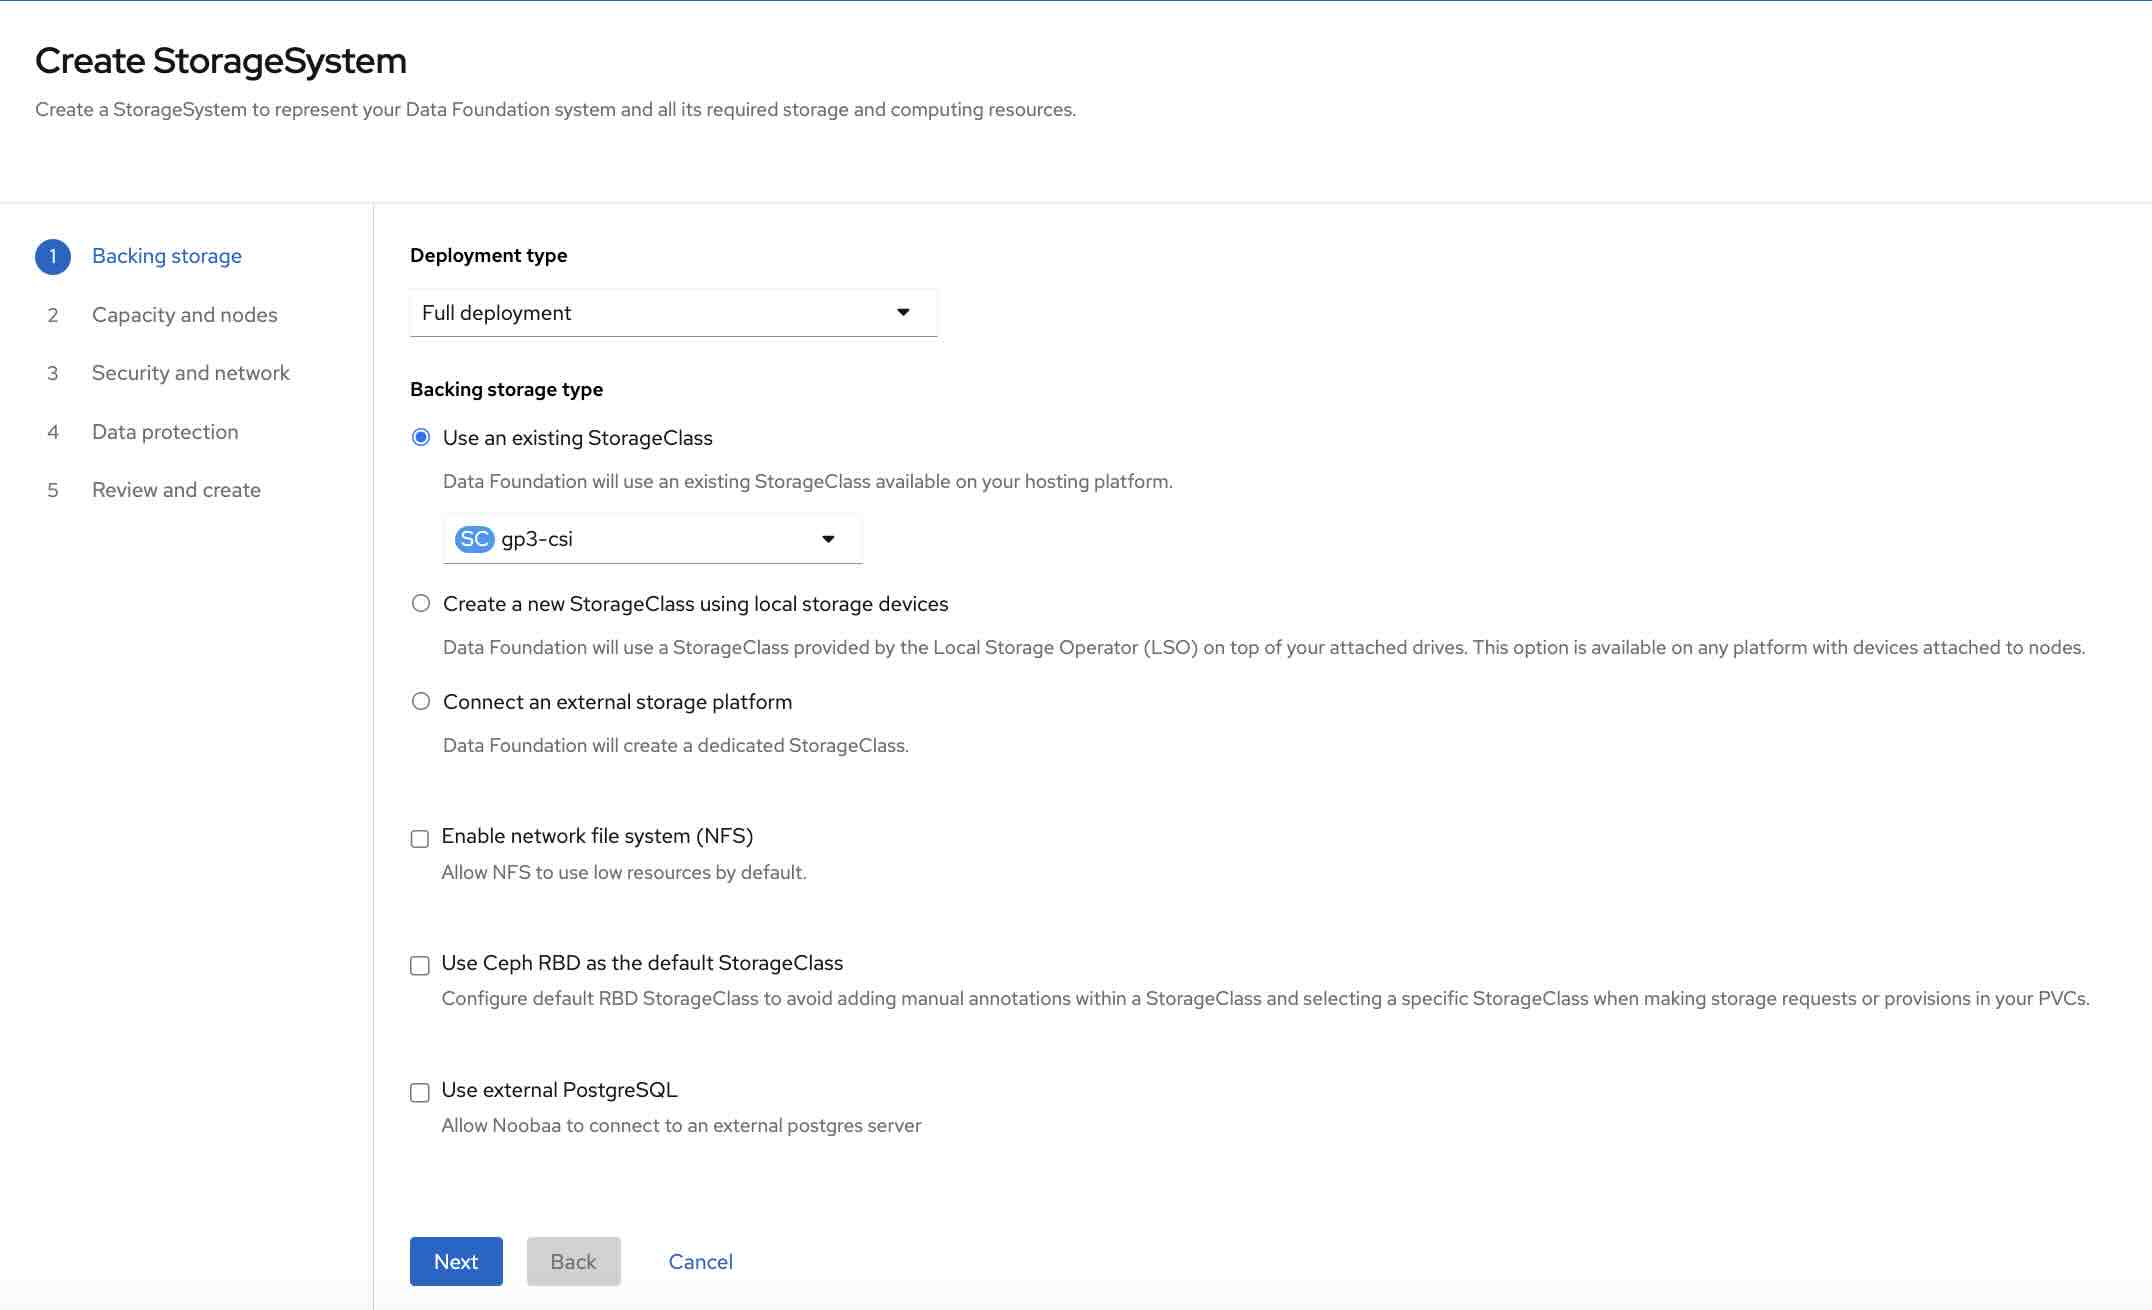
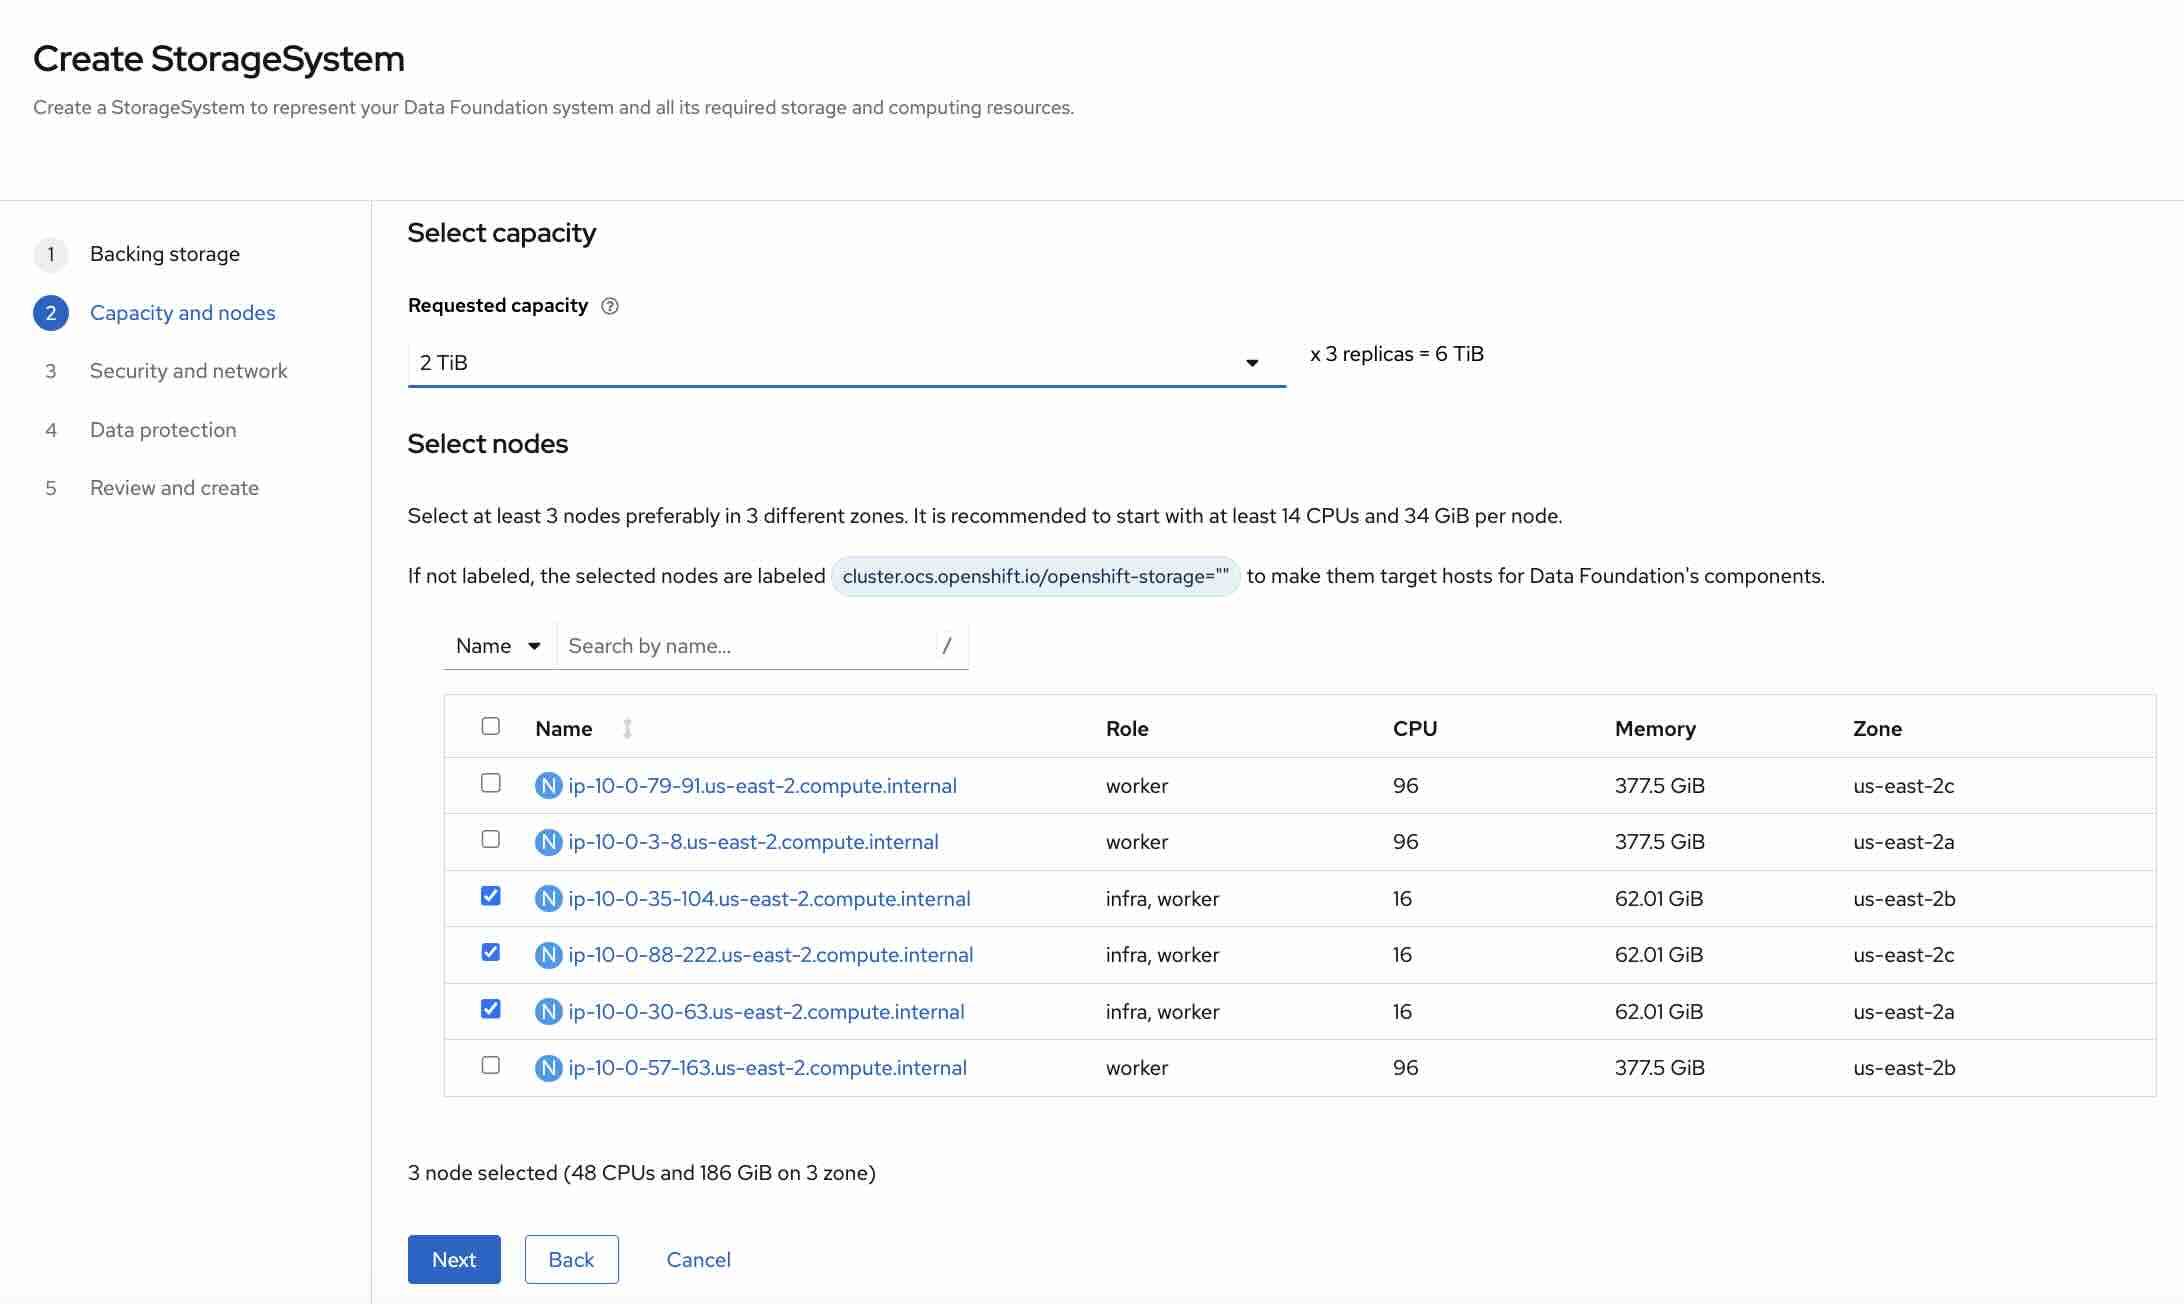
Figure 5 shows the node selection step. Nodes will be automatically selected thanks to the label cluster.ocs.openshift.io/openshift-storage="" we inserted at the beginning.
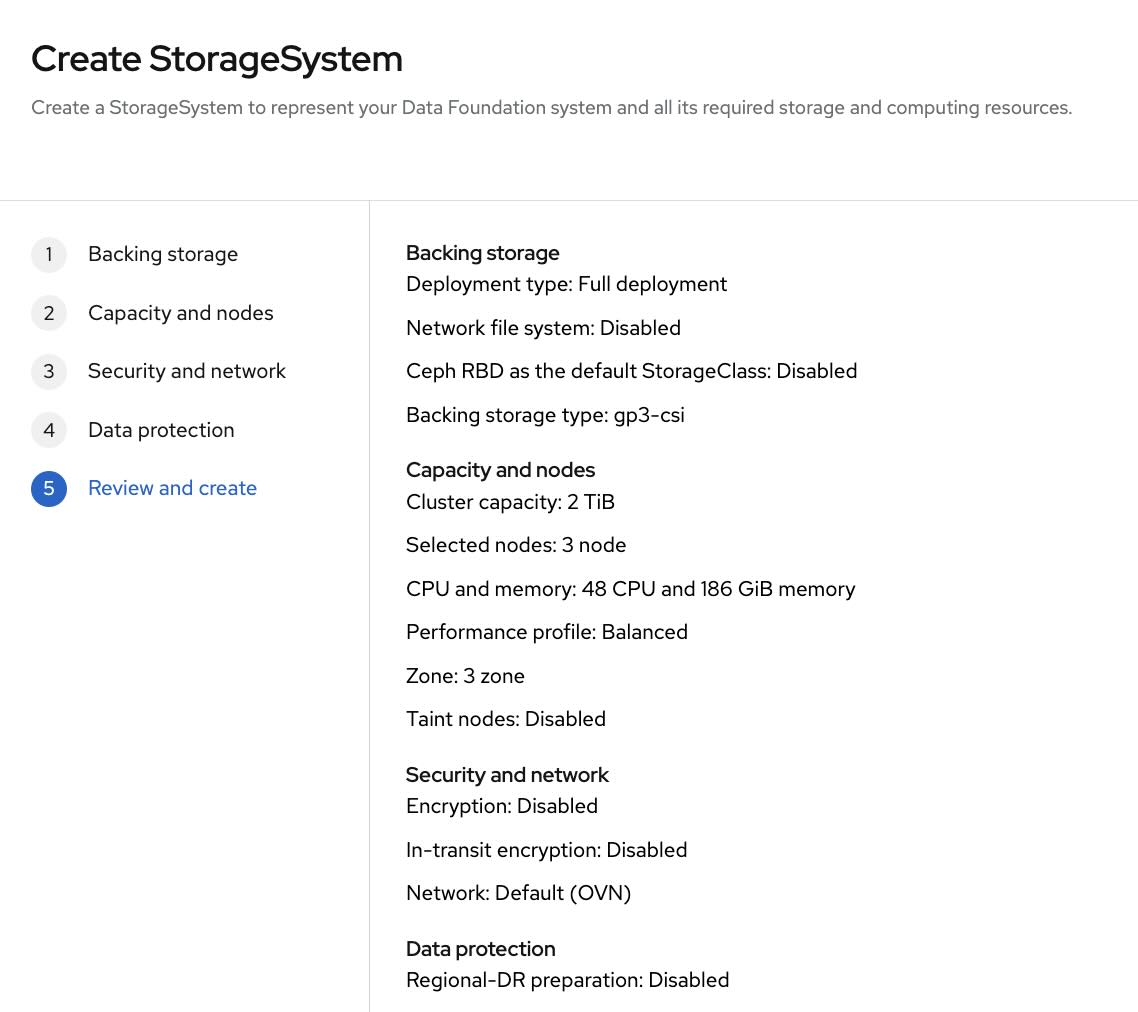
In step 3 and 4 we confirm the defaults settings and Figure 6 shows the final review before submitting the creation.
We must then create the LVMCluster custom resource managed by the LVM Storage operator. The nodes will be selected using the label ocpvirt=host we set previously in the MachineSet.
Creating the LVMCluster via web UI is a little articulate; it can be easier doing it via manifest:
apiVersion: lvm.topolvm.io/v1alpha1
kind: LVMCluster
metadata:
  name: test-lvmcluster
  namespace: openshift-storage
spec:
  storage:
    deviceClasses:
      - deviceSelector:
          optionalPaths:
            - /dev/nvme1n1
            - /dev/nvme0n1
        fstype: xfs
        nodeSelector:
          nodeSelectorTerms:
            - matchExpressions:
                - values:
                    - host
                  key: ocpvirt
                  operator: In
        thinPoolConfig:
          chunkSizeCalculationPolicy: Static
          sizePercent: 90
          name: thin-pool-1
          overprovisionRatio: 10
        name: vg1
        default: true
To check if the LVMCluster installation has been completed, you can use the following command:
oc -n openshift-storage get lvmclusterNAME STATUS
test-lvmcluster ReadyTo check the lvmcluster custom resource status, you can use the following command:
oc -n openshift-storage get lvmcluster test-lvmcluster -o \
go-template='---{{"\n"}}{{range .status.deviceClassStatuses}}VG: {{.name}}{{"\n"}}NODES:{{"\n"}}{{range .nodeStatus}}{{.node}}{{"\n"}}{{end}}{{end}}'
---
VG: vg1
NODES:
ip-10-0-16-232.us-east-2.compute.internal
ip-10-0-41-85.us-east-2.compute.internal
ip-10-0-83-249.us-east-2.compute.internalVirtualization and hosted control plane operators installation
To create HCP clusters using OpenShift Virtualization on bare metal nodes, we have to install two more operators:
- Red Hat OpenShift Virtualization: After installing the OpenShift Virtualization operator, you must create the HyperConverged custom resource, which will create the core virtualization management engine.
- Multicluster engine for Kubernetes: After installing the multicluster engine for Kubernetes operator, you must create the MultiClusterEngine custom resource to spin up the required controllers.
You can do it via web UI with default options in both cases.
In our setup, we will use the default ingress DNS of the hosting cluster to create subdomains for the hosted cluster, and we will have to create a new wildcard route for each hosted cluster. The HAProxy Ingress Controller supports wildcard routes. You must configure this behavior by entering the following command:
oc patch ingresscontroller -n openshift-ingress-operator default --type=json \
-p '[{ "op": "add", "path": "/spec/routeAdmission", "value": {wildcardPolicy: "WildcardsAllowed"}}]'
Hosted clusters creation
We can now create two different hosted clusters with nodepools running on OpenShift Virtualization on bare metal nodes and hosted control planes running on infra nodes.
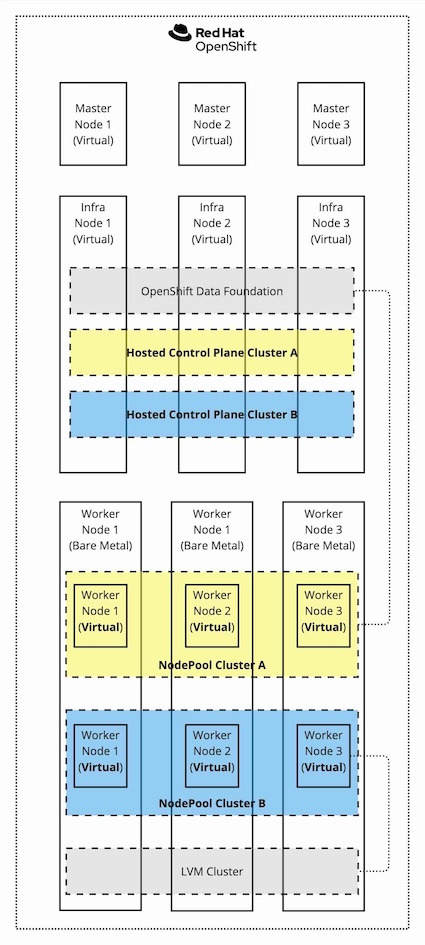
Considering the diagram shown in Figure 7, we will create one hosted cluster using cephfs as RWX-capable storage to host VM volumes (yellow cluster) and another hosted cluster using LVMCluster on local disks without RWX capability (blue cluster).
The diagram below shows what we will get at the end of the process: the so-called hosting cluster hosts the storage services (via OpenShift Data Foundation and LVM Storage), the OpenShift Virtualization hypervisor, and the hosted control planes. The hosted control planes are spun up from the HyperShift operators, and the HyperShift operator is deployed because of the multi-cluster engine operator. On top of the hosting cluster, we have two hosted clusters, cephfs-hcp (yellow cluster) and lvm-hcp (blue cluster).
Before installing the hosted clusters, you must install the hosted control plane command line interface, hcp, by completing the following steps:
- From the OpenShift Container Platform console, click the Help icon > Command Line Tools.
- Click Download hcp CLI for your platform.
You can input this command to create the local disks based hosted clusters (the blue one):
hcp create cluster kubevirt --infra-availability-policy HighlyAvailable --cores 4 --memory 16Gi \
--root-volume-size 120 --auto-repair --control-plane-availability-policy HighlyAvailable \
--pull-secret ./pull-secret.txt --node-upgrade-type Replace --node-pool-replicas 3 \
--node-drain-timeout 60s --node-selector node-role.kubernetes.io/infra="" \
--vm-node-selector ocpvirt=host --etcd-storage-class gp3-csi --root-volume-storage-class lvms-vg1 \
--name lvm-hcp --release-image=quay.io/openshift-release-dev/ocp-release:4.16.18-x86_64 \
--infra-storage-class-mapping=lvms-vg1/lvms-vg1
You can input this command to create the cephfs hosted clusters (the yellow one):
hcp create cluster kubevirt --infra-availability-policy HighlyAvailable --cores 4 --memory 16Gi \
--root-volume-size 120 --auto-repair --control-plane-availability-policy HighlyAvailable \
--pull-secret ./pull-secret.txt --node-upgrade-type Replace --node-pool-replicas 3 \
--node-drain-timeout 60s --node-selector node-role.kubernetes.io/infra="" \
--vm-node-selector ocpvirt=host --etcd-storage-class gp3-csi --root-volume-storage-class ocs-storagecluster-cephfs \
--name cephfs-hcp --release-image=quay.io/openshift-release-dev/ocp-release:4.16.18-x86_64 \
--infra-storage-class-mapping=ocs-storagecluster-cephfs/cephfs
Finally, you can monitor the hosted control plane status and availability with the following command:
oc -n clusters get hostedclusterNAME VERSION KUBECONFIG PROGRESS AVAILABLE PROGRESSING MESSAGE
cephfs-hcp 4.16.18 cephfs-hcp-admin-kubeconfig Completed True False The hosted control plane is available
lvm-hcp 4.16.18 lvm-hcp-admin-kubeconfig Completed True False The hosted control plane is availableAnd the related nodepools status and availability with the following command:
oc -n clusters get nodepoolsNAME CLUSTER DESIRED NODES CURRENT NODES AUTOSCALING AUTOREPAIR VERSION UPDATINGVERSION UPDATINGCONFIG MESSAGE
cephfs-hcp cephfs-hcp 3 3 False True 4.16.18
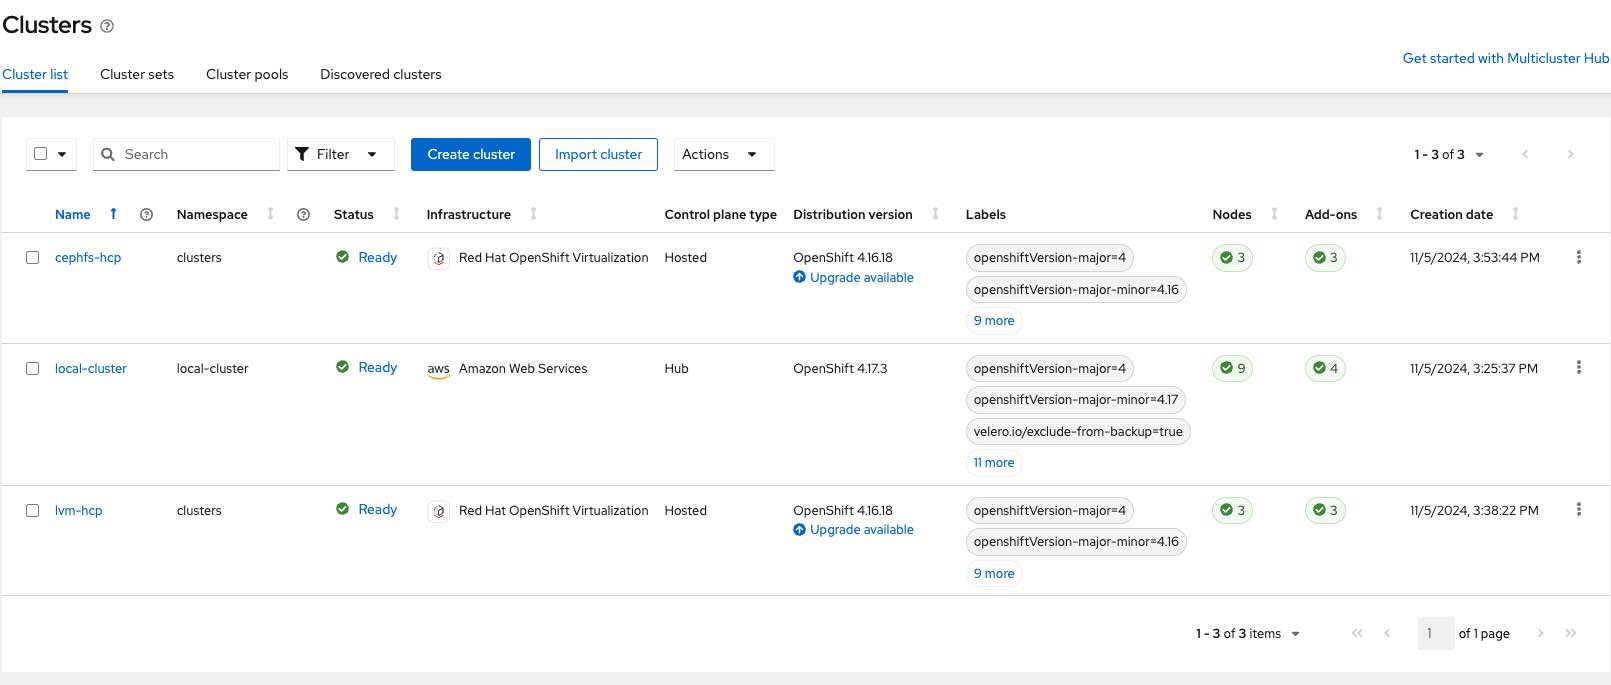
lvm-hcp lvm-hcp 3 3 False True 4.16.18The multicluster engine operator provides the All Clusters view of the OpenShift UI, which allows you to finally see all your clusters: the local cluster (the hosting cluster) and the two hosted clusters, as shown in Figure 8.
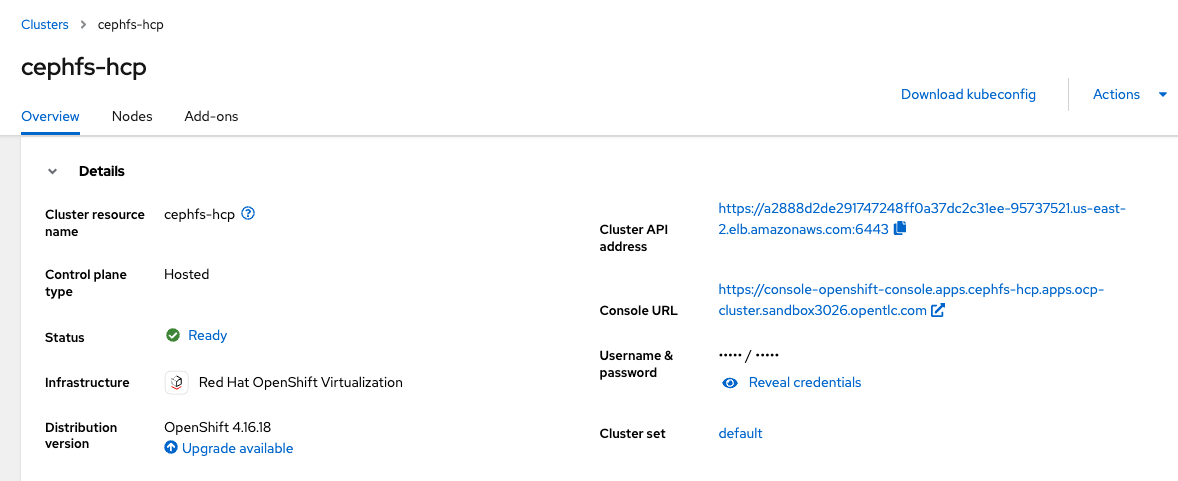
The credentials to access the newly created hosted clusters are available in the hosting cluster web console by selecting the All Clusters view on the top left and then selecting the single hosted cluster to check details, as shown in Figure 9.
You now have your lab completely set up and can start performing functional and nonfunctional tests to simulate a failure scenario and check how the platform reacts.
Best practices
To improve the resiliency of your architecture, best practices consist of using an RWX-capable storage solution for virtual machines attached to hosted clusters via nodepools. This will speed up the failover of worker nodes on kubervirt and allow for better management of cluster operations thanks to live-migration capabilities enabled by ReadWriteMany access mode.
Some other options that affect the availability of the hosted clusters have been used in the cluster creation phase, in particular:
--infra-availability-policy HighlyAvailable--control-plane-availability-policy HighlyAvailable--node-upgrade-type Replace--node-drain-timeout 60s--auto-repair
You can read more about those options in the official documentation to understand better the impact of setting them.
Finally, consider using Node Health Check Operator to improve the hosting cluster's resilience. It can also enhance the VMs’ failover process on OpenShift Virtualization.
You can find more information on the official documentation.
Wrap up
Hosted control plane technology associated with OpenShift Virtualization is a very powerful solution for using OpenShift Container Platform on a hypervisor to maximize the efficiency of your bare metal infrastructure. Thanks to the hypervisor's decoupling layer, the reliability and maintenance processes of the whole infrastructure are also improved. Moreover, the hosted control plane technology allows the reuse of the same Kubernetes/OpenShift primitives previously exclusive to workloads, which are now used to control planes as a workload: OpenShift FOR OpenShift.
Leveraging the public cloud can allow you to test this architecture quickly to gain confidence without providing bare metal infrastructures in your data center, at least initially.
Call to action
If you have reached the end of this article, you are ready to design and implement your own HCP with the KubeVirt provider lab environment and start trying this powerful technology to virtualize your OpenShift clusters without another third-party hypervisor.
Are you wondering if your virtualized hosted cluster can also be used for AI workloads? The answer is yes; starting from OpenShift 4.17, attaching NVIDIA GPUs to hosted clusters’ nodepools is also available as a Technology Preview feature.
Considering that we are talking about a new mode to provision virtualized OpenShift clusters, it is also worth noting that, with Red Hat Advanced Cluster Management 2.11 (the multi-cluster OpenShift/Kubernetes management technology), you can leverage observability from a single pane of glass for each cluster with OpenShift Virtualization installed.
Now, it is time to put your hands on the keyboard!
Some other articles on hosted control plane technology have been published; read them to complement what you have read here:
Last updated: January 15, 2025