In today's application landscape, ensuring data availability is crucial. For relational databases like MySQL, replication offers a robust solution to achieve it. This article explores deploying MySQL replication between virtual machines (VMs) leveraging software-defined networking in the Red Hat OpenShift platform. While this post is focused on MySQL within an OpenShift virtual machine, the same principle applies to any database replication within an OpenShift virtual machine.
Setup details
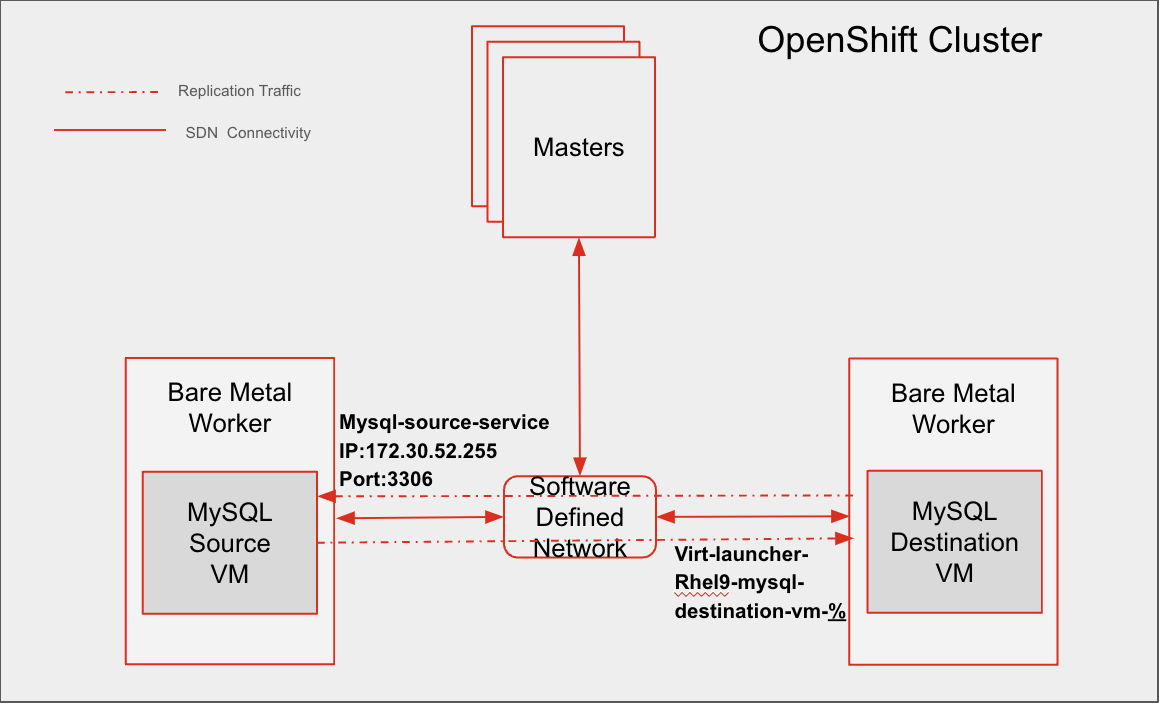
In this example, we are working with a standard OpenShift cluster with 3 master nodes and 2 or more worker nodes. Since we are replicating between virtual machines, the worker nodes are bare metal servers. The similar replication can be configured in an OpenShift compact cluster with bare metal nodes.
Takeaways
The key takeaways here extend beyond just MySQL and apply to various database technologies. By leveraging Red Hat OpenShift Virtualization, you gain a powerful platform for managing database deployments with replication capabilities. These capabilities mirror those of traditional active/passive database configurations within a cluster, offering:
- High availability: Replication ensures minimal downtime in case of node failures. The secondary database can be promoted to primary quickly, keeping your applications operational.
- Near zero recovery point objective (RPO): With proper configuration, data loss between the primary and secondary database can be minimized.
- Very low recovery time objective (RTO): The failover time from primary to secondary can be very short, ensuring a swift recovery process.
This approach is particularly valuable in scenarios where the database can withstand a node failure. Promoting the secondary as the new primary and bringing up production can be achieved faster within the cluster.
Technical approach
We'll delve into the intricacies of setting up a MySQL replication environment using pod networks in OpenShift. We'll cover detailed steps for:
- Creating Red Hat Enterprise Linux VMs and installing MySQL in the VM.
- Creating the necessary services and policies facilitating communication between MySQL instances in the OpenShift virtual machines.
- Step-by-step guide to configure a MySQL replication.
- Testing the replicated MySQL setup in OpenShift.
Benefits of OpenShift Virtualization templates
Before we dive in, let's highlight the power of templates in OpenShift Virtualization.
OpenShift Virtualization templates offer a powerful approach to provisioning virtual machines within your OpenShift cluster. These pre-configured templates come packed with advantages:
- Efficiency and consistency: Templates eliminate the need for manual configuration, saving you time and ensuring consistent deployments across your virtual machines. Imagine creating a new RHEL 9 virtual machine with just a few clicks, pre-configured with the necessary settings.
- Repeatability and standardization: Templates allow you to define a standard configuration for your environment. This ensures all your virtual machines have the same base setup, simplifying management and reducing the risk of errors.
- Customization flexibility: While templates provide a starting point, they're not rigid. You can easily customize them to meet your specific requirements, allowing you to tailor for your needs.
Create the virtual machines and install MySQL
Source the virtual machine:
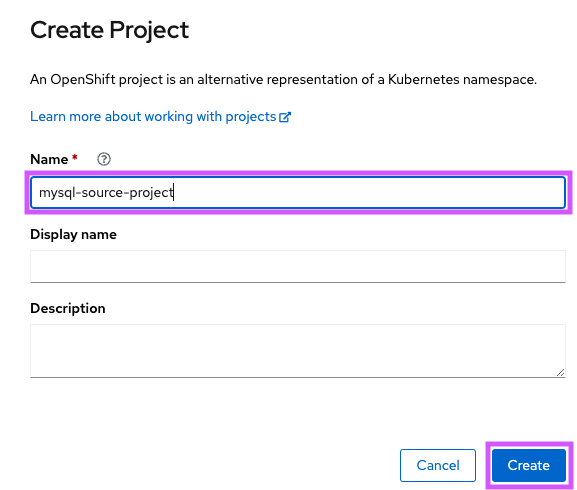
- Create the project
mysql-source-project(Figure 2).
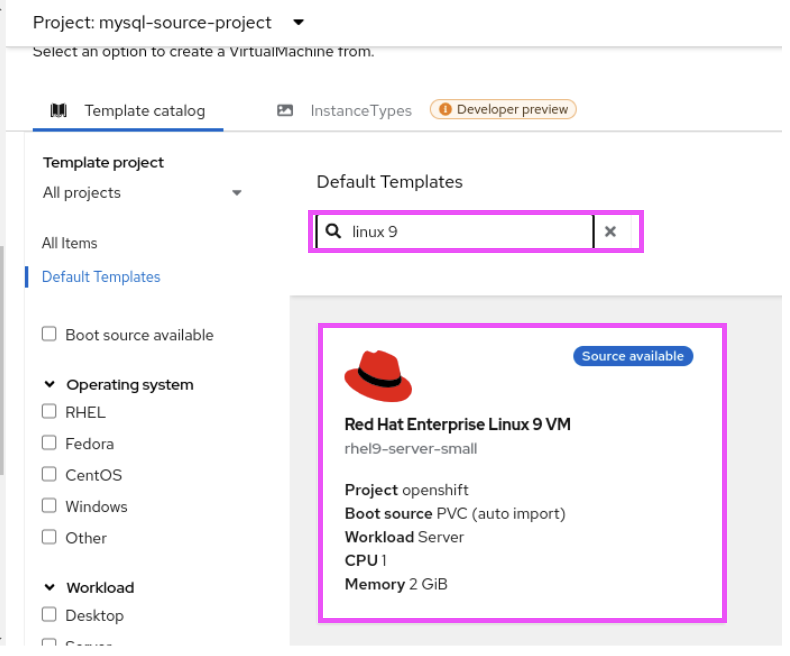
- Select the Red Hat Enterprise Linux 9 VM template (Figure 3).
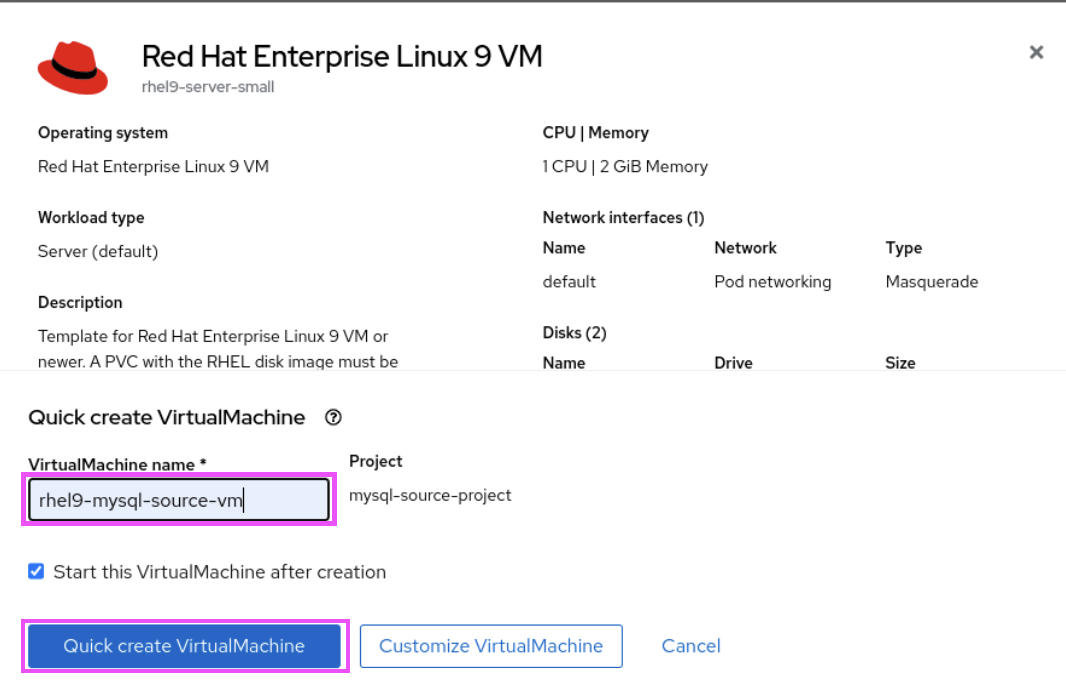
- Name the VM and select Quick Create VirtualMachine (Figure 4).
Set up the destination VM
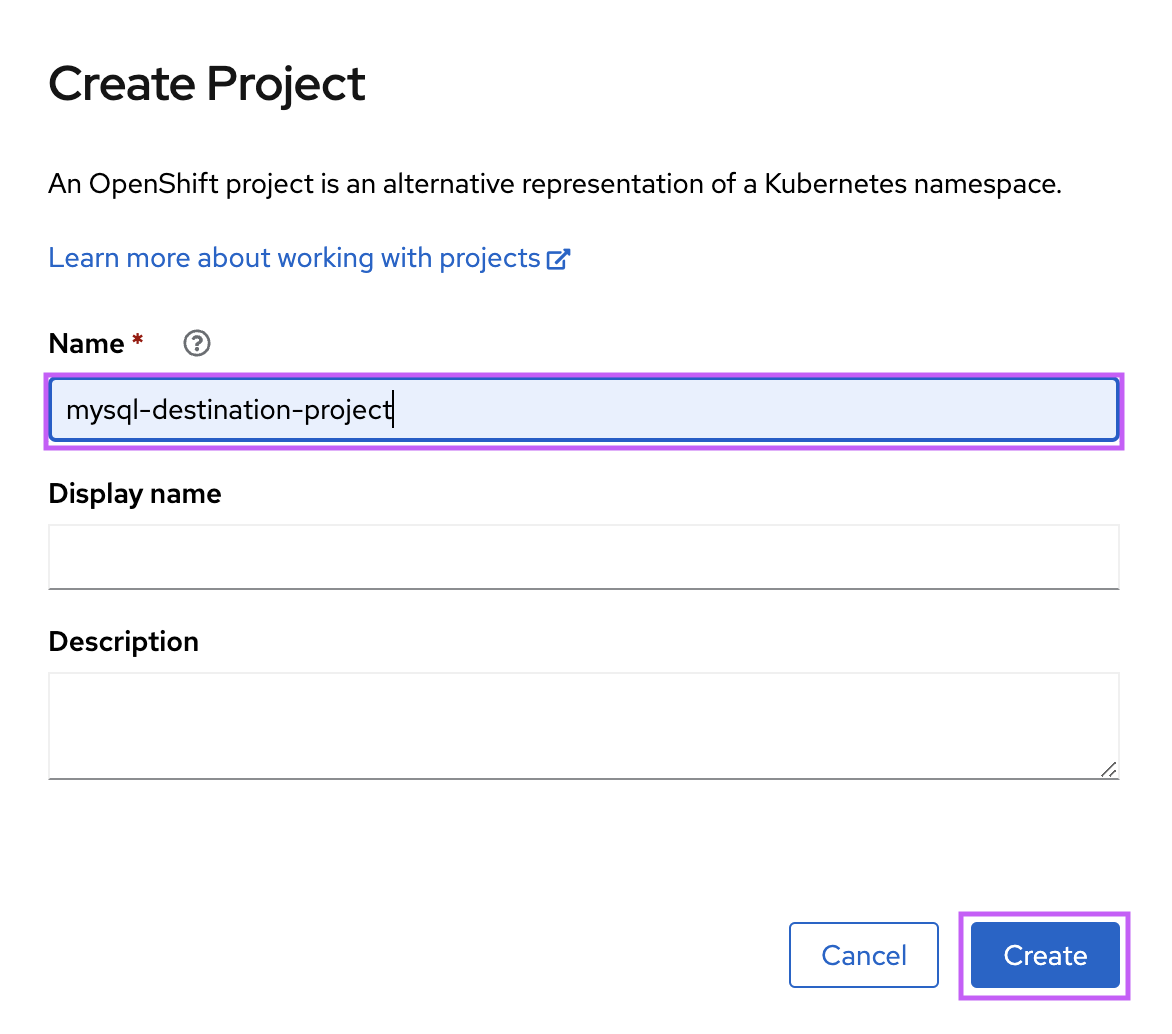
- Create the project
mysql-destination-project(Figure 5).
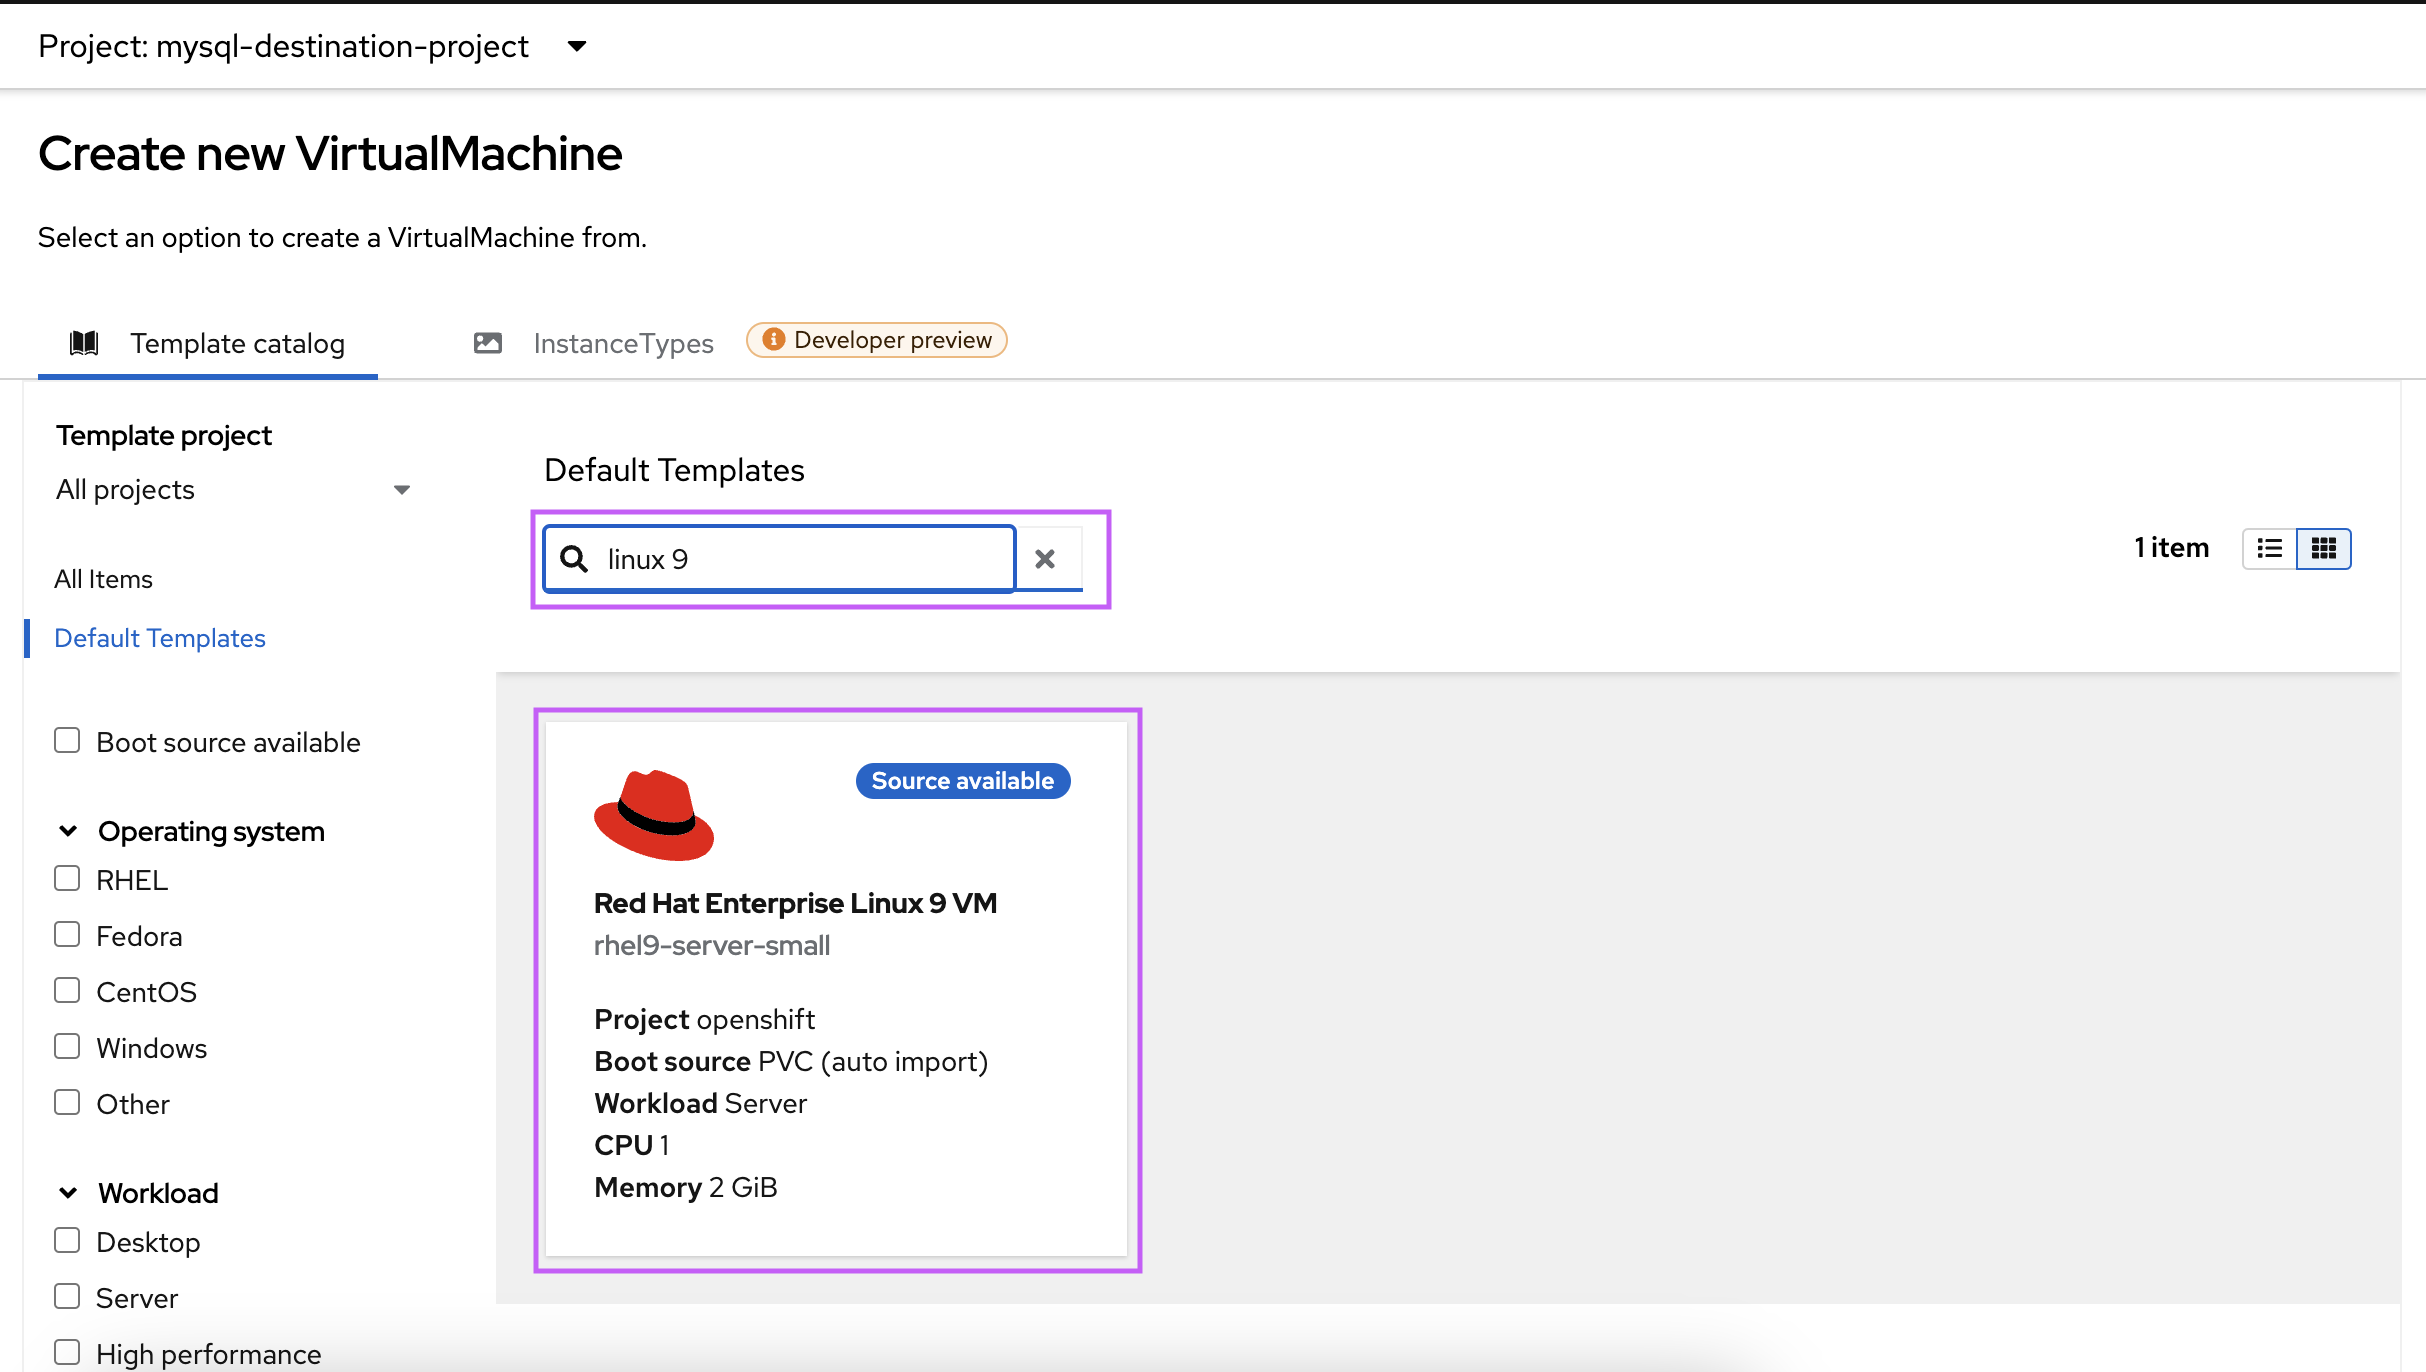
- Select the Red Hat Enterprise Linux 9 VM template (Figure 6).
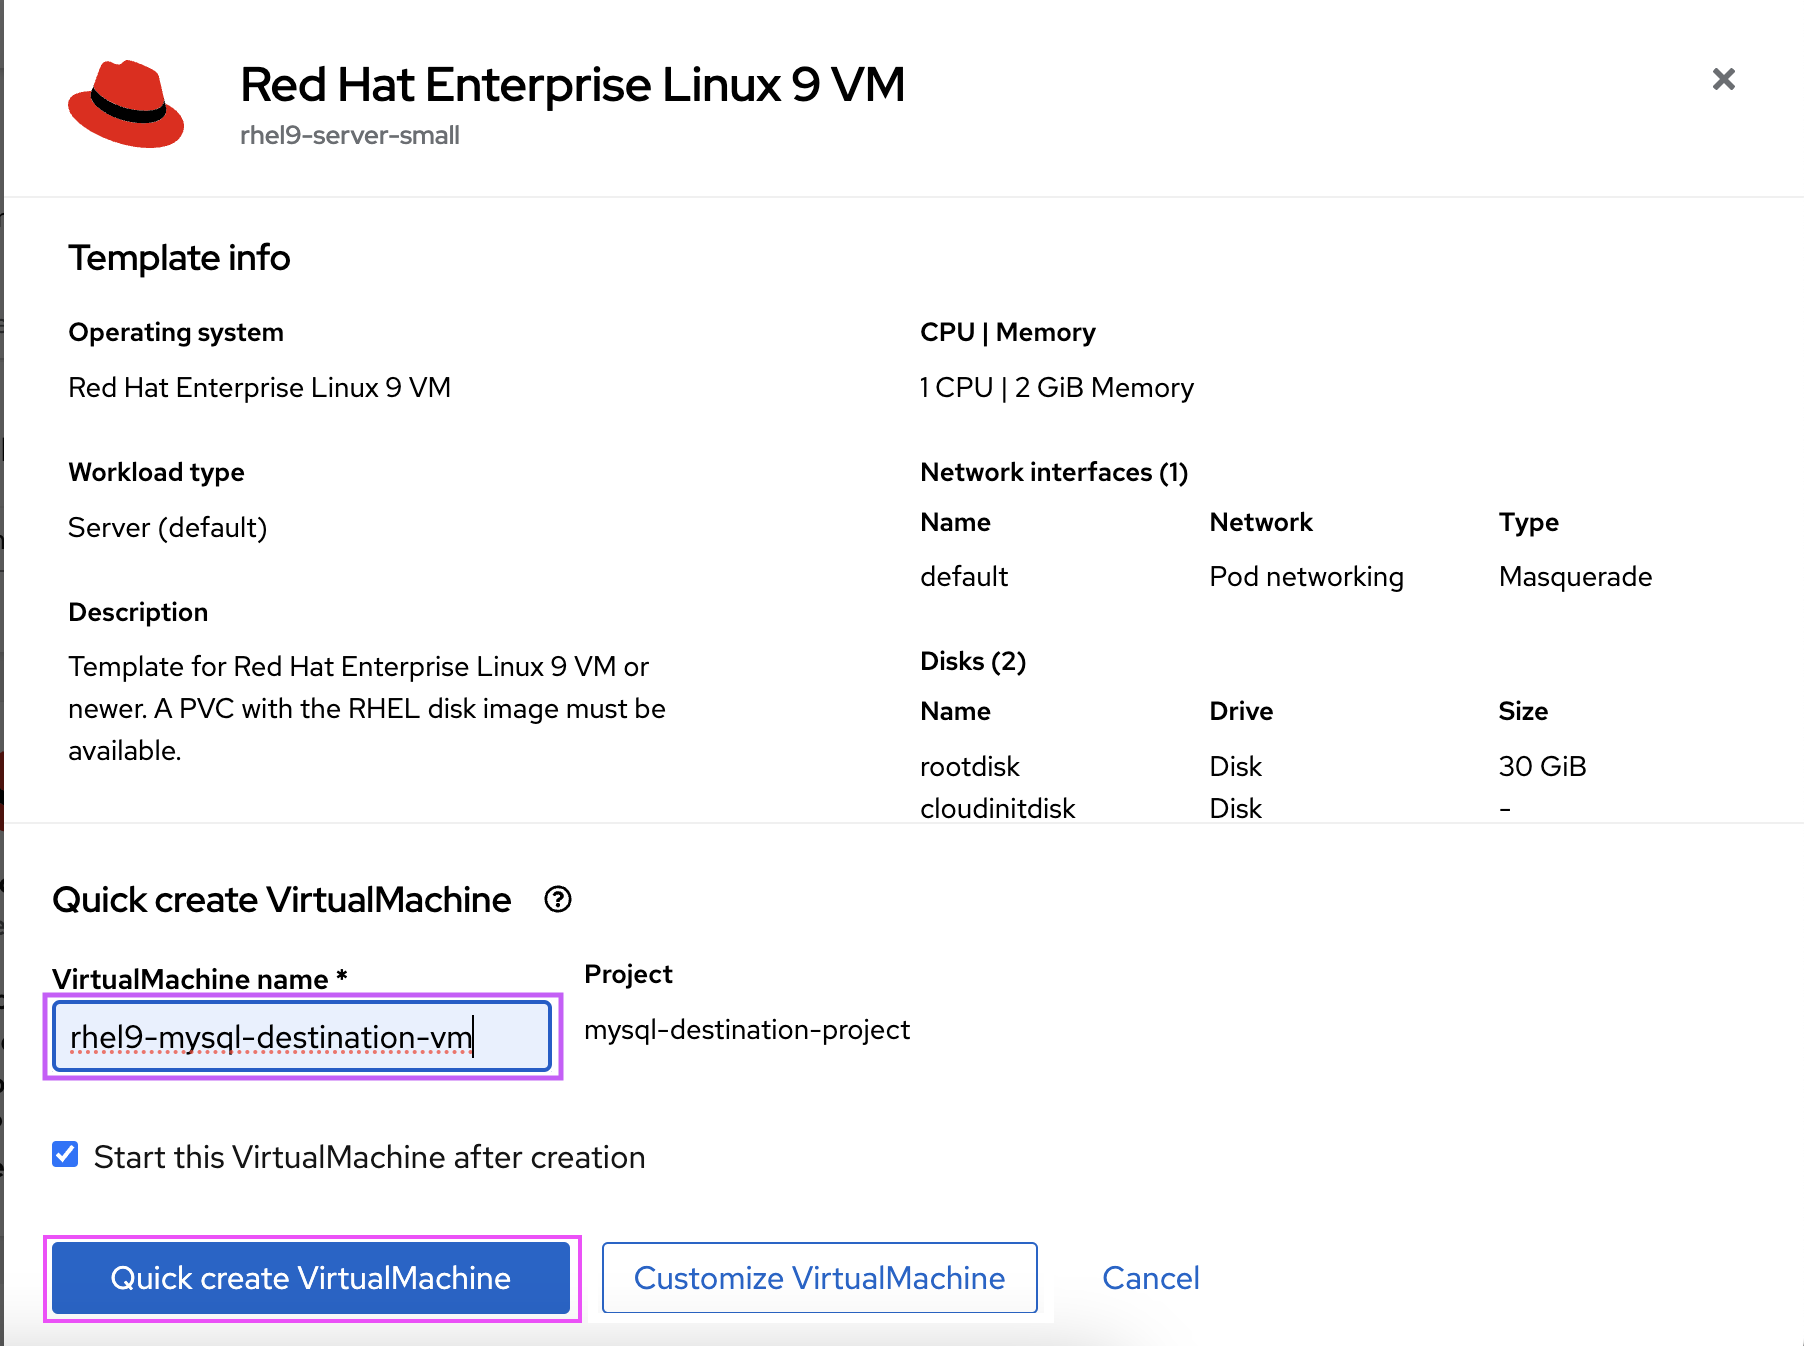
- Name the VM and select Quick Create VirtualMachine (Figure 7).
- Connect to the VMs (see Connecting to VMs in Red Hat OpenShift Virtualization) via SSH, register the VMs with Red Hat, and install the MySQL server in both source and destination VMs.
Register the VMs with repositories:
#subscription-manager registerInstall
mysql-server:#dnf install mysql-server
Configure MySQL parameters
In the MySQL source VM, set up the
mysql-server.cnf. Here, theserver-id(100) is an arbitrary number and10.0.2.2is the IP address of the VM seen from within the Operating System of VM.[root@rhel9-mysql-source-vm ~]# cat /etc/my.cnf.d/mysql-server.cnf # # This group are read by MySQL server. # Use it for options that only the server (but not clients) should see # # For advice on how to change settings please see # http://dev.mysql.com/doc/refman/en/server-configuration-defaults.html # Settings user and group are ignored when systemd is used. # If you need to run mysqld under a different user or group, # customize your systemd unit file for mysqld according to the # instructions in http://fedoraproject.org/wiki/Systemd [mysqld] datadir=/var/lib/mysql socket=/var/lib/mysql/mysql.sock log-error=/var/log/mysql/mysqld.log pid-file=/run/mysqld/mysqld.pid bind-address=10.0.2.2 server-id=100 log_bin=/var/log/mysql/mysql-bin.log gtid_mode=ON enforce-gtid-consistency=ON [root@rhel9-mysql-source-vm ~]#In the MySQL destination VM, set up the
mysql-server.cnf. Here, theserver-id(101) is an arbitrary number:[root@rhel9-mysql-destination-vm ~]# cat /etc/my.cnf.d/mysql-server.cnf # # This group are read by MySQL server. # Use it for options that only the server (but not clients) should see # # For advice on how to change settings please see # http://dev.mysql.com/doc/refman/en/server-configuration-defaults.html # Settings user and group are ignored when systemd is used. # If you need to run mysqld under a different user or group, # customize your systemd unit file for mysqld according to the # instructions in http://fedoraproject.org/wiki/Systemd [mysqld] datadir=/var/lib/mysql socket=/var/lib/mysql/mysql.sock log-error=/var/log/mysql/mysqld.log pid-file=/run/mysqld/mysqld.pid server-id=101 relay-log=/var/log/mysql/mysql-relay.log log_bin=/var/log/mysql/mysql-bin.log gtid_mode=ON enforce-gtid-consistency=ON log-replica-updates=ON skip-replica-start=ON [root@rhel9-mysql-destination-vm ~]#Start
mysqld.servicein both the VMs:#systemctl start mysqld.serviceIn both the VMs, run
mysql_secure_installationto set a root password# mysql_secure_installation
Configure MySQL replication
Before we begin, navigate to details of the rhel9-mysql-destination-vm and take a note of the pod name (Figure 8).
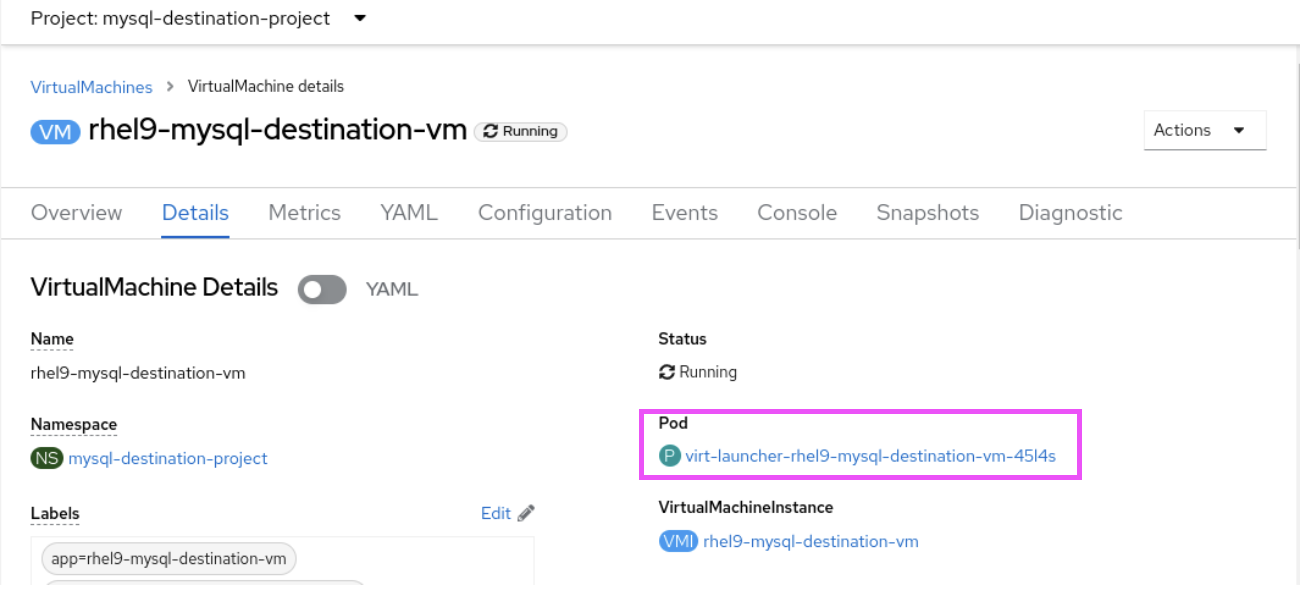
In this example, the pod name is virt-launcher-rhel9-mysql-destination-vm-45l4s.
Note: The pod's IP address would change after every reboot. We need a static component to ensure replication after reboot of the destination VM.
Because only the suffix part in the pod’s name is expected to change, a wild card (%) is used.
In the MySQL source VM, create the
replication_userand provide the permission:mysql>CREATE USER 'replication_user'@'virt-launcher-rhel9-mysql-destination-vm-%' IDENTIFIED WITH mysql_native_password BY 'Test@123'; Query OK, 0 rows affected (0.01 sec)For the
replication_userin the MySQL destination VM, grant the replication privileges in the MySQL source VM:mysql> GRANT REPLICATION SLAVE ON *.* TO 'replication_user'@'virt-launcher-rhel9-mysql-destination-vm-%'; Query OK, 0 rows affected (0.01 sec)Reload the grant tables in the MySQL database:
mysql> FLUSH PRIVILEGES;
Query OK, 0 rows affected (0.01 sec)
Set the instance in MySQL source VM (primary) to read-only state:
mysql> SET @@GLOBAL.read_only = ON;
Query OK, 0 rows affected (0.00 sec)
From a bastion host or any other host in the network in which
ocandvirtctlis installed and the cluster is accessible, switch tomysql-source-project:[root@ocp4-bastion auth]# oc project mysql-source-project Now using project "mysql-source-project" on server "https://api.ocp.example.com:6443".From the
virtctl, expose the port 3306 of the MySQL source VM through the servicemysql-source-service:[root@ocp4-bastion auth]# virtctl expose vm rhel9-mysql-source-vm --port=3306 --target-port=3306 --name=mysql-source-serviceConfirm that the service
mysql-source-serviceis created and take a note of the service’s IP address:[root@ocp4-bastion auth]# oc get services NAME TYPE CLUSTER-IP EXTERNAL-IP PORT(S) AGE service/mysql-source-service ClusterIP 172.30.52.255 <none> 3306/TCP 1m service/rhel9-mysql-source-vm-nodeport-ssh-service-zdo3 NodePort 172.30.221.246 <none> 22000:31399/TCP 29h [root@ocp4-bastion auth]#
In this example, 172.30.52.255 is the cluster IP of mysql-source-service.
Create an ingress network policy in
mysql-source-projectin OpenShift to restrict the traffic only frommysql-destination-project:kind: NetworkPolicy apiVersion: networking.k8s.io/v1 metadata: name: mysql-nw-policy namespace: mysql-source-project uid: e4a01ca8-02b9-4137-b67e-d4b03664df30 resourceVersion: '3451471' generation: 1 creationTimestamp: '2024-05-24T09:55:08Z' managedFields: - manager: Mozilla operation: Update apiVersion: networking.k8s.io/v1 time: '2024-05-24T09:55:08Z' fieldsType: FieldsV1 fieldsV1: 'f:spec': 'f:ingress': {} 'f:policyTypes': {} spec: podSelector: {} ingress: - from: - podSelector: {} namespaceSelector: matchLabels: kubernetes.io/metadata.name: mysql-destination-project policyTypes: - Ingress status: {}
Note: Additional network policies may be needed while integrating database VM to application pods in other projects.
Log in to the MySQL destination VM and switch the instance (secondary) to read-only mode:
mysql> SET @@GLOBAL.read_only = ON;
Query OK, 0 rows affected (0.00 sec)
Configure the replication source using the service ip of the
mysql-source-service:mysql> CHANGE REPLICATION SOURCE TO -> SOURCE_HOST='172.30.52.255', -> SOURCE_USER='replication_user', -> SOURCE_PASSWORD='Test@123', -> SOURCE_AUTO_POSITION=1; Query OK, 0 rows affected, 2 warnings (0.07 sec)Start the replica thread in the MySQL destination VM:
mysql> START REPLICA;
Query OK, 0 rows affected (0.02 sec)
Unset the read-only state on both the primary and secondary instances:
mysql> SET @@GLOBAL.read_only = OFF;
Query OK, 0 rows affected (0.00 sec)
Inspect the status of the replication in the MySQL destination VM:
mysql> SHOW REPLICA STATUS\G;
*************************** 1. row ***************************
             Replica_IO_State: Waiting to reconnect after a failed registration on source
                  Source_Host: 172.30.52.255
                  Source_User: replication_user
                  Source_Port: 3306
                Connect_Retry: 60
              – snip –
             Source_Server_Id: 100
                  Source_UUID: a5133440-1903-11ef-af94-02a4b0000000

  – snip –
mysql>
Test the replication
Follow the steps to test the replication in the MySQL source and destination VMs.
In the MySQL source VM
List the databases:
mysql> show databases
    -> ;
+--------------------+
| Database           |
+--------------------+
| information_schema |
| mysql              |
| performance_schema |
| sys                |
| test_db_1          |
| test_may24         |
+--------------------+
6 rows in set (0.01 sec)
Switch to the database
test_may24:mysql> use test_may24; Database changedList the tables in the
test_may24database:mysql> show tables -> ; +----------------------+ | Tables_in_test_may24 | +----------------------+ | test_may24_table | +----------------------+ 1 row in set (0.00 sec)Describe table
test_may24_table:mysql> desc test_may24_table; +----------+--------------+------+-----+---------+-------+ | Field | Type | Null | Key | Default | Extra | +----------+--------------+------+-----+---------+-------+ | name | varchar(255) | YES | | NULL | | | location | varchar(255) | YES | | NULL | | | number | int | YES | | NULL | | +----------+--------------+------+-----+---------+-------+ 3 rows in set (0.00 sec)Check if there are any records in the table:
mysql> select * from test_may24_table;
Empty set (0.00 sec)
Create some records:
mysql> insert into test_may24_table values ('Ramu','Delhi','01');
Query OK, 1 row affected (0.02 sec)
mysql> insert into test_may24_table values ('Raju','Mumbai','02');
Query OK, 1 row affected (0.01 sec)
mysql> insert into test_may24_table values ('Ragu','Chennai','03');
Query OK, 1 row affected (0.01 sec)
Check if the records are created in the table:
mysql> select * from test_may24_table;
+------+----------+--------+
| name | location | number |
+------+----------+--------+
| Ramu | Delhi    |      1 |
| Raju | Mumbai   |      2 |
| Ragu | Chennai  |      3 |
+------+----------+--------+
3 rows in set (0.00 sec)
Because we are replicating all the databases from the source, we should see the test_may24 database, test_may24_table table, and the records in the destination instance.
In the MySQL destination VM
Check if the t
est_may24database is replicated:mysql> show databases; +--------------------+ | Database | +--------------------+ | information_schema | | mysql | | performance_schema | | sys | | test_db_1 | | test_may24 | +--------------------+ 6 rows in set (0.01 sec)Switch to database
test_may24:mysql> use test_may24; Database changedList the tables in the
test_may24database:mysql> show tables; +----------------------+ | Tables_in_test_may24 | +----------------------+ | test_may24_table | +----------------------+ 1 row in set (0.00 sec)Check if the records are replicated to the destination:
mysql> select * from test_may24_table;
+------+----------+--------+
| name | location | number |
+------+----------+--------+
| Ramu | Delhi    |      1 |
| Raju | Mumbai   |      2 |
| Ragu | Chennai  |      3 |
+------+----------+--------+
3 rows in set (0.00 sec)
Here we can see the records created in MySQL source VM are replicated to the MySQL destination VM.
Conclusion
Regardless of the specific database technology you choose, replication within your OpenShift cluster can achieve high availability and disaster recovery. This ensures minimal downtime and data protection, keeping your applications running smoothly.
We hope this article has equipped you with a understanding of how to leverage software-defined networking for database replication between virtual machines in an OpenShift cluster.
Last updated: July 9, 2024