In this article, I will demonstrate how workstation users authenticating to Active Directory using the Kerberos protocol can use Simple and Protected GSSAPI Negotiation Mechanism (SPNEGO) tokens with Red Hat build of Keycloak (RHBK) technology for single sign-on to web applications.
In summary, the authentication flow is as follows:
- The user is authenticated with Active Directory over Kerberos and has a Ticket Granting Ticket (TGT) stored locally on the workstation.
- The user makes a request from the browser to access the web application.
- The web application redirects the browser to Red Hat build of Keycloak.
- Red Hat build of Keycloak responds with a 401 HTTP header:
WWW-Authenticate: Negotiate - The browser requests a Service Ticket (ST) from the Ticket Granting Service (TGS) part of the KDC and then responds back to Red Hat build of Keycloak and passes the Authorization Negotiate header containing the SPNEGO token.
- Red Hat build of Keycloak authenticates the user.
- The user is redirected back to the web application and is now allowed access to the protected content.
The source code for this tutorial can be found here: and here: .https://github.com/torbjorndahlen/kerberos-keycloak-openshift https://github.com/torbjorndahlen/keycloak-openshift-demo-nodejs
Architecture
The following figure shows the architecture used in this example, where three hosts are being used:
- Workstation: Contains the kinit client for user authentication to Active Directory and the browser for accessing the secured web application.
Opentlc.com: A Red Hat OpenShift cluster containing Red Hat build of Keycloak with akinitclient and the secured web application.Rhbk-demo: A Windows Server with Active Directory and KDC.
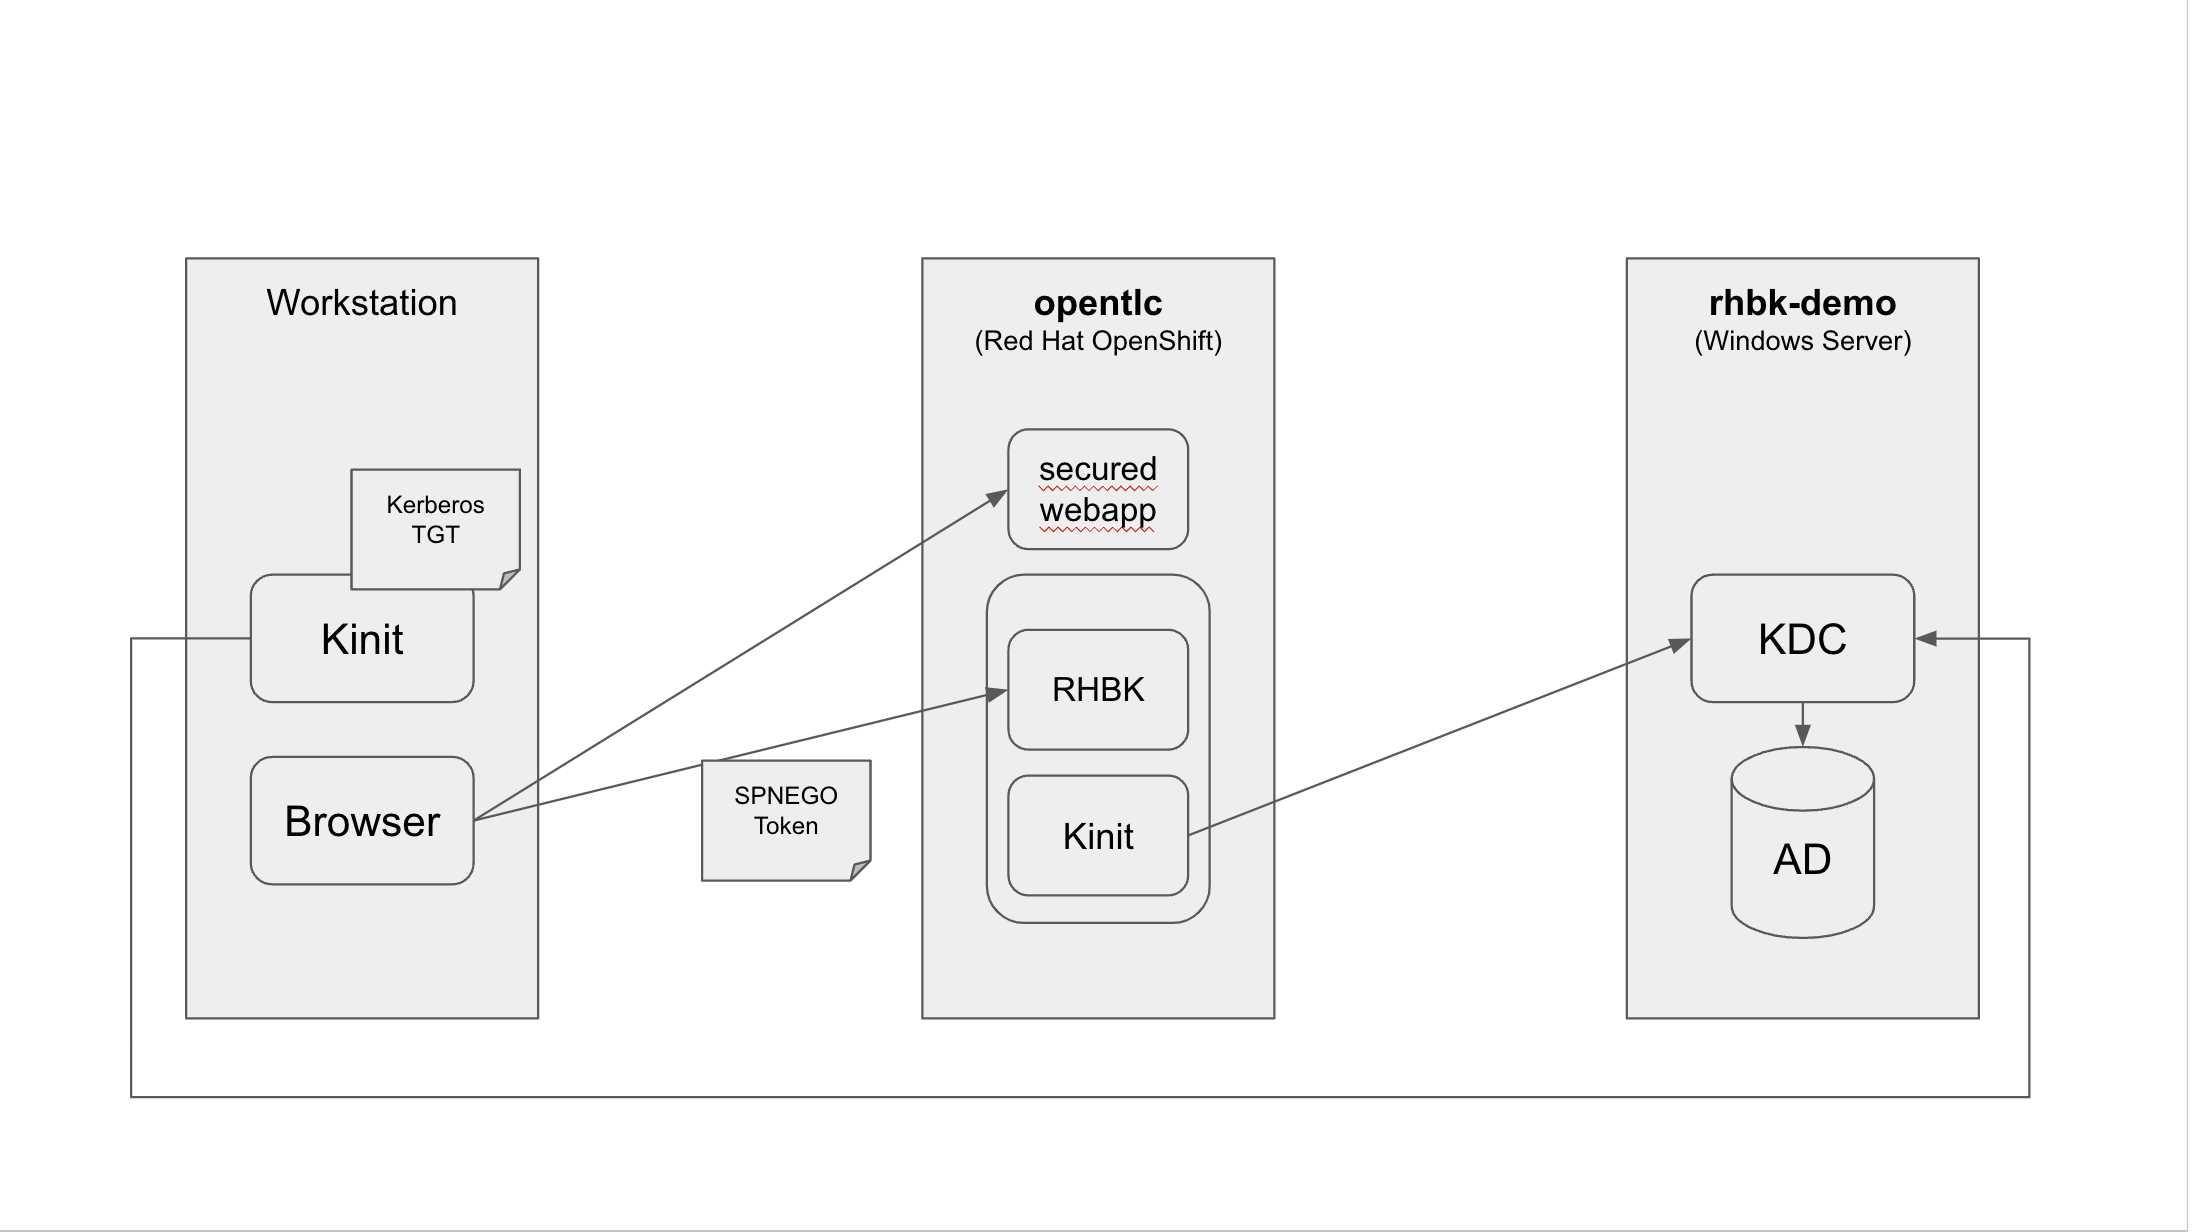
In this example, the user at some point before trying to access the web app, obtains a TGT using kinit on the workstation to authenticate to Active Directory. When accessing the web application from the browser, the TGT is used to obtain a ST from the TGS to authenticate to Red Hat build of Keycloak.
The secured web application and Red Hat build of Keycloak with a kinit client are both deployed on OpenShift with in the domain opentlc.com.
The Windows Server contains Active Directory and the KDC in the domain rhbk-demo.local.
Create a user in Active Directory
Active Directory Domain Services are required for default Kerberos implementations within the domain or forest. The KDC is integrated with Windows Server security services that run on the domain controller. The KDC uses the domain's Active Directory Domain Services database as its security account database.
In this example, I'm using the domain rhbk-demo.local. A local user called adminuser will be used to authenticate to Active Directory from the workstation later.
In order for clients on the workstation and on OpenShift to access the KDC, the firewall protecting the Windows Server where Active Directory is deployed needs to allow UDP requests to the port the KDC is running. (The default is port 88; other ports may be specified in the KDC's kdc.conf file.).
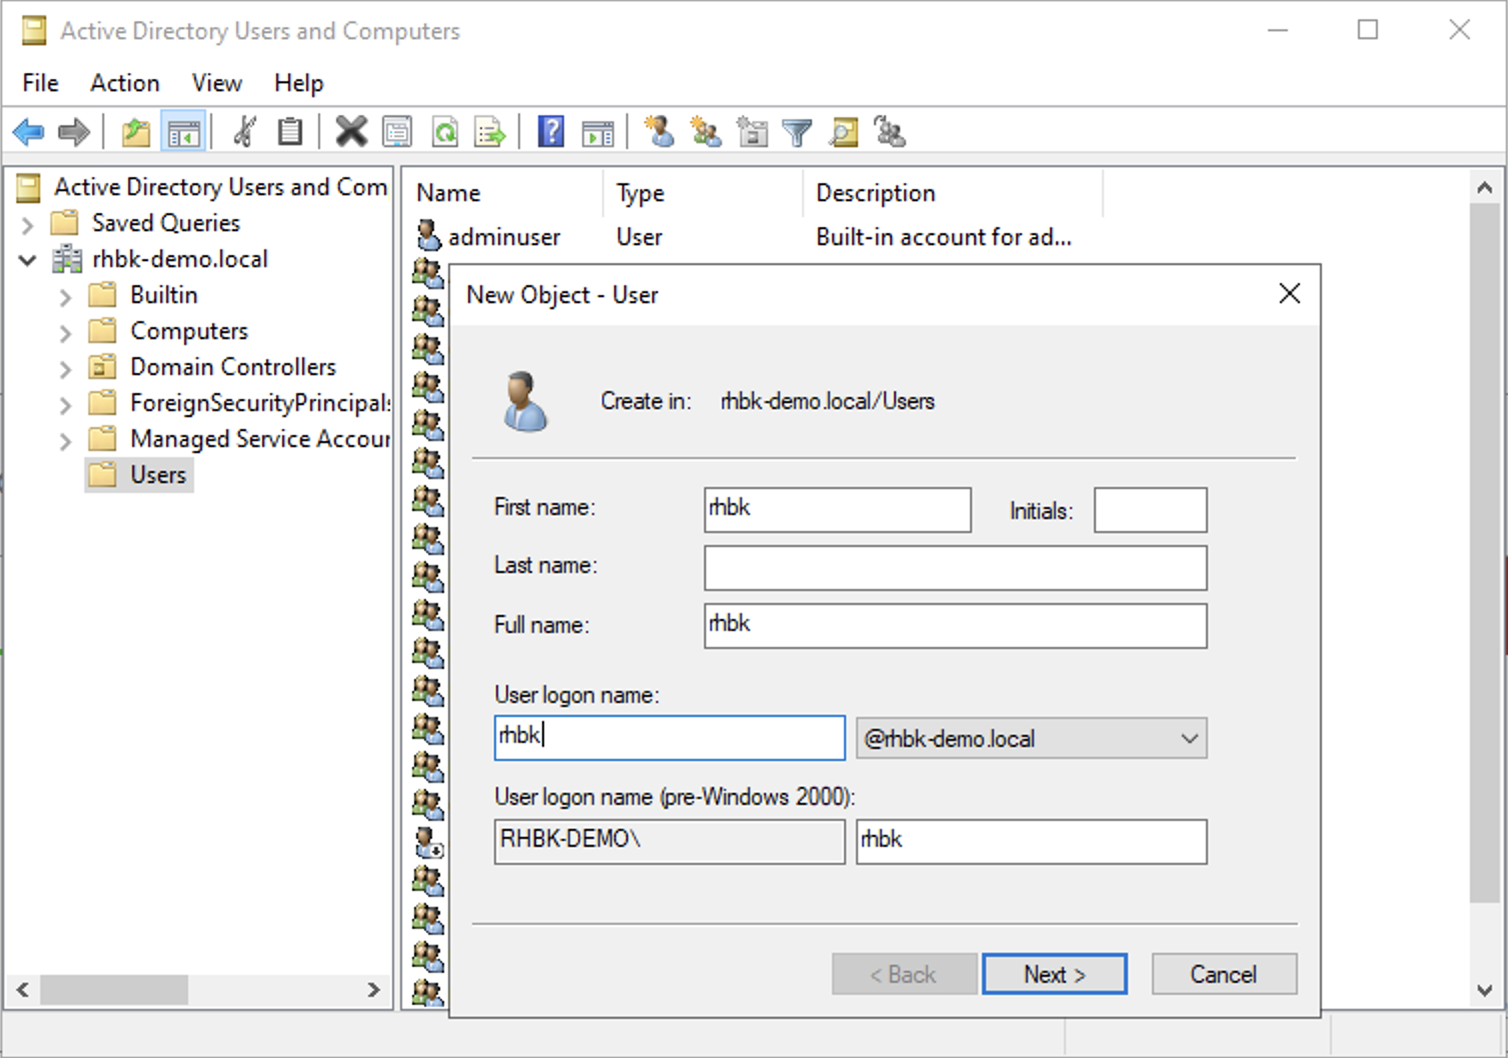
The following figure shows how to create a user in Active Directory. The user rhbk in the domain rhbk-demo.local will be representing the host where Red Hat build of Keycloak is deployed.
Configure encryption types allowed for Kerberos
In order to access Kerberos from the kinit client, the allowed encryption types needs to be configured. This configuration is located in the Windows Server Server Manager Tools menu under Local Security Policy → Local Policies → Security Options → Network Security: Configure encryption types allowed for Kerberos.
After selecting this configuration property, the allowed encryption types can be configured as is shown in Figure 3.
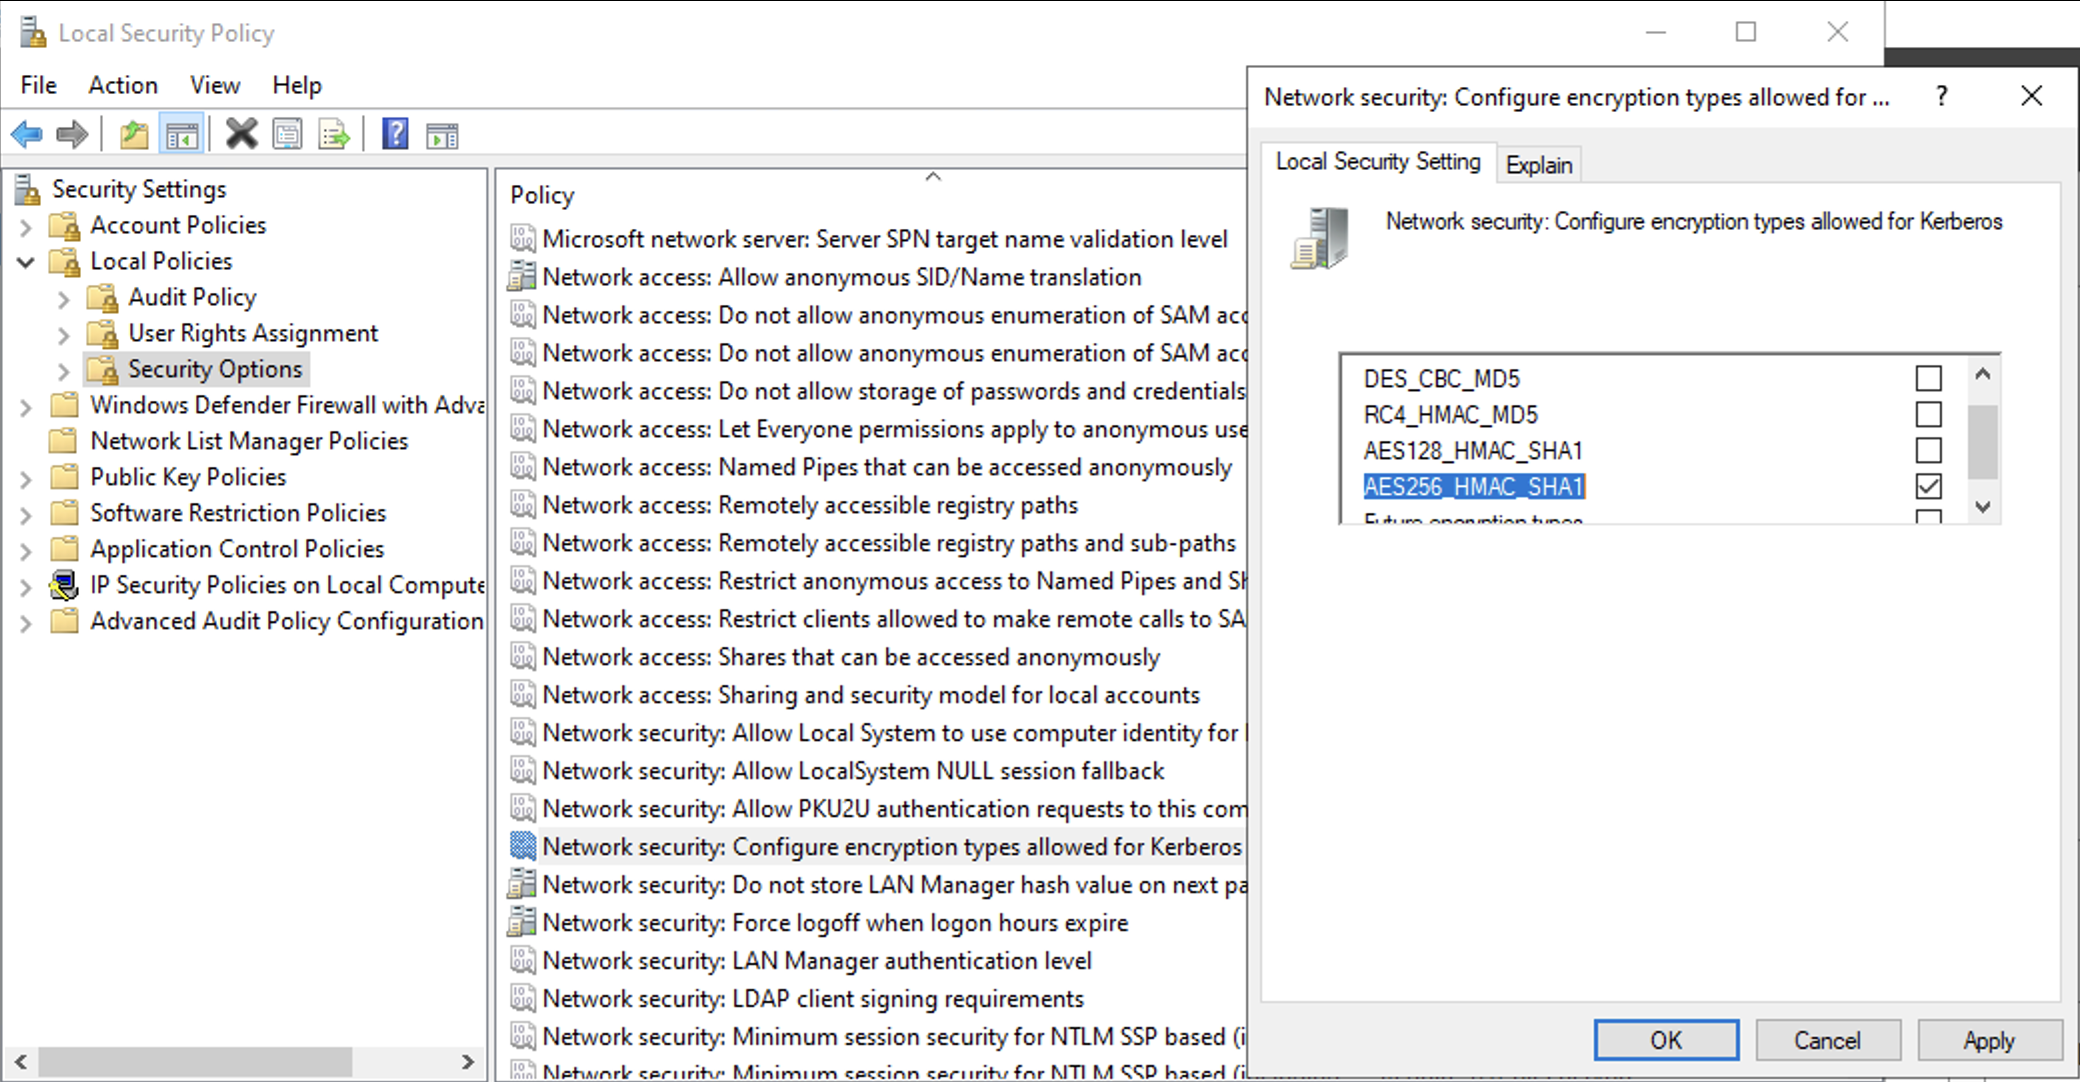
These settings should match the settings in the configuration file used for kinit (krb5.conf) on the workstation and in the RHBK container on OpenShift. In this example I've only allowed AES256_HMAC_SHA1.
Generate a keytab
A Kerberos keytab file is used by Red Hat build of Keycloak to enable Kerberos based user federation. Before the keytab is generated, the Service Principal Name (SPN) for Active Directory User Account must be set. Go back to the Windows Server admin console and run the following command:
C:\> setspn -S HTTP/rhbk-rhbk-demo.apps.<your domain> rhbkThe Service Principal Name (SPN) must include the protocol (HTTP in this example) and also the full route to Red Hat build of Keycloak and be mapped to the previously created user in AD.
On Windows Server ktpass.exe is used to create the keytab. Use ktpass -? to list all available options.
The SPN together with the Kerberos realm RHBK-DEMO.LOCAL is used as principal when generating the keytab for RHBK. Note that the value of the -mapUser parameter must be the full name of the user as registered in AD.
C:\> ktpass -out rhbk.keytab -princ HTTP/rhbk-rhbk-demo.apps.<your domain>@RHBK-DEMO.LOCAL -mapUser rhbk -mapOp set -pass my_password -crypto AES256-SHA1 -ptype KRB5_NT_PRINCIPALCopy the keytab file (in this example: rhbk.keytab) to the workstation from where you will deploy Red Hat build of Keycloak on OpenShift.
On the workstation, after copying, inspect the contents of the keytab file:
% ktutil -k rhbk.keytab listrhbk.keytab:
Vno Type Principal
6 aes256-cts-hmac-sha1-96 HTTP/rhbk-rhbk-demo.apps.<your domain>@RHBK-DEMO.LOCAL Notice the encryption type that needs to be specified as a permitted_enctype in the krb5.conf file.
Deploy Red Hat build of Keycloak on OpenShift
Create a project to contain the Red Hat build of Keycloak instance:
% oc new-project rhbk-demoAdd the view role to the default service account:
% oc policy add-role-to-user view system:serviceaccount:$(oc project -q):defaultTo generate an image puller secret to allow OpenShift to pull images from registry.redhat.io, you need to create a registry server account and the create a secret for OpenShift, this can be done from here: . https://access.redhat.com/terms-based-registry/accounts
The secret will look similar to:
apiVersion: v1
kind: Secret
metadata:
  name: 10000000---my--pull-secret
data:
  .dockerconfigjson: nnnn....
type: kubernetes.io/dockerconfigjson
Then create a secret in OpenShift:
% oc create -f my_user--secret.yaml -n rhbk-demoIn order to connect to KDC, Red Hat build of Keycloak needs to be deployed with kinit running in the same container. To achieve this, I'm creating a custom image for RHBK where kinit and the krb5.conf file are added. In addition, the previously created keytab is also included in the image.
The path to the krb5.conf configuration file for kinit is included in the Dockerfile that can be found here: . The file krb5.conf contains configuration for kinit and includes the Kerberos realm defined in Active Directory. In this case, the domain in Active Directory is rhbk-demo.local and the Kerberos realm is RHBK-DEMO.LOCAL. The allowed encryption types should be listed in krb5.conf. In the file you'll find an example configuration that you should modify to fit your environment.https://github.com/torbjorndahlen/kerberos-keycloak-openshift/blob/rhblog/krb5.confhttps://github.com/torbjorndahlen/kerberos-keycloak-openshift
Also the keytab file generated for Red Hat build of Keycloak in Windows Server is added to the Dockerfile. Finally, the krb5-workstation tools (kinit, klist, ktutils, etc.) are also added.
Using this Dockerfile, a custom image containing Red Hat build of Keycloak and krb5-workstation is built to deploy kinit in the same container as RHBK. The following is the Dockerfile I've used for this demo:
FROM registry.redhat.io/rhbk/keycloak-rhel9:24 as builder

FROM registry.redhat.io/rhbk/keycloak-rhel9:24
COPY --from=builder /opt/keycloak/ /opt/keycloak/

FROM registry.access.redhat.com/ubi9 AS ubi-micro-build
RUN mkdir -p /mnt/rootfs && \
    mkdir /krb5 && chmod 755 /krb5
RUN dnf install --installroot /mnt/rootfs krb5-workstation --releasever 9 --setopt install_weak_deps=false --nodocs -y && \
    dnf --installroot /mnt/rootfs clean all && \
    rpm --root /mnt/rootfs -e --nodeps setup


FROM registry.redhat.io/rhbk/keycloak-rhel9:24
COPY --from=ubi-micro-build /mnt/rootfs /

ADD krb5.conf /etc/krb5.conf
ADD --chown=keycloak rhbk.keytab /opt/keycloak/conf/rhbk.keytab

VOLUME ["/krb5","/dev/shm","/etc/krb5.conf.d"]

ENTRYPOINT ["/opt/keycloak/bin/kc.sh"]
I can then build the modified image of Red Hat build of Keycloak:
% oc new-build https://github.com/<your_git_user>/kerberos-keycloak-openshift \
> --strategy=docker \
> --name='keycloak-rhel9-krb5'
To deploy Red Hat build of Keycloak, I will generate a self-signed TLS certificate and store it as a secret in OpenShift:
% openssl req -verbose -subj '/CN=keycloak' -addext subjectAltName=DNS:rhbk-rhbk-demo.apps.<your domain> -newkey rsa:2048 -nodes -keyout keycloak-key.pem -x509 -days 365 -out keycloak-cert.pem% oc create secret tls keycloak-tls-secret --cert keycloak-cert.pem --key keycloak-key.pemNotice that the subjectAltName is set to the route of my RHBK instance in OpenShift. You should change this to match the route to your RHBK instance.
Once I have installed the RHBK Operator in my OpenShift cluster, I can create an RHBK instance using a Keycloak CR referencing the custom image I created earlier. You can use the CRs in the following repo to deploy PostgreSQL and RHBK on OpenShift: .https://github.com/torbjorndahlen/kerberos-keycloak-openshift
% oc apply -f postgres.yml% oc create secret generic keycloak-db-secret --from-literal=username=keycloak --from-literal=password=keycloak% oc apply -f keycloak.ymlRemember to change the hostname of RHBK in the CR to the hostname of your instance.
Once RHBK has been deployed, I can verify that the container has a connection to the KDC on Windows Server:
% oc get pods
NAME                            READY   STATUS      RESTARTS   AGE
keycloak-0                      1/1     Running     0          47s
keycloak-rhel9-krb5-1-build     0/1     Completed   0          5m51s
postgresql-0                    1/1     Running     0          101s
rhbk-operator-7675f4c54-9lrrj   1/1     Running     0          2m55s
% oc rsh keycloak-0Then, I'm using the adminuser account I created earlier in Active Directory to login using Kerberos:
sh-5.1$ kinit adminuser@RHBK-DEMO.LOCAL
Password for adminuser@RHBK-DEMO.LOCAL:
If everything works, the klist command shows that the user has a valid ticket:
sh-5.1$ klist
Ticket cache: FILE:/dev/shm/ccache
Default principal: adminuser@RHBK-DEMO.LOCAL

Valid starting       Expires              Service principal
06/17/2024 08:54:50  06/17/2024 18:54:50  krbtgt/RHBK-DEMO.LOCAL@RHBK-DEMO.LOCAL
	renew until 06/18/2024 08:54:42
In case of issues connecting to the KDC, you should verify that you have opened the KDC port (88) on your Windows Server.
Also, verify that the hostname for RHBK is the same as was used to create the SPN in AD:
% oc get route
NAME                     HOST/PORT                                                      PATH   SERVICES           PORT    TERMINATION            WILDCARD
keycloak-ingress-w86td   rhbk-rhbk-demo.apps.<your domain>          keycloak-service   https   passthrough/Redirect   None
Configure Red Hat build of Keycloak
Once deployed, my Red Hat build of Keycloak instance needs to be configured to be able to authenticate users stored in Active Directory with Kerberos.
To start, I'll create a realm. The credentials for the RHBK admin user are stored in a secret in OpenShift:
% oc get secret keycloak-initial-admin -o jsonpath='{.data.username}' | base64 --decode
admin
% oc get secret keycloak-initial-admin -o jsonpath='{.data.password}' | base64 --decodeI open the RHBK Admin console and create a new realm called rhbk-demo. You can also import the realm from .https://github.com/torbjorndahlen/kerberos-keycloak-openshift
In order to work with Kerberos, Red Hat build of Keycloak needs to have User Federation with Active Directory set up. Figures 4 and 5 show an example how to set up a federation with Active Directory.
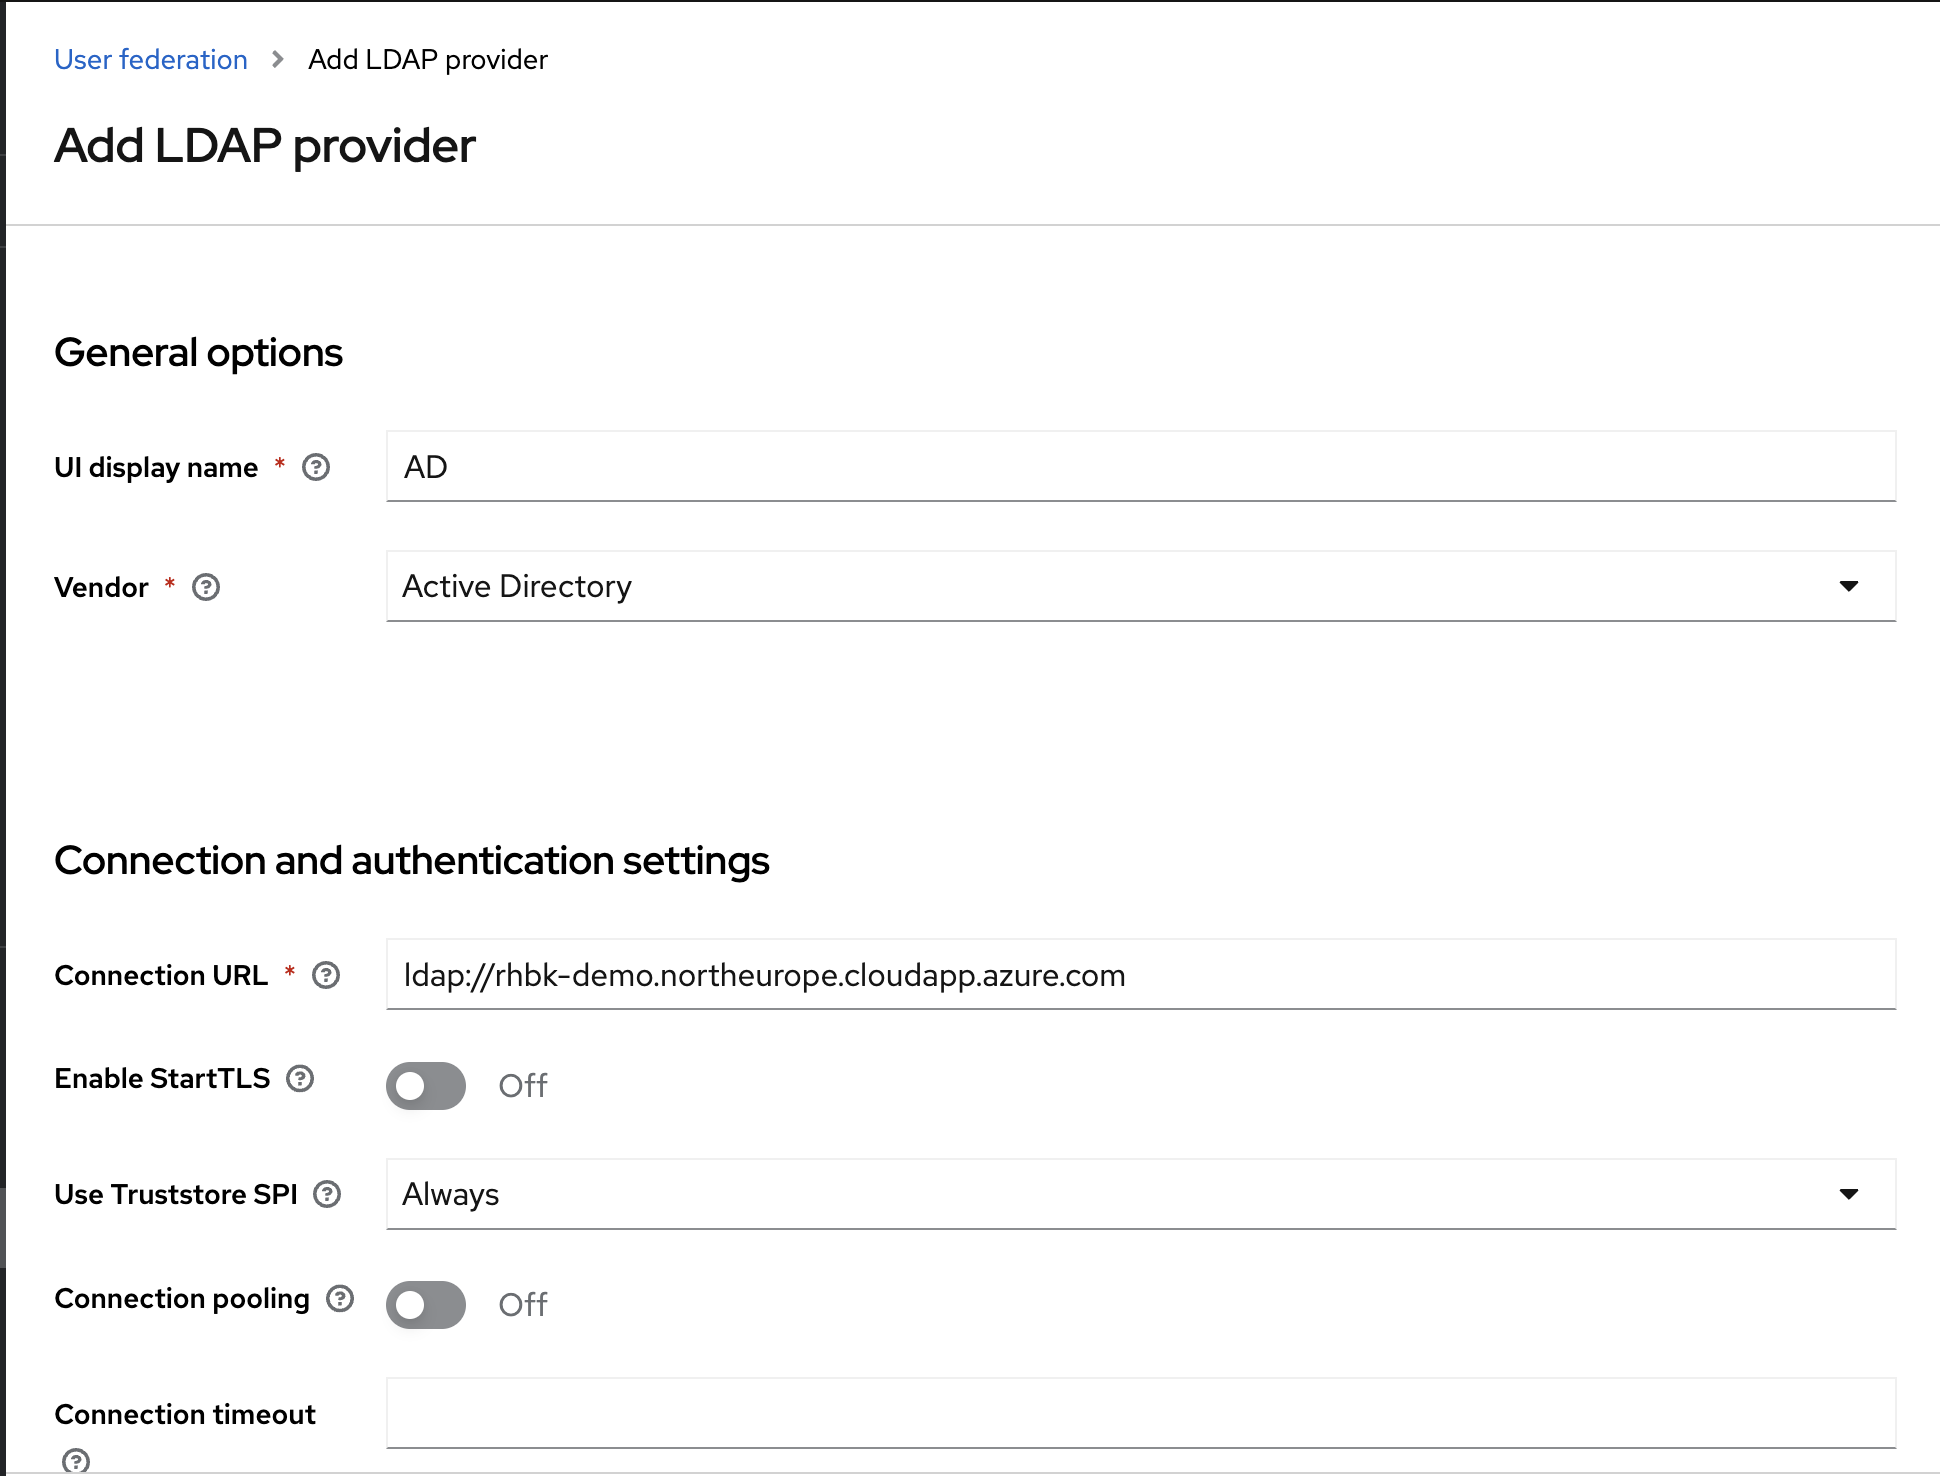
Notice that the Connection URL should be changed to match your Windows Server host.
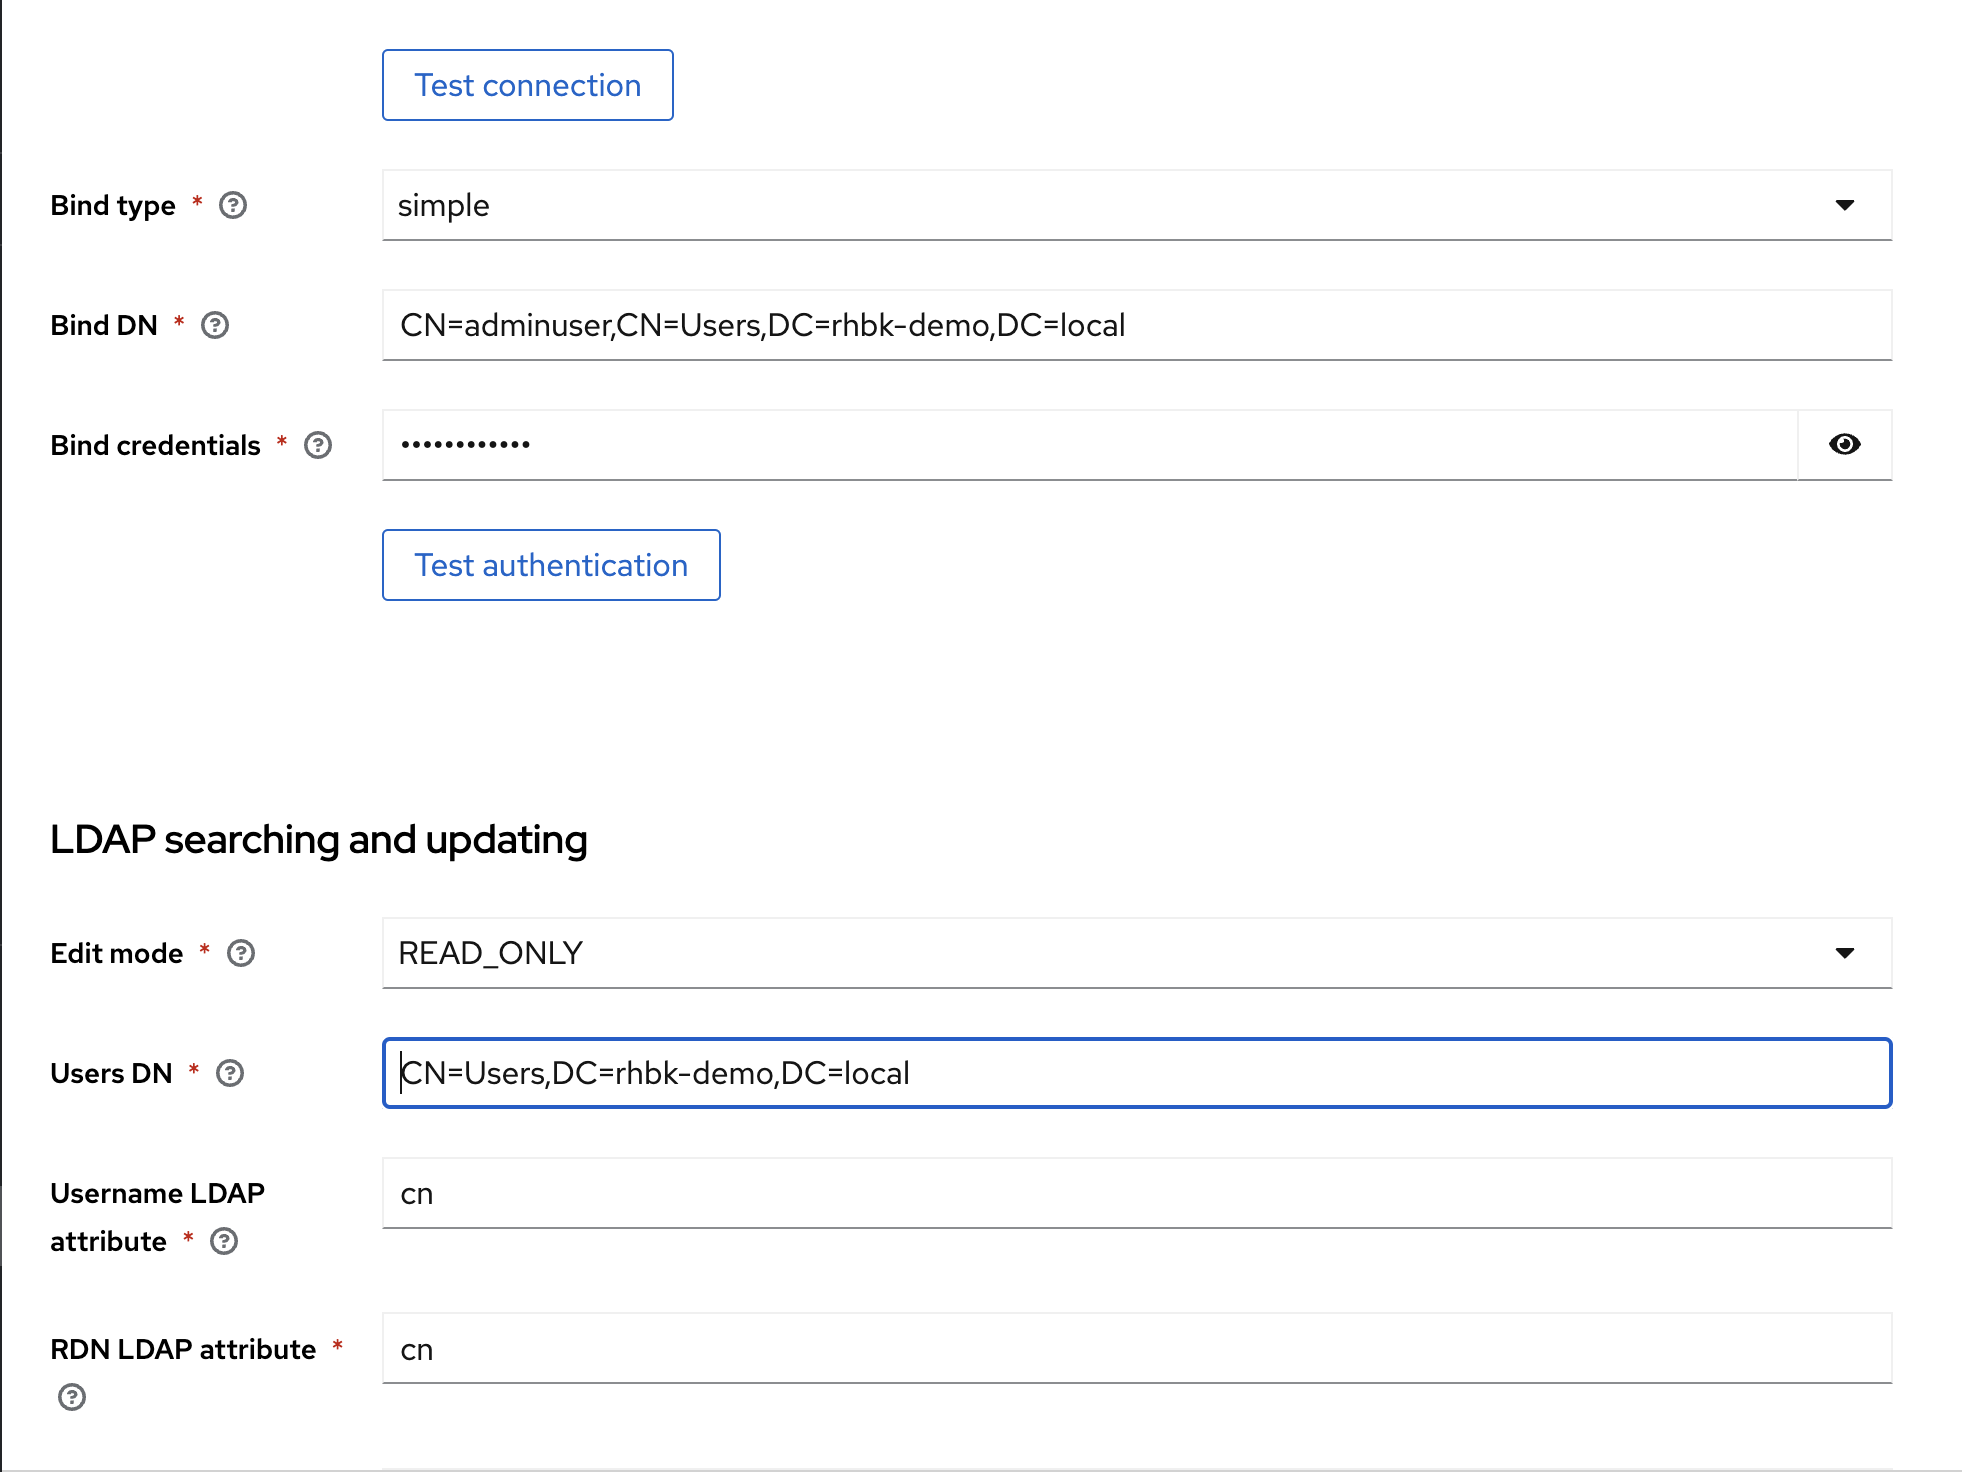
On Windows Server, I'm using the command dsquery user to find the DN to the adminuser which will be used to log in to Active Directory:
C:\> dsquery user -name adminuser
"CN=adminuser,CN=Users,DC=rhbk-demo,DC=local"
Finally, the LDAP object classes are configured (Figure 6).

Since I'm using Kerberos, the Kerberos integration also needs to be configured.
Figure 7 shows the configuration with the Kerberos realm as stated in the krb5.conf file.
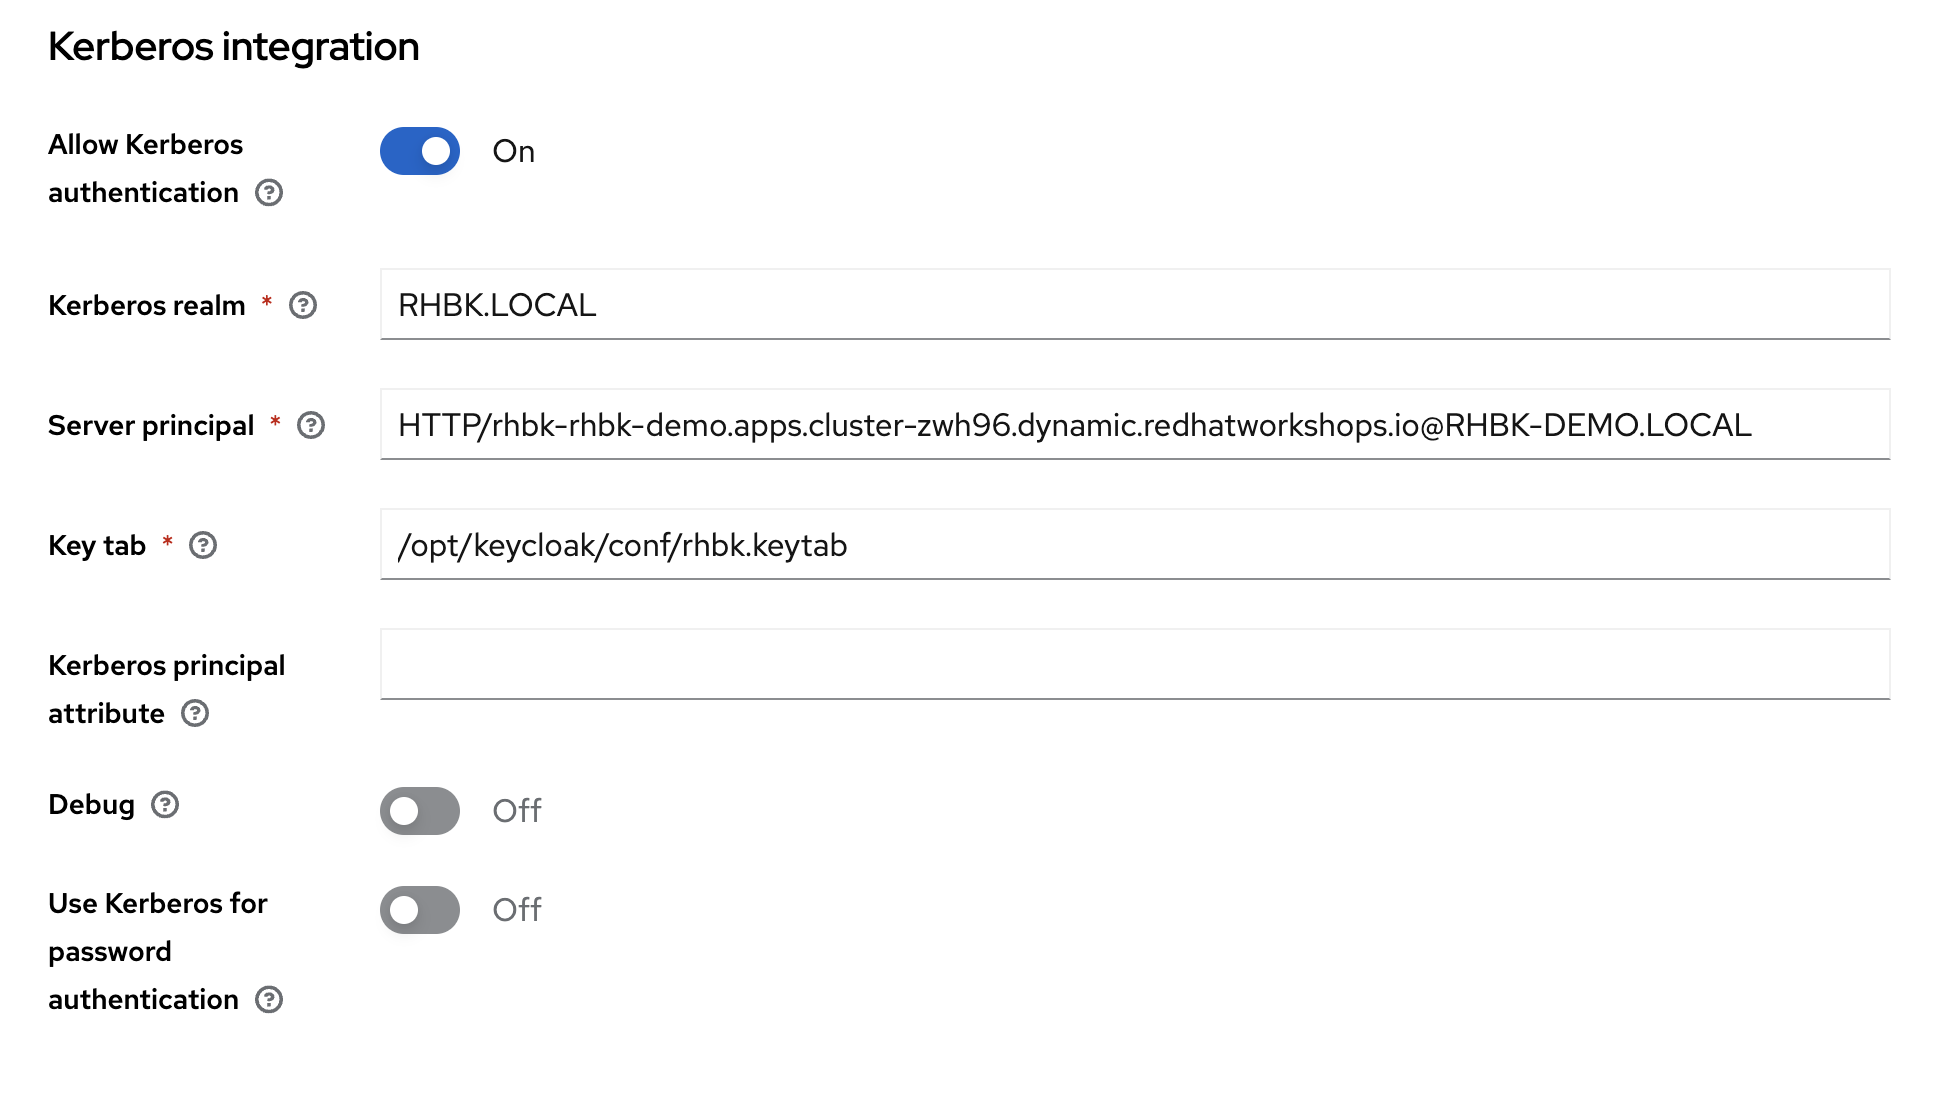
Notice that the Kerberos principal attribute should be left blank in order for RHBK to select only the username of the user authenticated with Kerberos, i.e., if adminuser@RHBK-DEMO.LOCAL is the authenticated user on the workstation, then adminuser will be used to lookup the user in Active Directory.
The SPN created in Active Directory and the location of the keytab file generated for Red Hat build of Keycloak are also included in the configuration.
I then verify that Kerberos authentication is listed as an alternative authentication method in the browser authentication flow in RHBK.
Deploy the web application
The web application is a simple Node.js application that has a /public and a /secured endpoint.
To secure the web application with Red Hat build of Keycloak, I create an OIDC client with the following settings:
Client ID: service-nodejs
Valid redirect URI: http://keycloak-openshift-demo-nodejs-rhbk-demo.apps.<your domain>/*
Client authentication: On (confidential access type)
Authenticatio flow: Standard
To use the OIDC client you need to modify the keycloak.json file found in to refer to your RHBK instance, and the push it to your copy of the git repo: . https://github.com/torbjorndahlen/keycloak-openshift-demo-nodejs
Then, I build and deploy the Node.js application on OpenShift as follows:
% oc new-app https://github.com/<your_git_user>/keycloak-openshift-demo-nodejsI create a Route to the Node.js app:
% oc expose svc/keycloak-openshift-demo-nodejsTest the route by calling the /public endpoint:
% curl http://keycloak-openshift-demo-nodejs-rhbk-demo.apps.<your domain>/publicYou should see the response:
{"message":"public"}While making a call to the /secured endpoint will be redirected to Red Hat build of Keycloak:
% curl http://keycloak-openshift-demo-nodejs-rhbk-demo.apps.<your domain>/securedFound. Redirecting to https://rhbk-rhbk-demo.apps.<your domain>/realms/rhbk-demo/protocol/openid-connect/auth?client_id=service-nodejs&state=35b0f9a0-2e37-483a-84e0-6e421e7bd439&redirect_uri=http%3A%2F%2Fkeycloak-openshift-demo-nodejs-rhbk-demo.apps.<your domain>%2Fsecured%3Fauth_callback%3D1&scope=openid&response_type=code
Set up workstation
Finally, the workstation used to authenticate to Active Directory over Kerberos and running the browser to access the secured web application should be configured to send the SPNEGO token to Red Hat build of Keycloak.
I'm using the same krb5.conf file that I deployed in my RHBK instance to configure kinit on my workstation by copying the krb5.conf file to /etc/krb5.conf for clients on Linux or Mac and C:\windows\krb5.ini for clients running on Windows.
To verify that kinit is set up correctly I log in on my workstation and authenticate to the KDC running on Windows Server:
% kinit adminuser@RHBK-DEMO.LOCALadminuser@RHBK-DEMO.LOCAL's password: I then verify that a Kerberos TGT has been created:
% klistCredentials cache: API:8C100835-BAEB-461F-8864-200FAE154E0E
Principal: adminuser@RHBK-DEMO.LOCAL
Issued Expires Principal
Jun 18 09:20:25 2024 Jun 18 19:20:18 2024 krbtgt/RHBK-DEMO.LOCAL@RHBK-DEMO.LOCALNext, my web browser is configured to allow SPNEGO to authenticate to the secured web application (Figure 8).
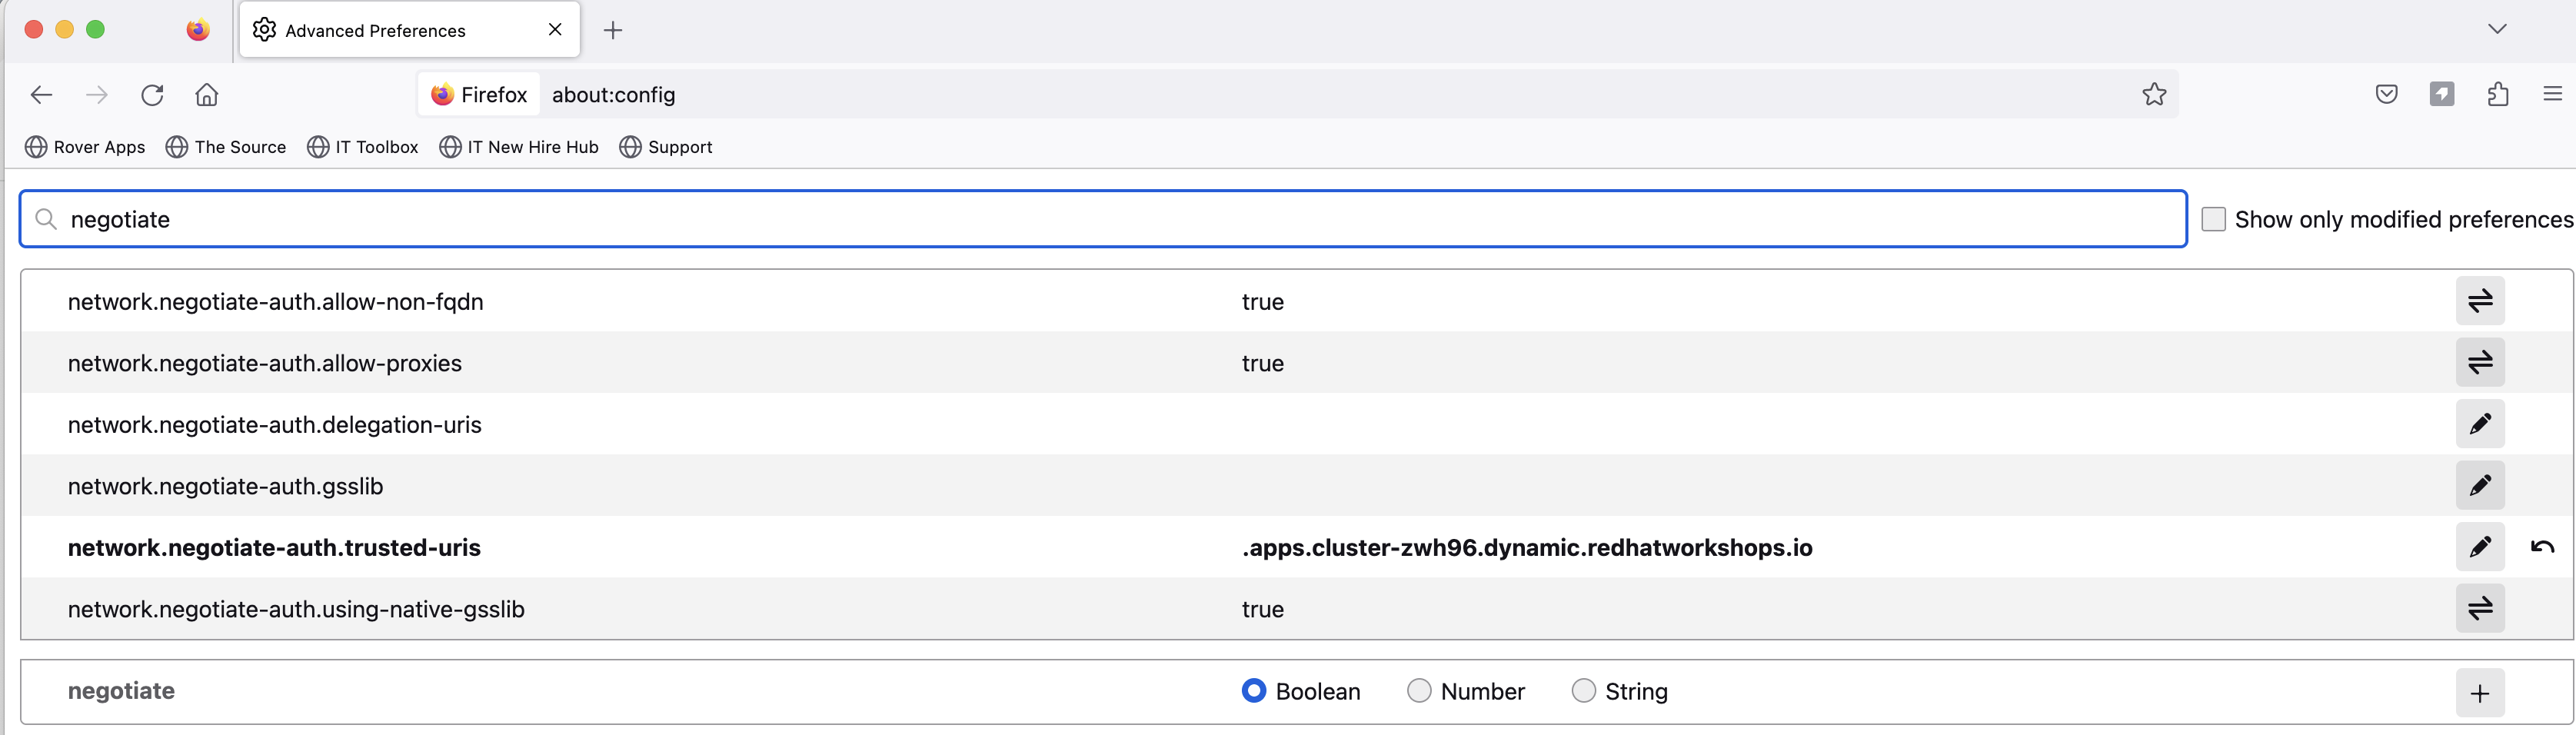
I'm entering about:config in the address bar in Firefox, then I search for negotiate to find the network.negotiate-auth.trusted-uris property.
The domain where the web application is deployed starts with a dot and then the domain name. This is a comma separated list and more trusted domains can be added here.
Finally, I navigate to the /secured endpoint in the web app, then I see the following response:
{"message":"secured"}When tracing the network traffic on my workstation I can see the Authorization negotiate header containing the SPNEGO token which is sent to RHBK when the browser is redirected (Figure 9).

Summary
In this article I have demonstrated how Red Hat build of Keycloak supports SPNEGO tokens for authentication to access protected web applications on OpenShift. By extending the standard RHBK image with a Kerberos client and configuring User Federation with Active Directory in RHBK, users having their account on Windows Server and using Kerberos to authenticate to their workstation can still access web applications deployed on OpenShift.
Troubleshooting
- Verify that the
krb5.conffile is located in the correct place on the workstation and contains the same information as in the RHBK container. - Check that Kerberos is enabled as authentication method for the realm in Red Hat build of Keycloak.
- Your
keycloak.jsonneeds to contain the configuration for your secured web application client in Red Hat build of Keycloak. - Make sure a ticket is actually created on the workstation after
kinit. Useklistto verify. - Verify that the
domain_realminkrb5.confpoints to the domain where the secured web application is running, both on the workstation and in the RHBK container. - The browser should be configured to send SPNEGO ticket to the domain where Red Hat build of Keycloak is running. In Firefox, it's
network.negotiate-auth.trusted-uris = <RHBK-domain>. Use[dot][domain-name]in a comma separated list. - Check the RHBK log for unsupported encryption type, you might need to restrict the allowed encryption types in Active Directory and make the corresponding change in
krb5.conf.