Red Hat's single sign-on technology is an identity and access management solution based on standard identity protocols (SAML, OpenID Connect) to perform authentication of users and share user information for access control. Red Hat's SSO sources user information from a federated user database, or user federation, and it provides the option to configure the Kerberos protocol for this purpose.
In this article, you'll see how to set up Red Hat's SSO to authenticate users using the standard Kerberos protocol along with the Simple and Protected GSS_API Negotiation Mechanism (SPNEGO) specification.
To use Kerberos, Red Hat's SSO must set up an identity called a service principal. The user gains access to Red Hat's SSO through Kerberos in a two-step process: first they obtain a Ticket Granting Ticket (TGT) and then they obtain service tickets (ST).
Objects in the Kerberos key distribution center (KDC) database are known as principals. Each principal is a user, service, or host. For this example, you will add a user principal and an HTTP service principal.
Figure 1 illustrates the flow of information and tokens.

Prerequisites
To follow this example, you need at least two Red Hat Enterprise Linux servers sharing a network and a domain. The example uses s1.example.com and s2.example.com as the names for the systems, but you'll want to substitute in yours. Red Hat's single sign-on technology should be installed on s2.example.com.
We've used Mozilla Firefox in the example screenshots to display the services and authenticate with Red Hat's single sign-on servers.
Summary of steps in this article
The procedure we'll go through breaks down as follows:
- Set up the Kerberos server
- Configure the Kerberos server
- Add principals and the export keytab
- Set up Red Hat's SSO server
- Configure the service principal and keytab file
- Enable Kerberos processing
- Set up your client machine
- Configure the Kerberos client
- Enable logins through SPNEGO
- Authenticate to Kerberos
Set up the Kerberos server
In this section, you'll install and configure a Kerberos server. This server will be used later to create service tickets that authenticate users to Red Hat's SSO.
We are using EXAMPLE.COM as our Kerberos realm. The Kerberos server (KDC) will be running on the host s1.example.com.
Configure the Kerberos server
As an administrator on your system, enter the following commands.
-
Install the Kerberos server and relevant libraries on
s1.example.com:# yum install krb5-server krb5-workstation sssd* -
Review the
/etc/krb5.confand/var/kerberos/krb5kdc/kdc.conffiles. Configure the realms as EXAMPLE.COM, andkdcandadmin_serverass1.example.com, as follows. Here'skdc.conf:[kdcdefaults] kdc_ports = 88 kdc_tcp_ports = 88 spake_preauth_kdc_challenge = edwards25519 [realms] EXAMPLE.COM = { #master_key_type = aes256-cts acl_file = /var/kerberos/krb5kdc/kadm5.acl dict_file = /usr/share/dict/words admin_keytab = /var/kerberos/krb5kdc/kadm5.keytab supported_enctypes = aes256-cts:normal aes128-cts:normal arcfour-hmac:normal camellia256-cts:normal camellia128-cts:normalAnd here's
krb5.conf:includedir /etc/krb5.conf.d/ [logging] default = FILE:/var/log/krb5libs.log kdc = FILE:/var/log/krb5kdc.log admin_server = FILE:/var/log/kadmind.log [libdefaults] dns_lookup_realm = false ticket_lifetime = 24h renew_lifetime = 7d forwardable = true rdns = false pkinit_anchors = FILE:/etc/pki/tls/certs/ca-bundle.crt spake_preauth_groups = edwards25519 default_realm = EXAMPLE.COM default_ccache_name = KEYRING:persistent:%{uid} [realms] EXAMPLE.COM = { kdc = s1.example.com admin_server = s1.example.com } [domain_realm] .example.com = EXAMPLE.COM example.com = EXAMPLE.COM -
Put the following line in your
/var/kerberos/krb5kdc/kadm5.aclfile, so that you can get access to the EXAMPLE.COM domain as an administrator:*/admin@EXAMPLE.COM * -
Create the KDC database using the
kdb5_utilutility:# kdb5_util create -s -r EXAMPLE.COM -
Start and enable the Kerberos services:
# systemctl start krb5kdc kadmin # systemctl enable krb5kdc kadmin -
Create the first principal:
# kadmin.local -q "addprinc root/admin" [root@s1 ~]# systemctl start krb5kdc kadmin [root@s1 ~]# [root@s1 ~]# kadmin.local Authenticating as principal root/admin@EXAMPLE.COM with password. kadmin.local: addprinc root/admin No policy specified for root/admin@EXAMPLE.COM; defaulting to no policy Enter password for principal "root/admin@EXAMPLE.COM": Re-enter password for principal "root/admin@EXAMPLE.COM": Principal "root/admin@EXAMPLE.COM" created. kadmin.local: addprinc rishabh No policy specified for rishabh@EXAMPLE.COM; defaulting to no policy Enter password for principal "rishabh@EXAMPLE.COM": Re-enter password for principal "rishabh@EXAMPLE.COM": Principal "rishabh@EXAMPLE.COM" created. kadmin.local:
Add principals and the export keytab
As mentioned earlier, a KDC principal can be a user, service, or host. For this example, you will add the user principal and HTTP service principal.
The user principal will be used to authenticate to and get access to the account management console on Red Hat's SSO.
The key of the HTTP service principal will be exported to a keytab file. Later, the HTTP service principal and exported keytab will be used to configure Kerberos-based user federation using Red Hat's SSO.
-
Add the user principal:
# kadmin.local kadmin.local: addprinc rishabh kadmin.local: quit -
Add the HTTP service principal and export keytab:
kadmin.local: addprinc -randkey HTTP/s2.example.com@EXAMPLE.COM No policy specified for HTTP/s2.example.com@EXAMPLE.COM; defaulting to no policy Principal "HTTP/s2.example.com@EXAMPLE.COM" created. kadmin.local: ktadd -norandkey -k /etc/jboss_s2_Example.keytab HTTP/s2.example.com@EXAMPLE.COM Entry for principal HTTP/s2.example.com@EXAMPLE.COM with kvno 1, encryption type aes256-cts-hmac-sha1-96 added to keytab WRFILE:/etc/jboss_s2_Example.keytab. Entry for principal HTTP/s2.example.com@EXAMPLE.COM with kvno 1, encryption type aes128-cts-hmac-sha1-96 added to keytab WRFILE:/etc/jboss_s2_Example.keytab. Entry for principal HTTP/s2.example.com@EXAMPLE.COM with kvno 1, encryption type arcfour-hmac added to keytab WRFILE:/etc/jboss_s2_Example.keytab. Entry for principal HTTP/s2.example.com@EXAMPLE.COM with kvno 1, encryption type camellia256-cts-cmac added to keytab WRFILE:/etc/jboss_s2_Example.keytab. Entry for principal HTTP/s2.example.com@EXAMPLE.COM with kvno 1, encryption type camellia128-cts-cmac added to keytab WRFILE:/etc/jboss_s2_Example.keytab. kadmin.local:
Set up Red Hat's SSO server
In this section, you'll configure Red Hat's SSO to use Kerberos.
Configure the service principal and keytab file
In your Red Hat single sign-on console, navigate to Red Hat SSO Admin console > Realm > User Federation > Add provider > Kerberos to configure the HTTP service principal and generated keytab (jboss_s2_Example.keytab) from the service principal (Figure 2). The keytab file should be present on the host where the SSO server is running. For the current walkthrough, that host is s2.example.com.

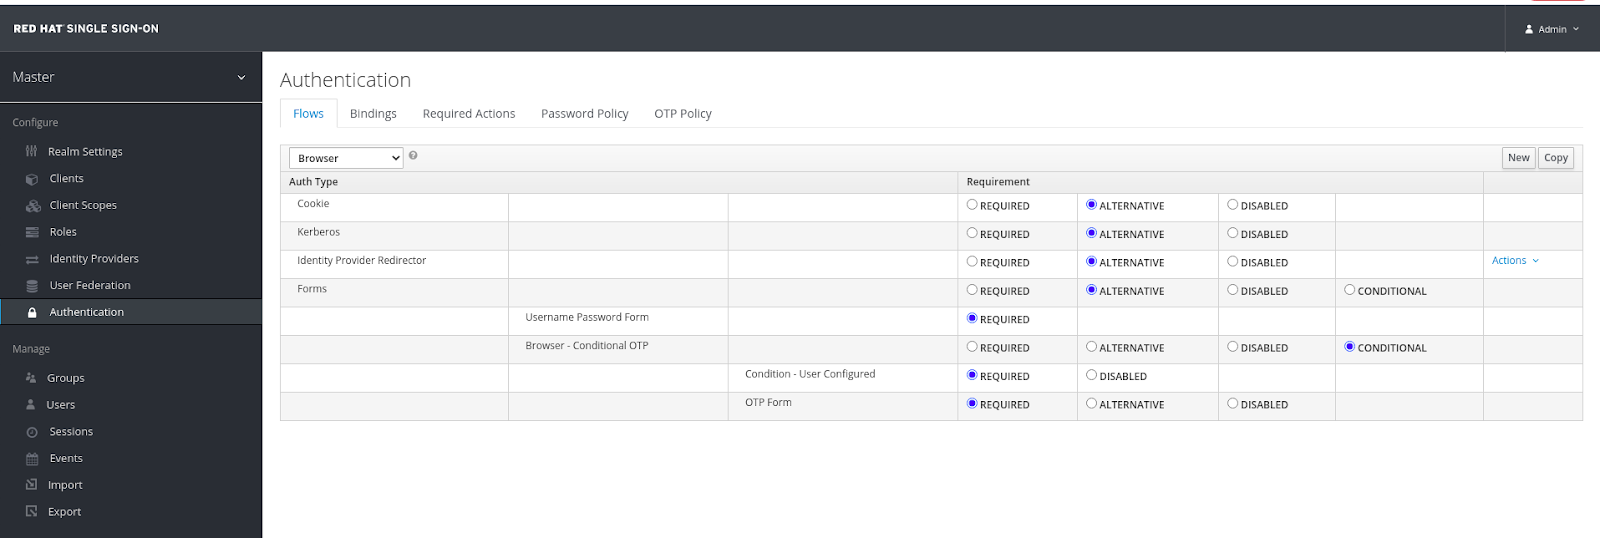
Enable Kerberos processing
Enable Kerberos in the Flow tab of the Authentication screen in the console of Red Hat's SSO (Figure 3). For our purposes, you can set the Kerberos requirement to either ALTERNATIVE or REQUIRED. (ALTERNATIVE means Kerberos is optional and if the user system is not configured to work with SPNEGO and Kerberos, then Red Hat's SSO will fall back to its regular login screens. REQUIRED does not allow the user to fall back if their system is not configured to work with SPNEGO and Kerberos.)
Set up your client machine
The Kerberos client should be able to connect to the KDC on s1.example.com and exchange tickets. The client can procure service tickets from the KDC. A service ticket will be used to authenticate with the SSO server, making use of the Kerberos user federation created in the previous step.
Configure the Kerberos client
To allow users to communicate and authenticate with the Kerberos server, krb5.conf must be configured on the user machine. This configuration file should point to the appropriate kdc and admin_server—remember, in the current example these are both s1.example.com.
The [domain_realm] section provides a translation from a domain name or hostname to a Kerberos realm name. For the current example, the .example.com domain maps to the EXAMPLE.COM realm.
includedir /etc/krb5.conf.d/

[logging]
    default = FILE:/var/log/krb5libs.log
    kdc = FILE:/var/log/krb5kdc.log
    admin_server = FILE:/var/log/kadmind.log

[libdefaults]
    dns_lookup_realm = false
    ticket_lifetime = 24h
    renew_lifetime = 7d
    forwardable = true
    rdns = false
    pkinit_anchors = FILE:/etc/pki/tls/certs/ca-bundle.crt
    spake_preauth_groups = edwards25519
    default_realm = EXAMPLE.COM
    default_ccache_name = KEYRING:persistent:%{uid}

[realms]
 EXAMPLE.COM = {
     kdc = s1.example.com
     admin_server = s1.example.com
 }

[domain_realm]
 .example.com = EXAMPLE.COM
 example.com = EXAMPLE.COM
Enable logins through SPNEGO
Next, you need to enable SPNEGO logins in the browser. To enable them in Mozilla Firefox, allow .example.com (note the presence of the initial period) in the network.negotiate-auth.trusted-uris configuration option as follows:
-
In the address bar of Firefox, type about:config to display the list of current configuration options.
-
In the Filter field, type
negotiateto restrict the list of options. -
Double-click the network.negotiate-auth.trusted-uris entry.
-
Enter the name of the domain against which to authenticate, including the preceding period (.). If you want to add multiple domains, enter them in a comma-separated list. The result should look like Figure 4.

Authenticate to Red Hat's SSO account console
Now that your systems are set up to use Red Hat's SSO and Kerberos, a user can initiate authentication by entering Kerberos's kinit command, as in the following listing. The rest of this section lays out the sequence of events, as diagrammed in Figure 1, that the servers go through to satisfy the user's request. Figure 5 illustrates the Kerberos Authentication Service request and response.
[rissingh@s2 configuration]$ klist
klist: Credentials cache 'KCM:109626' not found
[rissingh@s2 configuration]$ env KRB5_CONFIG=/home/rissingh/Desktop/Rough/Cases/RHSSO_Rough/Cases/Raw_Setup/kerberos/krb5.conf kinit rishabh
Password for rishabh@EXAMPLE.COM:
[rissingh@s2 configuration]$ klist
Ticket cache: KCM:109626
Default principal: rishabh@EXAMPLE.COM

Valid starting       Expires              Service principal
08/27/2021 23:23:24  08/28/2021 23:23:24  krbtgt/EXAMPLE.COM@EXAMPLE.COM
	renew until 08/27/2021 23:23:24

-
The initial client request is an AS-REQ message, which asks for a TGT from the KDC. (Figure 6 and the subsequent figures are screenshots of the
tcpdumpcommand offering visibility into the processing happening behind the scenes.)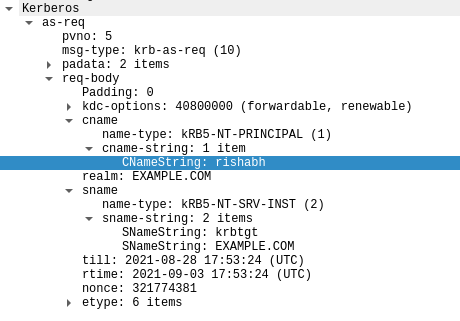
Figure 6: Figure 6: Requesting a TGT. -
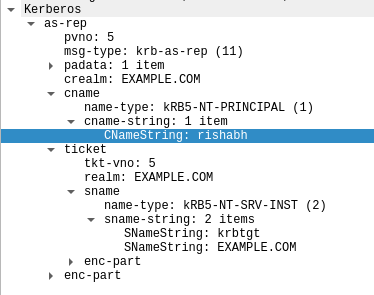
The AS processes the AS-REQ and responds back with an AS-REP message that includes the TGT.

Figure 7: Figure 7: Responding with a TGT. -
The user now has access to account management on Red Hat's SSO, which, assuming you've followed the steps outlined in this article, is now a Kerberized service.

Figure 8: Figure 8: Red Hat SSO is now a Kerberized service. -
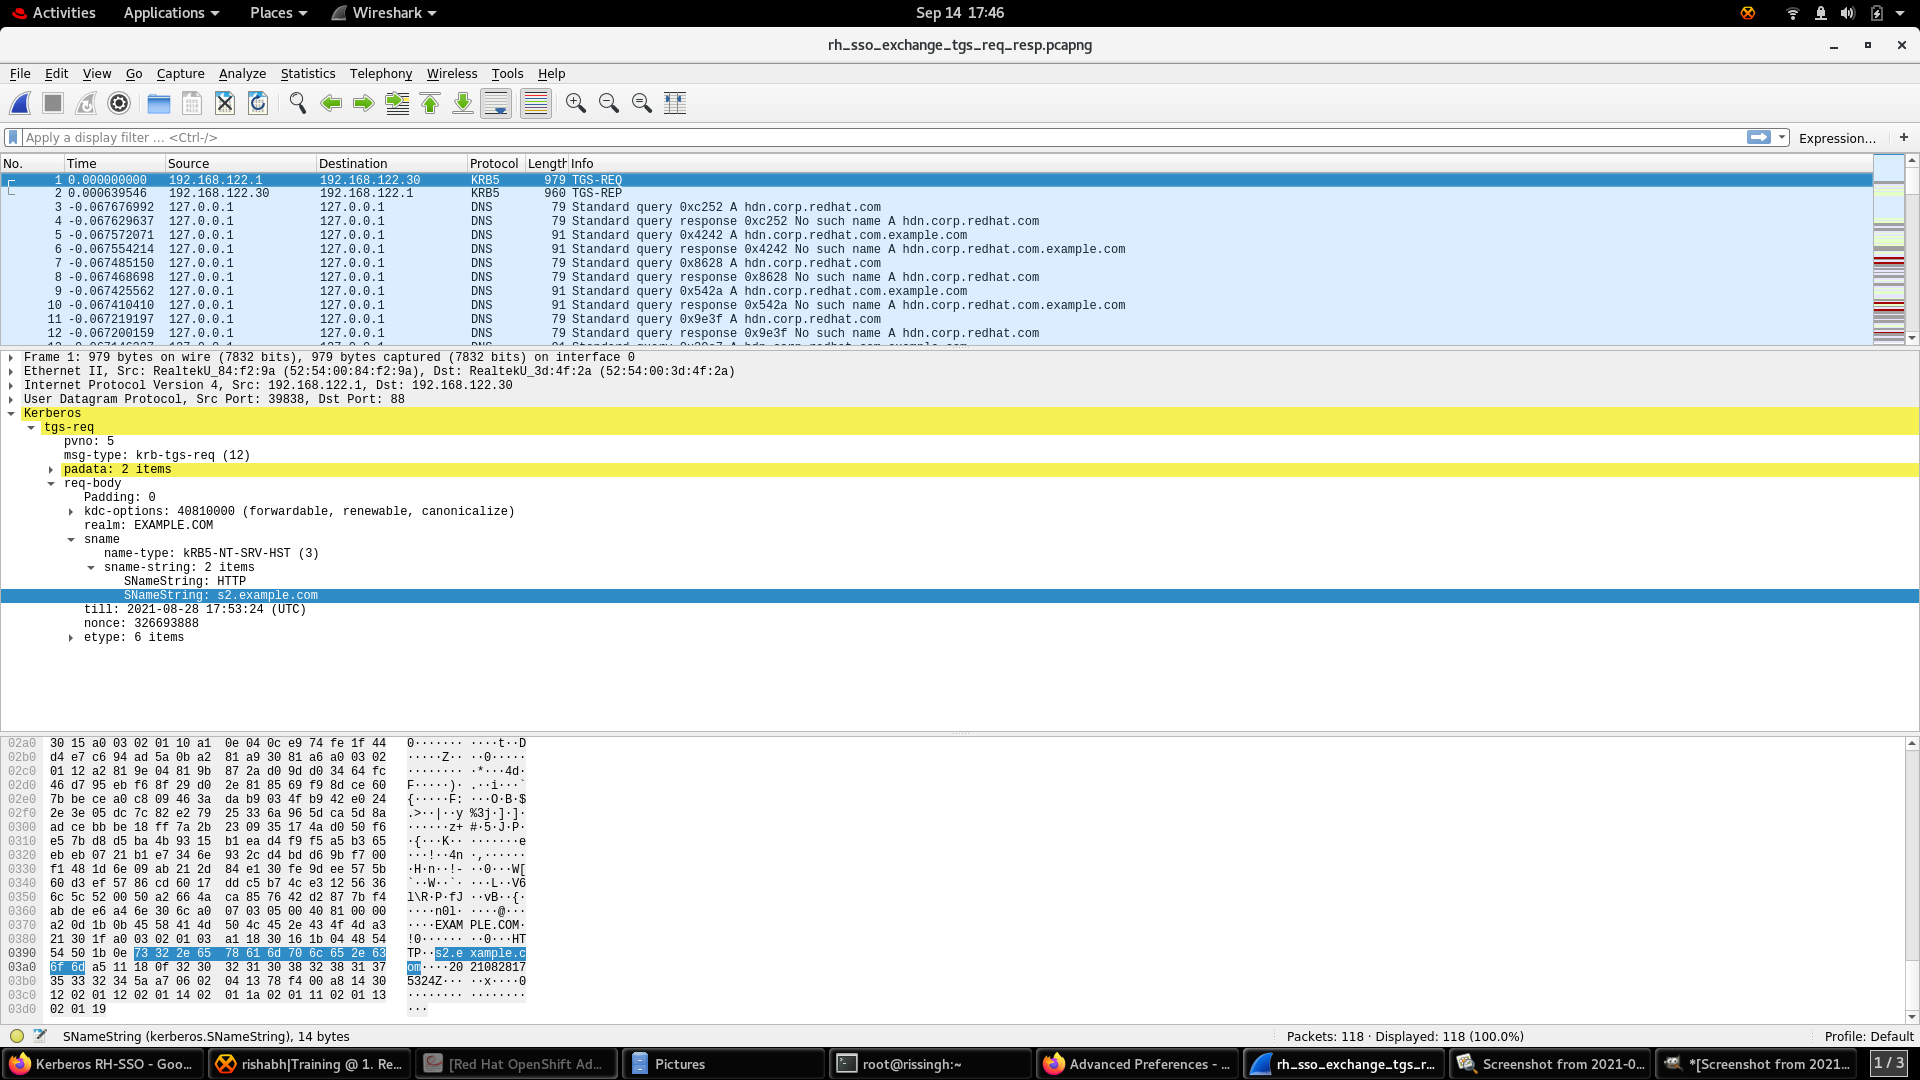
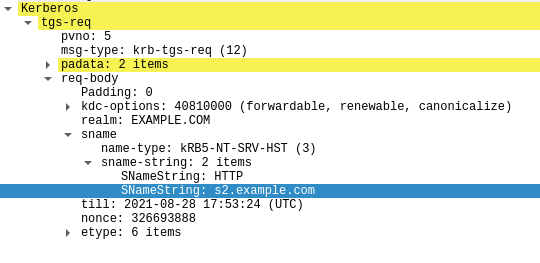
A TGS-REQ message, initiated to the Ticket Granting Service (TGS) for a service ticket, includes the TGT received in the AS-REP message earlier.

Figure 9: Figure 9: A TGS-REQ message. -
The Ticket Granting Service responds to the TGS-REQ request with a TGS-REP message that includes the requested service ticket.
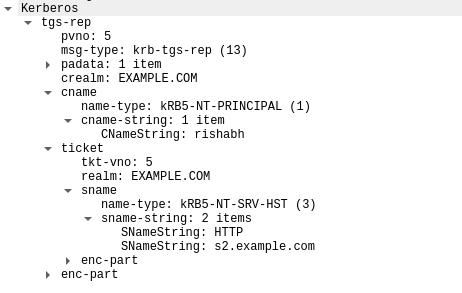
Figure 10: Figure 10: A TGS-REP message. -
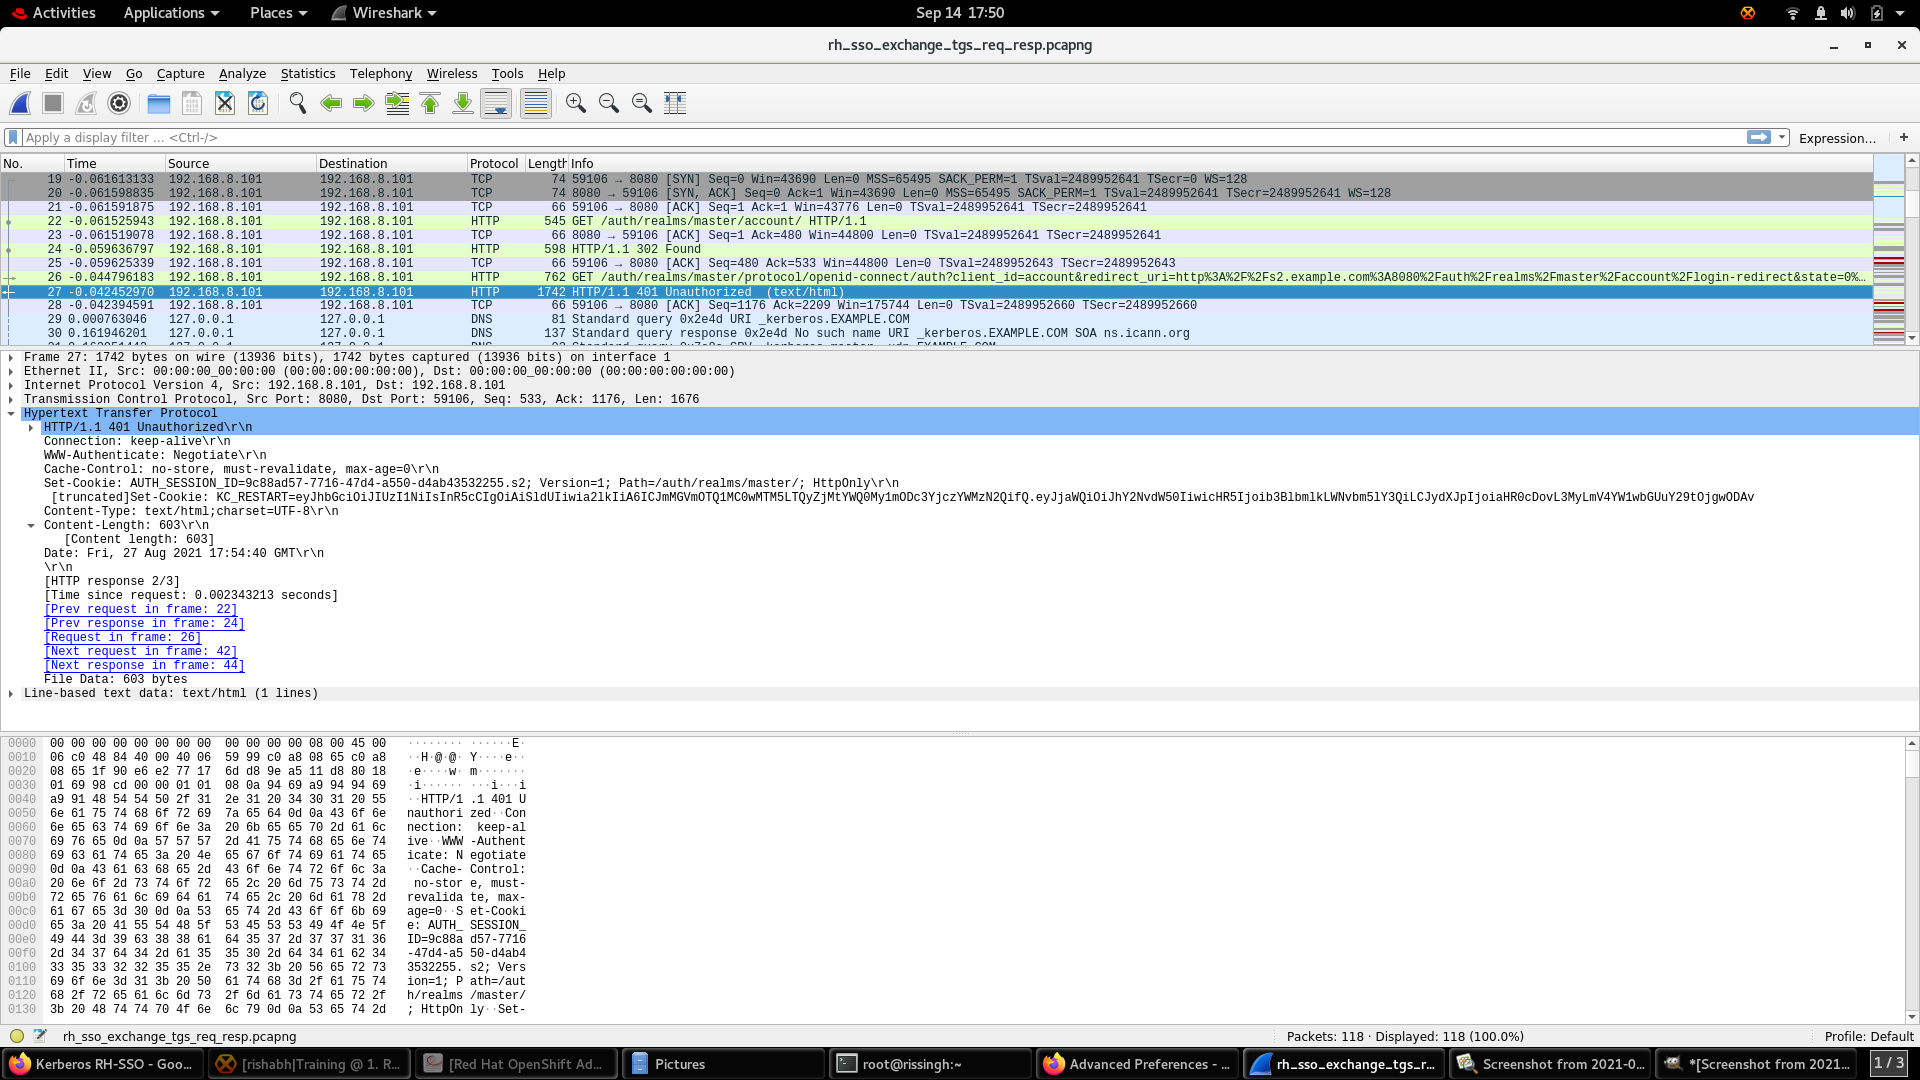
Red Hat's SSO responds back with an HTTP 401 message containing a
WWW-Authenticate: Negotiateheader.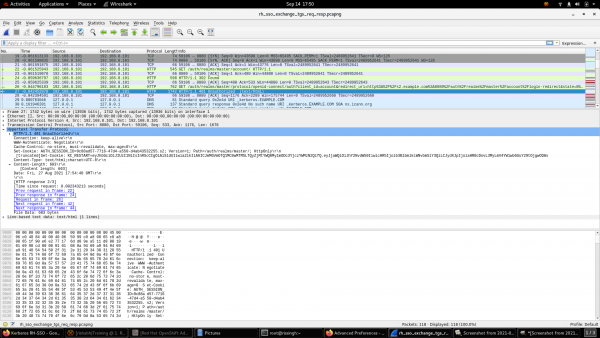
Figure 11: Figure 11: WWW-Authenticate: Negotiate header received from Red Hat's SSO. Execute the
klistcommand to list the service ticket received for theHTTP/s2.example.com@EXAMPLE.COMservice principal in step 5.[rissingh@s2 configuration]$ klist Ticket cache: KCM:109626 Default principal: rishabh@EXAMPLE.COM Valid starting Expires Service principal 08/27/2021 23:23:24 08/28/2021 23:23:24 krbtgt/EXAMPLE.COM@EXAMPLE.COM renew until 08/27/2021 23:23:24 08/27/2021 23:24:40 08/28/2021 23:23:24 HTTP/s2.example.com@EXAMPLE.COM renew until 08/27/2021 23:23:24 [rissingh@s2 configuration]$ -
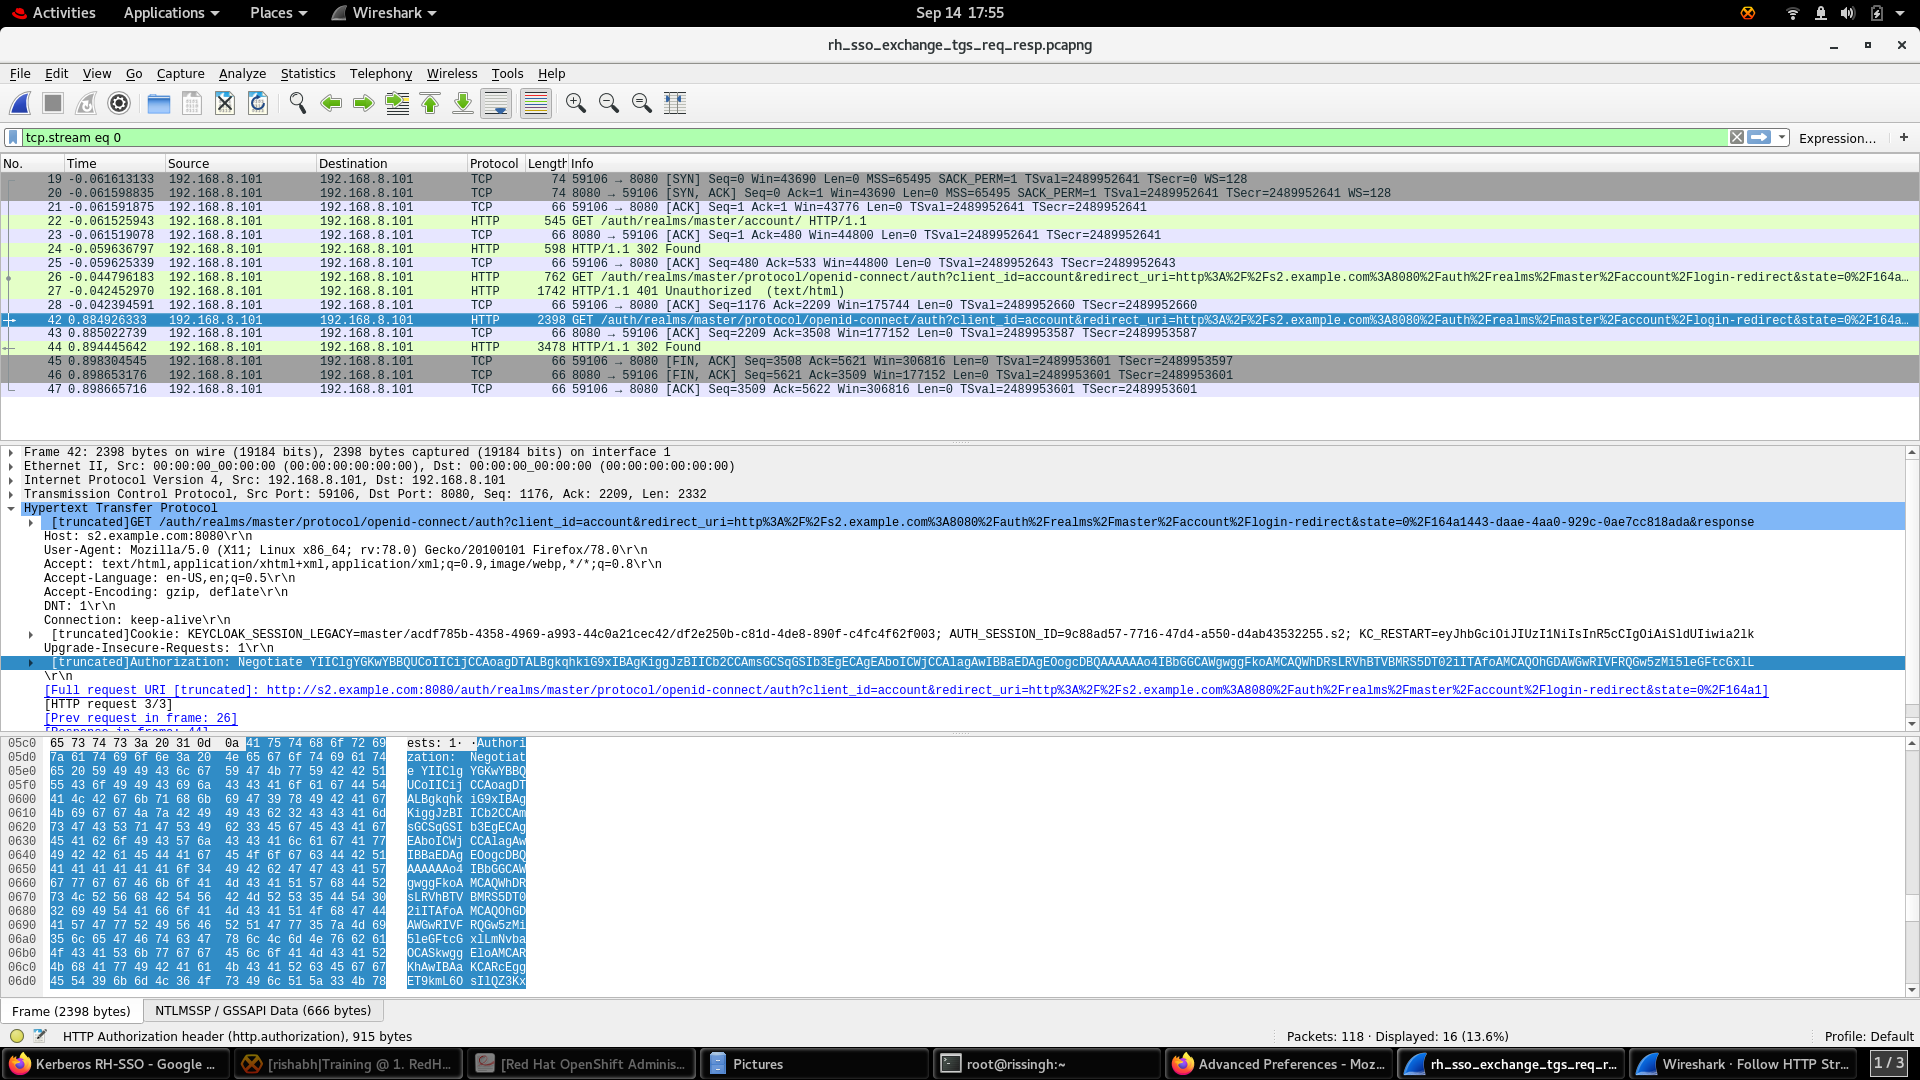
If the browser has the service ticket, it then transfers the SPNEGO token to Red Hat's SSO in the
Authorization: Negotiate 'spnego-token'header.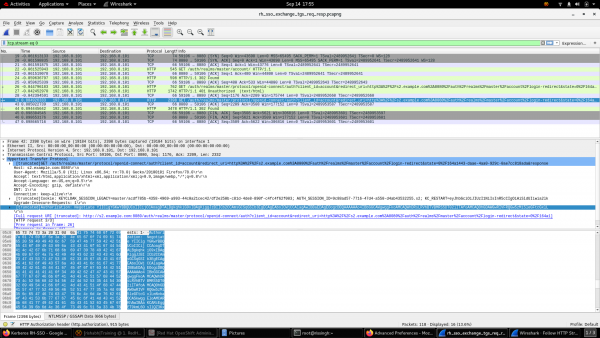
Figure 12: Figure 12: Transfering the SPNEGO token to Red Hat's SSO. -
Red Hat's SSO authenticates the user using the SPNEGO token.


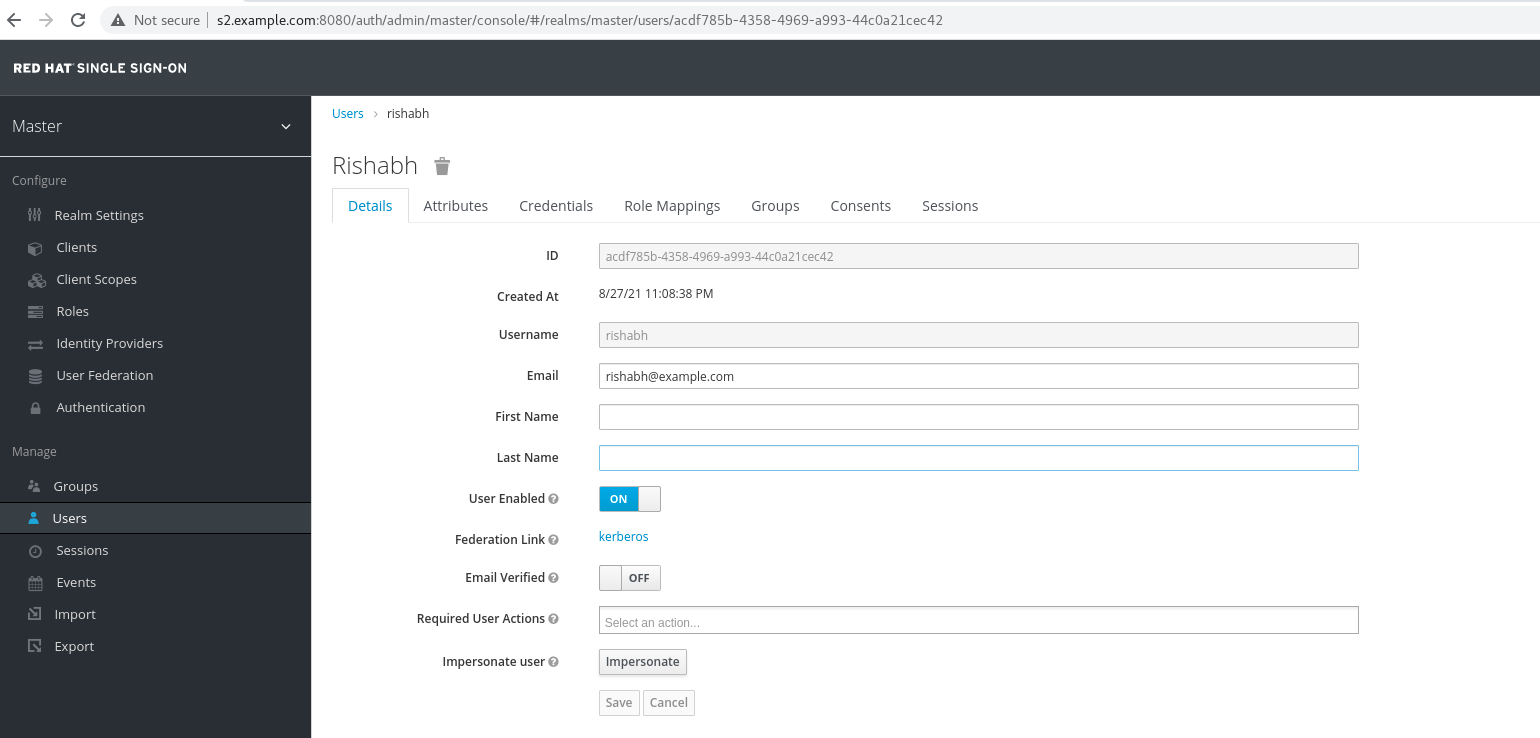
When all these steps finish, the Account screen for Red Hat's SSO is displayed in the browser, as shown in Figures 13 and 14.

Conclusion
Kerberos has been a fixture of federated security for decades. Red Hat's single sign-on technology, which enables you to secure your web applications, works well with Kerberos to provide a single sign-on experience.
Read more about Red Hat's SSO on Red Hat Developer:
Last updated: May 13, 2022