In cloud-native development, we often work with numerous tools and platforms to code, debug, and deploy our applications. The OpenShift Toolkit is a powerful feature-packed extension for popular IDEs Visual Studio Code and IntelliJ that aims to simplify the Red Hat OpenShift and Kubernetes cloud-native developer experience in one place. With this developer tooling at your fingertips, you can streamline your workflow right in your IDE. But how does one get started with this toolkit? That's what we'll explore in this article.
What is the OpenShift Toolkit?
Before diving into the setup, let's understand the problem the OpenShift Toolkit is solving. It's no secret that the process of setting up environments, switching terminals, installing dependencies, and getting code to run on OpenShift can be time-consuming. This overhead leads to a slower inner loop experience. The OpenShift Toolkit extension for Visual Studio Code and IntelliJ addresses these issues by integrating the entire cloud-native development process right into your favorite IDE, providing features such as:
- Quick Development: The toolkit provides an intuitive interface for interacting with your OpenShift cluster right from your IDE, including creating, deploying, and live debugging your containerized workloads. In addition, you can deploy applications in one click through the local workspace, Git repository, or default devfile templates.
- OpenShift Extensibility: You can easily browse and install Helm charts, as well as deploy and manage Knative & OpenShift serverless functions on a Kubernetes/OpenShift cluster.
- Comprehensive Monitoring: It provides the ability to work with Kubernetes resources, as well as log viewing for deployments, pods, and containers, thus removing the need for context switching.
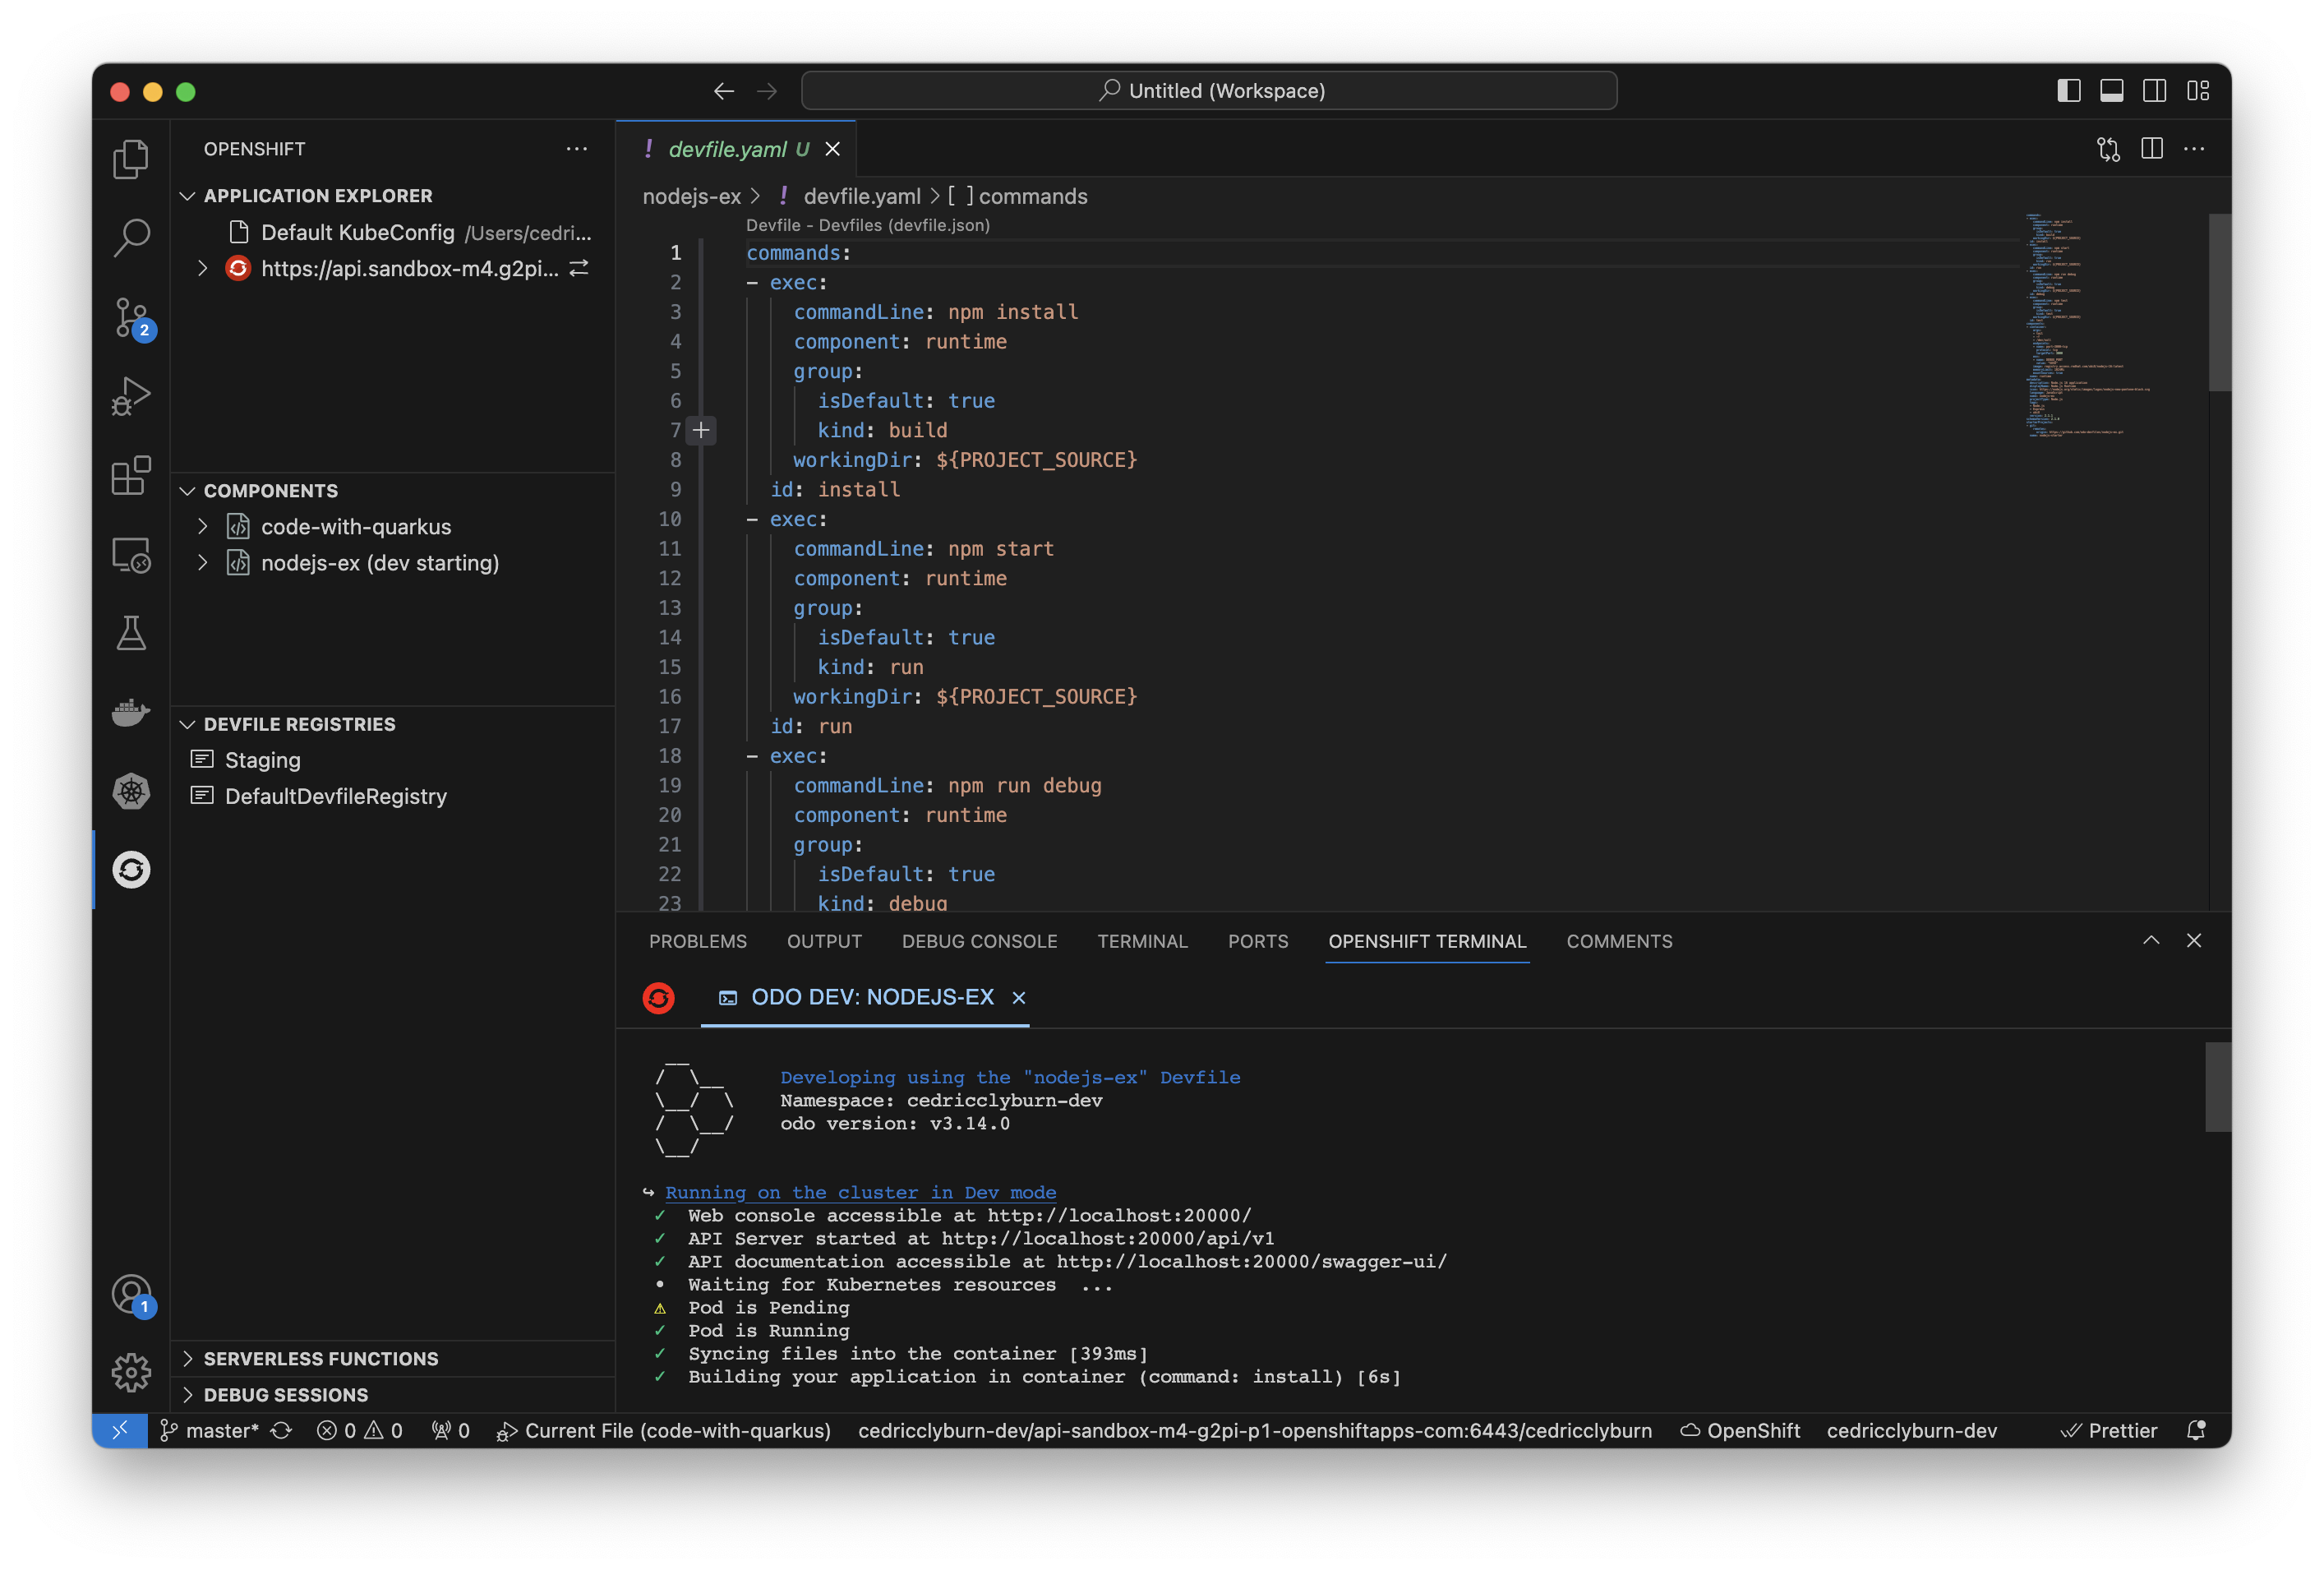
Ultimately, the OpenShift Toolkit aims to assist your development process, speeding up the inner loop - the process of writing, testing, and debugging code - and make you a more productive developer. Figure 1 shows the dashboard for the OpenShift Toolkit extension.
Installing the OpenShift Toolkit
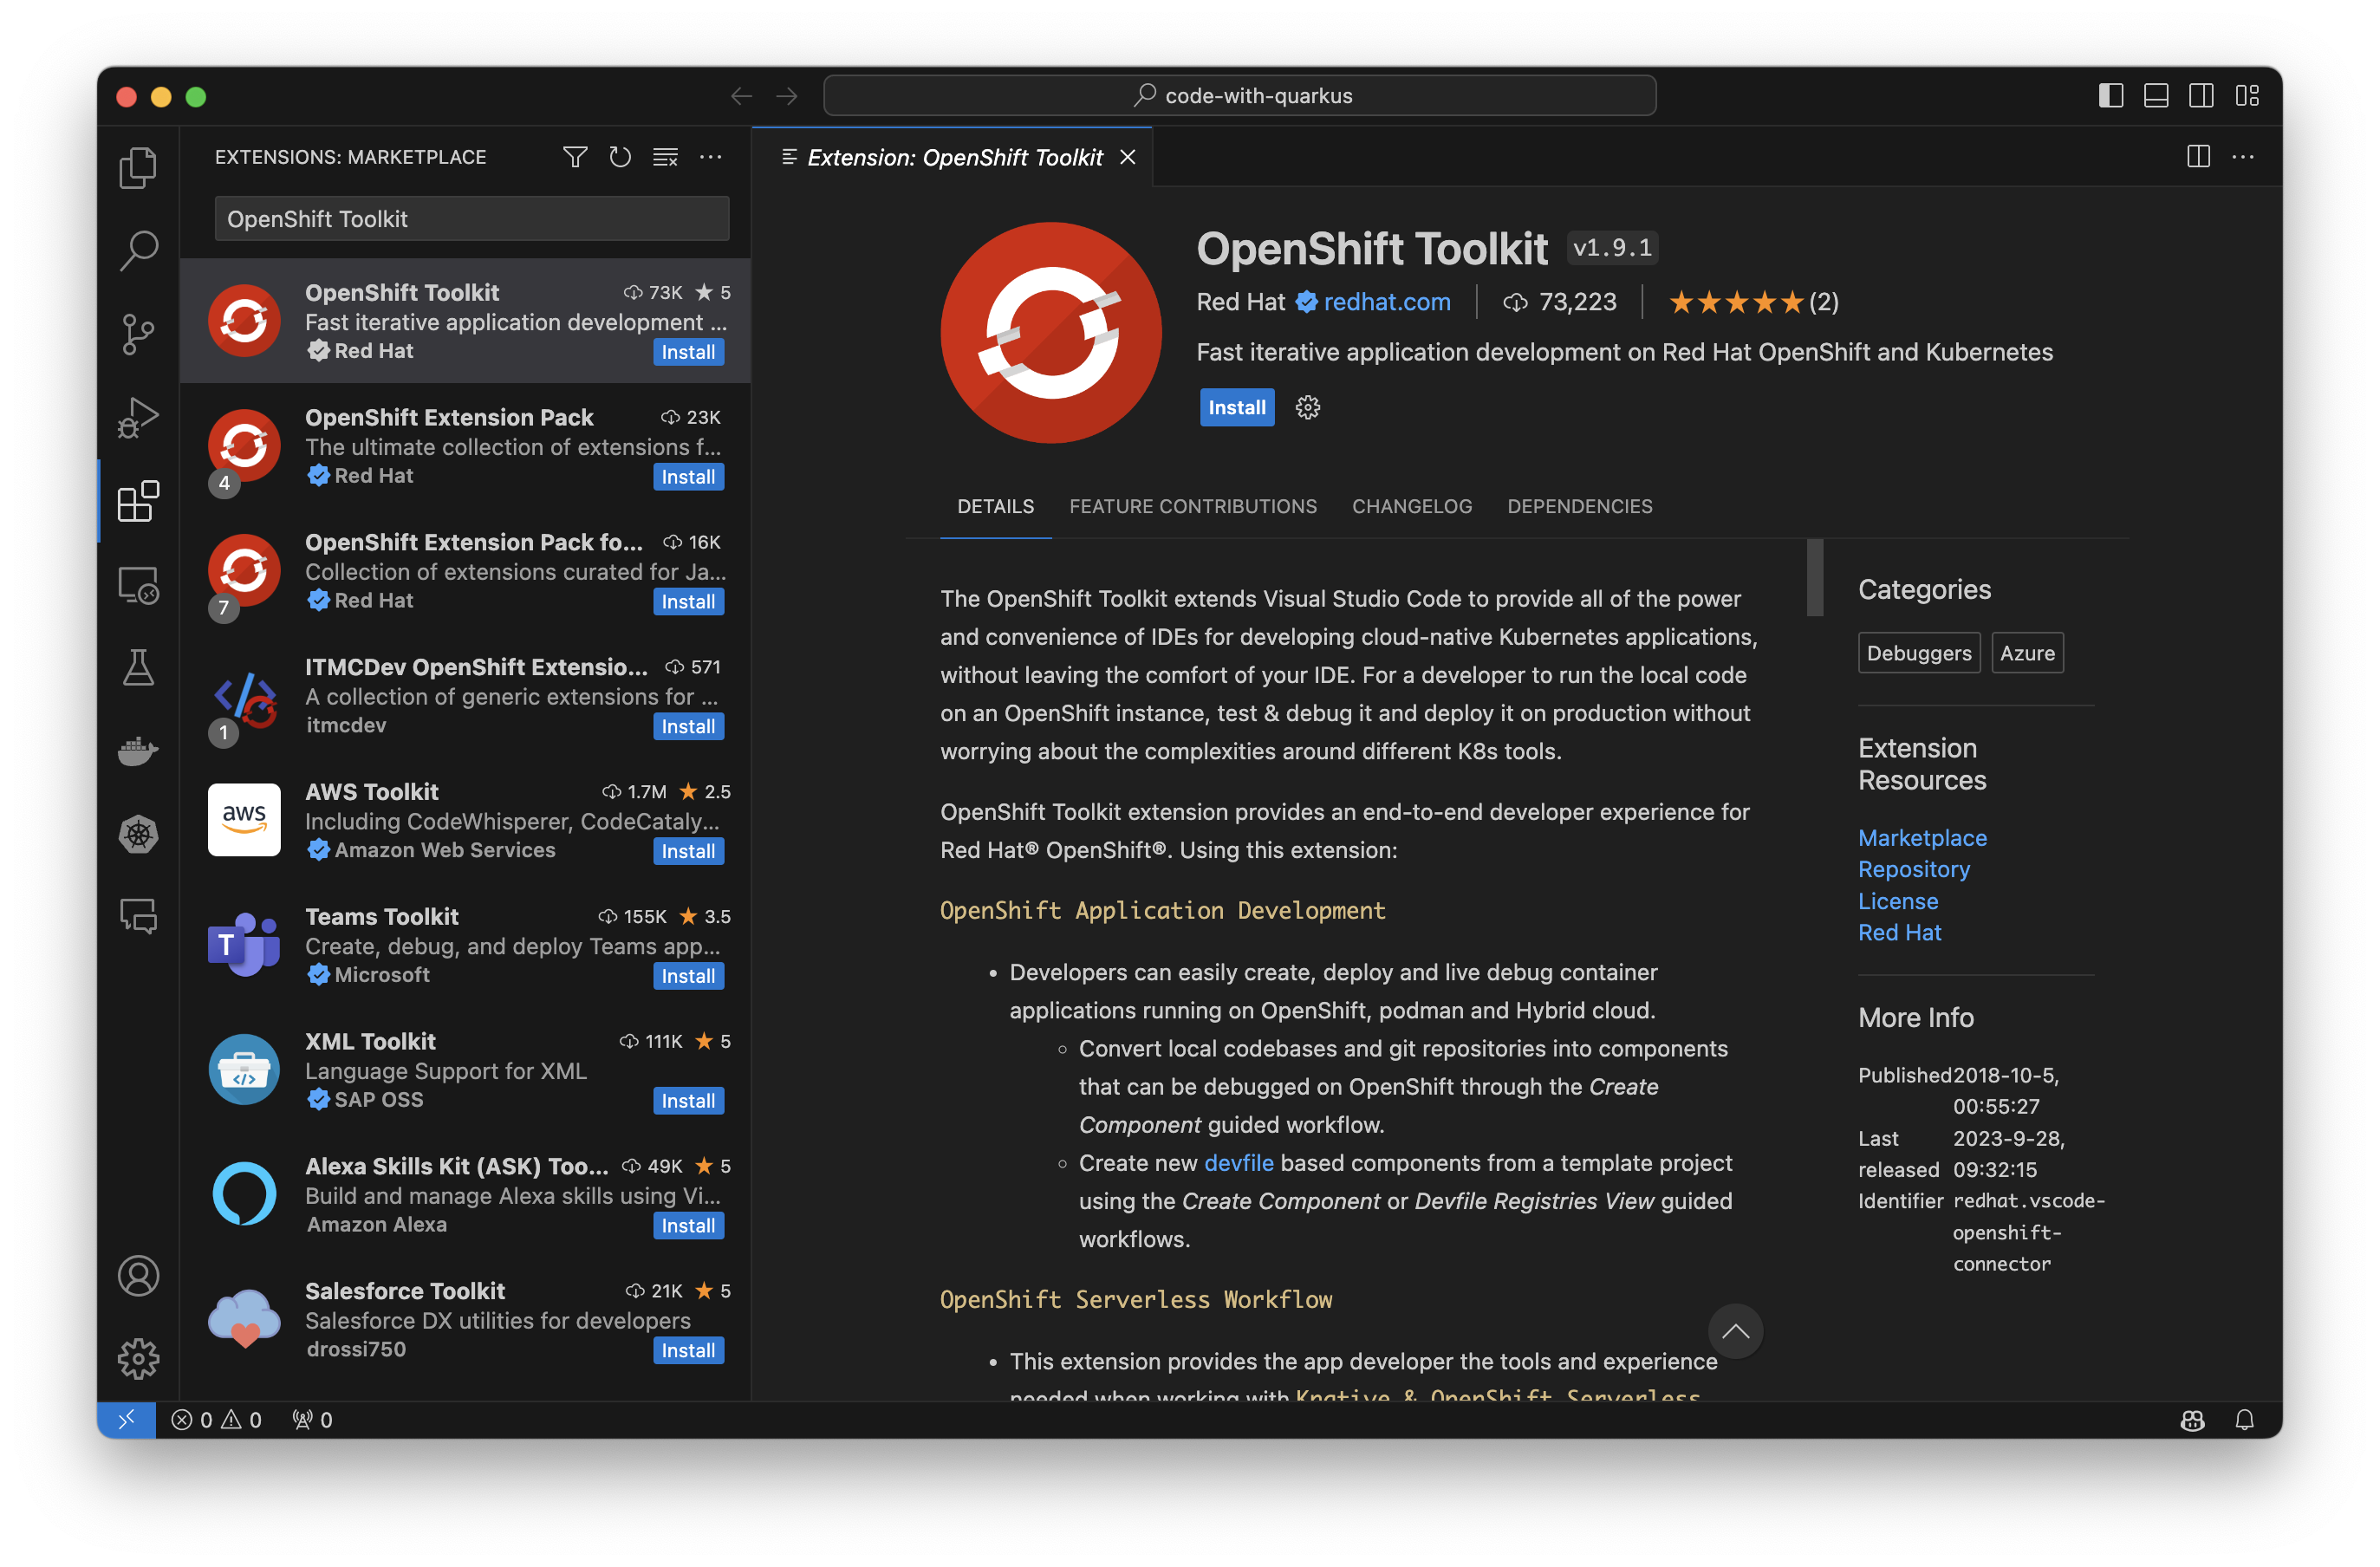
Getting started with the OpenShift Toolkit is as simple as installing a new extension. Depending on your chosen IDE—Visual Studio Code or IntelliJ—you can download the toolkit from the Visual Studio Code Marketplace or JetBrains Marketplace, respectively. The Toolkit is platform-agnostic, offering support for MacOS (including arm64), Windows, and Linux. Figure 2 illustrates a search for the OpenShift Toolkit on the Visual Studio Code marketplace.
Authenticating to your cluster
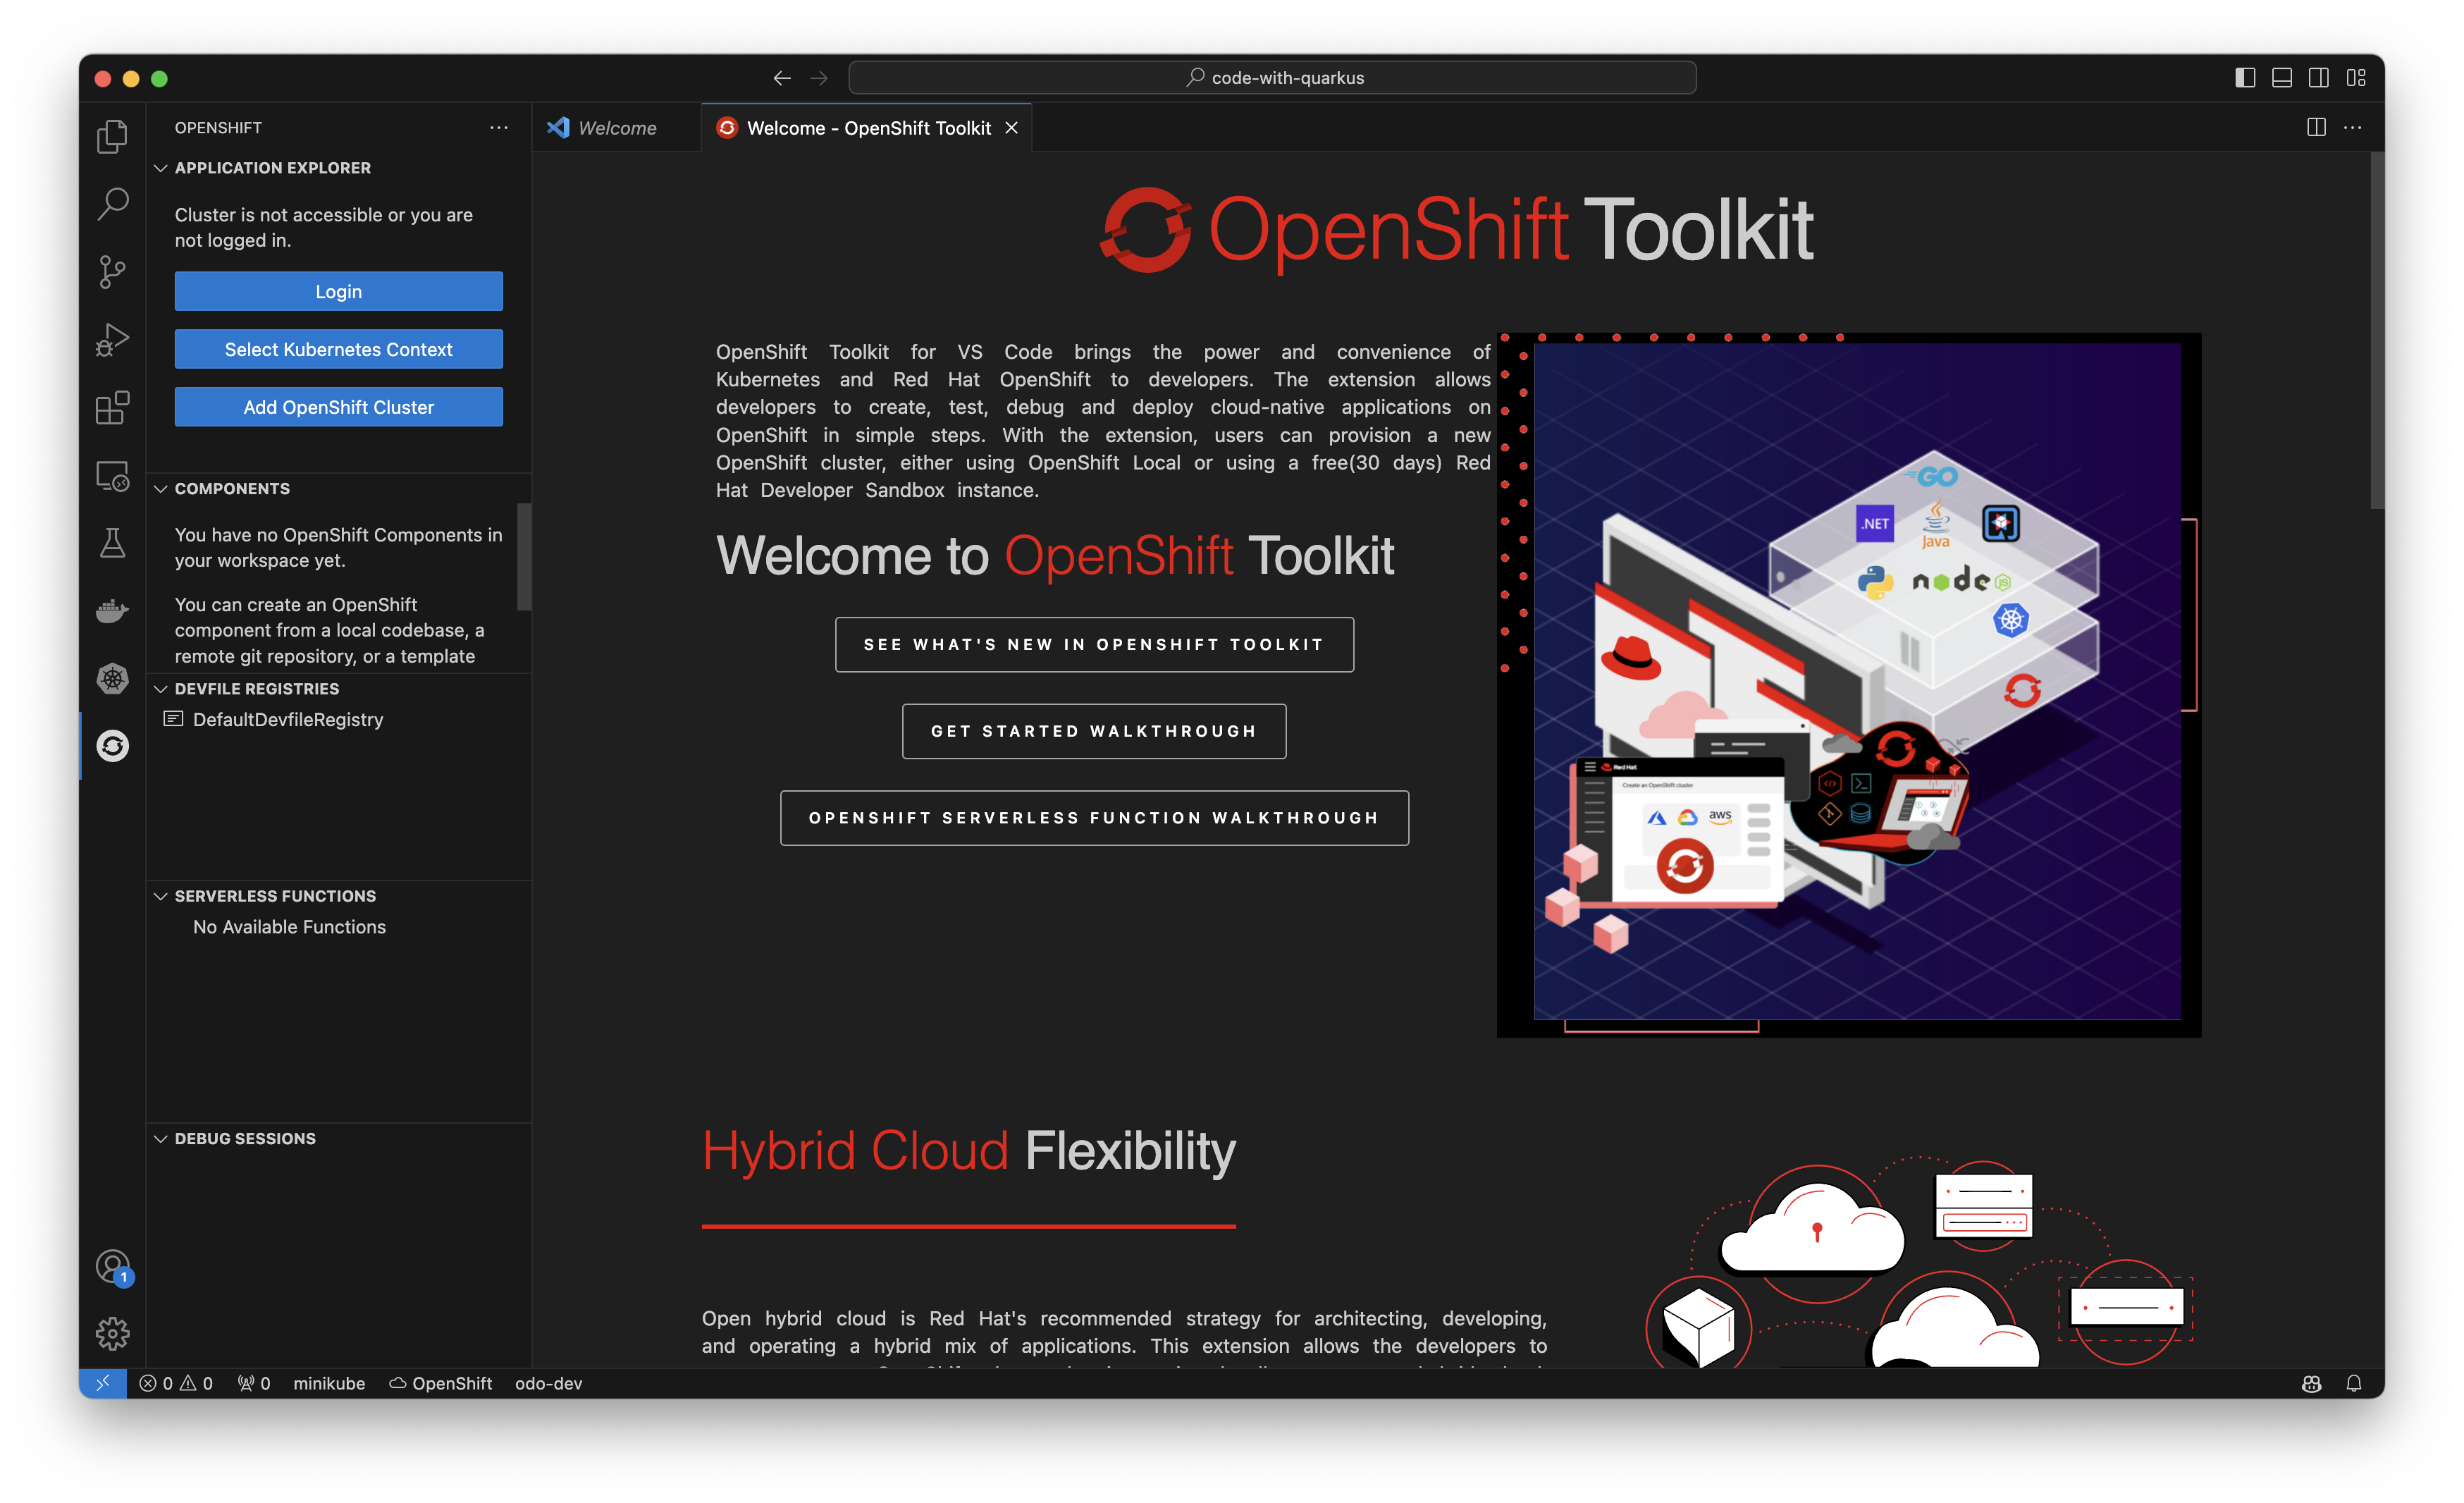
After installing, you will notice a new OpenShift logo in your IDE, as well as a new welcome page open in your IDE, which includes a guided UI workflow for authenticating to your cluster, creating a component, and debugging. The OpenShift Toolkit can help you authenticate to your existing clusters based on your current Kubeconfig, whether it’s your local Minikube cluster for testing or a remote Kubernetes or OpenShift cluster. To get started using a pre-existing cluster, use the interactive menu in the top-left corner of the toolkit to authenticate your credentials (Figure 3).
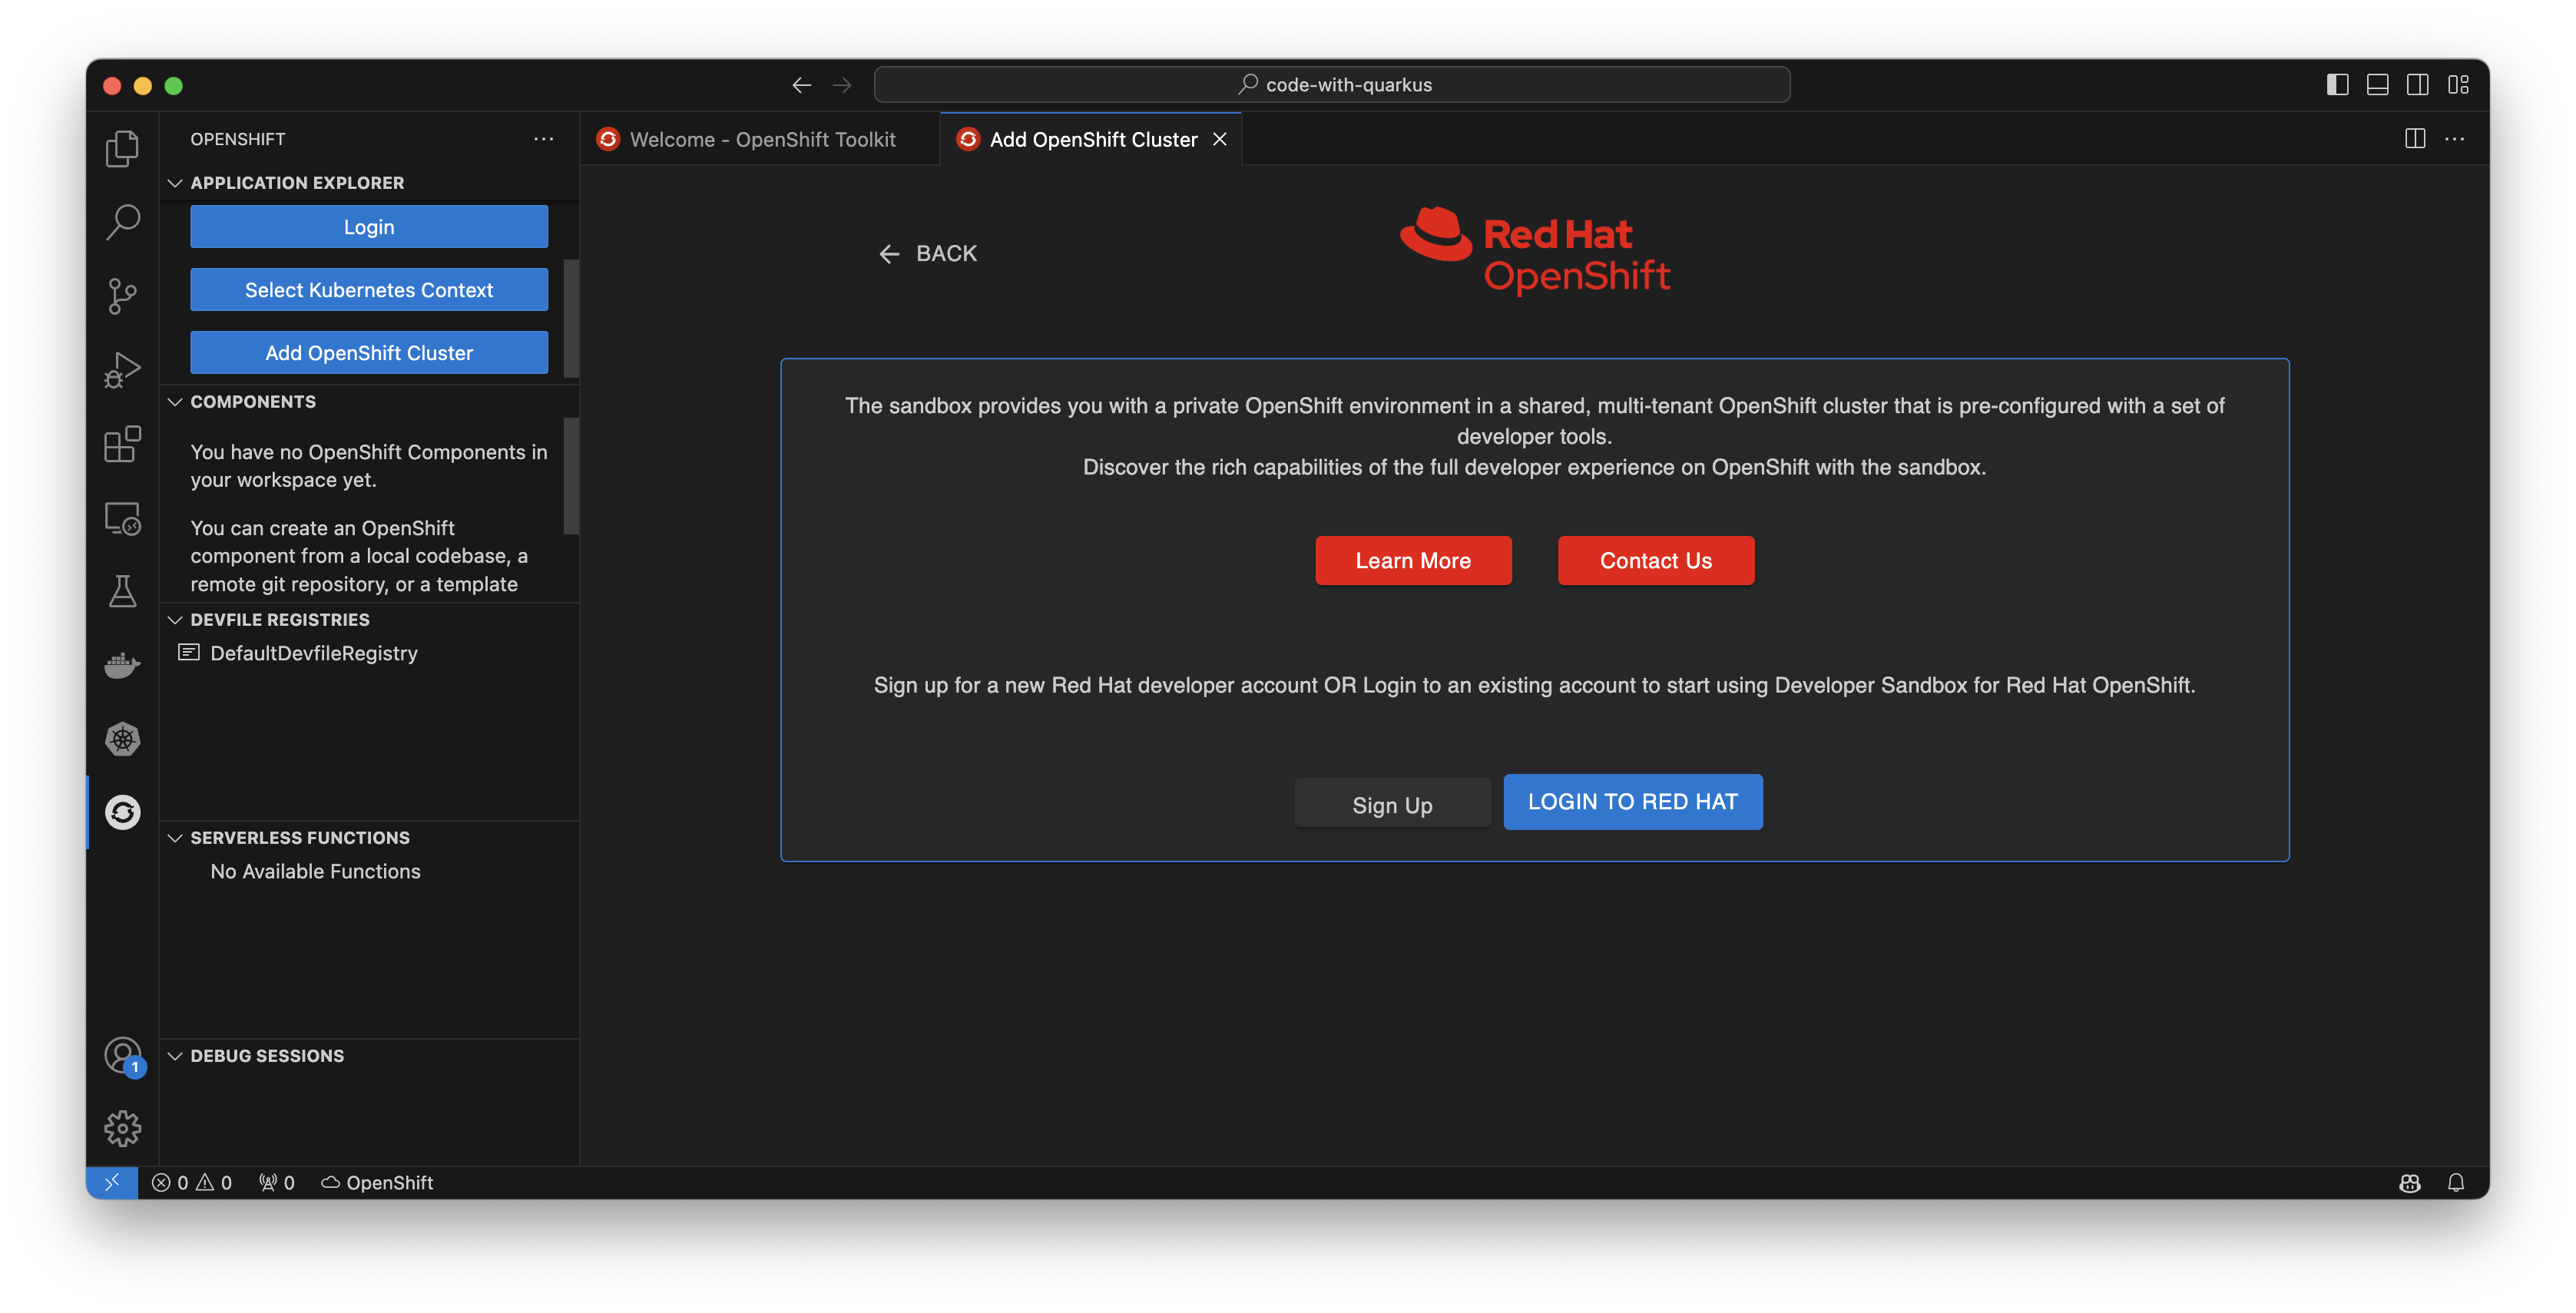
Add an OpenShift cluster
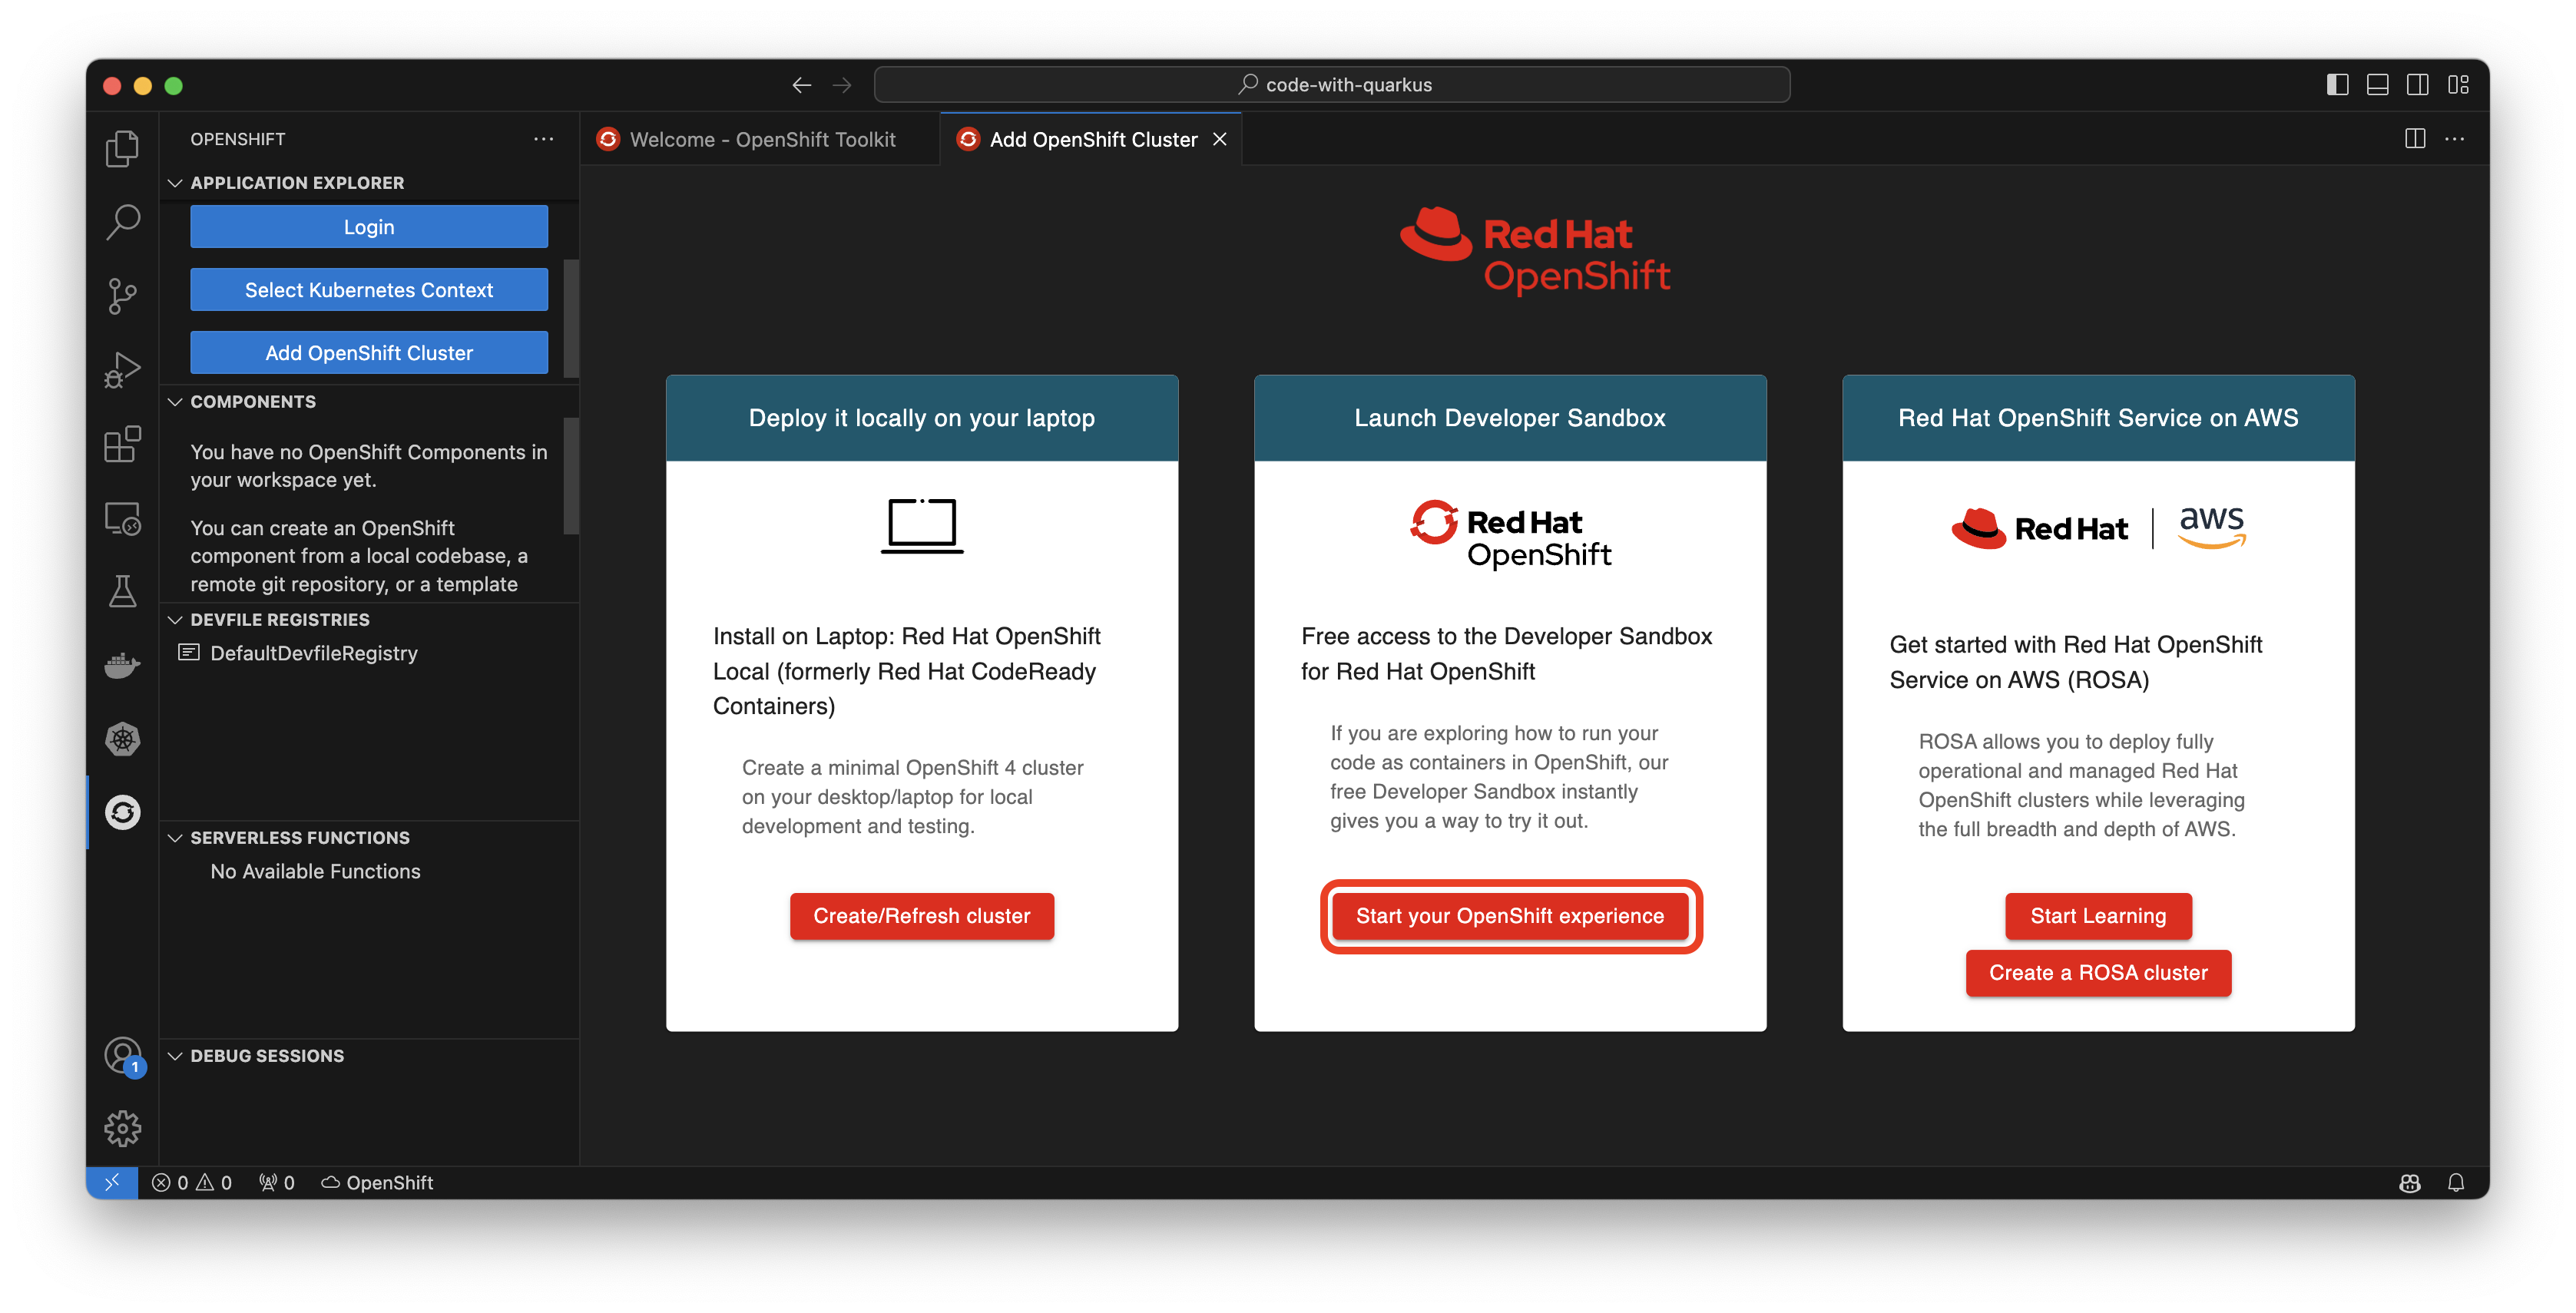
Don’t already have a Kubernetes cluster to use? Feel free to try the Developer Sandbox for Red Hat OpenShift, a no-cost, in-browser experience for building and deploying cloud-native applications. Within the toolkit’s application explorer or Get Started menu, you can select Add OpenShift Cluster to be brought to a menu containing multiple ways to deploy your applications on OpenShift, either locally with Red Hat OpenShift Local, Red Hat OpenShift Service on AWS (ROSA), or the Developer Sandbox which we’ll be using by selecting Start your OpenShift experience (Figure 4).
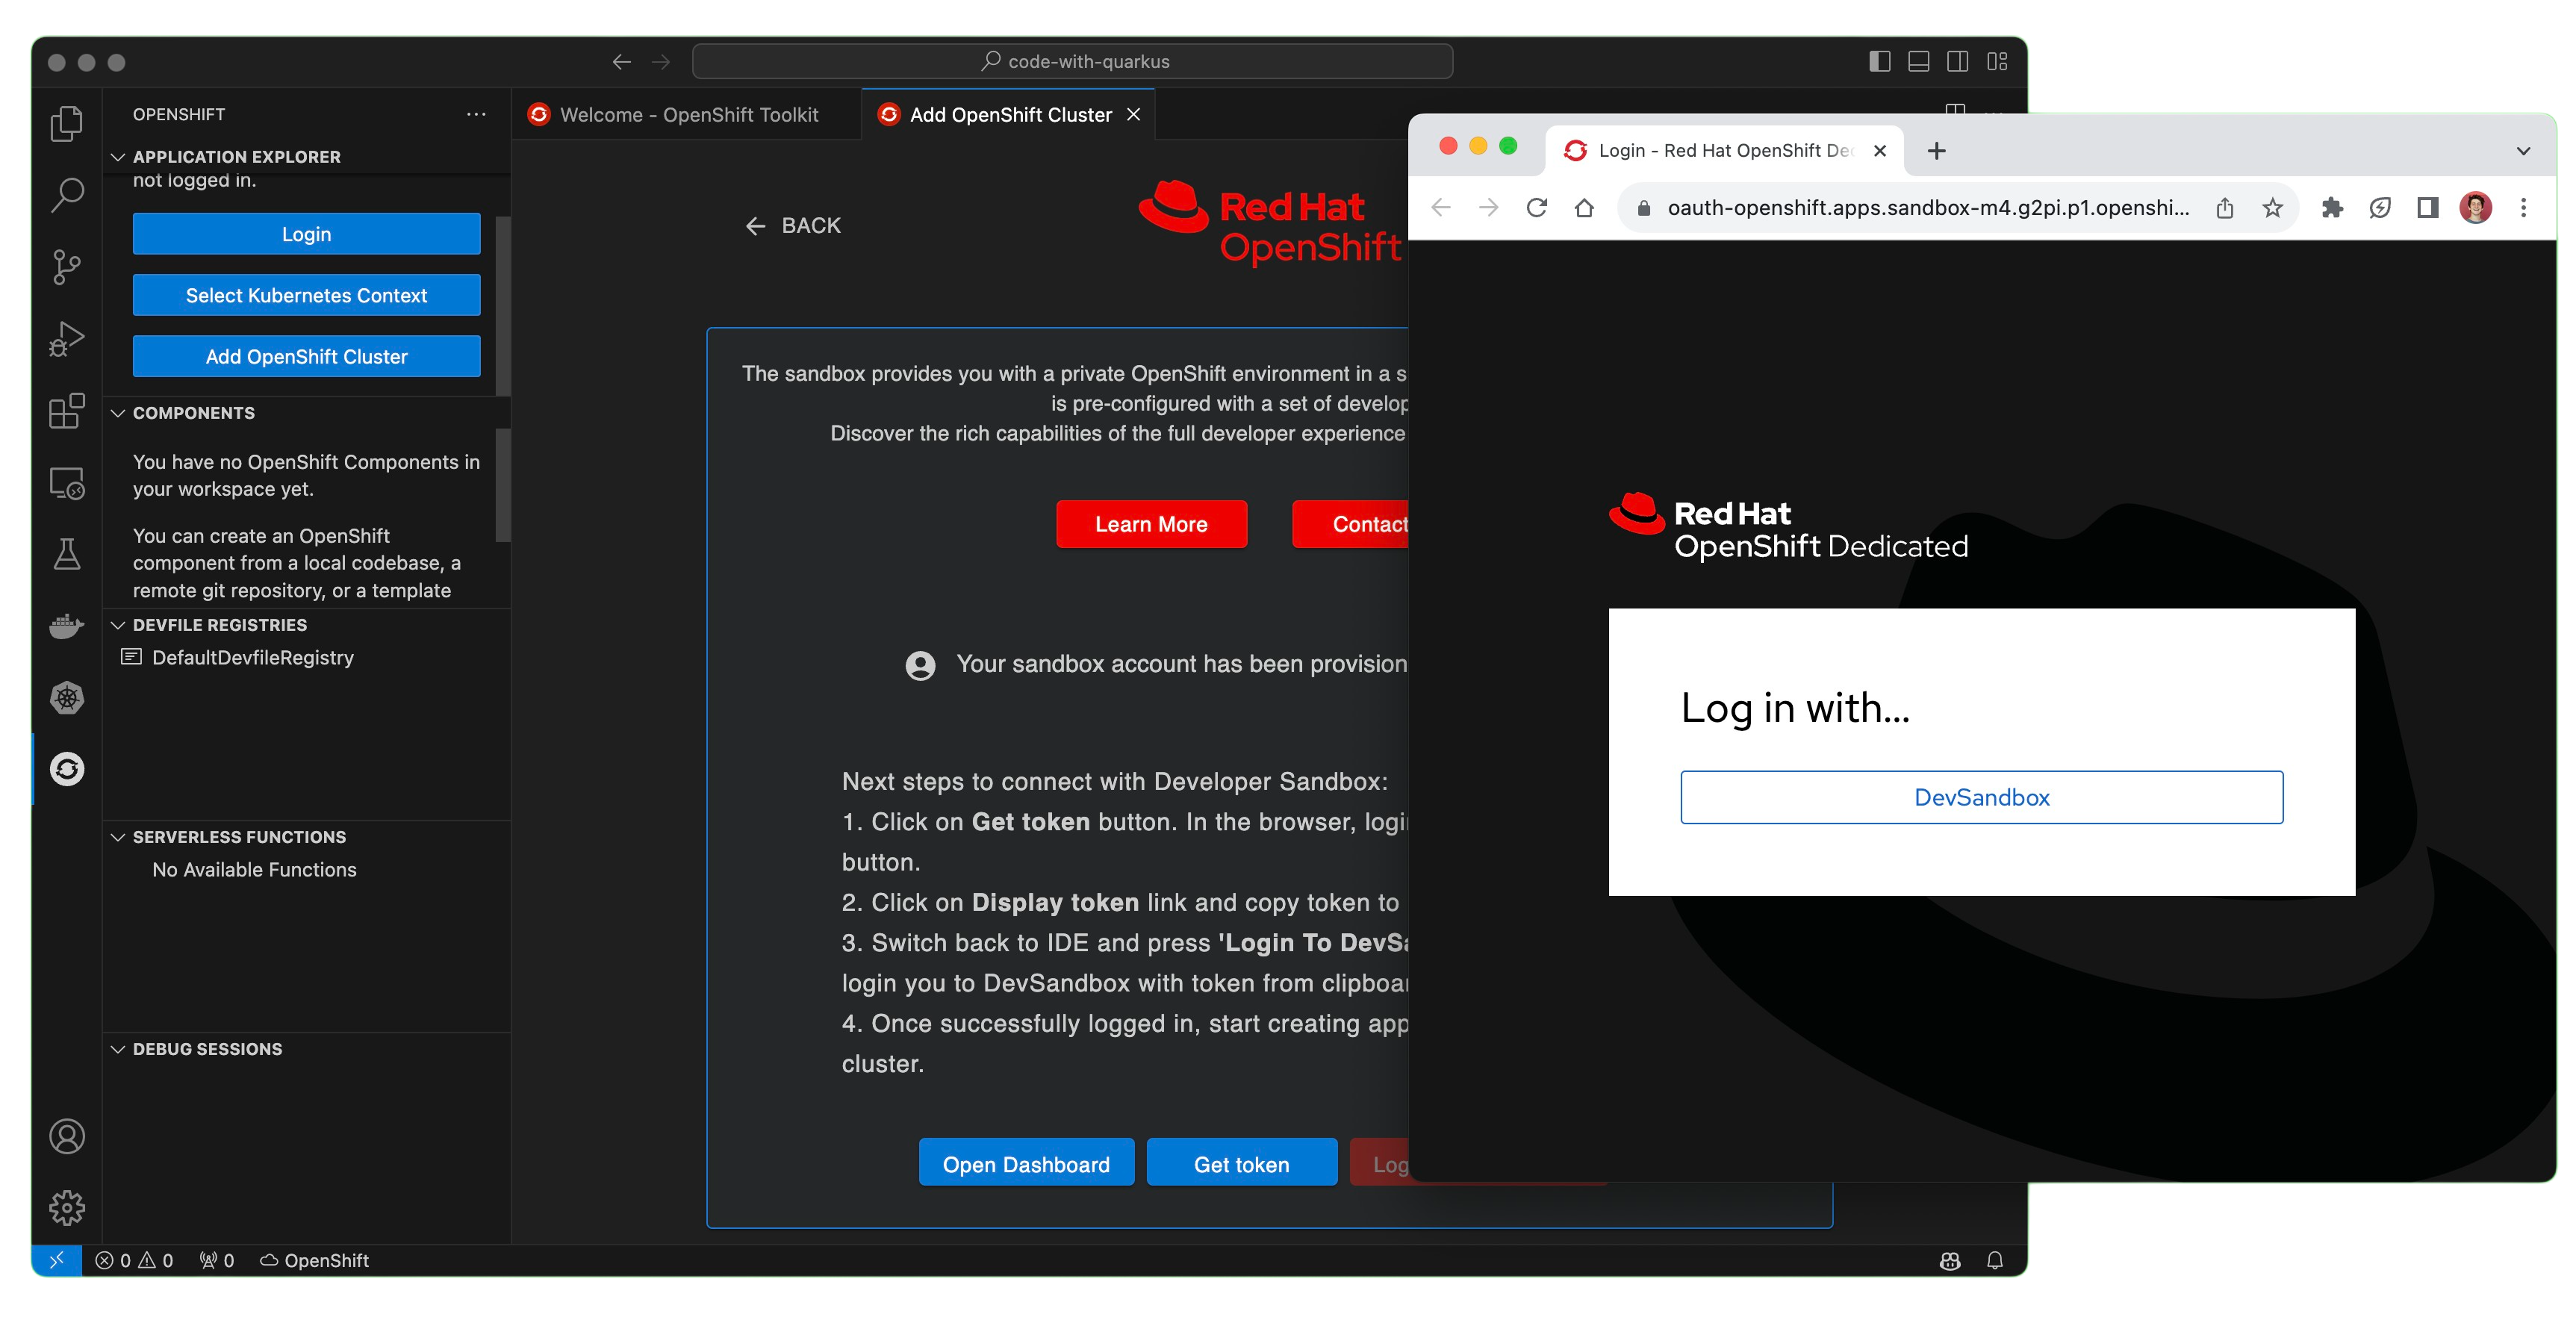
Now, select Login to Red Hat to log in with your Red Hat account and get free, 30-day access to the Developer Sandbox. This will include signing in via Red Hat SSO on your web browser and authenticating your account via text message (Figure 5).
With the Developer Sandbox for Red Hat OpenShift now provisioned and ready, we can deploy an example application directly from the OpenShift Toolkit. The final step to connect to the OpenShift cluster is copying the login token from the OpenShift Web Console from the Get token button, where you can copy the uppermost authentication token from your browser and use the Log in with DevSandbox button to finish the process (Figure 6). From here, the Developer Sandbox has been added to your system’s Kubeconfig like any Kubernetes cluster, and we can continue exploring what the OpenShift Toolkit has to offer.
Using the OpenShift Toolkit
In order to run your existing and new projects on Kubernetes and OpenShift using the OpenShift Toolkit extension, as well as take advantage of the vast features for creating, deploying, and debugging your applications, you’ll first need to configure your applications with one or more components. You can think of these similar to microservices, whether it be for projects in local codebases, remote Git repositories, and created in Java, Node.js, Python, etc. Let’s take a look at how we, once authenticated to a cluster, can create an OpenShift component for our containerized application and deploy it.
Setting up and deploying a project
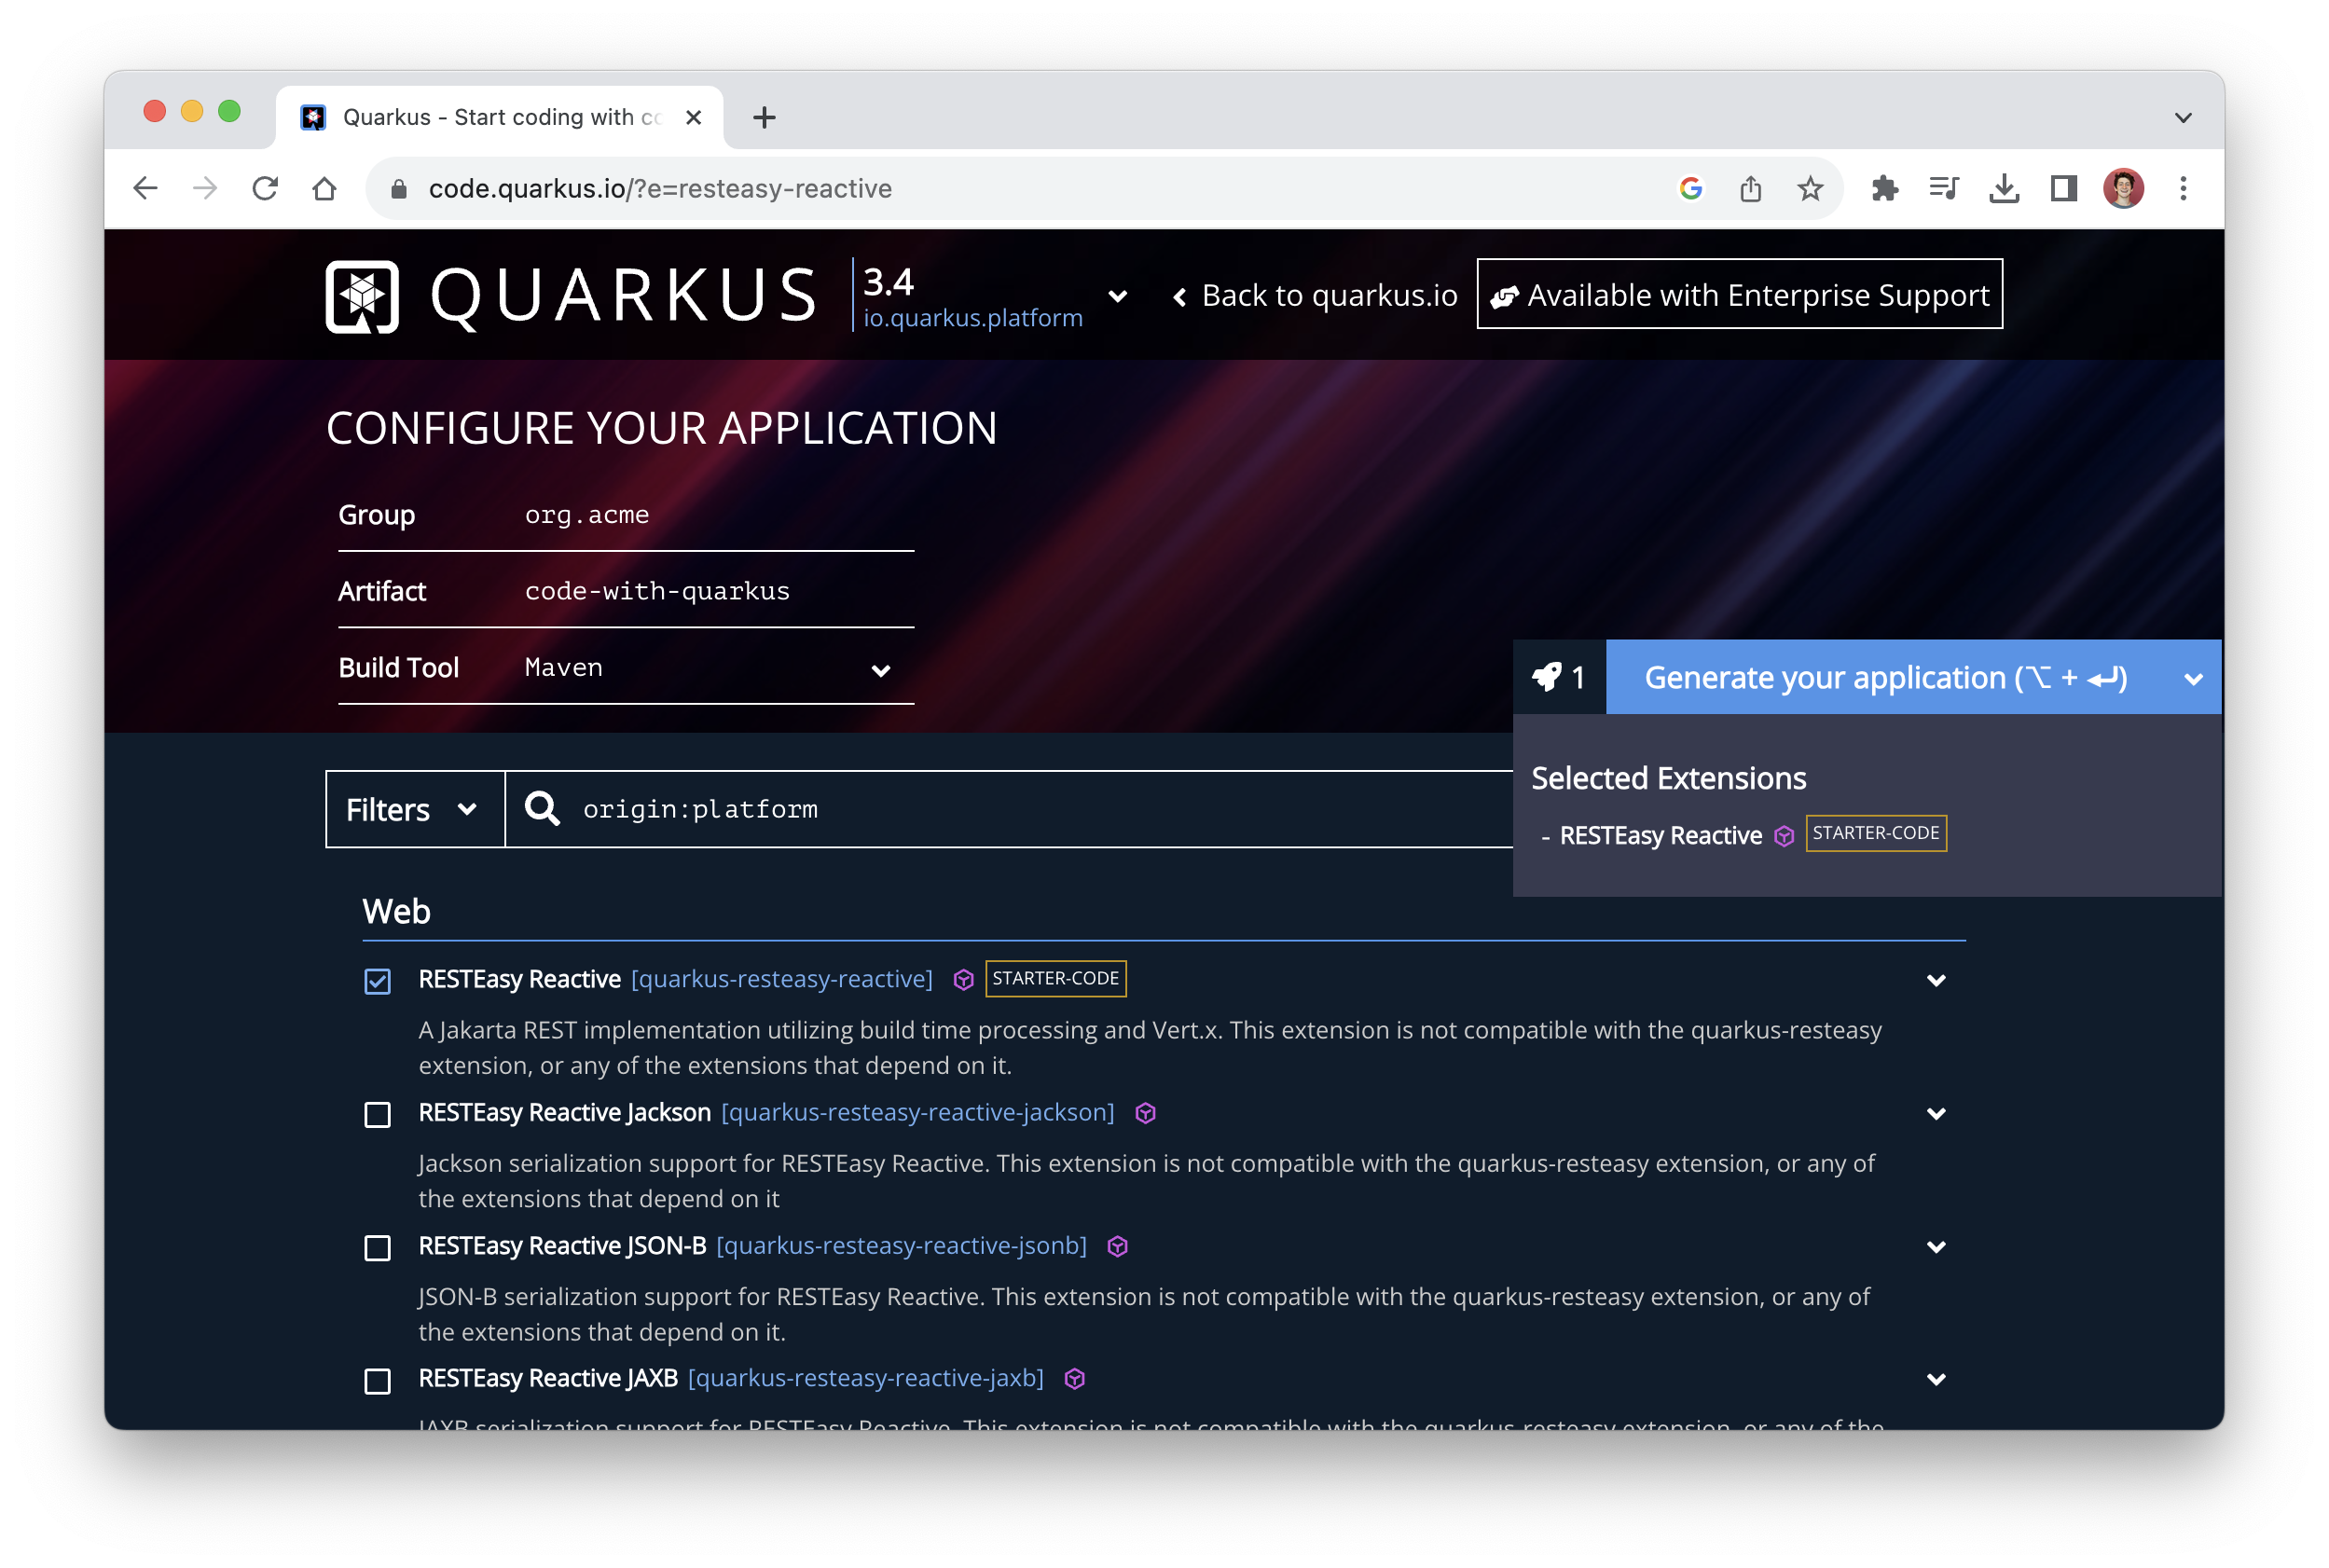
While you may already have an application you’d like to use, let’s start with an example project containing some source code using the container-first Java framework, Quarkus. By visiting the Quarkus quickstart page, we can quickly generate a project that includes a RESTful endpoint. Make sure to select the Generate your application button on the right-hand side to download a.zip file containing the project (Figure 7).
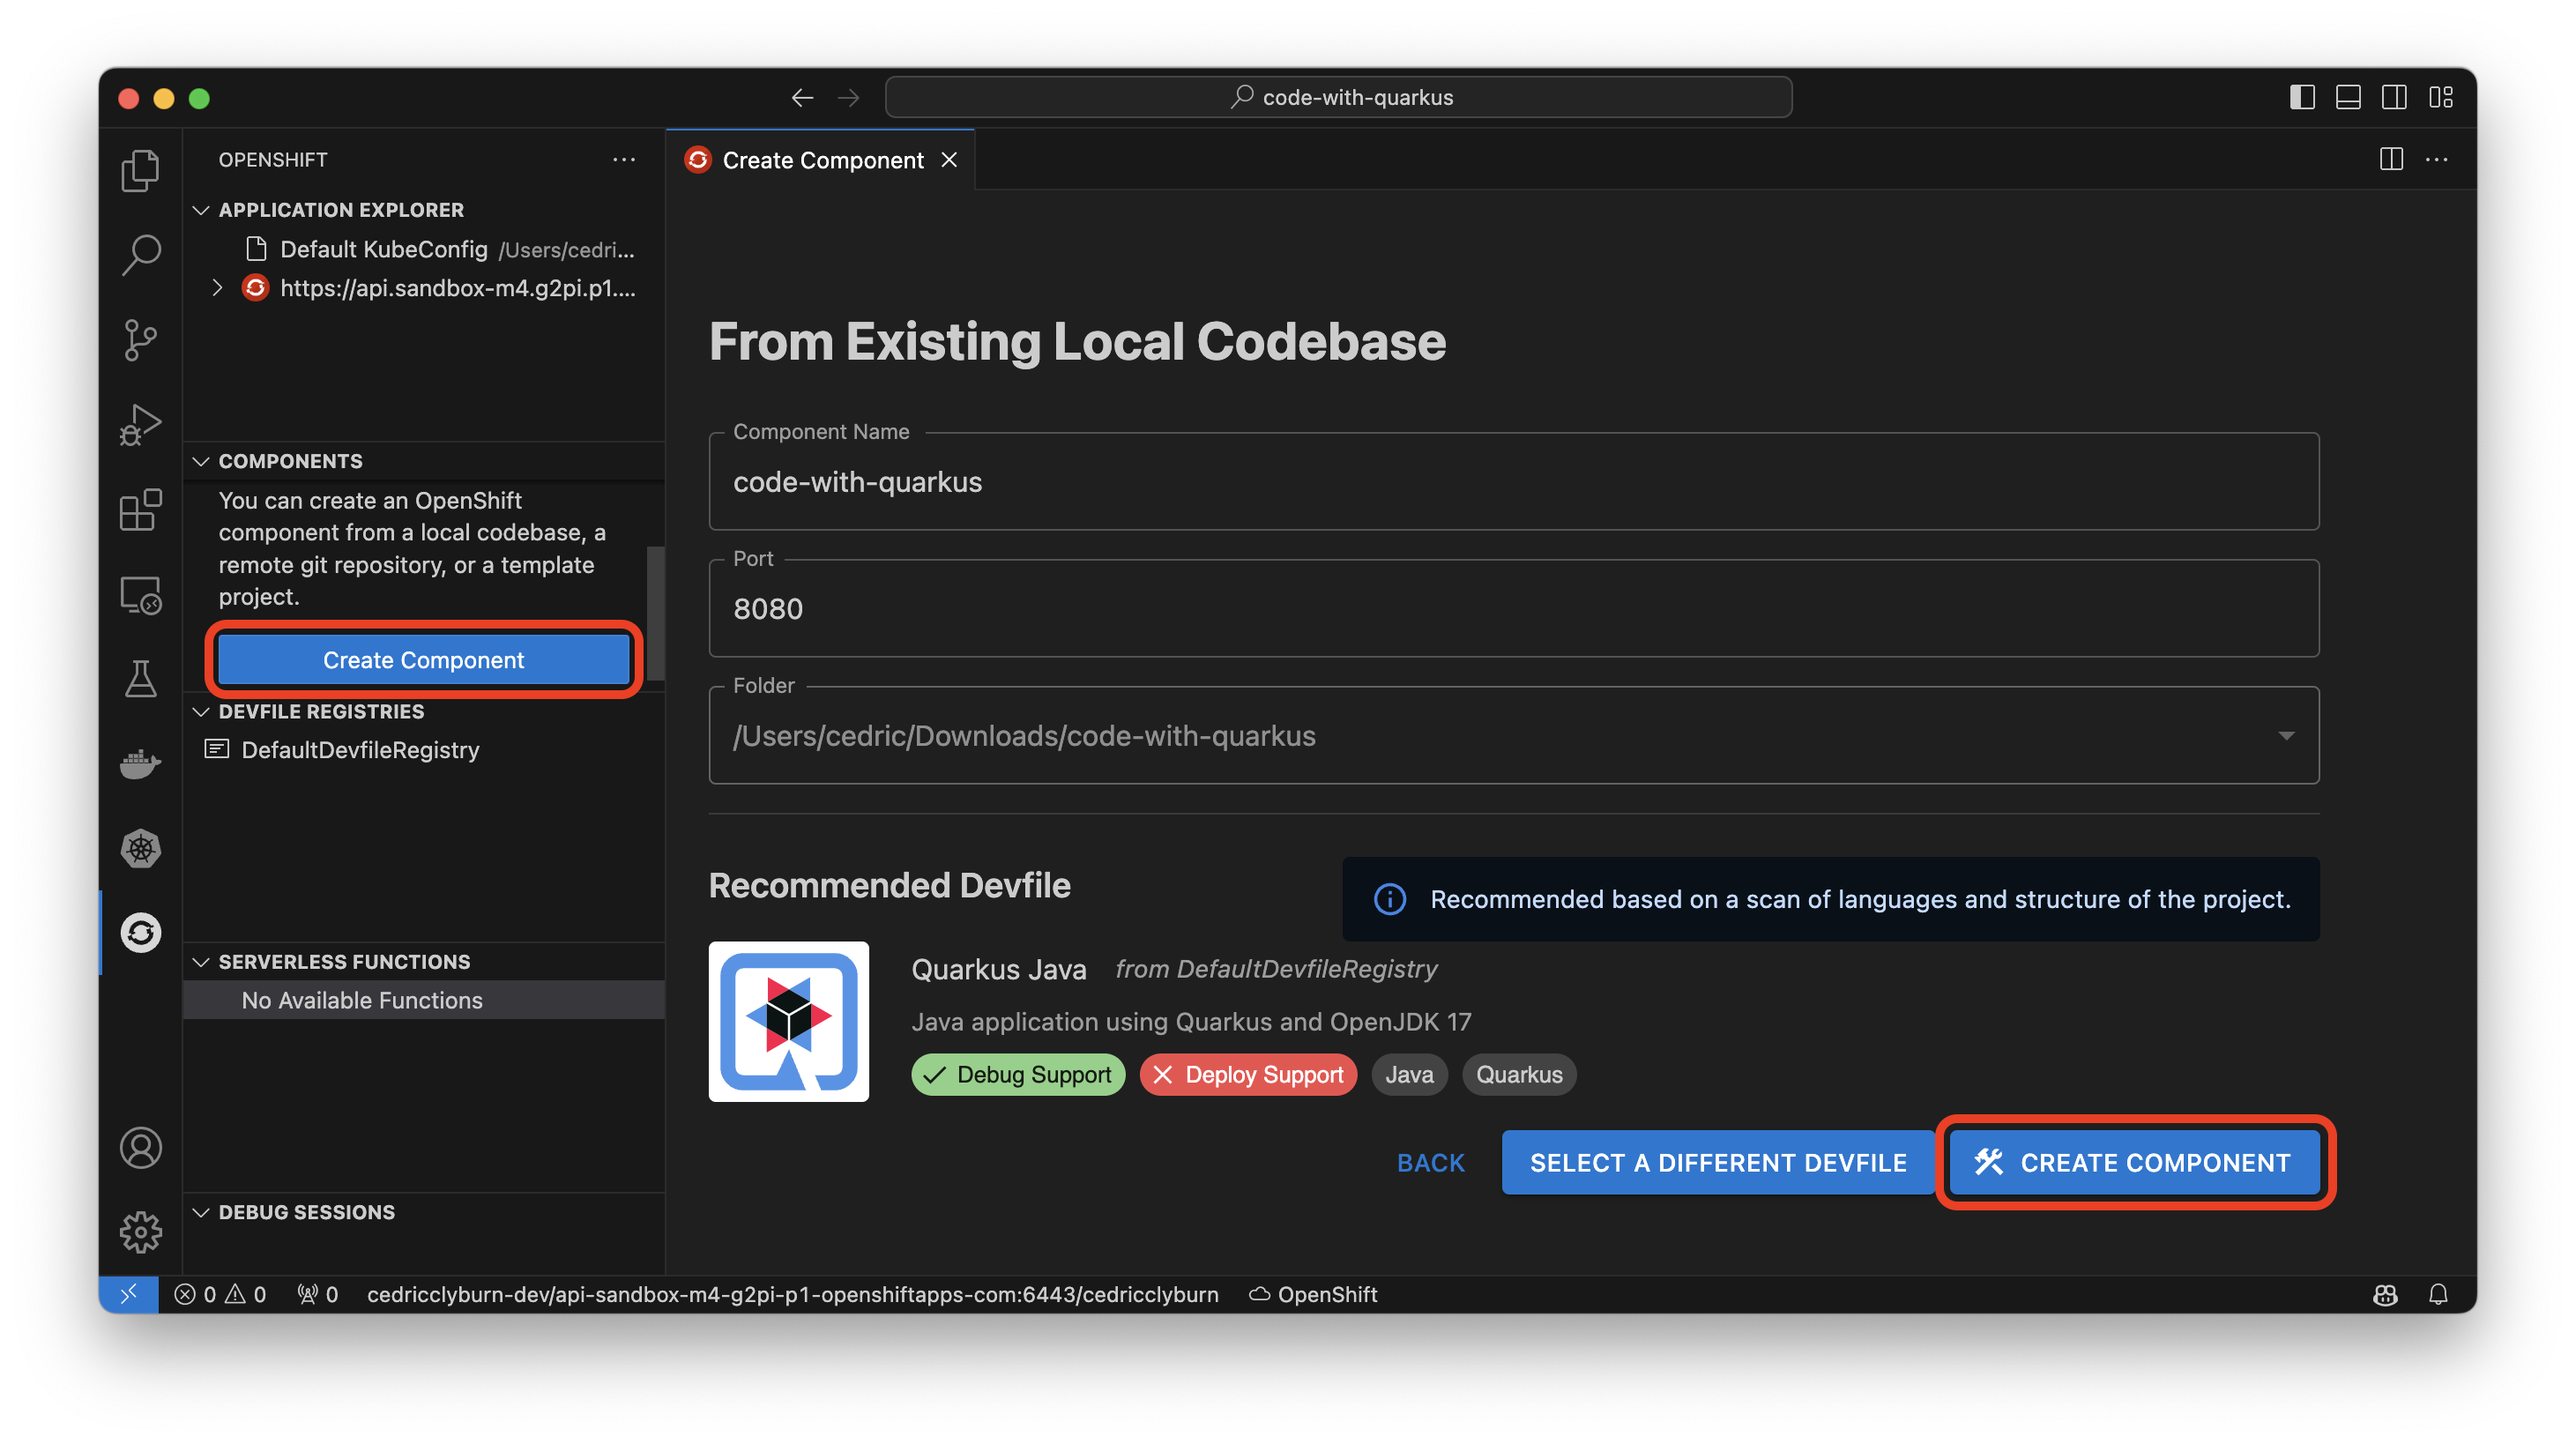
From here, let’s head to the Create Component section of the OpenShift Toolkit extension in your IDE and view the variety of options available to configure our existing project for OpenShift or Kubernetes. The magic happens using a Devfile, which contains YAML that defines your project and it’s parameters for deployment on Kubernetes & OpenShift (and is also used in open-source projects like OpenShift Dev Spaces and odo). Let’s select From Existing Local Codebase, and navigate to our downloaded Quarkus project (Figure 8). With the code-with-quarkus folder selected, hit Next to allow the Toolkit to auto-detect the Devfile and application structure, and you’re ready to hit the Create Component button.
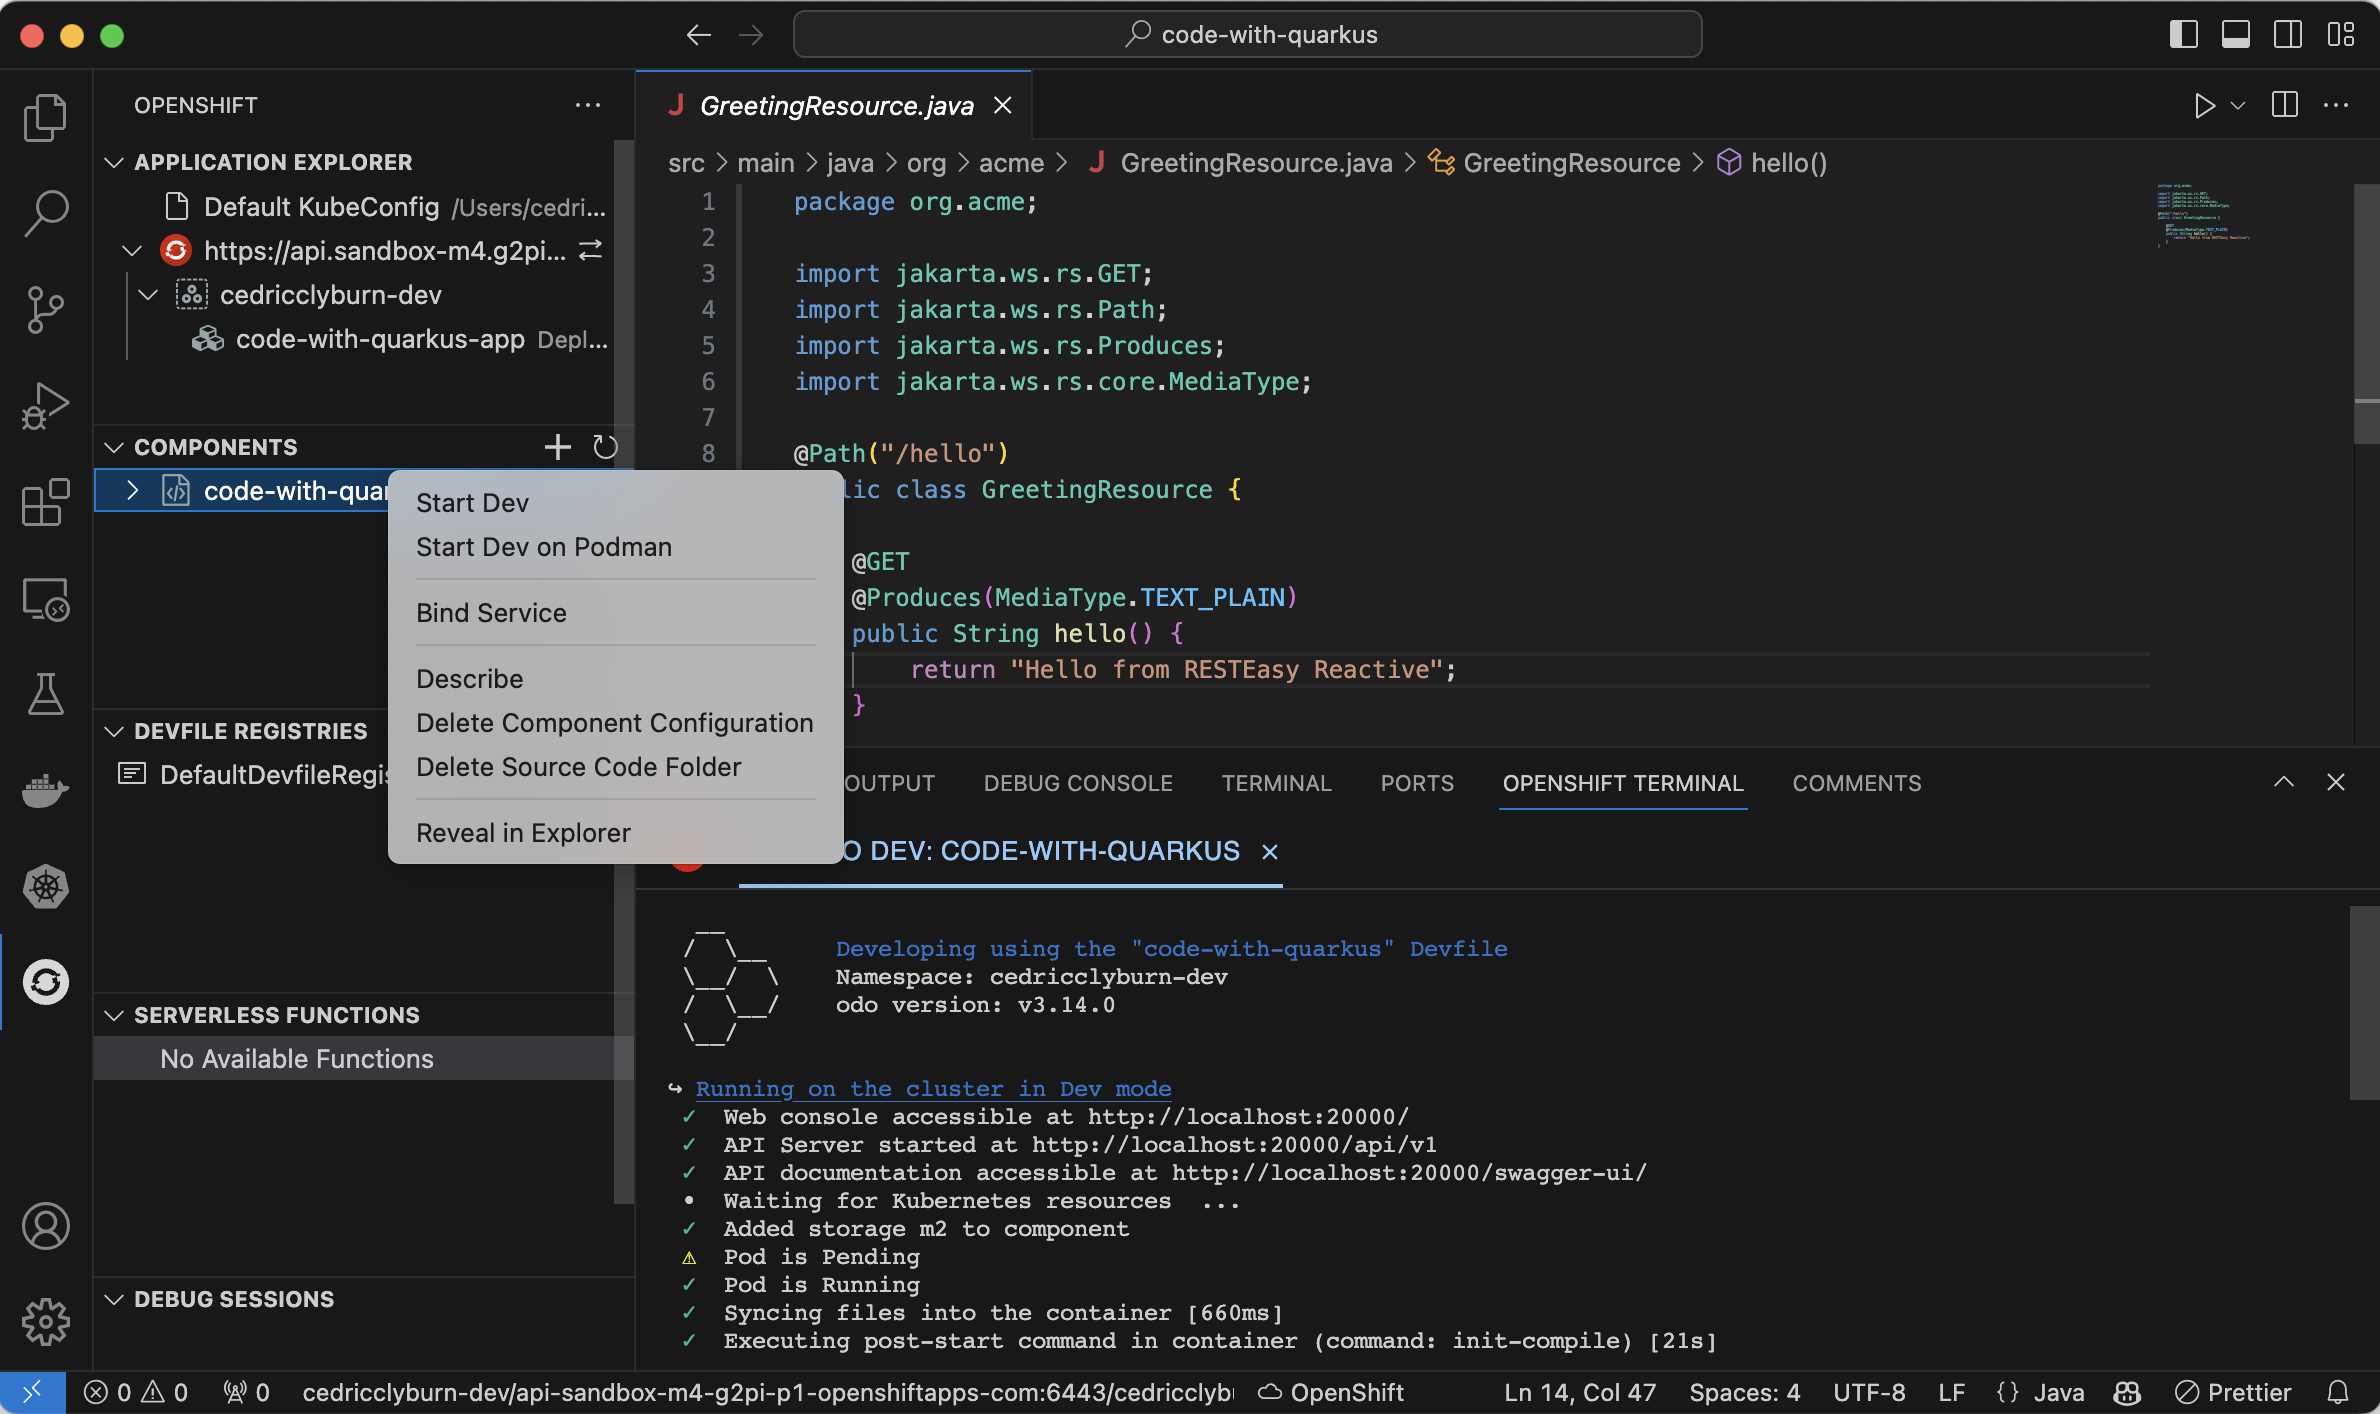
With your project now set up to be run and debugged on Kubernetes & OpenShift (you’ll notice a /.odo/config.yaml configuration file now in your project folder for re-creation and sharing), let’s right-click the code-with-quarkus component in the Components view and select Start Dev to deploy it directly on our Developer Sandbox for Red Hat OpenShift cluster (Figure 9). You’ll notice the option for also deploying it to Podman as a Pod, if you’d like to test things out locally.
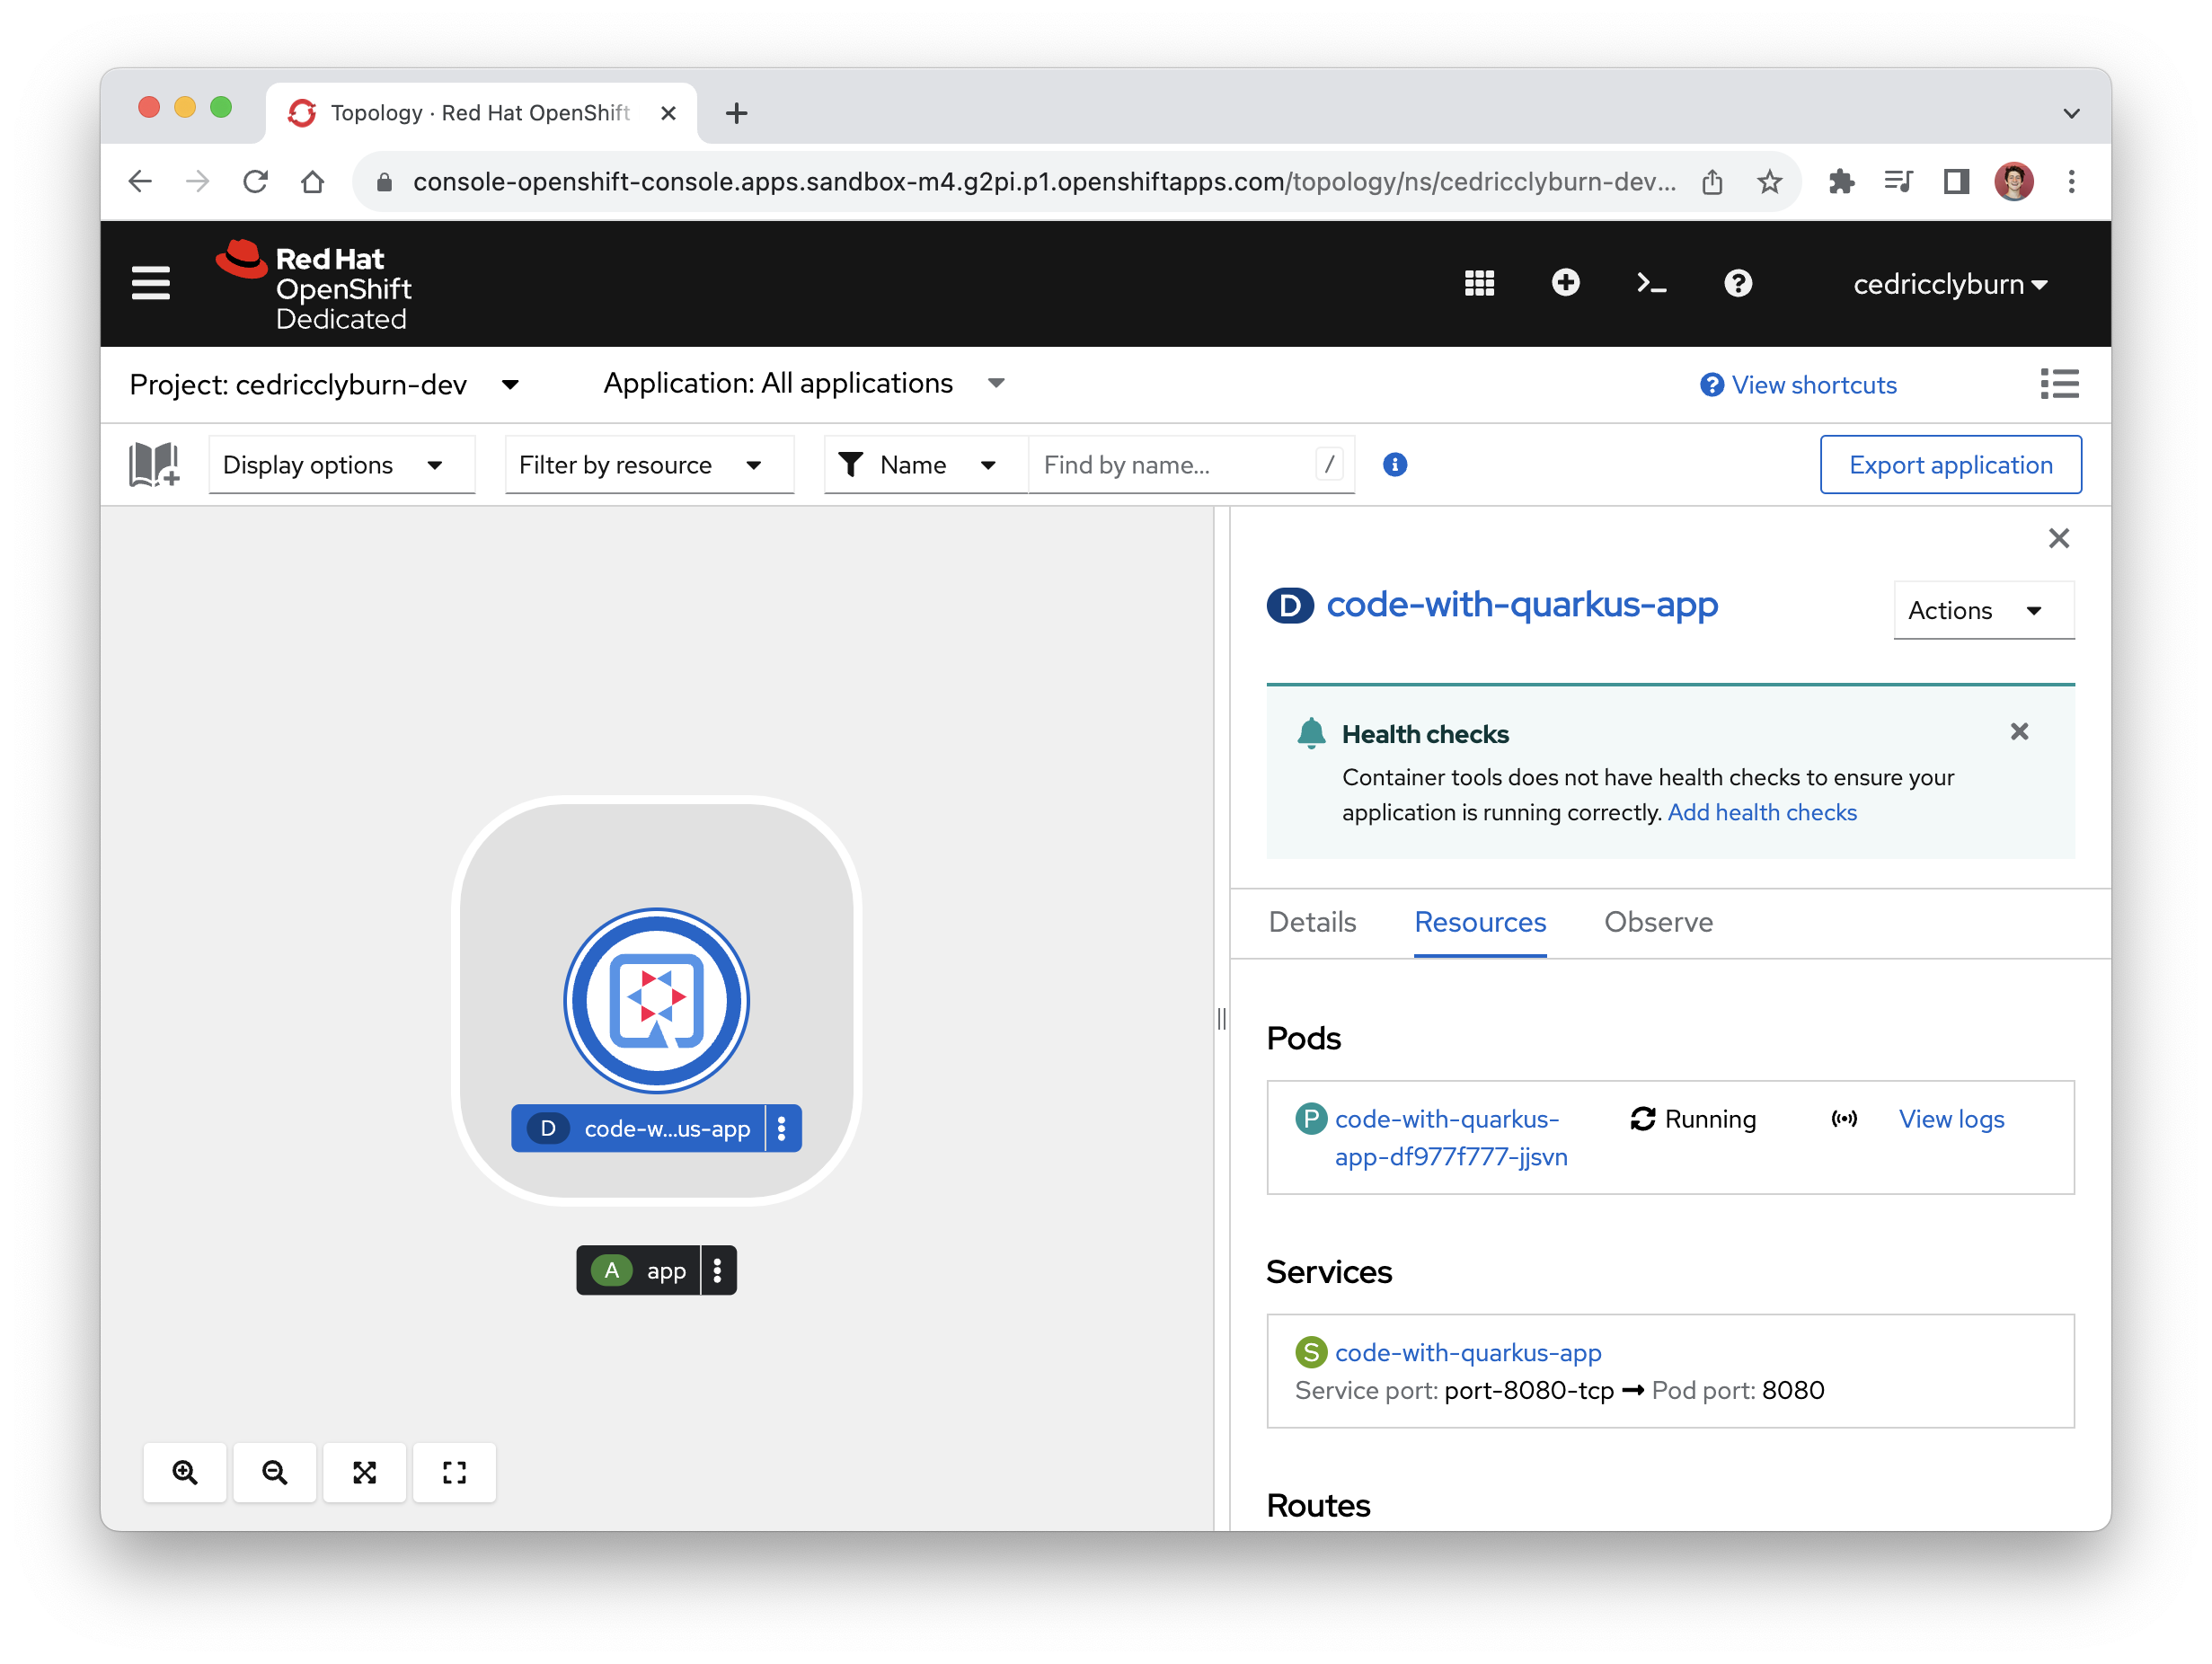
You’ll notice that I’ve also shown the logs for running my application in development already. Now, we can sync all changes happening from our project straight to the cluster. This action is powered by the binary of the odo tool, a CLI container-based development tool for deployment on Kubernetes and OpenShift. While we can view all of the Kubernetes resources directly from the OpenShift Toolkit (as well as YAML manifests and logs for pods, deployments, etc.), we can navigate straight to the OpenShift Web Console from the Application Explorer to view our newly deployed application in OpenShift (Figure 10).
With a cluster provisioned, a component created from a Quarkus project, and development mode enabled, your workload is now running live on the OpenShift cluster, ready to test, build, and deploy our code directly from our IDE.
Developing and debugging a project
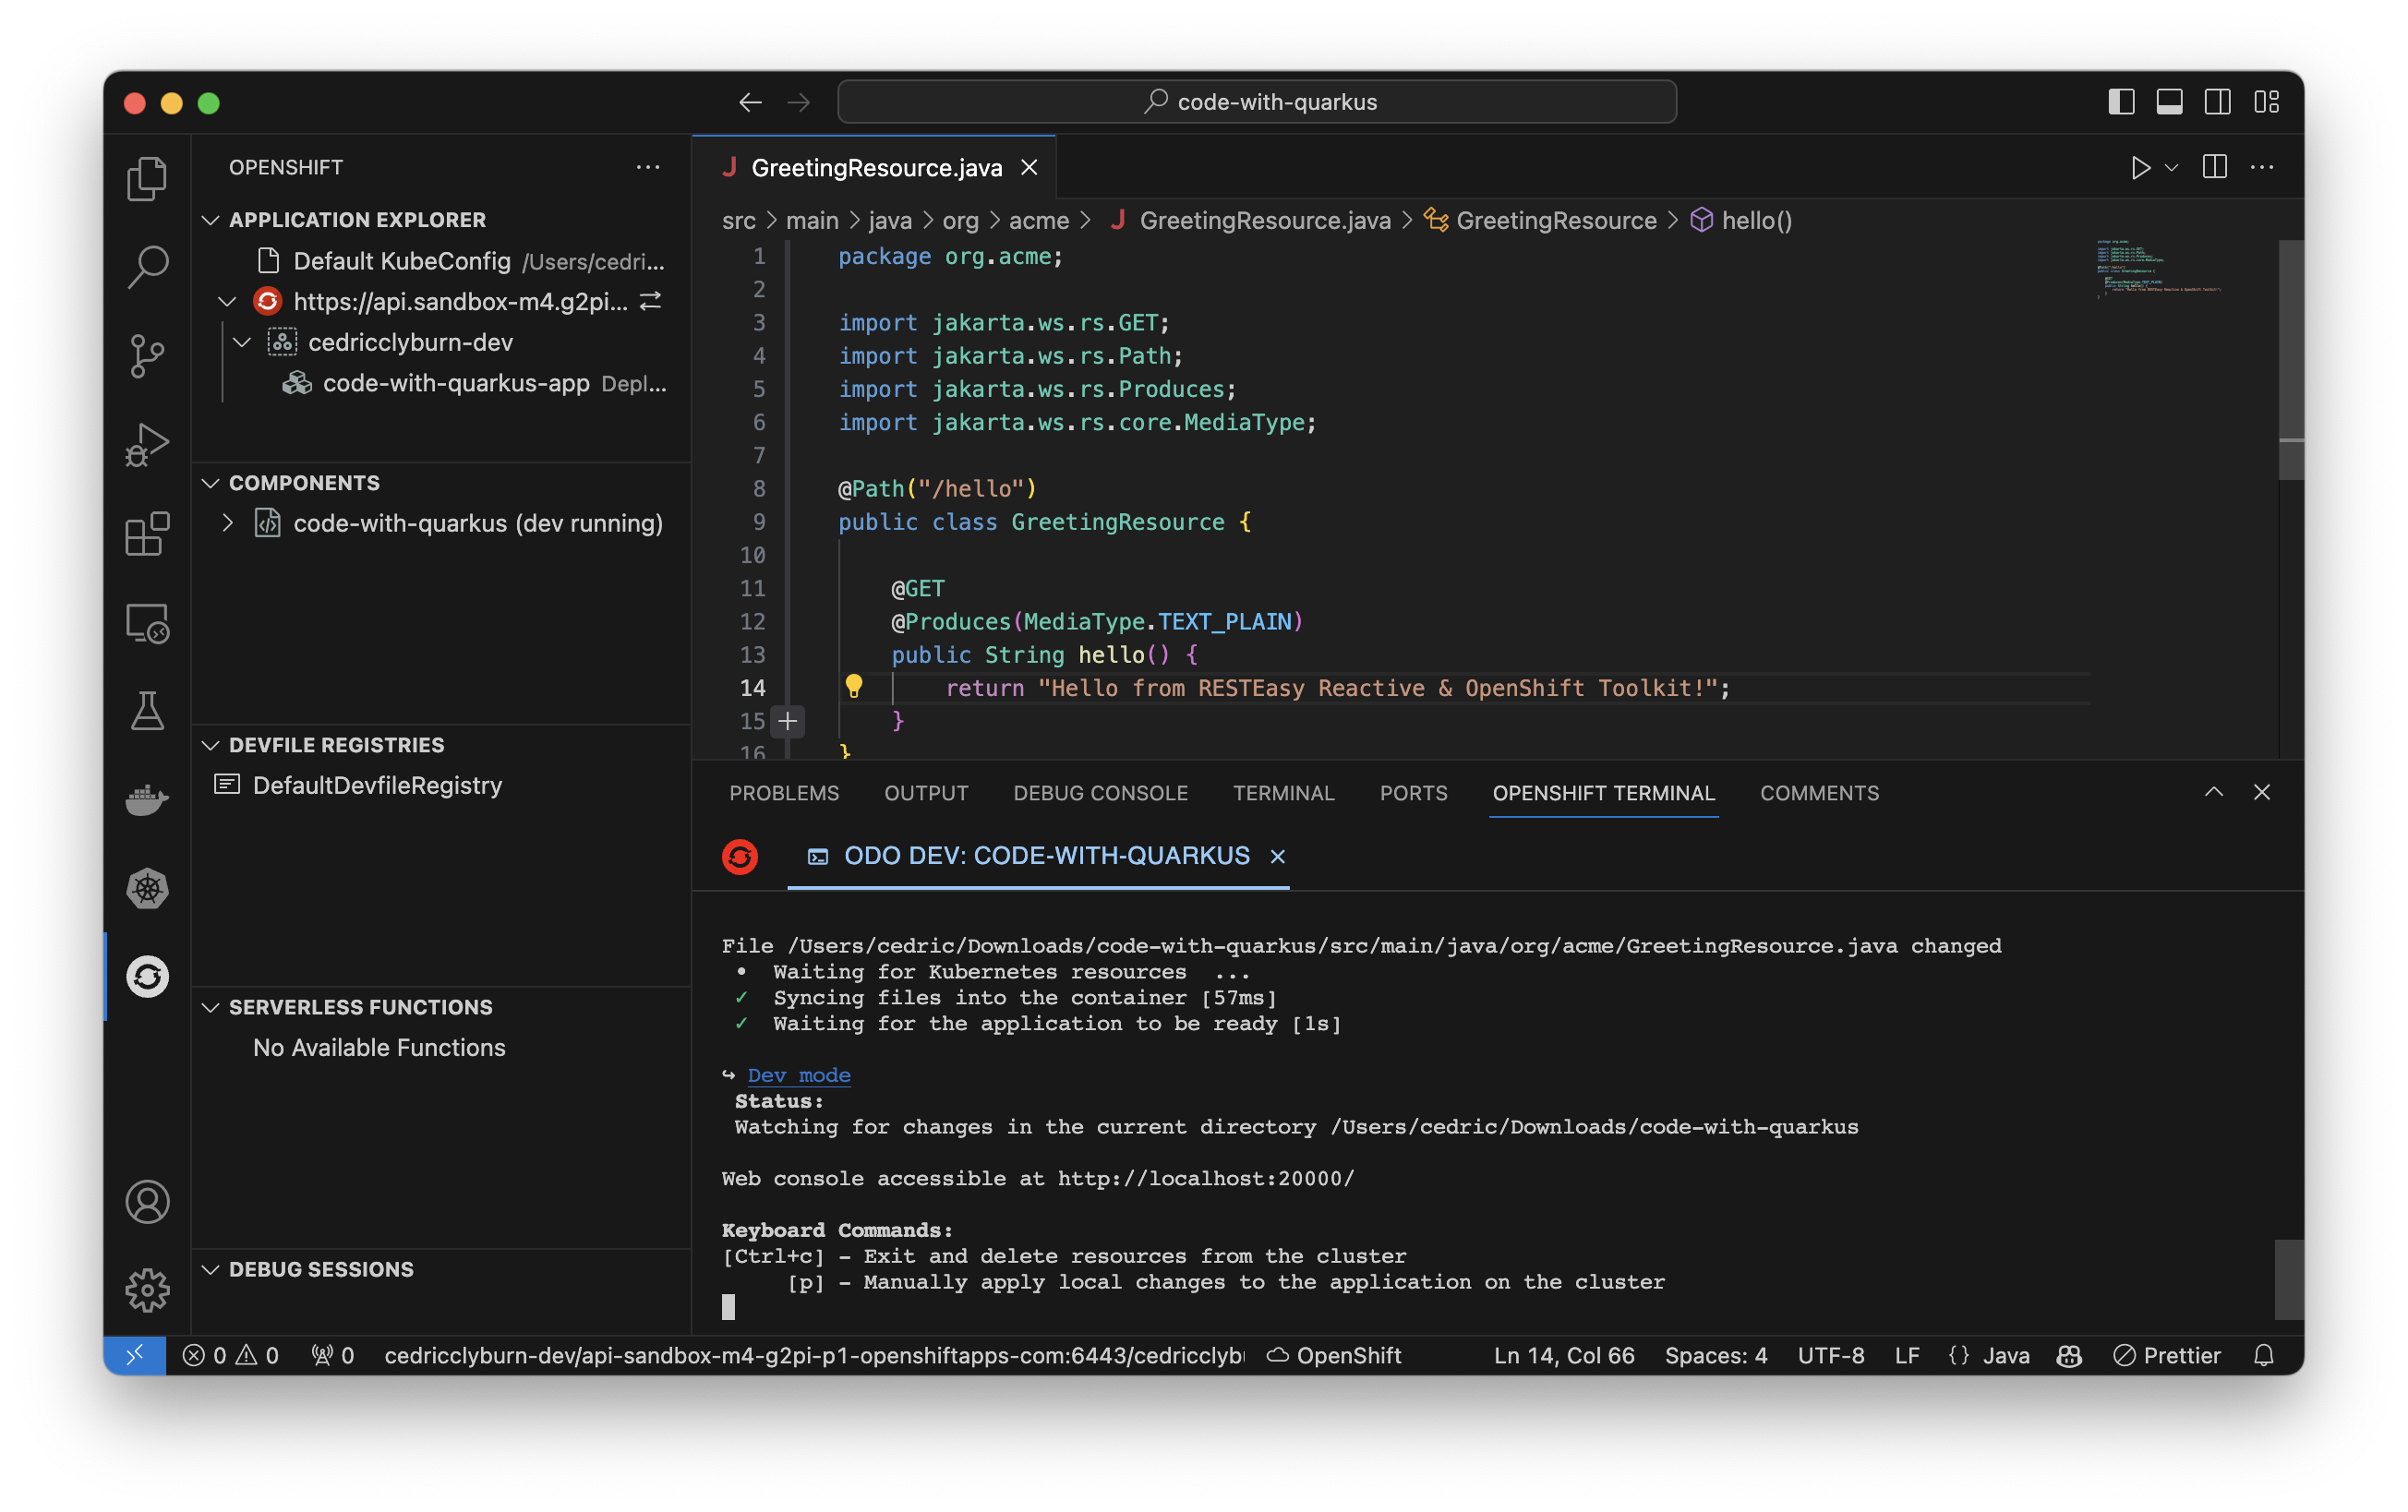
Let’s try making some changes to our existing project in the IDE to visually see the updates built and deployed to our OpenShift cluster. Here, I’m adding an extension to the string returned in our API endpoint, and we can see the changes automatically redeployed to our cluster (Figure 11).
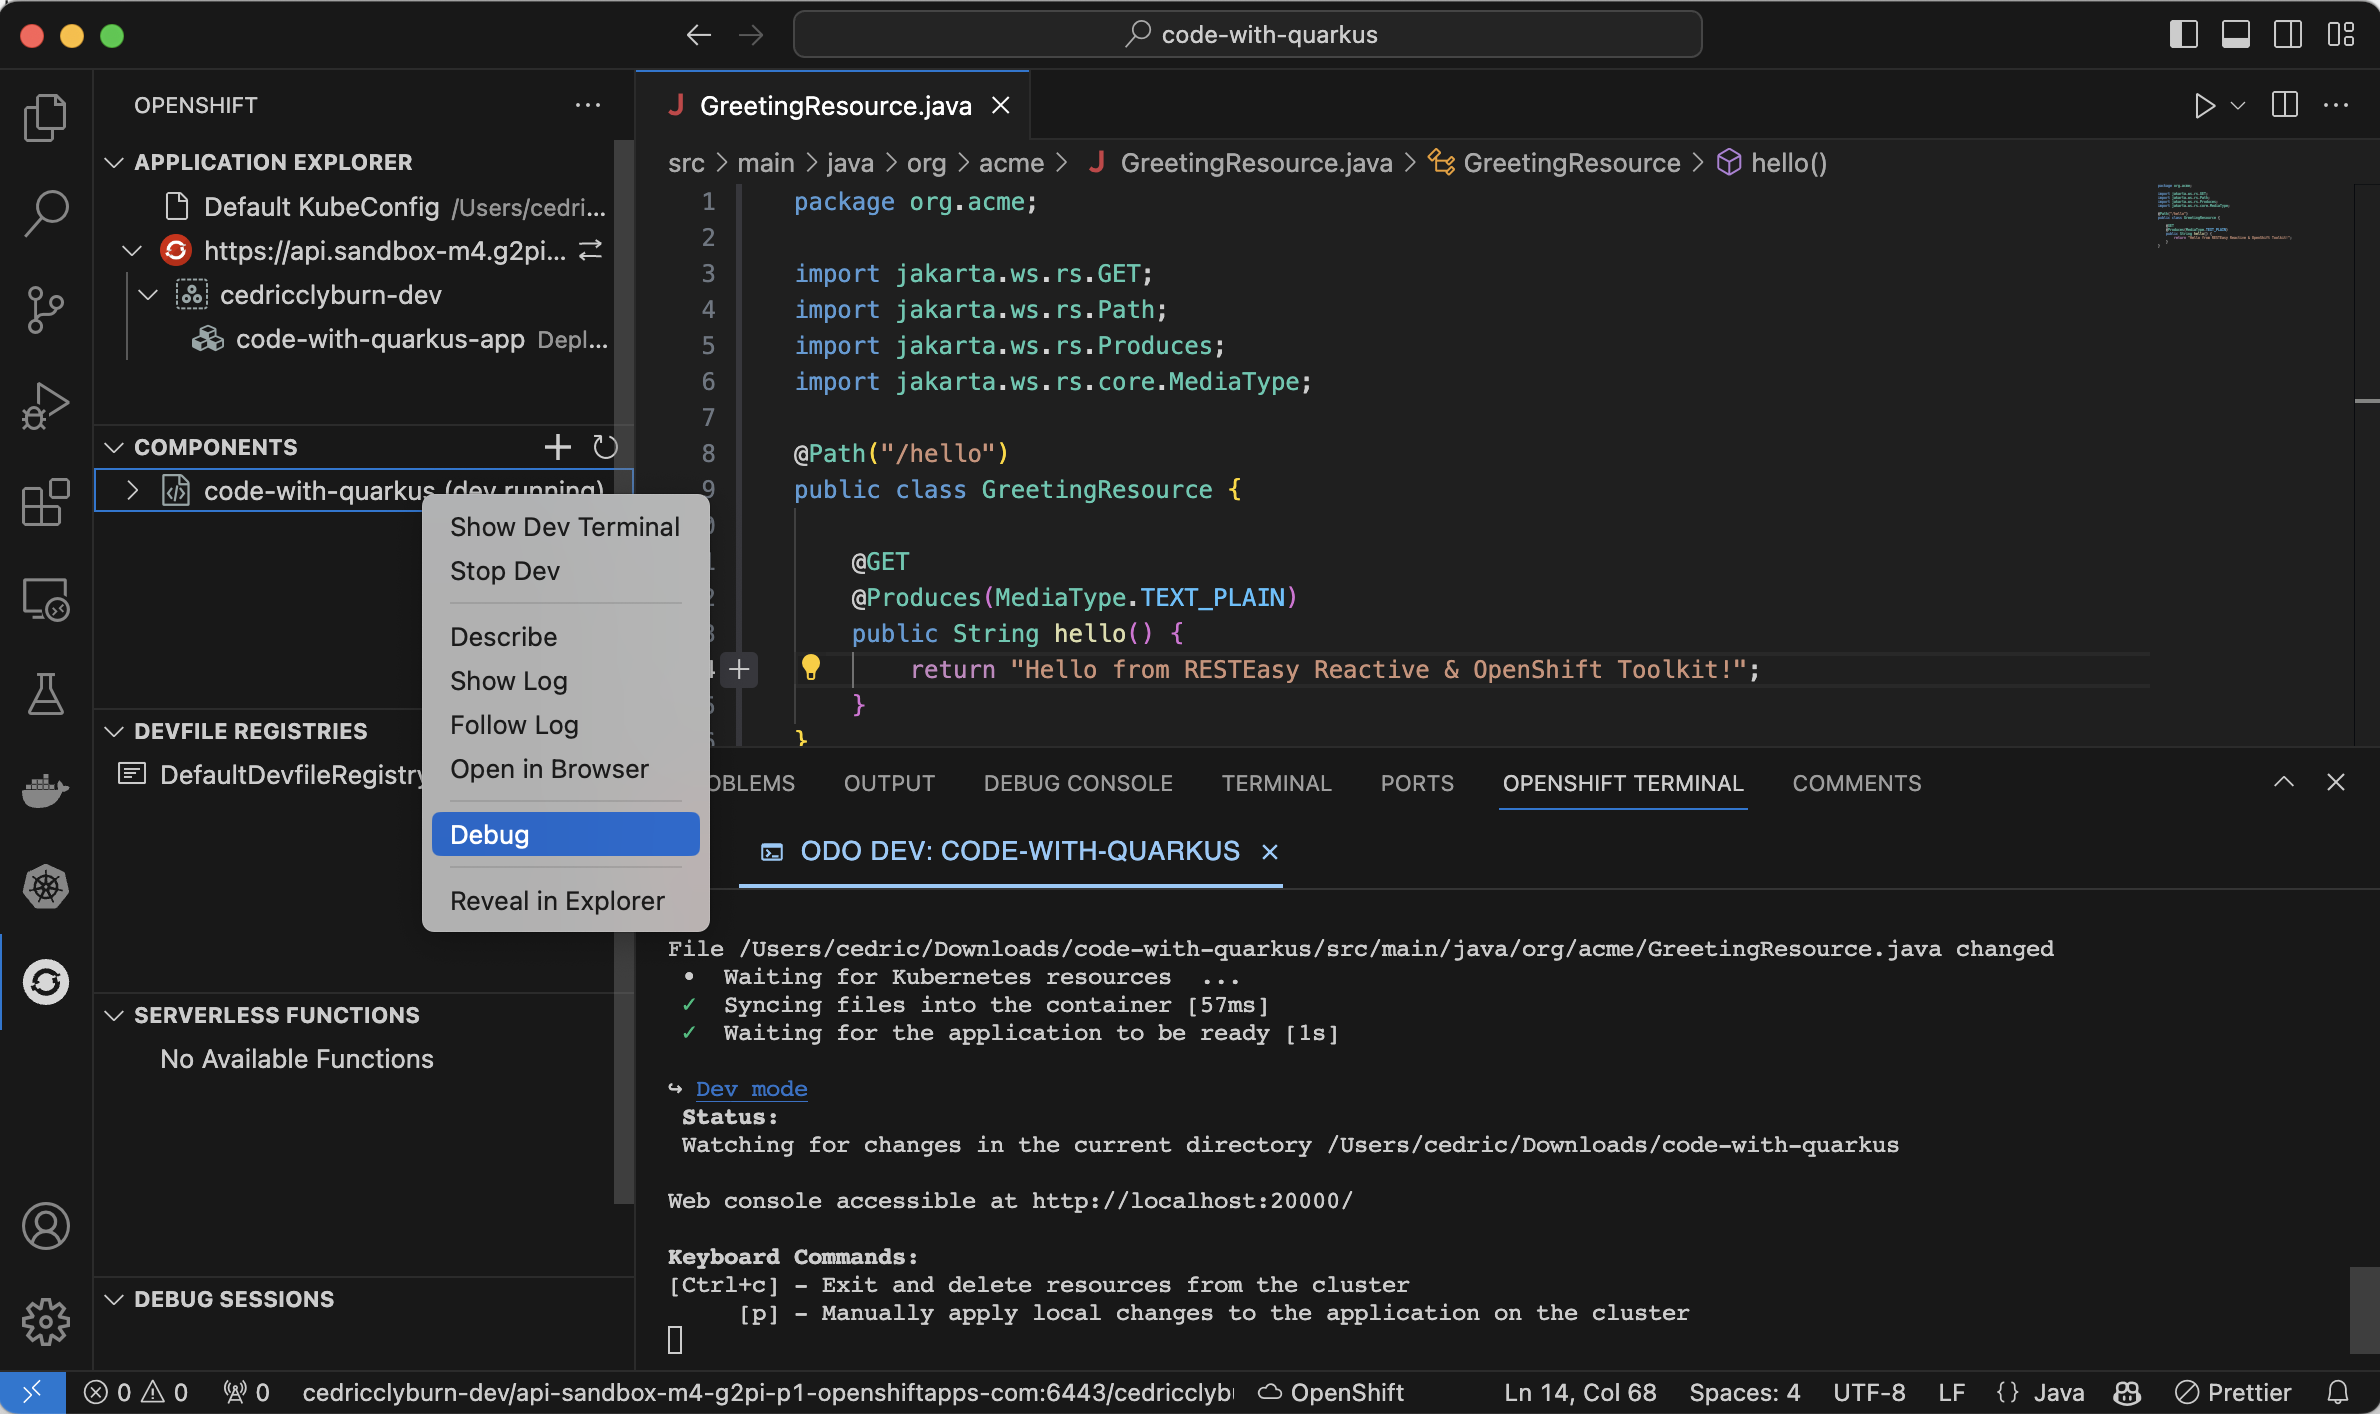
That’s neat, but what about debugging our code that’s already deployed on OpenShift? Well, debugging is difficult when our application runs remotely in containers. But with the OpenShift Toolkit’s debug feature for Java and Node.js components, we can easily debug our applications. Simply right click the existing component and select Debug to start a debugging session where we can set breakpoints in our code and explore what’s going on (Figure 12).
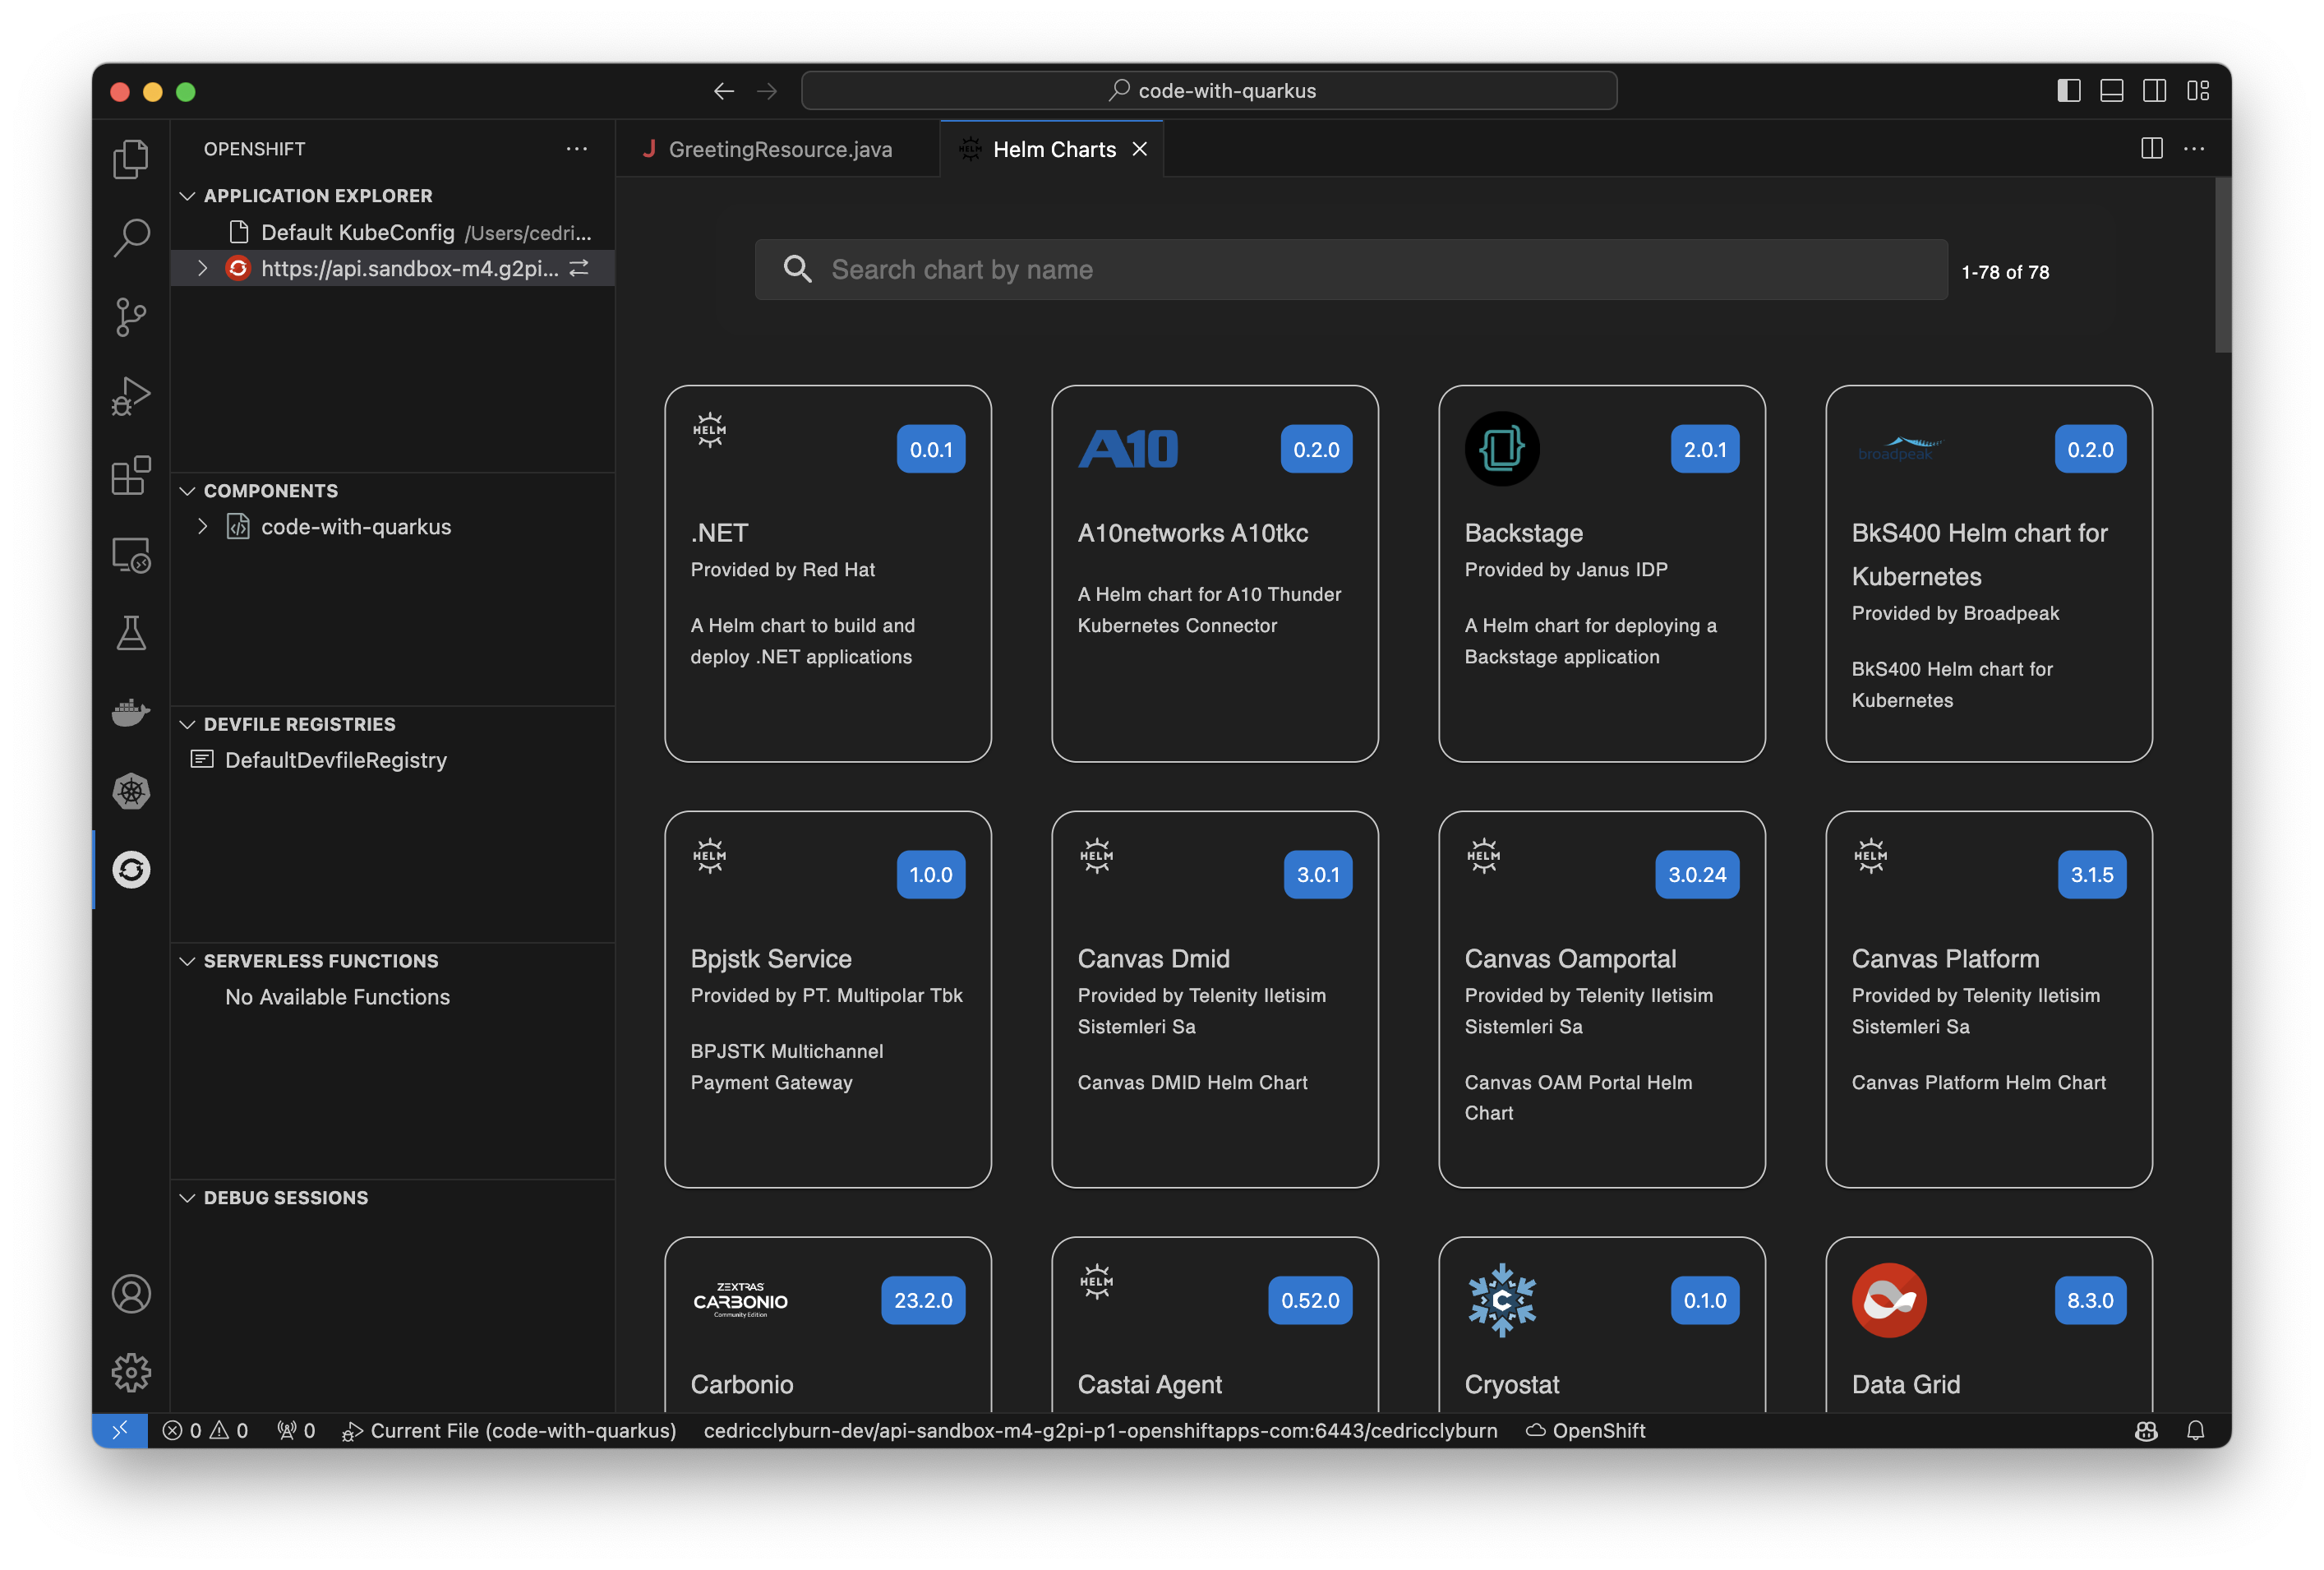
Deploying Helm charts to a cluster
The OpenShift Toolkit allows us to easily work with Helm, a package manager for deploying containerized applications on Kubernetes and Helm charts directly to our cluster. These are certified OpenShift Helm Charts from the community, partners, and Red Hat itself that you would find within your OpenShift Web Console view, but now easily accessible and deployable from your IDE (Figure 13).
Deploying serverless functions to a cluster
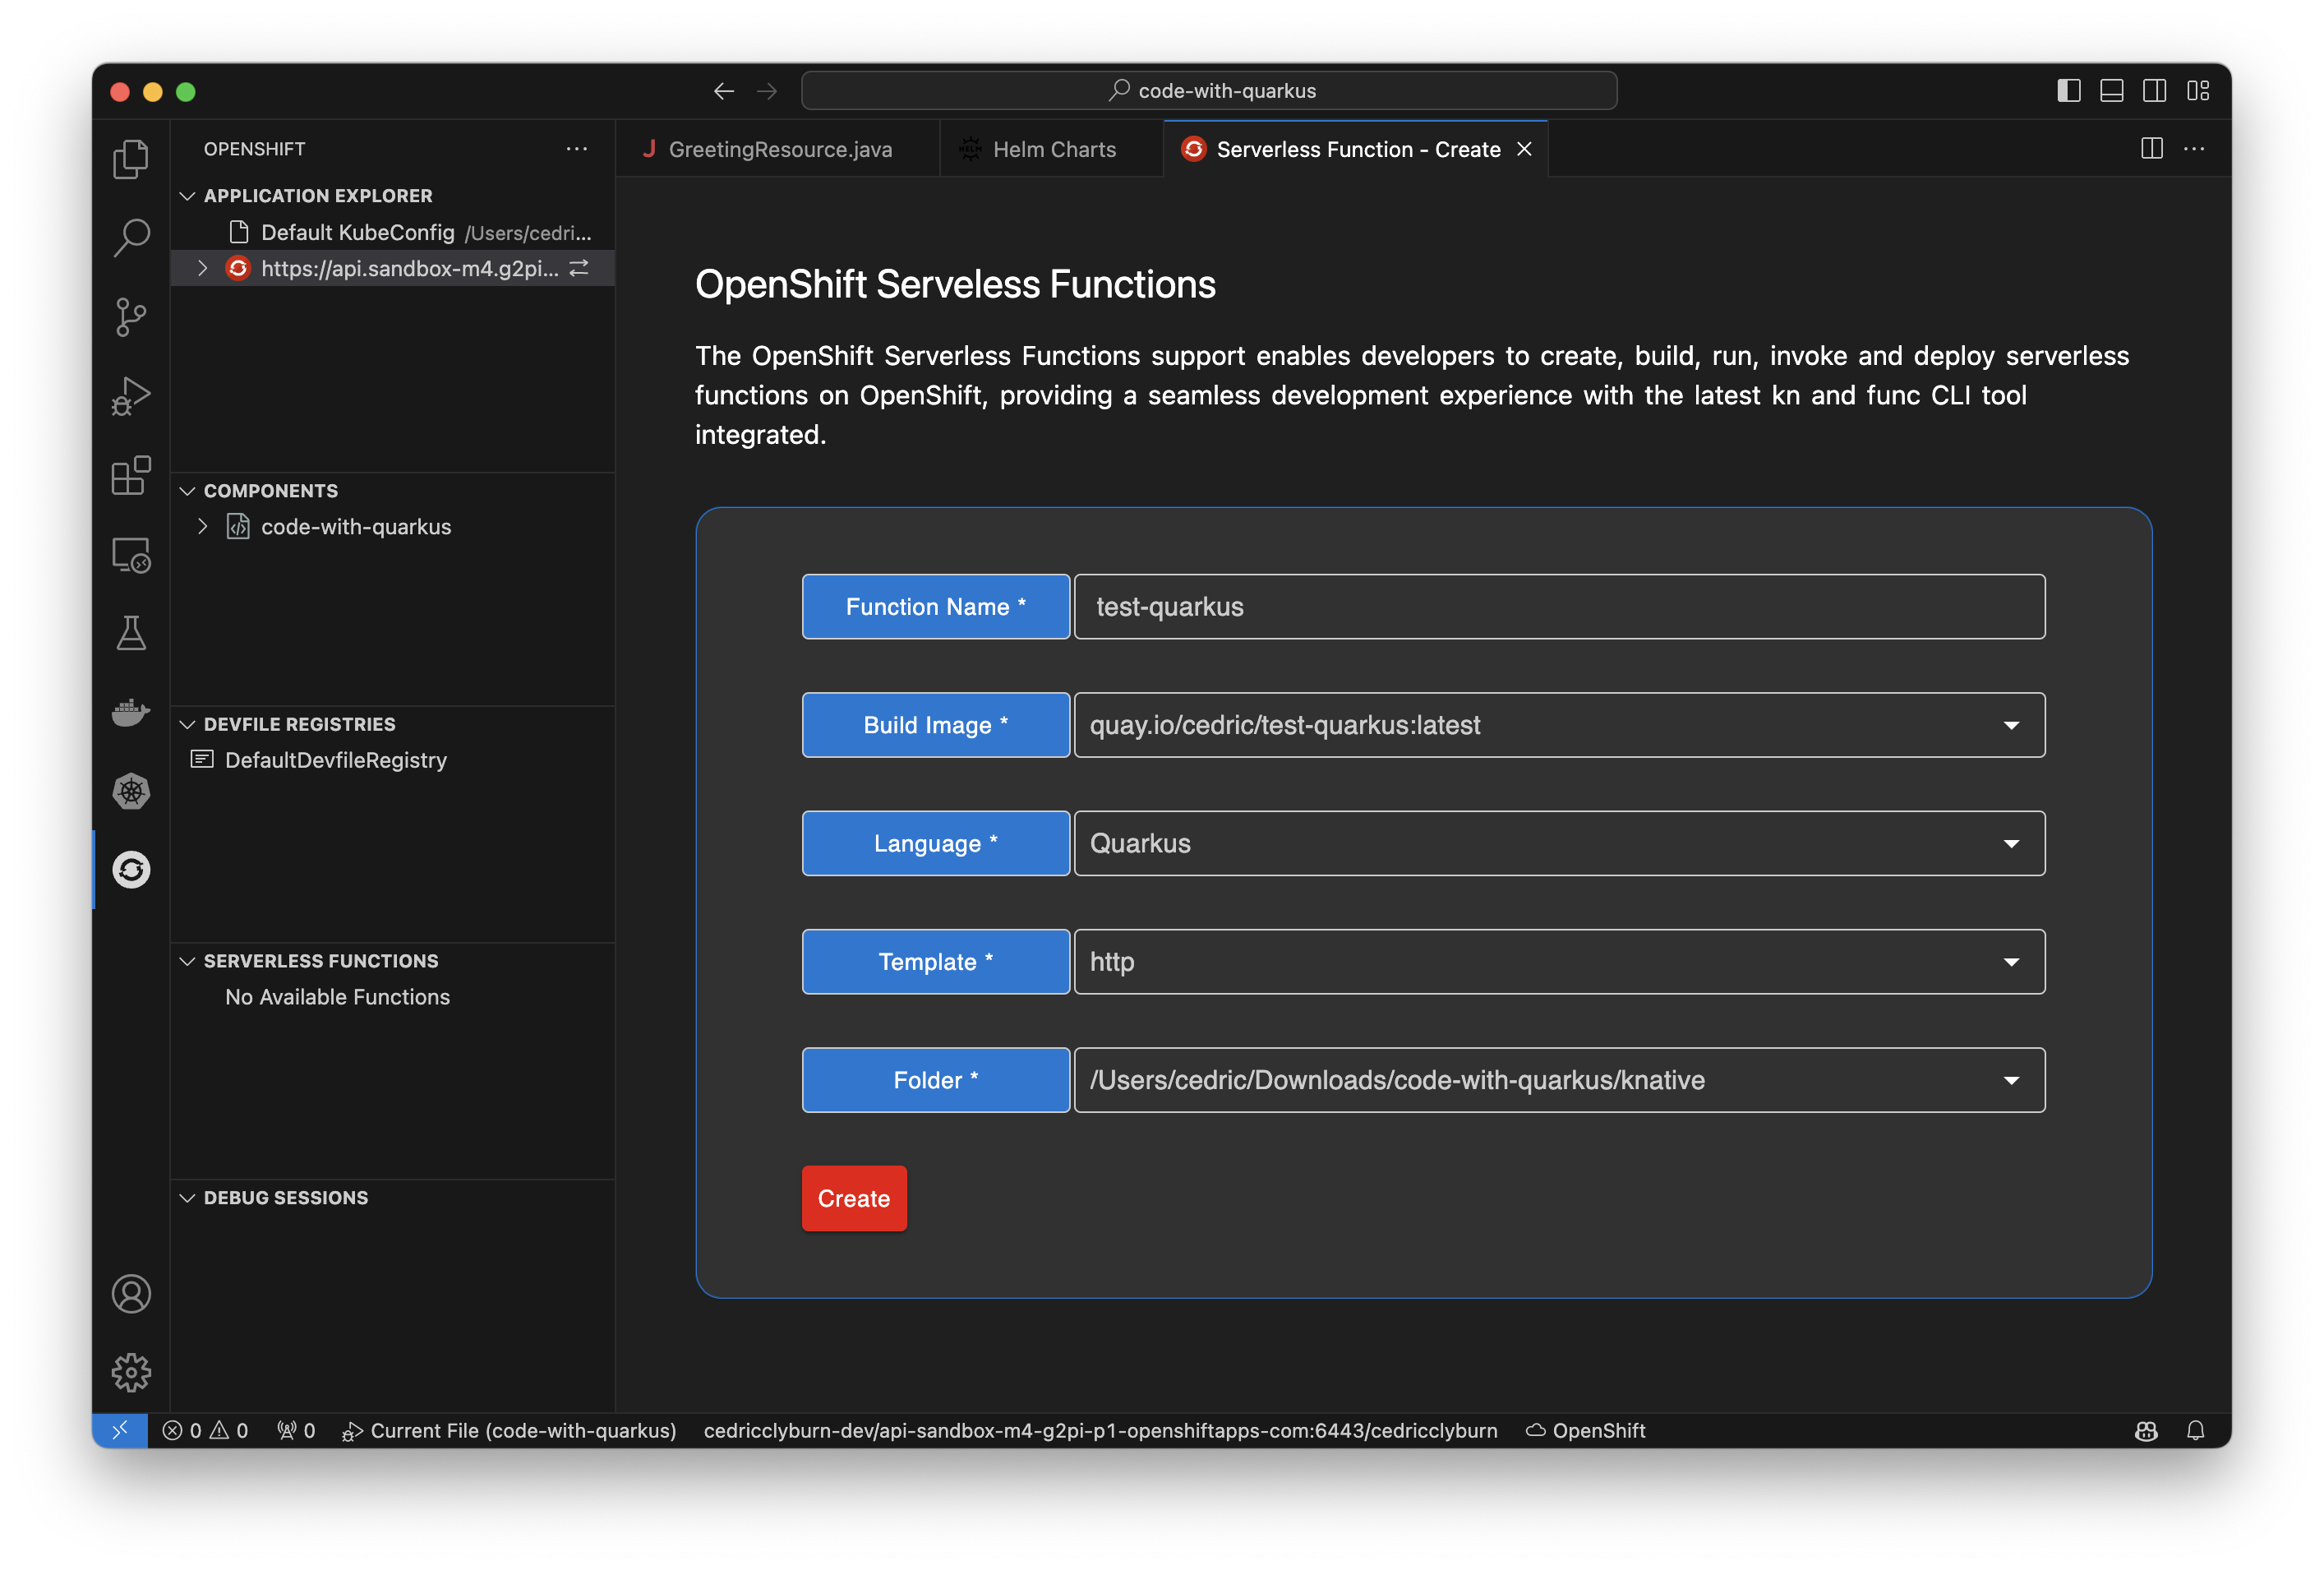
Working with Knative & OpenShift Serverless functions, the OpenShift Toolkit makes it simple and straightforward to develop and deploy functions in a serverless way. This includes creating a function with a local folder or Git template, then being able to run a function locally, deploy a function to a currently configured Knative-enabled cluster, and invoke the running function, locally or remotely (Figure 14).
Wrapping up
This article has demonstrated how OpenShift Toolkit is a fantastic extension for developers working on cloud-native Kubernetes applications in IDEs. The simplicity of being able to run our local and remote Git code on an OpenShift instance, as well as test and debug it, all without having to worry about the high-level abstractions and complexities around various Kubernetes tools is a game-changer! You can connect to your Kubernetes and OpenShift clusters, deploy applications, work with Helm charts and Serverless instances, and much more, all without ever leaving your IDE. Be sure to check out the OpenShift Toolkit for Visual Studio Code and IntelliJ, and start developing your containerized applications faster.
Last updated: November 15, 2023