In the age of Kubernetes, efficient and secure communication between distributed systems has become crucial due to traditional networking solutions often falling short when faced with the demands of modern architectures, hindering scalability, flexibility, and interoperability. A new breed of innovative tools has emerged to address these challenges head on, with Red Hat Service Interconnect (aka Skupper and formally Red Hat Application Interconnect) leading the charge.
Red Hat Service Interconnect was born from the upstream Skupper, an open-source project developed with the aim of simplifying and enhancing network connectivity, which offers a transformative solution to the challenges of interconnecting services regardless of the underlying infrastructure, enabling seamless communication across disparate systems.
At its core, Service Interconnect acts as a powerful service interconnect layer operating at the application level allowing it to transcend traditional networking limitations, enabling connectivity across different cloud platforms, hybrid environments, and even on-premises systems.
One of the key advantages of Service Interconnect is its ability to bridge the gap between various messaging protocols, facilitating seamless interoperability letting us connect services built on different technologies, whether it's bridging the gap between Kubernetes and traditional messaging platforms or connecting applications written in different programming languages, Service Interconnect provides a unified communication layer, simplifying the complexity of distributed architectures.
Moreover, Service Interconnect prioritizes security, ensuring that communication between services remains protected. It enables encrypted communication channels, allowing us to safeguard sensitive data and comply with regulatory requirements.
In this article, we will delve into the world of Service Interconnect, exploring its core features, deployment options, and real-world use cases.
Prerequisites
To start this demonstration, you will need the following:
- Red Hat OpenShift 3.11 , 4.10, 4.11, 4.12 and 4.13
- Red Hat Advanced Cluster Management for Kubernetes 2.7.1
- Gitops Operator 1.8.3
- Red Hat Service Interconnect 1.2
|
Tools Required |
macOS |
Linux/Fedora |
|
Git |
||
|
Openshift client 4.12 |
||
|
ArgoCD CLI |
||
|
Skupper CLI |
Note: These tools are available through the Web Terminal Operator.
Tested versions:
- Red Hat OpenShift 3.11 , 4.10, 4.11, 4.12 and 4.13
- Red Hat Advanced Cluster Management for Kubernetes 2.7.1
- Gitops Operator 1.8.3
- Red Hat Service Interconnect 1.2
Let's get to work. We will use the following git repository:
git clone https://github.com/ignaciolago/skupper-demo.git
cd skupper-demo/
skupper-demo git:(main) tree -L 3

├── README.md
├── bootstrap
│   └── base
│       ├── 00-argocd
│       ├── 01-applicationset-acm
│       ├── 02-applicationset-acm-integration
│       └── 03-skupper
└── resources
    ├── 01-acm-operator
    │   ├── 00-acm-namespace.yaml
    │   ├── 01-acm-operatorgroup.yaml
    │   ├── 02-acm-subscription.yaml
    │   ├── 03-acm-multiclusterhub.yaml
    │   └── kustomization.yaml
    ├── 02-acm-integration
    │   ├── 04-acm-managedclusterset.yaml
    │   ├── 05-acm-managedclustersetbinding.yaml
    │   ├── 05-acm-placement.yaml
    │   ├── 06-acm-gitopscluster.yaml
    │   └── kustomization.yaml
    └── 03-skupper
        ├── 00-skupper-subscription.yaml
        ├── 01-skupper-namespace.yaml
        ├── 02-skupper-site.yaml
        └── kustomization.yaml
Install OpenShift GitOps
To simplify the tasks of installation, deployment, and configuration, we will utilize the GitOps approach with Red Hat Advanced Cluster Management for Kubernetes (RHACM) and Red Hat OpenShift GitOps. Then apply the files.
oc apply -k /skupper-demo/bootstrap/base 00-argocd

namespace/openshift-gitops created
clusterrolebinding.rbac.authorization.k8s.io/argocd-rbac-ca created
subscription.operators.coreos.com/openshift-gitops-operator created
Check all is running.
oc get pods -n openshift-gitops

NAME                                                          READY   STATUS    RESTARTS   AGE
cluster-f4c64b496-zt4wv                                       1/1     Running   0          13m
kam-f5866858c-nz4zz                                           1/1     Running   0          13m
openshift-gitops-application-controller-0                     1/1     Running   0          13m
openshift-gitops-applicationset-controller-5c5744c48c-5rqff   1/1     Running   0          13m
openshift-gitops-dex-server-8578f74bf6-xr9rm                  1/1     Running   0          13m
openshift-gitops-redis-bb656787d-vktqt                        1/1     Running   0          13m
openshift-gitops-repo-server-d984475c-fnjxv                   1/1     Running   0          13m
openshift-gitops-server-6c4bf75c9b-h6q9x                      1/1     Running   0          13m
Now that the operator is installed, we recover the path of the Argo CD GUI by using the following command:
oc get route openshift-gitops-server -n openshift-gitops --template='https://{{.spec.host}}'
Copy the following URL (result of the command and paste it into the browser to access the Argo CD login page.
Install RHACM
Install the Red Hat Advanced Cluster Management and integrate it with ArgoCD by running the following command.
oc apply -k /skupper-demo/bootstrap/base/01-applicationset-acm/

appproject.argoproj.io/advance-cluster-management created
application.argoproj.io/advance-cluster-management created
We will to proceed to check the status.
Every 2.0s: oc get pod -n open-cluster-management                                                                                                                             thunderos: Fri Jun  2 19:05:00 2023

NAME                                                              READY   STATUS    RESTARTS       AGE
console-chart-console-v2-788d7bd946-h69dh                         1/1     Running   0              42s
console-chart-console-v2-788d7bd946-w6j9f                         1/1     Running   0              42s
grc-policy-addon-controller-d6bb897db-2h5w2                       1/1     Running   0              40s
grc-policy-addon-controller-d6bb897db-xgnz6                       1/1     Running   0              40s
grc-policy-propagator-5c6859cc67-7bqdt                            2/2     Running   0              40s
grc-policy-propagator-5c6859cc67-bg5pd                            2/2     Running   0              41s
insights-client-6c976cb7d5-hnr6b                                  0/1     Running   0              41s
insights-metrics-998dff774-htp4h                                  2/2     Running   0              41s
klusterlet-addon-controller-v2-74c7859b7f-2wg58                   1/1     Running   0              40s
klusterlet-addon-controller-v2-74c7859b7f-92j88                   1/1     Running   0              40s
multicluster-observability-operator-6bff769d75-fsj9k              1/1     Running   0              4m8s
multicluster-operators-application-695bc8dfbf-mvvtn               3/3     Running   2 (96s ago)    2m53s
multicluster-operators-channel-6fcddc8f8c-ppctl                   1/1     Running   1 (86s ago)    3m1s
multicluster-operators-hub-subscription-5b8f79d788-q9khw          1/1     Running   4 (106s ago)   3m14s
multicluster-operators-standalone-subscription-5fbb4678b5-84nt5   1/1     Running   0              2m23s
multicluster-operators-subscription-report-f9594c459-2b2dv        1/1     Running   0              2m53s
multiclusterhub-operator-65df7d9c64-hmmcv                         1/1     Running   0              4m8s
search-api-6c5cfd44d6-99x8d                                       0/1     Running   0              20s
search-collector-5d5c4b6648-4csch                                 0/1     Running   0              20s
search-indexer-c77f74d9d-nd7vl                                    0/1     Running   0              20s
search-postgres-84fc475db9-v6rv4                                  0/1     Running   0              20s
search-v2-operator-controller-manager-7b476dc7fd-j4sls            2/2     Running   0              41s
submariner-addon-7d945c4ff-89dds                                  1/1     Running   0              4m7s
volsync-addon-controller-5bc8699ccc-9rz8d                         1/1     Running   0              40s
Wait until the RHACM operator is installed. It can take up to ten minutes for the MultiClusterHub custom resource status to display as running in the status.phase field after you run the command:
oc get mch -o=jsonpath='{.items[0].status.phase}' -n open-cluster-management

Running
Integrating RHACM and OpenShift GitOps
RHACM introduces a new gitopscluster resource kind, which connects to a placement resource to determine which clusters to import into Argo CD. This integration allows you to expand your fleet while Argo CD automatically begins working with your new clusters. This means if you leverage Argo CD ApplicationSets, your application payloads are automatically applied to your new clusters as they are registered by RHACM in your Argo CD instances.
 oc apply -k bootstrap/base/02-applicationset-acm-integration/

application.argoproj.io/acm-argocd-integration created
Up until this point, we have successfully installed the necessary operators for OpenShift GitOps and Red Hat Advanced Cluster Management for Kubernetes, along with their respective configurations. We have also integrated these operators together and imported a new cluster, all while utilizing GitOps. These actions have been taken in preparation for our upcoming article demonstration.
Install Skupper
For this demo we will install an application that uses three pods: one for the database, one for the backend and finally one for the frontend.
We will show how we can use Skupper to migrate applications. We are going to migrate this application from a single cluster running on OCP 3.11 to OCP 4.x.
oc apply -k bootstrap/base/03-skupper/

applicationset.argoproj.io/skupper created
Now we can check the process.
Every 2.0s: oc get pod -n skupper-site

NAME                                          READY   STATUS    RESTARTS   AGE
skupper-router-7c6698d686-8m7bk               2/2     Running   0          64s
skupper-service-controller-55b48fb87f-9fhxr   1/1     Running   0          61s
Execute the following in the cluster 1 (ocp 3.11):
skupper init --enable-console
skupper token create $HOME/secret.yaml
In the second cluster, execute the following:
skupper init --enable-console --enable-flow-collector
skupper link create $HOME/secret.yaml
skupper token create $HOME/secret.yaml
Then return to the first one and create the link with the cluster2:
skupper link create $HOME/secret.yaml
Then we will start deploying apps. Refer to the example apps repo.
Clone it:
git clone https://github.com/pcastelo/workshop-code.git && cd workshop-code/

Cloning into 'workshop-code'...
remote: Enumerating objects: 2773, done.
remote: Counting objects: 100% (338/338), done.
remote: Compressing objects: 100% (158/158), done.
remote: Total 2773 (delta 245), reused 229 (delta 180), pack-reused 2435
Receiving objects: 100% (2773/2773), 17.18 MiB | 19.86 MiB/s, done.
Resolving deltas: 100% (1533/1533), done.
We will deploy three apps:
first one a board service with mongo db
oc new-app -f./config/app/boards-fromsource.yaml \
 -p APPLICATION_NAME=boards \
 -p NODEJS_VERSION_TAG=16-ubi8 \
 -p GIT_URI=https://github.com/RedHatGov/service-mesh-workshop-code.git \
 -p GIT_BRANCH=workshop-stable \
 -p DATABASE_SERVICE_NAME=boards-mongodb \
 -p MONGODB_DATABASE=boardsDevelopment
--> Deploying template "prueba/boards-fromsource" for "./config/app/boards-fromsource.yaml" to project prueba

     boards
     ---------

--> Creating resources...
    service "boards" created
    deploymentconfig.apps.openshift.io "boards" created
    buildconfig.build.openshift.io "boards" created
    imagestream.image.openshift.io "boards" created
    secret "boards-mongodb" created
    service "boards-mongodb" created
    deploymentconfig.apps.openshift.io "boards-mongodb" created
--> Success
The second is a context-scraper for testing purposes and having more apps running.
oc new-app -f./config/app/context-scraper-fromsource.yaml \
  -p APPLICATION_NAME=context-scraper \
  -p NODEJS_VERSION_TAG=16-ubi8 \
  -p GIT_BRANCH=workshop-stable \
  -p GIT_URI=https://github.com/RedHatGov/service-mesh-workshop-code.git
--> Deploying template "prueba/context-scraper-fromsource" for "./config/app/context-scraper-fromsource.yaml" to project prueba

     context-scraper
     ---------

--> Creating resources...
    service "context-scraper" created
    deploymentconfig.apps.openshift.io "context-scraper" created
    buildconfig.build.openshift.io "context-scraper" created
    imagestream.image.openshift.io "context-scraper" created
--> Success
Finally, the front end with this app, we will test all our Service Interconnect config. This one will be deployed in both clusters.
oc new-app -f./config/app/app-ui-fromsource.yaml \
  -p APPLICATION_NAME=app-ui \
  -p NODEJS_VERSION_TAG=16-ubi8 \
  -p GIT_BRANCH=workshop-stable \
  -p GIT_URI=https://github.com/RedHatGov/service-mesh-workshop-code.git \
  -e FAKE_USER=true
--> Deploying template "prueba/app-ui-fromsource" for "./config/app/app-ui-fromsource.yaml" to project prueba

     app-ui
     ---------

--> Creating resources...
    service "app-ui" created
    route.route.openshift.io "app-ui" created
    deploymentconfig.apps.openshift.io "app-ui" created
    buildconfig.build.openshift.io "app-ui" created
    imagestream.image.openshift.io "app-ui" created
--> Success
Important Note: This should be deployed in cluster 1 and cluster 2.
After executing all commands, we will check that all are running.
 oc get pods --watch
NAME                      READY   STATUS              RESTARTS   AGE
app-ui-1-build            1/1     Running             0          17s
boards-1-build            0/1     Completed           0          70s
boards-1-deploy           1/1     Running             0          12s
boards-1-m6cbd            0/1     ContainerCreating   0          6s
boards-mongodb-1-deploy   0/1     Completed           0          70s
boards-mongodb-1-mpmtq    1/1     Running             0          67s
context-scraper-1-build   1/1     Running             0          26s
boards-1-m6cbd            1/1     Running             0          10s
boards-1-deploy           0/1     Completed           0          17s
Now we expend skupper in both clusters, and then we can test the communication between both
skupper expose deploymentconfig boards
Retrieve the skupper-ui route and admin secret:
oc get route skupper -n skupper-site

NAME      HOST/PORT                                                               PATH   SERVICES   PORT      TERMINATION          WILDCARD
skupper   skupper-skupper-site.apps.cluster-twrtj.twrtj.sandbox1995.opentlc.com          skupper    metrics   reencrypt/Redirect   None
oc get secret skupper-console-users -n skupper-site -o go-template --template="{{.data.admin|base64decode}}"

6EicuQRHSm
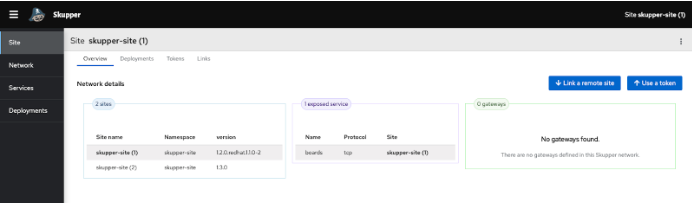
From the UI, we can check which sites are linked, the networks and deployments, and we can even link new sites and expose new deployments (Figure 1).
You can also verify the path of the app-ui deployment of cluster 2. We can see that it works as if it were in cluster 1.
Summary
In this article, we explored the steps for installing and connecting applications in different Kubernetes clusters using Red Hat Service Interconnect. We explained what Service Interconnect is and how it works, and discussed the installation to enable seamless communication between applications. By following these steps, you can achieve a cross-cluster deploy for traffic migration or high availability using the power of Red Hat Service Interconnect. We also utilized Red Hat Advanced Cluster Management for Kubernetes and Red Hat OpenShift GitOps operators to simplify this process.
Last updated: October 26, 2023