This article demonstrates how to deploy gaming applications in a Kubernetes (K8s) cluster using Red Hat Ansible Automation Platform. The minikube cluster is the best single node cluster for a personal POC. For this article, we will use a minikube cluster and Ansible Automation Platform 2.3 and a restricted set of privileges in the cluster to deploy the application in Kubernetes. Automation and orchestration are a rock solid combination that yield more promising results.
How to start minikube
Make sure you have kubectl and minikube CLI installed before getting started with the Kubernetes cluster.
$ minikube start
😄  minikube v1.26.1 on Redhat 9.1
❗  Specified Kubernetes version 1.25.7 is newer than the newest supported version: v1.24.3. Use `minikube config defaults kubernetes-version` for details.
✨  Using the docker driver based on existing profile
👍  Starting control plane node minikube in cluster minikube
🚜  Pulling base image...
🔄  Restarting existing docker container for "minikube"...
🐳  Preparing Kubernetes v1.25.7 on Docker 20.10.17...
🔎  Verifying Kubernetes components...
    ▪ Using image gcr.io/k8s-minikube/storage-provisioner:v5
    ▪ Using image kubernetesui/dashboard:v2.6.0
    ▪ Using image kubernetesui/metrics-scraper:v1.0.8
🌟  Enabled addons: storage-provisioner, default-storageclass, dashboard
🏄  Done! kubectl is now configured to use "minikube" cluster and "default" namespace by default
Check to see if the cluster is up and running, as follows:
$ kubectl get nodes
NAME       STATUS   ROLES           AGE    VERSION
minikube   Ready    control-plane   2d5h   v1.25.7
Install and configure Ansible Automation Platform
First, install the Ansible Automation Platform on your server or system.
Then, go to http://localhost in your browser to access the Ansible Automation Platform console.
5 steps to interact with Kubernetes cluster
Step 1: Set up Kubernetes cluster credentials
Credentials are utilized for authentication when launching jobs against machines, synchronizing with inventory sources, and importing project content from a version control system.
- From the Ansible Automation Platform console left menu, select Credentials (Figure 1).
- Click on Add and enter a name for the credentials.

- For the credential type (1), select Kubernetes or Kubernetes API Bearer Token.
- Select your organization.
- Enter the OpenShift or Kubernetes API Endpoint (2):
Provide the endpoint of the minikube cluster to which you want to deploy the application.
$ minikube ip
192.168.49.2
The minikube cluster endpoint:
https://192.168.49.2:8443
- For the token and certificate fields, we need to create a
ServiceAccount,Role,RoleBindingandSecret. Please apply the following context in your Kubernetes cluster.
Note: Make sure you have a cluster admin access.
cat <<EOF | kubectl apply -f -

---
apiVersion: v1
kind: Namespace
metadata:
  name: dev-game-app

---
  apiVersion: v1
  kind: ServiceAccount
  metadata:
      annotations:
      name: containergroup-service-account
      namespace: dev-game-app

---
  kind: Role
  apiVersion: rbac.authorization.k8s.io/v1
  metadata:
    name: role-containergroup-service-account
    namespace: dev-game-app
  rules:
  - apiGroups: ["*"]
    resources: ["*"]
    verbs: ["*"]
---
  kind: RoleBinding
  apiVersion: rbac.authorization.k8s.io/v1
  metadata:
    name: role-containergroup-service-account-binding
    namespace: dev-game-app
  subjects:
  - kind: ServiceAccount
    name: containergroup-service-account
  roleRef:
    kind: Role
    name: role-containergroup-service-account
    apiGroup: rbac.authorization.k8s.io

---
apiVersion: v1
kind: Secret
type: kubernetes.io/service-account-token
metadata:
  name: cicd
  namespace: dev-game-app
  annotations:
    kubernetes.io/service-account.name: "containergroup-service-account"
EOF
- Enter the API authentication bearer token (3):
$ kubectl get secret cicd -n dev-game-app -o json | jq '.data.token' | xargs | base64 --decode > containergroup-sa.token
This command creates a file named containergroup-sa.token. Copy the token context and paste it in the Ansible Automation Platform console.
- Enter the Certificate Authority data (4).
Extract the certificate from the cluster by using the following command:
$ kubectl get secret cicd -n dev-game-app -o json | jq '.data["ca.crt"]' | xargs | base64 --decode > containergroup-ca.crt
This creates a file named containergroup-ca.crt which you must copy and paste into the Ansible Automation Platform console and then save it.
Step 2: Configure the container and instance groups
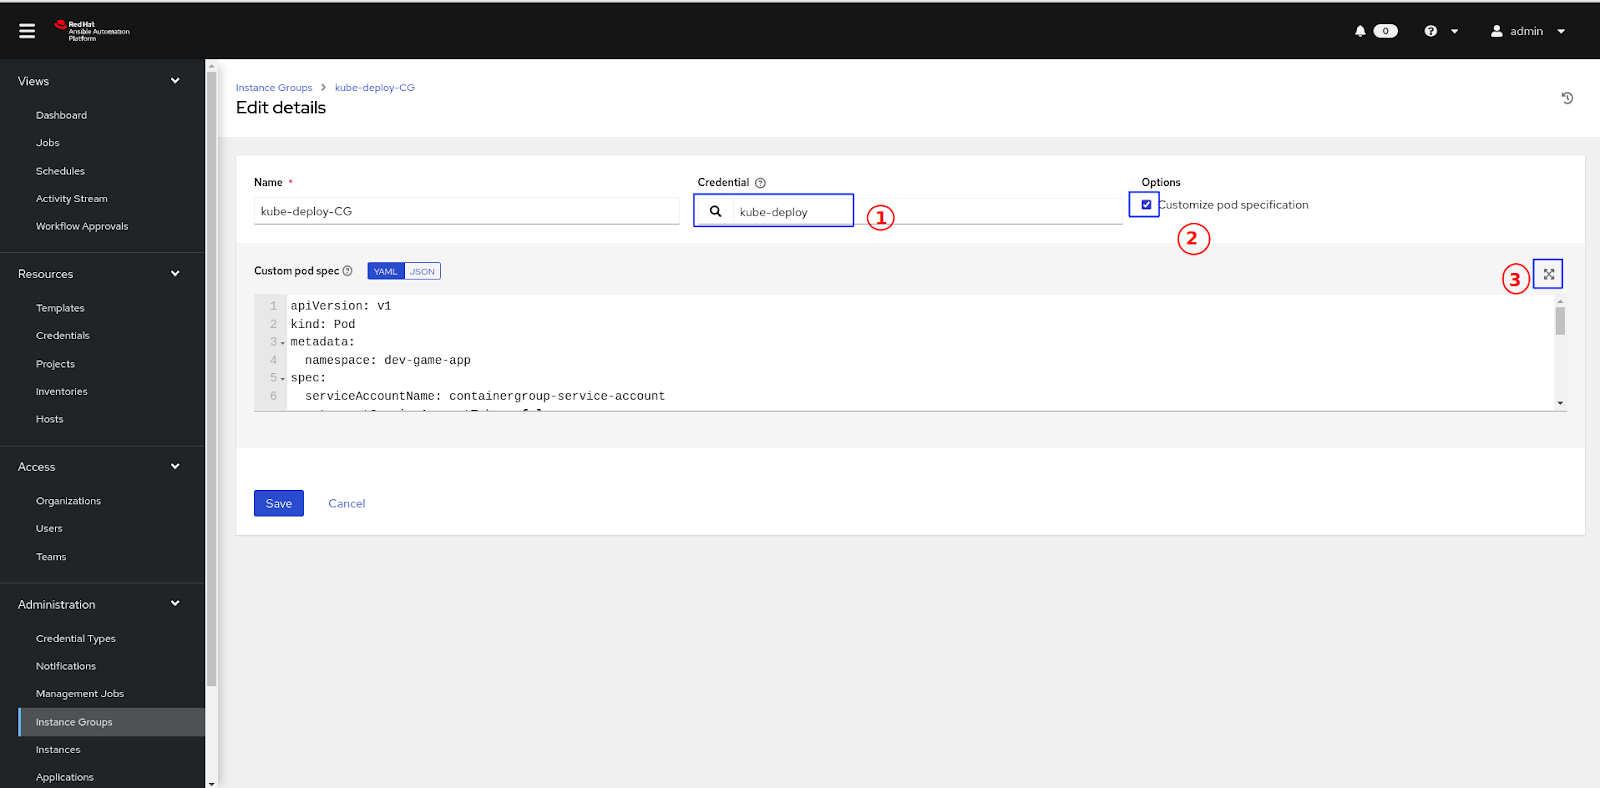
To configure the instance group, navigate to the instance group and create a Container group, as shown in Figure 2.
- Provide a name for the container group and select recently created credentials.
- Select the recently created credentials (1).
- Tick the box for the Customize pod specification under options (2).
- Click the Expand button (3).
We have already created the resources in the cluster in the credentials section, so we just need to update it as follows (Figure 3):
- Update the name of namespace (3.1).
- Update the serviceAccountName (3.2).
- The imagePullSecrets is not part of the default context (3.3).
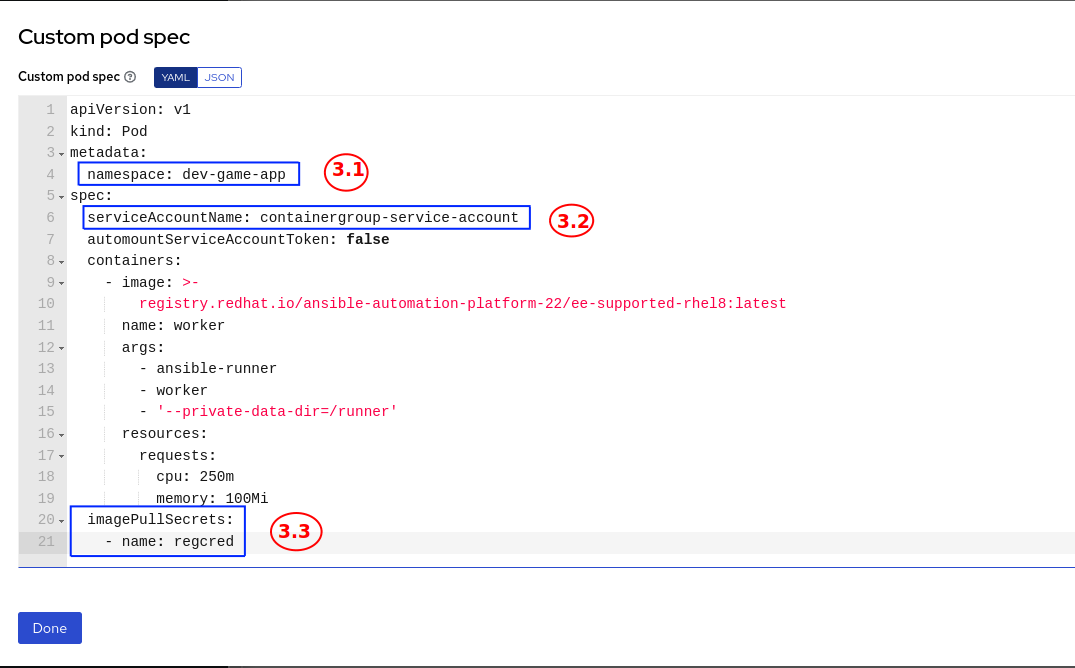
- Create the imagePullSecrets we defined in (3.3). Make sure you have an account on registry.redhat.io. Using the following command, you can create a secret easily in the Kubernetes cluster:
$ kubectl create secret docker-registry regcred --docker-server=registry.redhat.io --docker-username='foouser@xyz.com' --docker-password='123@Redhat' -n dev-game-app
Step 3: Add inventories
An inventory is a collection of hosts against which jobs can be launched, the same as an Ansible inventory file.
- From the left menu, select Inventories (Figure 4).
- Click on Add button and select Add Inventories.
- Enter a name to the inventory.
- Next, add the host to the inventory. We are using localhost. Copy and paste the following context in variable section:
---
{'ansible_host': '127.0.0.1', 'ansible_connection': 'local'}

- Finally, test the connectivity with the Kubernetes cluster using the ping module by clicking the Run Command button.
- Select the Run Command first.
- Select the ping module from the dropdown and choose Demo Credentials.
- Keep the rest of the details as default (you can change the settings per your environment requirement).
- Click Launch.
The job results are as follows:
kube-deploy-host | SUCCESS => {
    "ansible_facts": {
        "discovered_interpreter_python": "/usr/libexec/platform-python"
    },
    "changed": false,
    "ping": "pong"
}
This validates that the cluster details, such as the endpoints and credentials, are correct.
Step 4: Create a project
A project is a logical collection of Ansible Playbooks, represented in the automation controller. You can manage playbooks and playbook directories by either placing them manually under the project base path on your controller server, or by placing your playbooks into a source code management (SCM) system supported by the automation controller, including Git, Subversion, and Mercurial.
You can use this repo as well:
- Create a new project for our Git repository from the left menu.
- Click on the + icon from the right corner.
- Give project a name.
- Select your organization.
- Select the SCM TYPE (GIT, in our case).
- Add RESOURCE DETAILS
- 5.4.1. SCM URL.
- 5.4.2. SCM BRANCH.
- 5.4.3. SCM CREDENTIAL.
- Click on + it to create new credentials.
- Give credentials a name.
- Select organization.
- Select the credentials type and file accordingly.
- 5.4.4. Save it.
Step 5: Create job templates
A job template is a definition and set of parameters for running an Ansible job. Job templates are useful to execute the same job many times. Job templates also encourage the reuse of Ansible Playbook content and collaboration between teams.
Create a template that will execute the job for us.
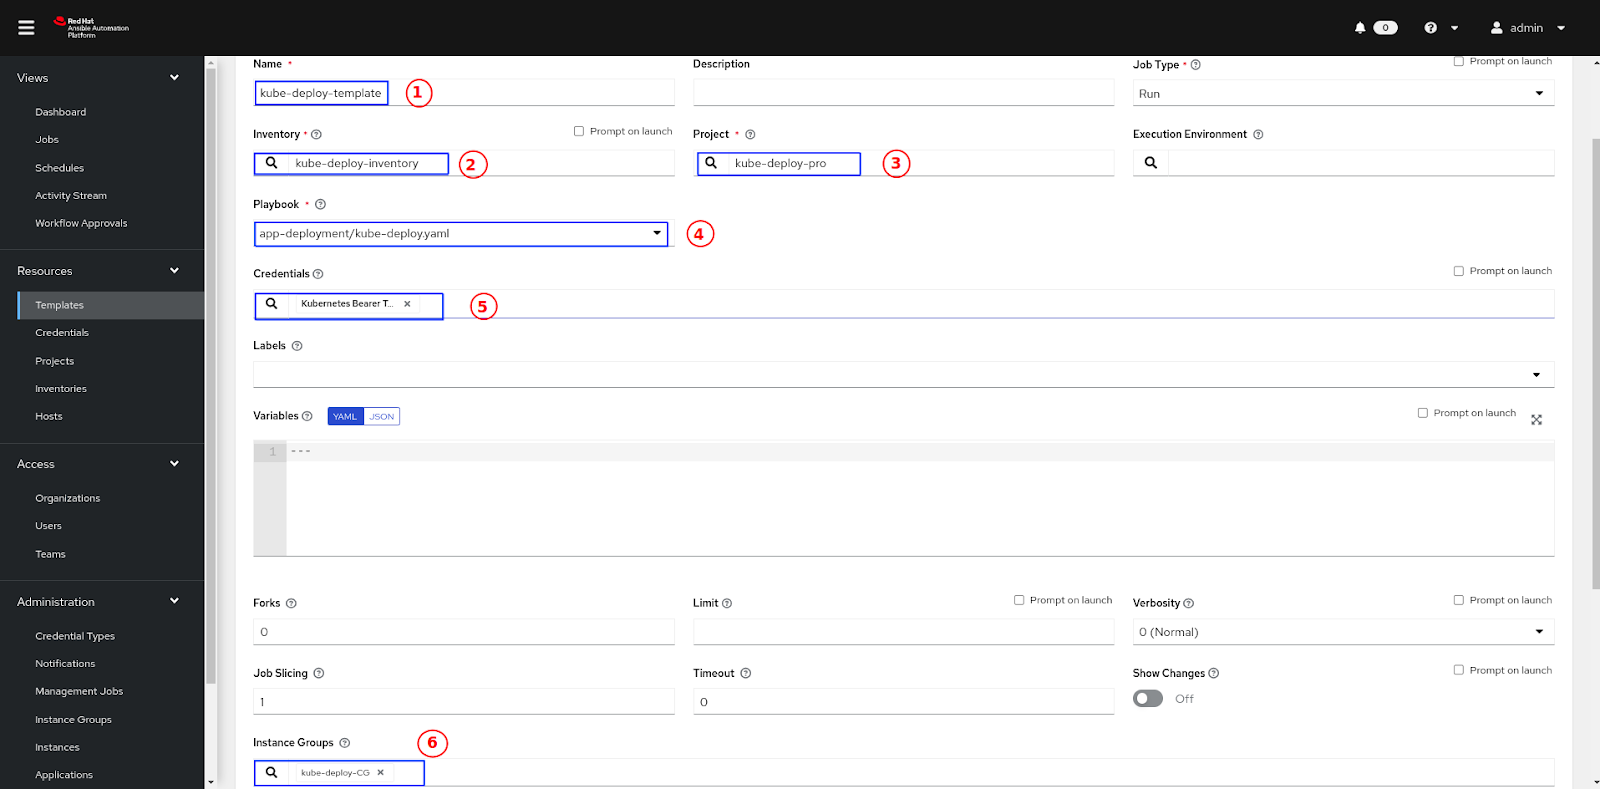
- From the left menu, select templates and create a new template (Figure 5).
- Click on + icon from the right corner and select the Job template.
- Give the template a name (1).
- Select the inventory (2).
- Select a Project (3).
- Choose the playbook you want to run in the template. GiHub repository (4).
- Choose Credentials (5).
- Select Instance group (6).
---
- hosts: all
- hosts: localhost

  collections:
  - kubernetes.core

  tasks:
  - name: Get a list of all pods from any namespace
    kubernetes.core.k8s_info:
      kind: Pod
      namespace: ansible-automation-platform
    register: pod_list

- name: create k8s pod
    kubernetes.core.k8s:
      src: deployment.yaml
      namespace: dev-game-app
      state: present

- name: service create
    kubernetes.core.k8s:
      src: service.yaml
      namespace: dev-game-app
      state: present
- Finally, run the template and verify the result in the cluster.
$ kubectl get pods -n dev-game-app -w
automation-job-267-wvsbx      0/1     Pending             0          0s
automation-job-267-wvsbx      0/1     Pending             0          0s
automation-job-267-wvsbx      0/1     ContainerCreating   0          0s
automation-job-267-wvsbx      1/1     Running             0          10s
automation-job-267-wvsbx      1/1     Terminating         0          11s
automation-job-267-wvsbx      0/1     Terminating         0          12s
automation-job-267-wvsbx      0/1     Terminating         0          13s
racing-game-fd795c897-82w87   1/1     Running             0          21s
- Do the port-forwarding to test the application.
$ kubectl port-forward pod/racing-game-fd795c897-82w87 8080:8080 -n dev-game-app
Forwarding from 127.0.0.1:8080 -> 8080
Handling connection for 8080
Handling connection for 8080
Open up the browser and enter localhost:8080 to get a glimpse of the gaming application.
Continue your automation journey
The goal of this article was to demonstrate how Ansible Automation Platform can be used to deploy gaming applications into Kubernetes clusters. It’s a one-time set up. You can also use the same solution for the managed Kubernetes cloud services like EKS, AKS, GKE, and many more.
Get started with the Ansible Automation Platform by exploring interactive labs. Ansible Automation Platform is also available as a managed offering on Microsoft Azure and as a self-managed offering on AWS. Get started with OpenShift by visiting the Developer Sandbox for Red Hat OpenShift. Microsoft Azure and Amazon Web Services also offer OpenShift managed services. Explore interactive lessons to begin your OpenShift learning journey.
Last updated: September 21, 2023