Kubernetes has become the most prevalent container orchestration framework in today's enterprises. Red Hat OpenShift, a hosted platform for Kubernetes applications, simplifies many of the development and administrative tasks Kubernetes requires, but you still need to understand Kubernetes concepts to develop applications on the platform. This article is the first in a two-part series that lays out key Kubernetes concepts for developers.
For Part 2, see A developer's guide to using OpenShift with Kubernetes.
Why a background in Kubernetes is important
Kubernetes makes it possible to run applications composed of a large number of containers in a manner that is reliable, continuous, and failsafe. When a container running in a Kubernetes cluster fails, Kubernetes can restore the container almost immediately. Kubernetes enables teams to update applications as they're running. Also, Kubernetes provides secure access to applications at a very fine-grained level. These are just a few of the many benefits that Kubernetes provides.
Although Kubernetes is popular and powerful, it's not easy to use. You have to know a lot even to do a simple task. The learning curve can be daunting.
Fortunately, OpenShift makes working with Kubernetes a lot easier by providing a layer of abstraction that removes a good deal of Kubernetes's operational complexity from the day-to-day developer experience. This abstraction is called the Red Hat OpenShift Container Platform. For example, developers can use the platform's OpenShift web console to work with Kubernetes in a graphical manner. One click of a button in the web console can do the work on a Kubernetes cluster that otherwise would require fiddling with a configuration file or typing half a dozen commands into a terminal window.
However, OpenShift developers still need a basic understanding of what Kubernetes offers and how it works. Such knowledge is particularly important for debugging and troubleshooting the applications deployed into a Kubernetes or OpenShift cluster.
The purpose of this two-part series is to provide this basic understanding. This first installment provides a general overview of the Kubernetes architecture and its core components. I also describe the basic Kubernetes resources that are typically used when working with a Kubernetes cluster under the OpenShift Container Platform.
The second installment will explain how the OpenShift Container Platform works with Kubernetes from both a conceptual and a concrete operational perspective.
Understanding the Kubernetes architecture
The place to start is the basics of Kubernetes architecture, which is based on the controller-worker model. As the name implies, in the controller-worker model, one computer or group of computers controls another group that does the work.
In Kubernetes parlance, the components and data installed in the control computer make up what is called the control plane and the worker computers are called the worker nodes (Figure 1.) The control plane and the worker nodes, combined, constitute a cluster.
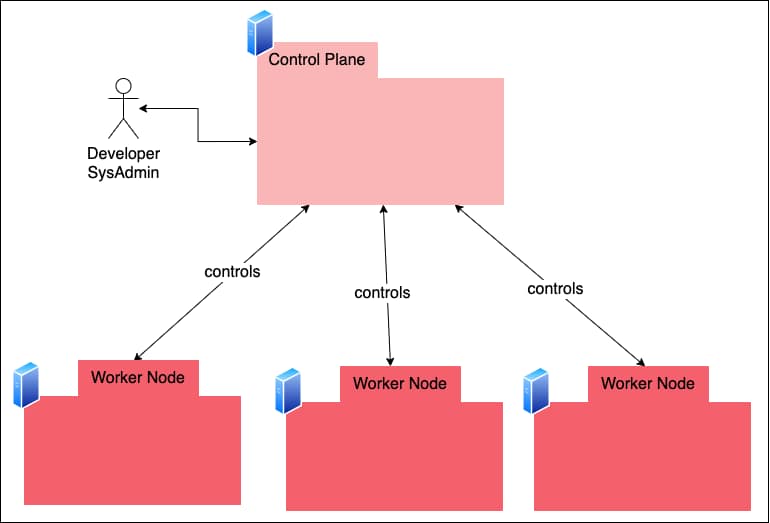
One of the reasons that Kubernetes uses the controller-worker model is that the model allows a Kubernetes cluster to scale up or down on demand to meet the computational needs of the enterprise. Under Kubernetes, when a cluster reaches the limits of its computing capacity, a system administrator can automatically spin up another computer (real or virtual) and add it to the cluster in real time. Then Kubernetes automatically provisions the machine to the desired state. The cluster never needs to be taken offline. The benefits of this automation should be apparent.
Understanding how the control plane and worker nodes interoperate is important. I'll explain it all in a moment. But first let's take a look at how Kubernetes works in general.
Understanding how Kubernetes works
The fundamental building block of Kubernetes is the Linux container (or its Windows version, when running under that operating system). A container isolates the process associated with it in a way that makes the process think that it's the only process on the computer. Therefore, at a logical level, the process has its own filesystem as well as special access to other system resources. Also, the process can be given its own IP address. The process is indeed isolated. No other process running on the computer has access to it.
Operationally, this means that you can deploy everything an application needs in a single deployment unit: the container. This deployment can include files special to the operating system, third-party libraries the application might need, and any files and other artifacts that are particular to the application.
For example, you can deploy an application written in Node.js in a container that has not only the application's source code and package dependencies, but the Node.js runtime. This means that the computer hosting the container doesn't need to have the Node.js runtime installed. Rather, the Node.js runtime is deployed in the container.
Containers bring a lot of versatility to the deployment process. You can add and remove them at a whim without having to reboot the host computer. Also, containers can be configured at a very fine grain.
A pod is a resource in Kubernetes that logically hosts one or more containers. You can think of a pod as a logical "wrapper" for containers.
Running a container on a single local machine is useful, but containers really become powerful when you deploy a number of them onto a collection of computers networked together. You can distribute a number of identical containers with different IP addresses among these computers. Put all these identical containers behind a load balancer that routes network traffic to the containers evenly, and you have a fairly robust distributed application. This is the good news.
The bad news is that supporting such an architecture is complex and error-prone. This is where Kubernetes comes into play. Kubernetes makes it easy to deploy containerized applications from a container repository and provision the containers within the cluster automatically. And Kubernetes offers several additional features that make the technology compelling:
- The Kubernetes control plane automatically figures out which of its worker nodes is best suited to host the application's containers.
- Kubernetes creates access to the container on the cluster's internal network as part of the container deployment process.
- Kubernetes guarantees that all the containers that are supposed to be running are always running, and replenishes a container in the event of failure.
- Should a worker node computer fail entirely, Kubernetes recreates the containers that were running on the failing worker node onto another machine.
- If a new worker node computer is added to the cluster, Kubernetes redistributes the containers to balance the workload.
Now that you understand what Kubernetes is and what it does, let's take a look at how it works. The place to start is the control plane.
The control plane
As mentioned earlier, the control plane controls activities within the cluster in general and among worker nodes in particular. The control plane can be made up of one or many computer systems, and consists of the basic components shown in Figure 2.
The components that made up the control plane are:
- API server
- Controller manager
- Scheduler
- Data storage
- DNS server
Let's discuss the details of each component in turn.
API server
Components in a Kubernetes cluster need to communicate with each other in order to execute tasks. The API server is the component that meets this need. It's the central access point into the control plane.
The API server publishes a REST interface that's used internally by components in the control plane and the worker nodes as well as services and users external to the Kubernetes cluster.
You'll see how the API server plays a central role in the Kubernetes cluster in the description of the control plane and worker node components to come.
Developers and administrators can interact with the API server, and therefore control Kubernetes, through the kubectl command. The oc command performs the same role in OpenShift, for developers who prefer to use the command line instead of, or in conjunction with, the web console.
Controller manager
Tasks that are executed within a Kubernetes cluster are managed by a type of component called a controller. For example, the ReplicationController watches over the cluster to ensure that the pods in the cluster are working properly and replenishes pods if something goes wrong. The node controller watches over the various computers that make up the given Kubernetes cluster.
The controller manager manages all the other controllers in the cluster. This includes controllers that ship with Kubernetes by default as well as custom controllers created by developers.
Scheduler
The scheduler finds the best worker node in the cluster in which to install a pod. Sometimes, all the scheduler has to do is find a worker node that has enough disk space and CPU capacity to host the given pod. But a pod could be configured to have more specific requirements. For example, you can configure a pod to require that it run on a bare metal computer and not within a VM. In that case, the scheduler inspects the cluster to find a worker node that is a bare metal computer.
Once the most appropriate worker node has been identified, the scheduler will, as its name implies, schedule the pod to run on the node. All the interactions between the scheduler and the cluster are conducted by way of the API server.
Data storage
One of the reasons why Kubernetes is so effective is that it does a really good job of keeping track of the entire state of the cluster all the time. You can have a cluster that's made up of hundreds of worker nodes, with thousands of pods installed on each node, and Kubernetes knows the exact state of every node and pod in the cluster at any moment.
Information about the state of the cluster is stored in an etcd database. Any and all data that describes the state of the cluster is stored in etcd. Developers can inspect data in etcd using the describe subcommand of kubectl, and OpenShift developers can use the corresponding describe subcommand of oc.
The following example runs oc describe to read the information from etcd about a pod named simplehttp:
$ oc describe pod/simplehttp
The following is a snippet of the response returned from the oc describe command starting from the beginning of the output:
Name:                 simplehttp
Namespace:            reselbob-dev
Priority:             -3
Priority Class Name:  sandbox-users-pods
Node:                 ip-10-0-175-2.us-east-2.compute.internal/10.0.175.2
Start Time:           Wed, 14 Dec 2022 19:04:30 +0000
Labels:               role=admin
Annotations:          k8s.v1.cni.cncf.io/network-status:
                        [{
                            "name": "openshift-sdn",
                            "interface": "eth0",
                            "ips": [
                                "10.131.2.57"
                            ],
                            "default": true,
                            "dns": {}
                        }]
.
.
.
DNS server
The Domain Name System (DNS) assigns easily readable names to IP addresses. For example, when you type www.redhat.com into the address bar of a browser, a DNS server somewhere converts the readable name redhat.com into the IP address of the Red Hat web server running on the internet. The request from the browser is then forwarded to that IP address. The scope of the network that the DNS server supports is worldwide in this case, because the internet is a worldwide, public network.
However, a DNS server can also be used to create and manage readable names within a private network, such as the one within a Kubernetes cluster.
The control plane's DNS server enables Kubernetes to use readable names instead of IP addresses to locate resources within its network. For example, the following name was generated by the DNS server within an OpenShift cluster running on my instance of the Red Hat Developer Sandbox:
simple-site-app.rreselma-dev.svc.cluster.local
The name is also managed by the DNS server. Thus, when I call the DNS name of the application's service from a command line within the sandbox, I'll get a response from the web server running at the internal IP address that Kubernetes assigned to my application. The following HTML output shows the response from calling the application from the command line using the curl command using the application's DNS name:
<!DOCTYPE html>
<html lang="en">
<head>
    <meta charset="UTF-8">
    <title>Simple Site</title>
    <link href="https://cdn.jsdelivr.net/npm/bootstrap@5.2.1/dist/css/bootstrap.min.css" rel="stylesheet" integrity="sha384-iYQeCzEYFbKjA/T2uDLTpkwGzCiq6soy8tYaI1GyVh/UjpbCx/TYkiZhlZB6+fzT" crossorigin="anonymous">
</head>
<body>
<h1>Hello from Simple Site!</h1>
</body>
</html>
The important thing to remember about all of this is that the DNS server is a component of the Kubernetes control plane. The DNS server allows applications and services running within a Kubernetes cluster to interact with each other over the internal network according to the readable names that the DNS server creates and manages. (Readable names created by the Kubernetes DNS server follow a predefined naming convention.)
The naming capability provided by the DNS server becomes very important when configuring applications that interact with services internal to the Kubernetes cluster. The IP address assigned to a service might change, but the service's DNS name will not.
Worker nodes
A worker node is the computer or virtual machine that hosts containers running under Kubernetes. They follow the specifications configured for the Kubernetes pod representing the given containers.
The components hosted on a worker node are:
- kubelet
- cAdvisor
- Kube-proxy
The following sections describe the details of each.
kubelet
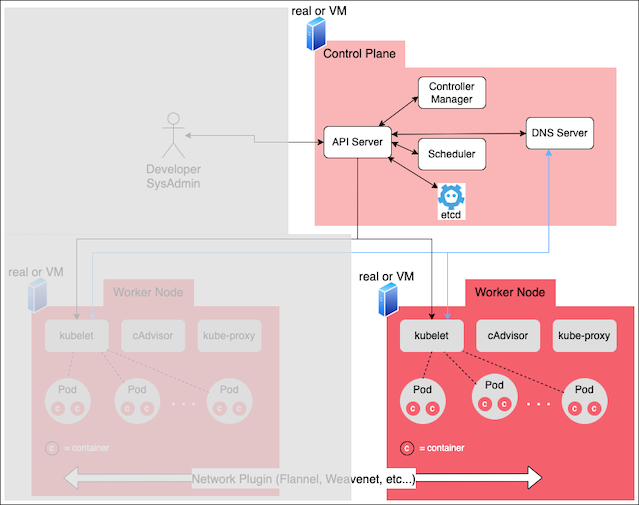
Containers do not appear on a worker node by magic. Rather, as explained earlier, once a container specification is assigned to a pod, it's up to the scheduler to find an appropriate worker node on which to run the container. That is the purpose of kubelet: To create containers (a process called realizing them) on its worker node and then monitor them.
Once the best worker node is found, the control plane notifies the instance of kubelet running on the identified worker node to realize a pod's container. Then, kubelet does the work of installing the container on the worker node (Figure 3) and reports back to the API server the particulars about the container installation. That information is stored in the etcd database.
cAdvisor
cAdvisor gathers and reports metrics about activities within the given worker node. The name is derived from a blending of the words container and advisor.
cAdvisor is aware of all the containers running on a worker node, and collects CPU, memory, file system, and network usage statistics about the containers. This information can be viewed using reporting tools such as Prometheus and Grafana. The information provided by cAdvisor is particularly useful when testing and troubleshooting an application running on Kubernetes.
kube-proxy
kube-proxy is a daemon that runs on each worker node in a Kubernetes cluster in order to route the network traffic received by the worker node to the appropriate container hosted on the worker node.
kube-proxy does this job by working with the control plane to observe how routes are defined for the service, endpoint, or EndpointSlices resources operating within the cluster. Using this information, kube-proxy figures out how to route an incoming request to the corresponding container on the worker node.
Should routing information change within the control plane, each instance of kube-proxy running in the cluster updates its respective worker node to accommodate the new routing information.
Customizing Kubernetes
An important feature of Kubernetes is its extendable design. Should an organization need some capability that is not available in Kubernetes by default, the organization's IT department can create a custom component to meet the need at hand. For example, a company can create a custom controller that watches for particular changes in a pod's behavior and sends a notification about the behavior change to a predefined email address.
Also, developers can write custom resources through what's called, in Kubernetes parlance, a custom resource definition (CRD). Writing a CRD is an advanced topic beyond the scope of this article. The important thing to understand about a CRD is that it extends Kubernetes beyond the capabilities provided by the basic resources.
That being said, it's useful to have an understanding of the basic resources that come with Kubernetes by default.
Basic Kubernetes resources
A Kubernetes resource, which is also known as a Kubernetes object or an API resource, is a logical structure within the Kubernetes ecosystem that represents a certain aspect of state or activity in a Kubernetes cluster.
You can think of a Kubernetes resource as a data structure that defines a "thing" that is managed by a controller within the control plane. A resource doesn't do anything on its own. Rather, it declares a data structure that allows a controller to execute behavior on the host computer using the information in the particular resource's data structure.
For instance, when you tell Kubernetes to create a pod (you'll read about pods in a moment), the pod doesn't magically make itself. Rather, the API server contacts a controller, such as the ReplicationController, which then creates a data structure that describes the particulars of the given pod. That data structure is stored in the control plane's etcd datastore. Then other controllers take over and do the work of realizing the pod's containers according to the information about the pod in the data store.
The important thing to understand is that a Kubernetes resource is not a program. Rather, it is a data structure that tells other programs how to behave.
Imperative versus declarative resource realization
Before I go into describing the details of the basic Kubernetes resources, it's important to understand in general how a Kubernetes resource is realized. There are two ways to realize a resource.
One way is called imperative realization. Imperative realization takes place when you create a Kubernetes resource directly from the command line using the kubectl CLI. For example, the following kubectl command creates a pod that has a container running a simple HTTP server:
$ kubectl run simplehttp --image=quay.io/openshift-examples/simple-http-server
The other way is called declarative realization. To create a resource declaratively, you write a text file that describes the resource's configuration. Then you execute the kubectl command against that file.
The text file is called a manifest or configuration file. The text file can be created in either YAML or JSON format, although YAML is by far more prevalent. Also, the text file must be constructed according to the specification that is standard to the various Kubernetes resources.
The following listing shows a manifest named server.yaml that creates the pod named simplehttp pod, with the same result as the declarative command shown previously:
apiVersion: v1
kind: Pod
metadata:
  name: simplehttp
  labels:
    role: admin
spec:
  containers:
    - name: httpserver
      image: quay.io/openshift-examples/simple-http-server
      ports:
        - name: web
          containerPort: 8080
          protocol: TCP
The following example shows the kubectl command to execute against the server.yaml configuration file to create the pod declaratively. The -f option precedes the name of the configuration file:
$ kubectl apply -f server.yaml
Typically, developers use imperative realization while experimenting with containers during their development activities. But when it comes to production work, particularly around releases that require some sort of continuous integration/continuous deployment (CI/CD) automation, declarative realization is preferred.
Now that I've covered declarative versus imperative realization, let's move on and take a look at the resources typically used when creating an application that runs on Kubernetes.
Pod
As mentioned earlier, a pod is a logical wrapper for one or more containers hosted within a Kubernetes cluster. A pod defines the container image (or multiple images) along with the associated image repository to use to realize the corresponding containers. The pod can define the environmental variables to be created in the given container's process. The pod can also define startup behavior in the form of an initContainer, as well as the type of machines the containers require.
A pod has an IP address that is unique to the cluster. This IP address will be shared by the containers assigned to the pod. However, each container in a pod can have a port number unique to the container.
I've mentioned just a few of the configuration settings available when defining a pod.
The implementation of a sidecar pattern is one common use case for a pod with multiple containers. The sidecar pattern is, as the name implies, an architectural design pattern in which one container uses services available in another container. The second container acts as a "sidecar" to the first. The benefit of putting two containers in the same pod to implement the sidecar pattern is that the containers are installed on the same machine and share the same IP address, requiring minimal network overhead.
Deployment
A deployment is a Kubernetes resource that gathers a set of identical pods and guarantees that they run continuously in a Kubernetes cluster, even if individual pods fail. Although a pod can be created as a standalone resource, pods are typically created by way of a deployment.
In addition to ensuring the continuous operation of all its pods, a deployment offers another benefit of scaling on demand. This means that pods can be added or removed from a deployment at runtime without affecting the cluster's operation.
In short, deployments provide resilience against failure as well as the ability to scale pods up or down to meet an application's operational demands of the moment.
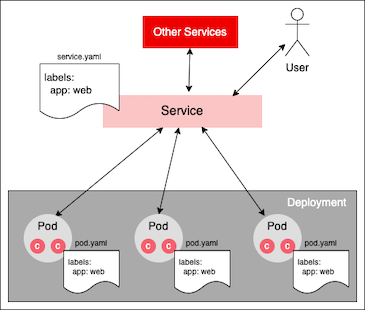
Service
A service is a Kubernetes resource that represents a pod's logic on the internal Kubernetes network. Typically, users and other services interact with pods by way of a service resource. It's very rare to interact with a pod directly.
Kubernetes associates a service to a set of pods using labels. A label is assigned to a pod either imperatively at the command line or declaratively within its manifest file. Then, a parameter within the service's manifest file describes which pods a service should use according to labels defined in those pods (Figure 4).
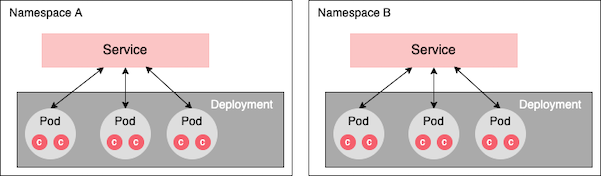
Namespace
A namespace is a Kubernetes resource that enables Kubernetes resources within a given cluster to be isolated and given a readable name. Once a Kubernetes resource is assigned to a namespace, it can see and be seen only by other resources within that namespace (Figure 5).
Secret
A secret is a Kubernetes resource that stores encrypted information of interest to other resources in the given Kubernetes cluster. Typically, secrets store sensitive information such as access credentials to a database. At the enterprise level, secrets are usually managed by system administrators and security personnel. These administrators give developers access to a secret according to its resource name. The developers then configure their applications to use information in the secret at run time.
The benefit that a secret provides is that developers can use the information within a secret without actually knowing the exact content of that information.
ConfigMap
A ConfigMap is a Kubernetes resource that stores and exposes configuration information of interest to other resources in a given Kubernetes cluster. Unlike a secret, which is encrypted, information in a ConfigMap is stored as clear text key-value pairs.
Persistent volume
A persistent volume is a Kubernetes resource that represents disk storage in a Kubernetes cluster. The benefit of a persistent volume is that it provides a way for containers to store information independently of a container's file system. By default, a container stores information in its own file system, and that information is deleted when the container is deleted. When a container stores information in a persistent volume, that information remains available even when the container is deleted.
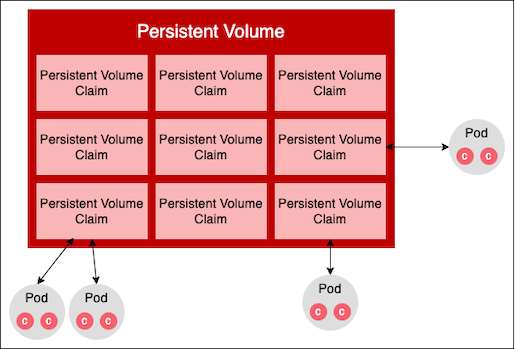
Persistent volume claim
A persistent volume claim is a Kubernetes resource that allots disk storage in a Kubernetes cluster.
You can think of a persistent volume as a hotel, and a persistent volume claim as a room in the hotel. Users don't reserve the hotel; rather, they reserve an individual room. As with a hotel, in Kubernetes developers don't use the persistent volume directly. Rather, they ask for a portion of the persistent volume, in the form of a persistent volume claim (Figure 6). Once granted, the storage in the persistent volume claim can store a container's data.
Kubernetes components and resources enable great flexibility and scaling
This article described what Kubernetes is and how it works. You learned how Kubernetes implements the controller-worker model by way of the control plane and worker nodes. You learned the basic components of the control plane: The API server, the controller manager, the scheduler, etcd data storage, and DNS server. In addition, you learned about the components hosted in every worker node: The kubelet, cAdvisor, and kube-proxy.
Finally, you learned about imperative versus declarative realization as well as the basic Kubernetes resources: Pods, deployments, services, namespaces, secrets, ConfigMaps, persistent volumes, and persistent volume claims.
The next article in this series will describe how the OpenShift Container Platform adapts and enhances Kubernetes to make the developer experience easier and more efficient. Read it here: A developer's guide to using OpenShift with Kubernetes
Last updated: September 20, 2023