This article introduces dotnet build-image, a tool that containerizes .NET applications automatically. You can use build-image to create Dockerfiles and containerized images. You will also discover how to use the tool in a GitHub workflow to create an image from a .NET application and push it to a repository.
Building an image or Dockerfile with dotnet build-image
To run a .NET application in a container, you need a Dockerfile. At first, learning about Dockerfiles and writing them can be fun. But after a while, it becomes repetitive. Moreover, the files need to be kept in sync with the application. And if you have several applications, you need to keep updating their Dockerfiles to use the same style.
The dotnet build-image is a global tool that writes the Dockerfile for you. The tool's features include:
- It uses a multi-stage build: First, the application is published into one image, then the result is copied into a smaller runtime image.
- The tool determines the .NET version an image should use from the .NET project (
TargetFramework). - You can choose the image base's operating system, such as Ubuntu or Alpine.
- It supports both Podman and Docker to build the image.
- It caches NuGet packages across builds.
- It uses the SDK version from global.json for publishing the application if the file is present.
To get started, install the tool from NuGet:
$ dotnet tool install -g dotnet-build-image
Next, build an image from the default web template application:
$ dotnet new web -o web
$ cd web
$ dotnet build-image -t mywebapp
You will see the build in the terminal. Once the build is finished, run the image:
$ podman run -p 8080:8080 mywebapp
Open the web application in your browser at: http://localhost:8080.
The tool has several options for you to explore by passing the argument: --help .
$ dotnet build-image --help
Description:
  Build a container image from a .NET project.

Usage:
  build-image [<PROJECT>] [options]

Arguments:
  <PROJECT>  .NET project to build [default: .]

Options:
  -b, --base <base>            	Flavor of the base image
  -t, --tag <tag>              	Name for the built image [default: dotnet-app]
  --push                       	After the build, push the image to the repository
  --as-dockerfile <as-dockerfile>  Generates a Dockerfile with the specified name
  --version                    	Show version information
  -?, -h, --help               	Show help and usage information
We have already used the tag (-t) option.
The --base option allows you to specify the base image. You can specify any base image that Microsoft publishes on the Microsoft Artifact Registry. When you specify ubi as the base, your application will use the .NET images from the Red Hat Ecosystem Catalog. Red Hat's UBI images are enterprise-grade images that can be freely distributed and deployed anywhere. To learn more, take a look at the UBI FAQ or read the e-book Red Hat Universal Base Images (UBI).
As an alternative to specifying the options on the command line, add them to the csproj file:
  <PropertyGroup>
    <TargetFramework>net6.0</TargetFramework>
    <ImageTag>mywebapp</ImageTag>
    <ImageBase>ubi</ImageBase>
  </PropertyGroup>
If you prefer to have a Dockerfile under version control, the tool can still be useful. Specify the --as-dockerfile Dockerfile argument to write out a Dockerfile instead of building an image. You can inspect the file and customize it.
Using dotnet build-image in a GitHub workflow
This section creates a GitHub repository and uses dotnet build-image in a GitHub workflow to set up continuous delivery (CI/CD) of a .NET application as a container image.
As my image registry, I use my free account at Quay.io. Other registries such as Docker Hub work too.
First, create a new repository and populate it with a .NET web app. I've named mine build-image-demo:
$ git clone git@github.com:tmds/build-image-demo.git
$ dotnet new web -o web --no-restore
$ git add web
$ git commit -m "Add web project"
$ git push
Add a global.json file that captures the SDK version you'd like contributors and CI to use:
$ dotnet new globaljson --sdk-version 6.0.100 --roll-forward latestFeature
$ git add global.json
$ git commit -m "Use 6.0 SDK"
$ git push
Note that we've used the latestFeature argument. That permits the use of any 6.0.xxx SDK. Without that argument, the SDK is limited to the 6.0.1xx feature band.
To use the Red Hat .NET images, add the ImageBase property in the web.csproj file. Add the line marked by a plus sign (+) in the PropertyGroup section:
   <PropertyGroup>
 	<TargetFramework>net6.0</TargetFramework>
 	<Nullable>enable</Nullable>
 	<ImplicitUsings>enable</ImplicitUsings>
+	<ImageBase>ubi</ImageBase>
   </PropertyGroup>
Include this change in your next commit:
$ git add web/web.csproj
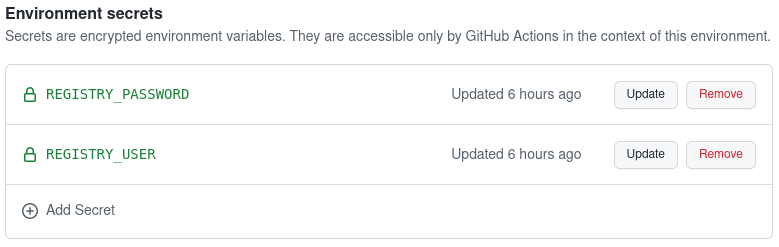
Now, add the credentials for accessing the registry server to your GitHub project. Click the project's Settings link in the GitHub web interface and open the Environments tab. Then click New Environment and name it ImageRegistry. Add two secrets named REGISTRY_USER and REGISTRY_PASSWORD. These contain the credentials used to access the registry (Figure 1). After you add these values, verify that they work by using them with the podman login or docker login command.
Now you're ready to add the workflow. Create a file at: .github/workflows/deploy-image.yml and add the following content.
name: Deploy Image

on:
  push:
	branches: [ "main" ]

env:
  DOTNET_PROJECT: web
  REGISTRY: quay.io
  IMAGE_NAME: tmds/web

jobs:
  deploy:

	environment: ImageRegistry
	runs-on: ubuntu-latest

	steps:
	- uses: actions/checkout@v3
	- name: Install .NET
  	uses: actions/setup-dotnet@v2
	- name: Install dotnet-build-image
  	run: dotnet tool install -g dotnet-build-image
	- name: Log in to Image registry
  	run: echo "${{ secrets.REGISTRY_PASSWORD }}" | docker login $REGISTRY -u "${{ secrets.REGISTRY_USER }}" --password-stdin
	- name: Build and push image
  	run: dotnet build-image --push "$DOTNET_PROJECT" -t "$REGISTRY/$IMAGE_NAME"
Update the REGISTRY and IMAGE_NAME properties under the env field to the right values for your image registry. If you're using Docker Hub, use docker.io as the REGISTRY.
Let's take a look at the steps in the workflow:
- The first step (
checkout) checks the source code. - The next step (
setup-dotnet) installs the .NET SDK using the version fromglobal.json. - A command runs which logs into the image registry.
- The last step runs the
dotnet build-imagetool to build the image and push it to the registry.
When you've finished updating the file, push it to the repository:
$ git add .github/workflows/deploy-image.yml
$ git commit -m "Add deploy-image workflow."
$ git push
GitHub will trigger the workflow. You can follow progress under the Actions tab in the GitHub web interface.
When you make changes to the web application and commit them to the main branch, it triggers the workflow that creates a new image and pushes it to the repository.
$ podman run –rm -p 8080:8080 quay.io/tmds/web
If you open the website at http://localhost:8080, the .NET application responds.
Now when you make a change to the web application and commit it to the main branch, it triggers the workflow again and pushes a new image to the repository.
Automating the Dockerfile creation
In this article, you have learned how to use dotnet build-image to create a container image from a .NET application without writing a Dockerfile, and how to integrate build-image into a GitHub CI/CD workflow. To share feedback about this tool, please create a ticket in the GitHub repository.
Last updated: August 14, 2023