Kafka has emerged as one of the more popular open source technologies for powering message-driven applications at web scale. It can handle hundreds of thousands, if not millions of messages a second. And, it will store any message it receives for a configurable amount of time, whether the message is consumed or not. That timespan can be weeks, or it can be years. These capabilities alone make Kafka a very powerful technology.
Yet, while Kafka is powerful, it is also complex. There are many moving parts that need to be accounted for. Fortunately, there are client libraries written in a variety of languages that abstract away much of the complexity that comes with programming Kafka. One of the more popular libraries is the one written for Java, which is published as the Apache Kafka Clients.
The Java client libraries for Kafka streamline a lot of the work that goes into producing messages to and consuming messages from Kafka brokers. But they are not magical. You need to know a thing or two in order to use them effectively. Java is an object-oriented programming (OOP) language, which means there's a bit more to understand, particularly if you are new to OOP.
This article provides a helping hand to get you started working with Java producers and consumers from an object-oriented perspective. It covers the basics of creating and using Kafka producers and consumers in Java. You'll learn how to:
- Work with a Java properties file to configure programmatic access to Kafka brokers.
- Program a Kafka producer in Java to emit messages to a broker.
- Program a Kafka consumer in Java to retrieve messages from a broker.
- Install Kafka as a Podman or Docker container for use by both producers and consumers.
Note: This is the second article in our series about working with Kafka and Java. If you're new to Kafka and Java concepts, be sure to read the previous installment, A developer's guide to using Kafka with Java.
Prerequisites
This article ships with a demonstration application that is the focus of this article. You can run this application's code from any Linux computer with Java and Maven installed. The code is painstakingly commented in order to provide a greater understanding of the programming details. Each line of code has a purpose. Understanding that purpose is important.
I do assume that you understand the basics of OOP, that you know what packages, classes, interfaces, and abstract classes are, and that you understand what class inheritance is about. I also assume that you understand the fundamentals of variable scope, and that you know what the keywords private, protected, and public mean.
The illustrations in this article generally follow the guidelines defined in Unified Modeling Language (UML). To follow along, it's not essential to understand the fine points of UML—understanding the meaning of the arrowhead symbols used with connector lines, for example—but it won't hurt if you do.
Finally, the demonstration code for this article is a Maven project, so having a basic idea of what Maven is about is useful, but not required.
The demonstration project object model
You can download the article's demonstration project from the Red Hat Developer GitHub repository by executing the following command from a Terminal window:
git clone https://github.com/redhat-developer-demos/kafka-java-demo.git
The demonstration project is written in Java and uses the Maven application management framework. Thus, both the Java Development Kit and Maven need to be installed on the Linux computer you plan to use, should you decide to follow along in code. (The readme.md file in the demonstration project source code provides instructions for this.)
The demonstration project publishes an Application class that is the starting point of execution. This class has a main() method that starts either a Kafka producer or a Kafka consumer. Which one it starts will depend on the values passed as parameters to main() at the command line. For example, to have the Application class start a Kafka producer, you'd type the following in a terminal window from the root of the working directory of the demonstration application:
mvn -q clean compile exec:java \
 -Dexec.mainClass="com.demo.kafka.Application" \
 -Dexec.args="producer mytopic"
The class that encapsulates the Kafka producer is named SimpleProducer. The class that encapsulates the Kafka consumer is named SimpleConsumer. As the names imply, SimpleProducer emits messages to the Kafka broker, and those messages are retrieved and processed by SimpleConsumer. (In this sample application, these messages just contain random text data.) All this is illustrated in Figure 1.

Both SimpleProducer and SimpleConsumer get their configuration values from a helper class named PropertiesHelper. PropertiesHelper uses the values declared in a text file named config.properties to create a Java Properties class. This Properties class exposes all the values in config.properties as key-value pairs, as illustrated in Figure 2.
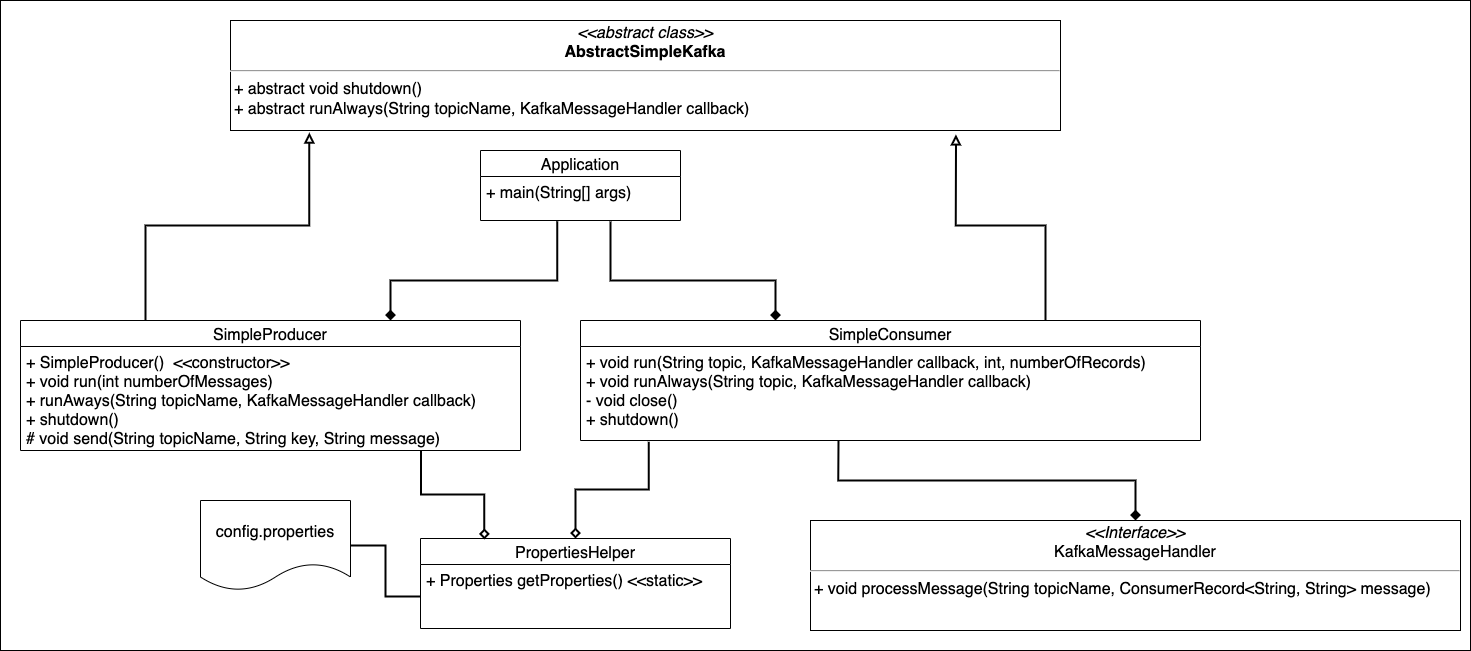
The code's configuration settings are encapsulated into a helper class to avoid violating the DRY (or Don't Repeat Yourself) principle. The config.properties file is the single source of truth for configuration information for both the producer and consumer classes. You could just create and populate a Properties object directly in both the producer and consumer code in order to provide runtime information, but having consumers and producers use the PropertiesHelper class to get runtime information means that, if a configuration value needs to be added or changed, all the developer needs to do is to alter the contents of the config.properties file and then recompile. There is no need to fiddle around with actual Java code.
Working with KafkaClient properties
As earlier noted, the config.properties file is the single source of truth for defining runtime information that the consumers and producers need to bind to a Kafka broker. The following listing shows the contents of this file for the demonstration application, commented to explain the purpose of each entry.
# The location of the Kafka server
bootstrap.servers=localhost:9092

# the default group ID
group.id=test-group

# the default topic to use if one is not provided
default.topic=magic-topic

# The number of records to pull of the stream every time
# the client takes a trip out to Kafka
max.poll.records=10

# Make Kafka keep track of record reads by the consumer
enable.auto.commit=true

# The time in milliseconds to Kafka write the offset of the last message read
auto.commit.interval.ms=500

# classes for serializing ...
key.serializer=org.apache.kafka.common.serialization.StringSerializer
value.serializer=org.apache.kafka.common.serialization.StringSerializer

# ... and deserializing messages
key.deserializer=org.apache.kafka.common.serialization.StringDeserializer
value.deserializer=org.apache.kafka.common.serialization.StringDeserializer
Now that you understand how runtime information stored in a properties file is exposed by way of a helper class, you're ready to learn how the SimpleProducer class emits messages to a Kafka broker.
The Kafka producer implementation
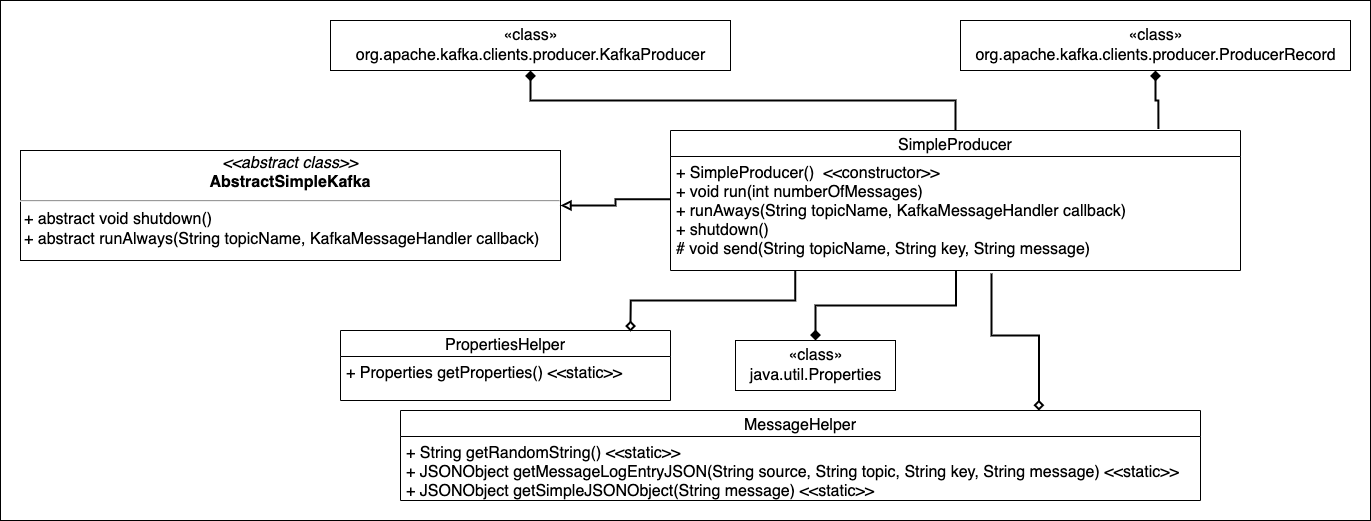
SimpleProducer has the code that first creates a message that contains a random string and then sends that message on to the Kafka broker. The location of the Kafka broker is defined in the config.properties file. The actual class that does the work of sending the message to the Kafka broker is called KafkaProducer, which is part of the Apache Kafka client package. It has all the intelligence required to work with a Kafka broker.
SimpleProducer is inherited from the abstract class named AbstractSimpleKafka. AbstractSimpleKafka provides the graceful shutdown behavior for SimpleProducer. That shutdown behavior is also used by the SimpleConsumer class that you'll learn more about shortly.
AbstractSimpleKafka declares two abstract methods named shutdown() and runAlways(). Declaring these methods as abstract means that a class that inherits from AbstractSimpleKafka must provide implementation logic for them. This is appropriate because the classes that inherit from AbstractSimpleKafka will have a particular way of implementing their behavior. Declaring shutdown() and runAlways() as abstract ensures that they will be implemented.
The demonstration application uses an abstract class here in order to support the DRY principle. Since both KafkaProducer and SimpleConsumer have common shutdown behavior, it's best to put the behavior that can be shared in a single location, hence the justification for AbstractSimpleKafka. Logic in AbstractSimpleKafka does the work of intercepting process termination signals coming from the operating system and then calling the shutdown() method. All that's required for a class that inherits from AbstractSimpleKafka is to provide graceful shutdown behavior specific to the inheriting class by overriding the shutdown() method. All this is illustrated in Figure 3.
To get a new instance of KafkaProducer that is bound to a Kafka broker, pass the configuration values defined in config.properties as a Properties object to the KafkaProducer constructor. As mentioned, the PropertiesHelper class encapsulates loading the keys and values defined in the config.properties files and then exposing the information as a Properties object. The following listing shows the getter method that returns the internal KafkaProducer object that SimpleProducer uses.
private KafkaProducer<String, String> getKafkaProducer() throws Exception {
        if (this.kafkaProducer == null) {
            Properties props = PropertiesHelper.getProperties();
            this.kafkaProducer = new KafkaProducer<>(props);
        }
        return this.kafkaProducer;
    }
In the next listing, the SimpleProducer method runAlways() uses the protected method send() to emit messages to the Kafka broker defined in config.properties. The method will send messages continuously every 100 milliseconds until the process in which the class is running is terminated.
 public void runAlways(String topicName, KafkaMessageHandler callback) throws Exception {
        while (true) {
            String key = UUID.randomUUID().toString();
            //use the Message Helper to get a random string
            String message = MessageHelper.getRandomString();
            //send the message
            this.send(topicName, key, message);
            Thread.sleep(100);
        }
    }
The send() method uses the values of its key and message parameters passed to create a ProducerRecord object. This object is the lingua franca by which messages are passed to a Kafka broker by way of the internal KafkaProducer object.
protected void send(String topicName, String key, String message) throws Exception {
        String source = SimpleProducer.class.getName();

        //create the ProducerRecord object which will
        //represent the message to the Kafka broker.
        ProducerRecord<String, String> producerRecord =
                new ProducerRecord<>(topicName, key, message);

        //Use the helper to create an informative log entry in JSON format
        JSONObject obj = MessageHelper.getMessageLogEntryJSON(source, topicName, key, message);
        log.info(obj.toJSONString());
        //Send the message to the Kafka broker using the internal
        //KafkaProducer
        getKafkaProducer().send(producerRecord);
    }
The send() method is declared as protected to make it visible for unit testing. Because send() is only used internally within SimpleProducer, it's illogical to give the method public visibility. Best practices dictate that you don't want to expose code to the public that doesn't warrant such visibility. But the method does need to be unit tested, and making send() private would deny a unit test access to it. Setting its visibility to protected makes it visible to any other class in the package com.demo.kafka. Both SimpleProducer and the testing class, SimpleProducerConsumerTest, are part of the same com.demo.kafka package. Thus, send() is testable from the testing class SimpleProducerConsumerTest.
Making send() protected in scope is a subtle point, but it's an important one from the point of view of object-oriented programming.
These are the most important points about the Kafka producer implementation. Next, you'll see how the class SimpleConsumer retrieves and processes messages from a Kafka broker.
The Kafka consumer
SimpleConsumer is a "wrapper" class that uses an Apache Kafka client's KafkaConsumer class to retrieve and process messages from a Kafka broker, as illustrated in Figure 4.

The actual work of continuously getting messages from the Kafka broker and processing them is done by the method runAlways(). Remember, runAlways() was declared in the abstract class AbstractSimpleKafka as an abstract method that was not yet implemented. Since SimpleConsumer inherits from AbstractSimpleKafka, it must provide implementation logic for this method.
As you can see in the listing below, the code gets the Properties object that contains the information to bind to the Kafka broker using the getProperties() method in the helper class PropertiesHelper. The properties are passed as a parameter to the constructor of the internal KafkaConsumer object.
KafkaConsumer then subscribes to the topic. The name of the topic is passed as a parameter to the runAlways() method. The KafkaConsumer object polls the broker at set intervals to get messages. The polling timespan is set according to the value assigned to the class variable TIME_OUT_MS.
public void runAlways(String topic, KafkaMessageHandler callback) throws Exception {
      Properties props = PropertiesHelper.getProperties();
      kafkaConsumer = new KafkaConsumer<>(props);
      //keep running forever or until shutdown() is called from another thread.
      try {
          kafkaConsumer.subscribe(List.of(topic));
          while (!closed.get()) {
              ConsumerRecords<String, String> records =
                      kafkaConsumer.poll(Duration.ofMillis(TIME_OUT_MS));
              if (records.count() == 0) {
                  log.info(MessageHelper.getSimpleJSONObject("No records retrieved"));
              }

              for (ConsumerRecord<String, String> record : records) {
                  callback.processMessage(topic, record);
              }
          }
      } catch (WakeupException e) {
          // Ignore exception if closing
          if (!closed.get()) throw e;
      }
  }
Every time a poll is conducted against the Kafka broker, an array of messages comes back as a ConsumerRecords object. ConsumerRecords is a collection of ConsumerRecord objects. The maximum number of messages returned from a poll is defined by the value of the max.poll.records entry in the config.properties file.
The code uses a callback object to process each message that's retrieved from the Kafka broker. The callback object is passed as a parameter to the runAlways() method. As you can see in the listing above, the code traverses the ConsumerRecords collection retrieved from the poll and invokes the processMessage() method supplied by the callback object.
The actual callback object is defined in another part of the code. The behavior of the callback object's processMessage() method is unknown to runAlways(). As long as the callback object publishes a method that conforms to the method signature defined by the pre-existing interface KafkaMessageHandler, the code will execute without a problem. Putting the message processing behavior in a place different from where the actual message retrieval occurs makes the code more flexible overall. This is the essential benefit of using a callback object.
The work of polling the Kafka broker and processing retrieved messages is encapsulated in a try-catch block. The code will catch a WakeupException, which is raised when an outside thread attempts to stop message consumption. The reason theWakeupException is caught and checked is to make sure the call to stop message consumption came from the SimpleConsumer's shutdown() method, as shown in the following listing.
public void shutdown() throws Exception {
        closed.set(true);
        log.info(MessageHelper.getSimpleJSONObject("Shutting down consumer"));
        getKafkaConsumer().wakeup();
    }
The private class variable named closed is provided as a logical gate that gets “closed” from within the shutdown() method. Only when the gate is closed by shutdown() will the WakeupException be allowed to execute from the call within runAlways(). Remember, under the covers, throwing a WakeupException has the effect of shutting down message consumption.
The closed variable is of type AtomicBoolean. This type of variable provides a thread-safe way to represent state among threads. If for some reason an outside thread raises a WakeupException, it will be ignored. As mentioned previously, only a WakeupException that is raised by shutdown() will be respected. It's fundamentally good housekeeping. In this case, the behavior of shutdown() is to log a shutdown event. However, there are other graceful instructions that could be included in the shutdown() behavior too.
The runAlways() method of the SimpleConsumer class is the core means by which message consumption from a Kafka broker is implemented in the demonstration project. Now that you have reviewed the code, the next thing to do is to get it up and running.
Run Kafka using Podman
Before you can run the demonstration project, you need to have an instance of Kafka installed on the local computer on which the project's code will run. The easiest way to do this on a local machine is to use a Linux container.
The following is the command to get Kafka up and running in a terminal window on a computer that has Podman installed:
podman run -it --name kafka-zkless -p 9092:9092 -e LOG_DIR=/tmp/logs quay.io/strimzi/kafka:latest-kafka-2.8.1-amd64 /bin/sh -c 'export CLUSTER_ID=$(bin/kafka-storage.sh random-uuid) && bin/kafka-storage.sh format -t $CLUSTER_ID -c config/kraft/server.properties && bin/kafka-server-start.sh config/kraft/server.properties'
To see if your system has Podman installed, type the following in a terminal window:
which podman
If Podman is installed, you'll see output similar to the following:
/usr/bin/podman
If the call to which podman results in no return value, Podman is not installed.
Run Kafka with Docker
Below is the command to execute in a terminal window to get Kafka up and running on a Linux machine using Docker:
docker run -it --name kafka-zkless -p 9092:9092 -e LOG_DIR=/tmp/logs quay.io/strimzi/kafka:latest-kafka-2.8.1-amd64 /bin/sh -c 'export CLUSTER_ID=$(bin/kafka-storage.sh random-uuid) && bin/kafka-storage.sh format -t $CLUSTER_ID -c config/kraft/server.properties && bin/kafka-server-start.sh config/kraft/server.properties'
To see if your system has Docker installed, type the following in a terminal window:
which docker
If Docker is installed, you'll see output similar to the following:
/usr/local/bin/docker
If the call to which docker results in no return value, Docker is not installed.
Install Podman or Docker
If you have neither Podman nor Docker installed on your computer, you need to install one of the container managers. Check out the documentation for Podman or Docker for installation instructions.
Test the demonstration project
Run the following command from the top level of the directory where you installed the demonstration code:
maven test
Executing this command will have the Maven framework run the unit tests defined in the src/test/java/com/demo/kafka directory of the demonstration project.
Run the demonstration project
The demonstration project is made up of two parts. First, you need to run the producer to continuously emit messages that have random data. Then you need to run the consumer, which will retrieve those messages and process them. The processing behavior of the consumer is to log the contents of a retrieved message. Those log messages will appear in the file logging.log, which will be in the root level of the demonstration application working folder.
The following sections describe how to get both the producer and consumer running. Remember: You must have an instance of Kafka up and running on the local machine in order for this all to work.
Start a continuously running producer
In a new terminal window, go to the directory in which the demonstration code is installed and execute the following command:
sh ./runproducer.sh mytopic
You should see a steady stream of screen output. That's the log output of messages being sent to the topic named mytopic.
Start a continuously running consumer
In another terminal window, go to the same directory and execute the following command:
sh ./runconsumer.sh "mytopic"
You should see a steady stream of screen output. That's the log output of messages being sent and retrieved from the topic named mytopic.
At this point, if you're running the demonstration project, you should have a producer emitting messages continuously and a consumer retrieving those messages. The following listing shows the log entries that SimpleConsumer generates when messages are retrieved.
2022-03-05 09:37:55 INFO  KafkaMessageHandlerImpl:26 - {"bootstrapServers":"localhost:9092","topic":"mycooltopic","source":"com.demo.kafka.KafkaMessageHandlerImpl","message":"2djW70ABZM","key":"b506a6ac-b354-49cc-88f4-37e4b59b8b1a"}
2022-03-05 09:37:55 INFO  KafkaMessageHandlerImpl:26 - {"bootstrapServers":"localhost:9092","topic":"mycooltopic","source":"com.demo.kafka.KafkaMessageHandlerImpl","message":"gPpzP6quCY","key":"2c09847f-037c-455d-845e-7a21b8e8912c"}
Your work is done!
Learn more about Kafka at Red Hat
This has been a lengthy article, no doubt. Between the content and the demonstration code, we've covered a lot. You reviewed the purpose of Kafka. I described how the demonstration code is organized. I went into detail about how the client classes KafkaProducer and KafkaConsumer are used by their wrapper classes SimpleProducer and SimpleConsumer, respectively. I also discussed some of the object-oriented aspects of the demonstration code's structure, particularly around supporting the DRY principle.
As mentioned at the beginning of this article, the classes published by the Apache Kafka client package are intended to make programming against Kafka brokers an easier undertaking. You can find more resources about Apache Kafka on Kubernetes on our Red Hat Developer site. Learn more about how to run Kafka on Red Hat OpenShift with Red Hat AMQ Streams.
Last updated: May 25, 2023