Running Proof of Concept (PoC) code on your local machine is great and definitely worthwhile, but the real test comes when you must face the fallacies of distributed computing and run things in the cloud. This is where you make the leap from PoC to more of an emulation of real life.
In this article, I will guide you through the process of using Red Hat OpenShift Streams for Apache Kafka from code running in a different cluster on the Developer Sandbox for Red Hat OpenShift. All of the code will be running in the cloud, and you will understand the attractions of distributed computing.
Here's a broad overview of what this process entails:
- Create a Kafka instance in Managed Kafka (
samurai-pizza-kafkas). - Create a topic (
prices). - Confirm all this from the command line using the
rhoascommand-line interface (CLI). - Create an application in Developer Sandbox using the image at
quay.io/rhosak/quarkus-kafka-sb-quickstart:latest. - Bind the service to your application from the command line.
- See the results.
Prerequisites
Here's what you'll need to follow along with this tutorial:
- An OpenShift Streams for Apache Kafka account
- A Developer Sandbox for Red Hat OpenShift account
- The
rhoasCLI tool - The OpenShift CLI
oc
What you won't need is a specific operating system. The beauty of working in the cloud is that the burden of operating systems, libraries, connections, etc., is "out there," and not at your machine. You're simply controlling it. You can literally control millions of dollars worth of computing power from an underpowered PC running a terminal session. Processing is now done in the cloud; your local PC is simply for issuing commands. That's the power of leverage. That's pretty cool.
The event of the season
Events are everywhere. An event has a time when it happened and information about itself. These two things give an event meaning. To be quite philosophical about all this: All of existence is a series of events.
For this article, we have an imaginary scenario. Samurai Pizza has been struggling lately, and a large group of hedge fund managers decide to "short" the stock. Learning this—they read it on the internet—a grassroots organization resolves to buy up large swaths of Samurai Pizza stock in order to, in the vernacular, "teach those fund managers a lesson." This results in a very volatile stock price.
(I'm totally making this up and it has no correlation to anything in real life. This is just a game; stop with the comparisons.)
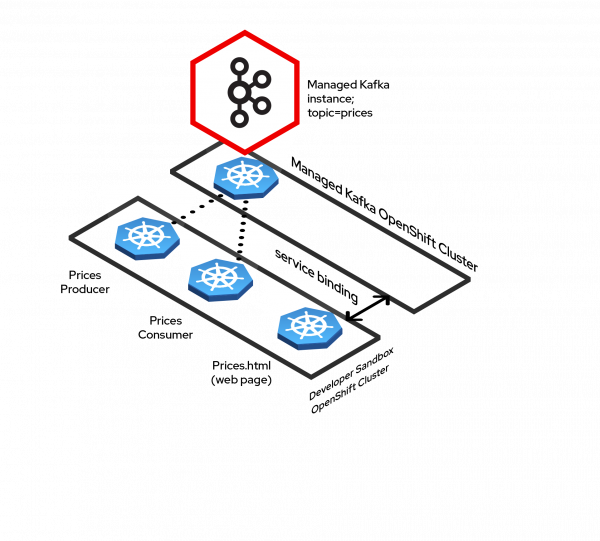
Our application produces the prices and sends them over to Kafka, which then forwards the event to our consumer. Finally, a web page is updated with the new price. Hilarity ensues as the hedge fund managers and grassroots individuals battle it out.
Figure 1 shows an architectural overview of our subject.
Free Managed Kafka trial
The first step is to get your free trial of Red Hat OpenShift Streams for Apache Kafka. It's a simple process, there's no charge or credit card number required, and it's a nice way to start experimenting without any installations needed. This is, truly, the cloud at its best. You can find it here.
Creating the Kafka instance and topic
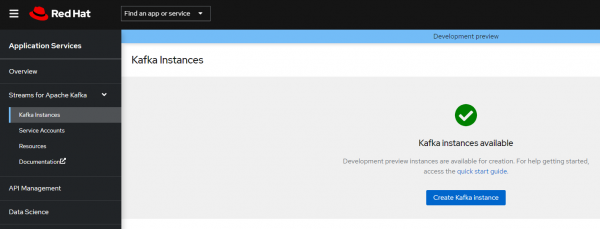
Navigate your way to the Kafka Instances page shown in Figure 2. Click the big, blue Create Kafka instance button to start.
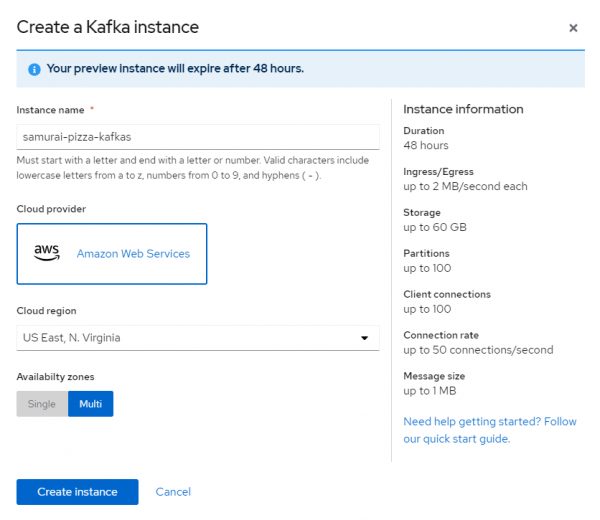
You'll be prompted for information. You will need to supply are the name of the Kafka instance: samurai-pizza-kafkas. You must also select a Cloud provider, a Cloud region, and the Availability zones. Click the Create instance button (see Figure 3) and you'll soon have an instance.
Wait for the instance to reach Ready status(see Figure 4). Be patient; mine took about five minutes. You may need to refresh the screen to see the status change.

At this point, we have an instance of Managed Kafka ready for our use. We can now create our topic, prices.
Creating the topic
The steps to creating our topic follow the familiar create-something-in-the-dashboard model:
- Open the parent: Click on the instance name,
samurai-pizza-kafkas. - Select to create the child: Click the Create Topic button.
- Create the child: Enter the topic name and accept the default values.
But we're not going to do that. Instead, we'll use the command line. Open a terminal session and use the following command: rhoas login, as illustrated here:
PS C:\Users\dschenck> rhoas login
⣷ Logging in...

 You are now logged in as "rhn-engineering-dschenck"
Your browser will open to inform you that you are logged into your Kafka instance. And, of course, your user name will be different.
Now back to the command line, where we'll spin just a little more rhoas magic to create our topic. We need three commands, which are illustrated:
rhoas kafka list: We are using this command to get the id of our kafka instance, which we'll use in the following command.rhoas kafka use --id <<KAFKA_INSTANCE_ID>>: This command allows us to select our instance as the current instance, i.e., the one we want to use.rhoas kafka topic create --name prices: The magic happens here. This command creates the topic using the default values.
PS C:\Users\dschenck> rhoas kafka list
  ID (1)                 NAME                   OWNER                      STATUS   CLOUD PROVIDER   REGION
 ---------------------- ---------------------- -------------------------- -------- ---------------- -----------
  c6l32qnnd4k4as5jmvdg   samurai-pizza-kafkas   rhn-engineering-dschenck   ready    aws              us-east-1

PS C:\Users\dschenck> rhoas kafka use --id c6l32qnnd4k4as5jmvdg
 Kafka instance "samurai-pizza-kafkas" has been set as the current instance.

PS C:\Users\dschenck> rhoas kafka topic create --name prices
Topic "prices" created in Kafka instance "samurai-pizza-kafkas":

...JSON removed to save space...
That last command will spit out a JSON document, which simply defines the topic. You can see a more human-readable output by running the command rhoas kafka topic list (this is entirely optional).
Meanwhile, in your Developer Sandbox...
Let's get our application up and running. First, log into your sandbox cluster from the command line using the oc login command. For detailed instructions, refer to my article Access your Developer Sandbox for Red Hat OpenShift from the command line.
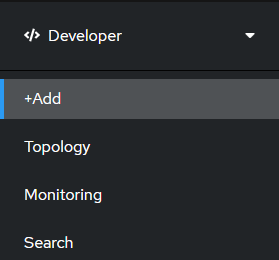
We'll be running an image that's already been compiled from source code. The easiest way to do this is from your Sandbox cluster dashboard. Making sure you're in the Developer environment, select the +Add option shown in Figure 5.
This will present a list of options; we want to use the Container Image option, so simply click that panel (see Figure 6).
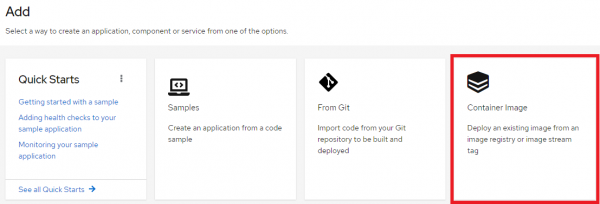
The next page lets us set the parameters for our application. In this case, the only value we need to supply is the image name. Enter quay.io/rhosak/quarkus-kafka-sb-quickstart:latest in the name field (see Figure 7) and click the Create button at the bottom of the page.

OpenShift will do the rest: Import the image, start it in a container, create a Service, create a Route, and create a Deployment for the application.
Just for fun, you can go into the pod and view the logs. You'll see that the application is throwing errors because it cannot connect to the expected Kafka instance. Time to fix that.
Connecting the application to Kafka
We have an application and an instance of Kafka with the topic (prices) our application expects. Now we need information in order to start using our Managed Kafka instance. Specifically, we need the API token from our Managed Kafka instance. We get that by going to https://cloud.redhat.com/openshift/token and copying the token to our local clipboard. You'll see a screen like the one shown in Figure 8.

With the token available, we can run the following command at the command line to connect our Kafka instance to our application:
rhoas cluster connect --token {your token pasted here}
This, in turn, will return the YAML needed to create the service binding object that binds the Kafka instance to our application. The output will be similar to what's shown here:
PS C:\Users\dschenck> rhoas cluster connect --token <<redacted>>
? Select type of service kafka
This command will link your cluster with Cloud Services by creating custom resources and secrets.
In case of problems please execute "rhoas cluster status" to check if your cluster is properly configured

Connection Details:

Service Type:                   kafka
Service Name:                   samurai-pizza-kafkas
Kubernetes Namespace:           rhn-engineering-dschenck-dev
Service Account Secret:         rh-cloud-services-service-account
? Do you want to continue? Yes
 Token Secret "rh-cloud-services-accesstoken" created successfully
 Service Account Secret "rh-cloud-services-service-account" created successfully

Client ID:     srvc-acct-b2f43cd6-da3f-41bd-9190-e1aade856103

Make a copy of the client ID to store in a safe place. Credentials won't appear again after closing the terminal.

You will need to assign permissions to service account in order to use it.
For example for Kafka service you should execute the following command to grant access to the service account:

  $ rhoas kafka acl grant-access --producer --consumer --service-account srvc-acct-b2f43cd6-da3f-41bd-9190-e1aade856103 --topic all --group all

 kafka resource "samurai-pizza-kafkas" has been created
Waiting for status from kafka resource.
Created kafka can be already injected to your application.

To bind you need to have Service Binding Operator installed:
https://github.com/redhat-developer/service-binding-operator

You can bind kafka to your application by executing "rhoas cluster bind"
or directly in the OpenShift Console topology view.

 Connection to service successful.
If you're using Developer Sandbox for Red Hat OpenShift, the Service Binding Operator is already installed.
Important ACL rules
You may notice in the middle of the output that you're instructed to update the Access Control List for your Kafka instance. This allows your application to use the instance and topic. This command is necessary; here's an example — your's will differ slightly:
rhoas kafka acl grant-access --producer --consumer --service-account srvc-acct-b2f43cd6-da3f-41bd-9190-e1aade856103 --topic all --group all
Where are we?
At this point we have a Kafka instance (samurai-pizza-kafkas) with a topic (prices), and we have an application running in OpenShift that wants to use that instance. We've connected our cluster to Kafka, but not the individual application. That's next.
The bind that ties
We need to run a command to bind our Kafka instance to our application.
rhoas cluster bind
Here's an example:
PS C:\Users\dschenck> rhoas cluster bind
Namespace not provided. Using rhn-engineering-dschenck-dev namespace
Looking for Deployment resources. Use --deployment-config flag to look for deployment configs
? Please select application you want to connect with quarkus-kafka-sb-quickstart
? Select type of service kafka
Binding "samurai-pizza-kafkas" with "quarkus-kafka-sb-quickstart" app
? Do you want to continue? Yes
Using ServiceBinding Operator to perform binding
 Binding samurai-pizza-kafkas with quarkus-kafka-sb-quickstart app succeeded
PS C:\Users\dschenck>
Are we there yet?
Yes, we have arrived. At this point, the application is both producing and consuming events, using the Kafka instance and topic we created.
Viewing the results
You can open the application's route from the dashboard or use the command oc get routes to see the URL to the application. Paste the URL into your browser and append /prices.html to it to view the results.
Here is the example URL:
quarkus-kafka-sb-quickstart-rhn-engineering-dschenck-dev.apps.sandbox-m2.ll9k.p1.openshiftapps.com/prices.html
Now you can watch the prices fluctuate wildly as the hedge fund managers and grassroots folks battle it out. The prices will update every five seconds, all flowing through your Managed Kafka instance.
What just happened?
A ton of stuff happened and was created behind the scenes here; let's break it down. After all, you may want to undo this, and knowing what happened and what was created is necessary.
When you created a Kafka instance in Managed Kafka, it, well, created an instance of Kafka there. Pretty straightforward. That instance was also assigned a unique ID within the Red Hat Managed Services system, the key to which is the token, which we used later when we connected to it.
When you ran rhoas use and selected your Kafka instance, you set the context of the rhoas CLI (on your local PC) to that instance, so any subsequent commands would go against that instance. That's important, because later you'll be connecting to your own (Sandbox) cluster; this is where you designate what gets connected to your cluster.
The rhoas kafka topic create --name prices command simply created a topic within Kafka. If you're not clear on this, there's some fantastic material here to get you up to speed. Instant Kafka expertise.
Running oc login connects your local machine to your—in this case, Sandbox—cluster. Note at this point in the tutorial, your local machine is "connected" to both your cluster and the Kafka instance. This allows the magic to happen.
When you created the application in your cluster, it did a lot. It pulled the image from the registry and put it into your cluster—it's in the image streams section (Hint: Run the command oc get imagestreams). It created a pod to run the application. It created a Deployment. It created a Service. It created a Route. Why is this important? Because if you want to completely remove the application and everything associated with it—well, there are several objects.
Note that the application has hard-coded values for the topic (prices). The instance name doesn't matter; the bootstrap server host and port are injected when we do the service binding. Which, incidentally, triggers OpenShift to replace the running pod with a new pod—one with all the correct Kafka information.
Now the real magic happens when you run the rhoas cluster connect command with your token. This tells the Red Hat OpenShift Application Services (RHOAS) Operator, which is running in the Sandbox cluster (and which you need to have in any cluster you will use with Red Hat Managed Services offerings) to connect to the managed service—which it knows because of your rhoas login command—using the token supplied. That token, if you recall, identifies your Kafka instance. This connects the two.
"Wait: Does that mean I can log into another cluster and also use the same Kafka instance there?"
Yes. On the Kafka instance, multiple clusters. Distributed processing, cloud-native computing, microservices... all the buzzwords suddenly come to have real meaning.
The rhoas cluster connect also creates some objects in your cluster. In this case, a Custom Resource of type KafkaConnection. You can see this at your command line by running oc get kafkaconnection. The ability of Kubernetes (and, by extension, OpenShift) to handle Custom Resources is a huge benefit. This is just one small example.
Finally, a ServiceBinding object is created that defines the binding between the Kafka instance and your application—remember when you had to alter that YAML to include the application name (quarkus-kafka-sb-quickstart)?
"Why are the stock prices displayed in Euros?"
Okay, I took a little poetic license here in order to make this demo a little more fun. Besides, hedge fund managers battling a grassroots organization to control a stock price? That would never happen.
Last updated: May 30, 2024