Are you a developer building microservices? Do you struggle with developing and testing individual microservices that are part of a more extensive system? Would you rather focus on your applications and let something else manage the services they require?
This article introduces the Quarkus Superheroes sample application, shows how to deploy it to the free Developer Sandbox, and then illustrates how Java developers can modify the application to replace the backing services with fully managed services provided by Red Hat OpenShift Application Services. The article might seem long, but running the steps should take only 15 to 20 minutes. There are many screenshots to help guide you on your way.
Prerequisites
Here's what you will need if you want to follow along with the steps in this article:
- A Red Hat account, which you need in order to create the managed Application Services on the Red Hat Hybrid Cloud Console and access the Developer Sandbox. No credit card is required.
- The
ocRed Hat OpenShift command-line interface (CLI), or kubectl. - A Java development environment. This article uses the Java 17 version of the application, but any of the other three versions (natively-compiled Java 11, JVM Java 11, or natively-compiled Java 17) would work just the same.
Quarkus Superheroes sample application
Quarkus has excellent documentation and quickstarts to help you become familiar with various features in the Quarkus ecosystem. However, what was missing before was a fully implemented sample set of real-world applications that use these features, patterns, and best practices while also reflecting the problems Quarkus is trying to solve.
Released in February 2022, the Quarkus Superheroes application consists of several microservices co-existing to form a more extensive system. Some microservices communicate synchronously via REST. Others are event-driven, producing and consuming events to and from Apache Kafka. Some microservices are reactive, while others are traditional.
Figure 1 shows the overall architecture of the application.

Detailed information about the application and its architecture can be found on the quarkus.io blog. One of the main requirements when building the application was that it should be simple to deploy on Kubernetes. Let's test that theory.
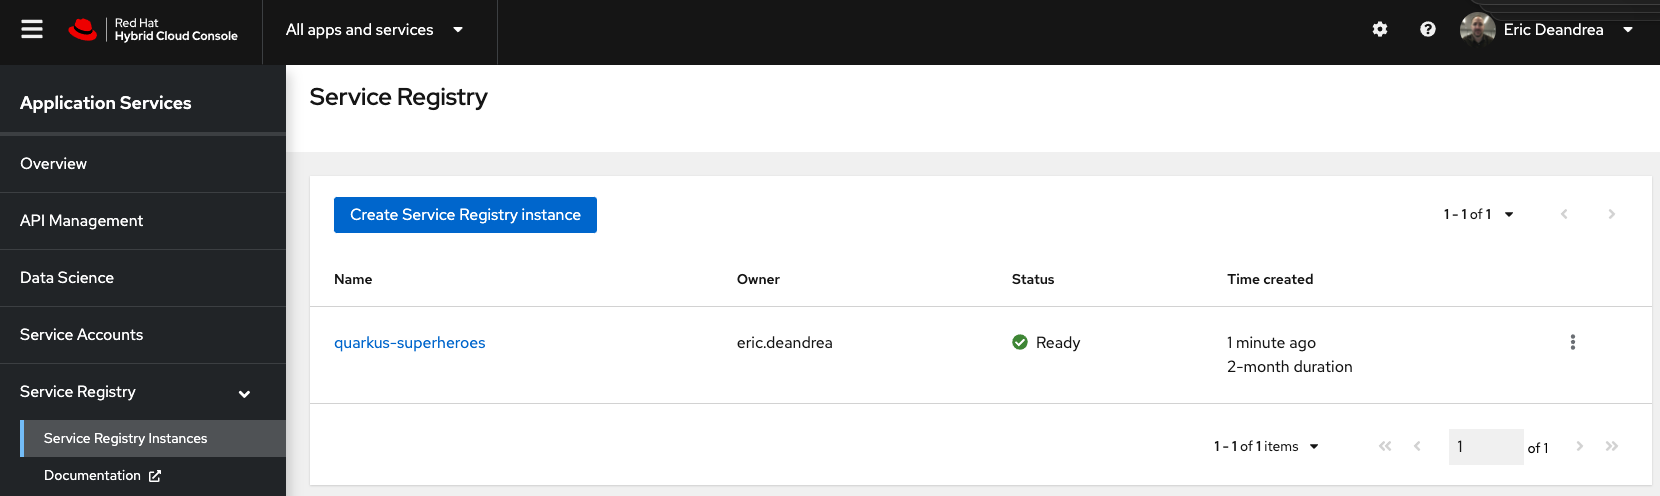
Deploy the application on the Developer Sandbox for Red Hat OpenShift
The Developer Sandbox for Red Hat OpenShift provides you with a private Red Hat OpenShift environment, free for use for 30 days, in a shared, multi-tenant OpenShift cluster that is preconfigured with a set of developer tools. Your private OpenShift environment includes two projects (namespaces) and a resource quota of 7GB RAM and 15GB storage. Your application's development and stage phases can be emulated using the two namespaces. All user Pods are automatically deleted 12 hours after being created.
Log into the Developer Sandbox
You can spin up and access your Developer Sandbox with your Red Hat account. Follow these instructions to log into your Developer Sandbox account. Don't worry if you don't yet have a Red Hat account. The instructions will guide you through how to create and verify one.
Note: You need to follow only the six steps in the Get access to the Developer Sandbox section of the instructions.
You can move to the next section once you are in the Developer Perspective of your sandbox.
Connect your local machine to the Developer Sandbox
Now you need to connect your local machine to your sandbox. Follow these instructions to download the OpenShift CLI (if you don't already have it) and run oc login with the token from your sandbox. Once done, your terminal should be set in the <your-username>-dev project.
Note: If you already have a Developer Sandbox account and have existing workloads in your project, you might need to delete those before deploying the Quarkus Superheroes application. The Developer Sandbox limits the resources each user can deploy at a single time.
Deploy Quarkus Superheroes
The deploy/k8s directory in the root of the repository contains Kubernetes descriptors for each of the four versions of the application: JVM 11, JVM 17, natively compiled with Java 11, and natively compiled with Java 17.
Note: The Quarkus Superheroes repository contains Kubernetes descriptors for various flavors of Kubernetes: OpenShift, minikube, Knative, and "vanilla" Kubernetes. The only real difference between the minikube and Kubernetes descriptors is that all the application Services in the minikube descriptors use type: NodePort. A list of all the applications can be obtained simply by running minikube service list. The Knative descriptors use Knative Serving for each of the applications.
If you'd like, you can run git clone to download the code from the Quarkus Superheroes GitHub repository. However, cloning isn't necessary because you can apply Kubernetes resources directly from remote locations.
Follow the following steps in your terminal to deploy the Java 17 version of the application container images. Wait for each step to complete before proceeding with the next:
Deploy the application by executing:
$ oc apply -f https://raw.githubusercontent.com/quarkusio/quarkus-super-heroes/main/deploy/k8s/java17-openshift.ymlDeploy the Prometheus monitoring service by executing:
$ oc apply -f https://raw.githubusercontent.com/quarkusio/quarkus-super-heroes/main/deploy/k8s/monitoring-openshift.yml
That's it—deploying the Superheroes is super simple! Once everything is deployed, your browser should look something like Figure 2.

The application as deployed is not considered production-ready. The databases, Prometheus instance, Kafka broker, and schema registry deployed are not highly available and do not use any Kubernetes operators for management or monitoring. They also use ephemeral storage.
Later in this article, we'll substitute a fully hosted and managed Kafka service and schema registry service into the mix.
Interacting with the application
Open the event statistics user interface (UI) by clicking the icon in the upper right corner of the event-statistics application, shown in Figure 3.
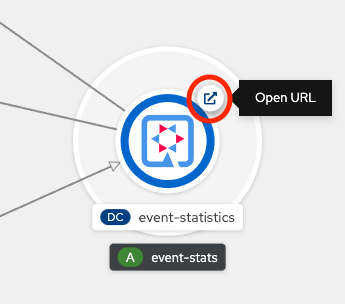
Once open, you should see the event-statistics UI shown in Figure 4.
There isn't anything here yet, but once we interact with the main application UI, there will be.
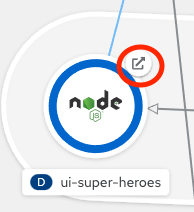
Similarly, open the Superheroes UI by clicking the icon in the upper right corner of the ui-super-heroes application, shown in Figure 5.
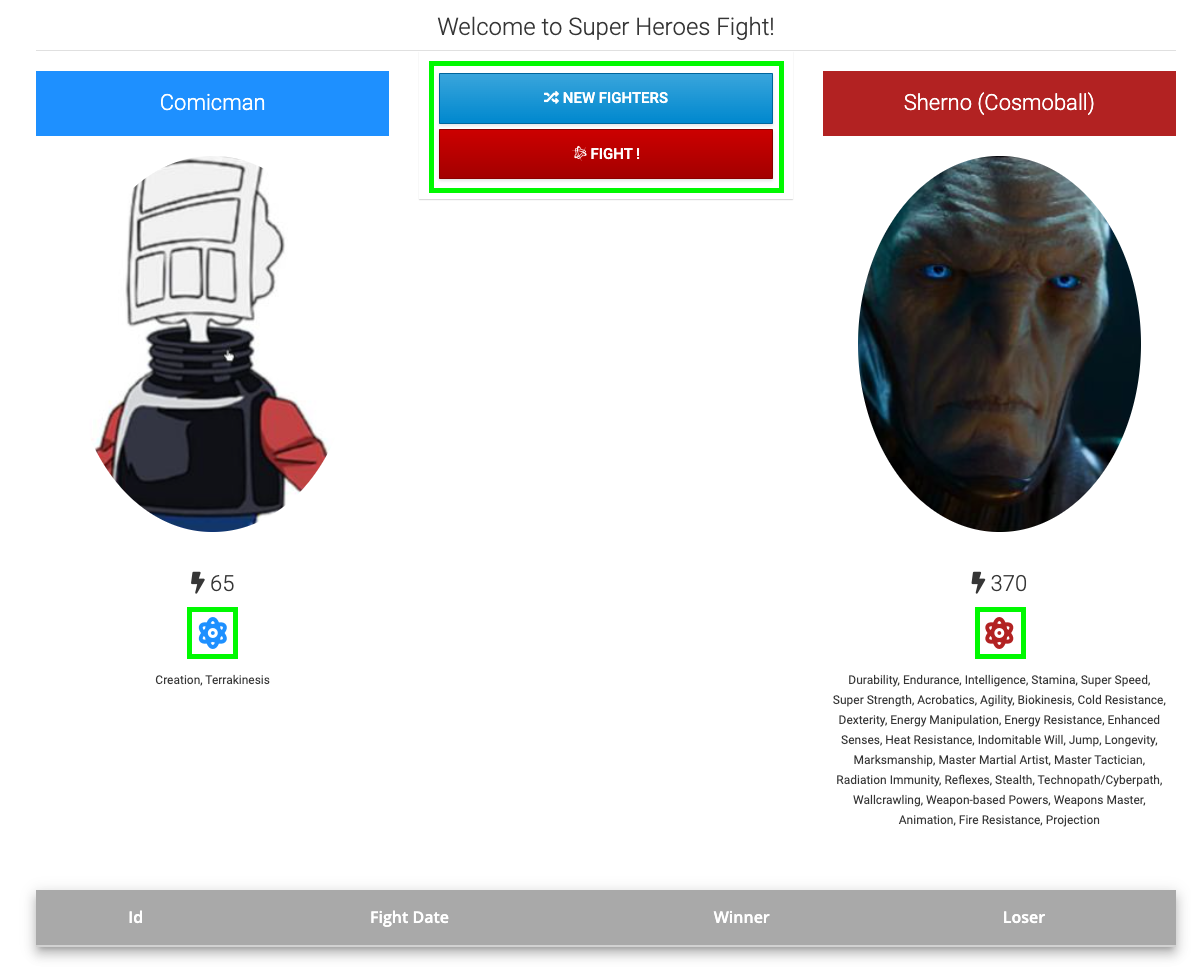
Once open, you should see the Superheroes UI, shown in Figure 6. Highlighted in green in Figure 6 are clickable areas such as:
- Expand/collapse the list of powers a hero or villain has
- Randomly select a new hero and villain
- Perform a battle
Note: You will most likely see different fighters than in the screenshot. They are randomly chosen.
Go ahead and perform a few battles, both with the same fighters and with new fighters. Once you've completed a few battles, note that a chronological list of battles is now displayed in the table on the screen.
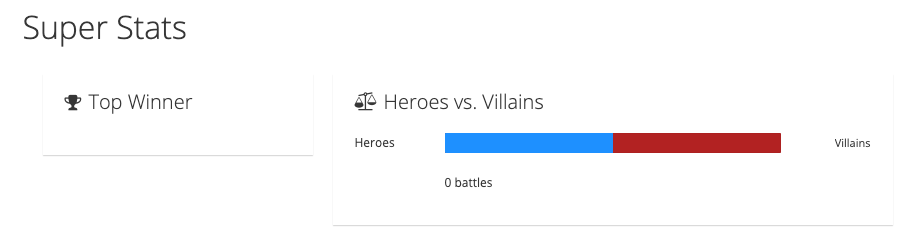
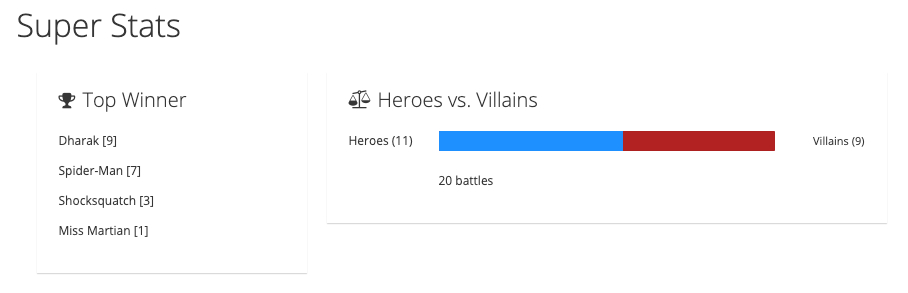
You can also switch your browser tab back over to the event statistics UI. The slider in the event statistics UI should have moved one way or another or stayed in the middle if there were equal wins. There should also be a list of the top ten winners and the number of wins for each. Figure 7 shows an example.
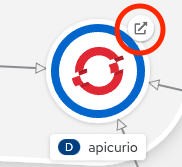
Messages in Apache Avro format arrive from Apache Kafka from the rest-fights service to the event-statistics service. The schema for these messages is registered in an Apicurio Schema Registry. You can open the Apicurio Schema Registry by clicking the icon in the upper right corner of the apicurio application, shown in Figure 8.
Once open, you should see the Apicurio UI, shown in Figure 9.

Click the Fight (fights-value) link to see all the details of the schema, including the Avro source of the schema itself.
Creating managed services
We already mentioned that the current setup is not production-ready. Furthermore, if the Kafka or Schema Registry Pods restart, all the data is lost. One way to fix this is to use fully hosted and managed Kafka and Schema Registry services.
Red Hat provides managed cloud services, known as the Red Hat OpenShift Application Services. We will use a free trial for two of these services, Red Hat OpenShift Streams for Apache Kafka and Red Hat OpenShift Service Registry, to provide a set of production-ready services for our application.
Creating service accounts
The first thing you need to do is create a few service accounts to be used by your applications. Two applications communicate with Kafka in this architecture: The event-statistics and rest-fights services. Each service needs an individual service account for communicating with the managed services.
Note: In some instances, it might make sense for each service to have an individual service account for each managed service. In this article, we decided to keep things simple, so each service has a single service account for both managed services.
Follow these steps to create the two service accounts:
- Open a new browser tab to the Red Hat OpenShift Application Services dashboard. The dashboard uses the Red Hat account with which you logged into the sandbox. You might need to accept some additional terms and conditions if this is the first time you've visited the dashboard.
- On the left-hand navigation, select Service Accounts.
- In the middle of the screen, click Create service account.
- In the Short description field, enter
event-statisticsand click Create. - The Credentials successfully generated screen is now shown. Save the Client ID and Client secret somewhere in a safe place. You will need them later, and they cannot be viewed again. These are the ID and secret for the
event-statisticsservice. - Once copied, check the I have copied the client ID and secret box and click Close.
- The Service Accounts screen will be shown. Click Create service account.
- Repeat steps 4-6, but use
rest-fightsas the Short Description and copy the generated ID and secret for therest-fightsservice somewhere safe.
Create the Service Registry service
Red Hat OpenShift Service Registry is based on the open-source Apicurio Registry project. The service provides a highly available service registry instance that is secure and compatible with the Confluent Schema Registry API and CNCF Schema Registry API. OpenShift Service Registry is also a perfect companion service for applications that use Red Hat OpenShift Streams for Apache Kafka and Red Hat OpenShift API Management.
Create the Service Registry instance
Follow these steps to create a Service Registry instance and give the service accounts the proper access:
- From the Red Hat OpenShift Application Services dashboard, expand the Service Registry entry on the left-side menu and click the Service Registry Instances link.
- Click the Create Service Registry Instance button in the middle of the screen.
- In the Name field, enter
quarkus-superheroesand click Create.- It might take a minute or so for the instance to create. The Status column will display a green checkmark to indicate when the instance is ready for use, as shown in Figure 10.
Assign service account access to the Service Registry
Now follow these steps to give the two service accounts access to the instance:
- Click the quarkus-superheroes instance.
- Click the Access tab at the top.
- Click the Grant access button in the middle of the screen.
- In the Grant access dialog that pops up, choose the service account for the
event-statisticsservice, choose the Manager role, and click Save. - Repeat steps 3 and 4 to grant the Manager role to the
rest-fightsservice account.
Note: We are giving the service accounts the Manager role instead of the Viewer role because both the rest-fights and event-statistics services publish the schema to the registry if it does not already exist.
Get Service Registry connection details
Now follow these steps to get the connection details for the Service Registry instance:
- Click the Service Registry Instances link on the left-side menu to return to the list of Service Registry instances.
Click the menu on the right of the
quarkus-superherosinstance and select Connection, as shown in Figure 11. The screen displays the client connection information for thequarkus-superheroesinstance.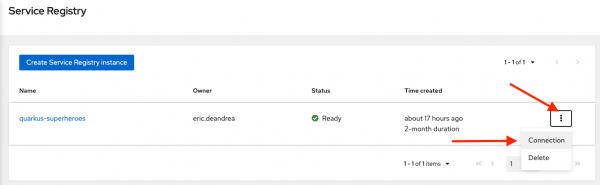
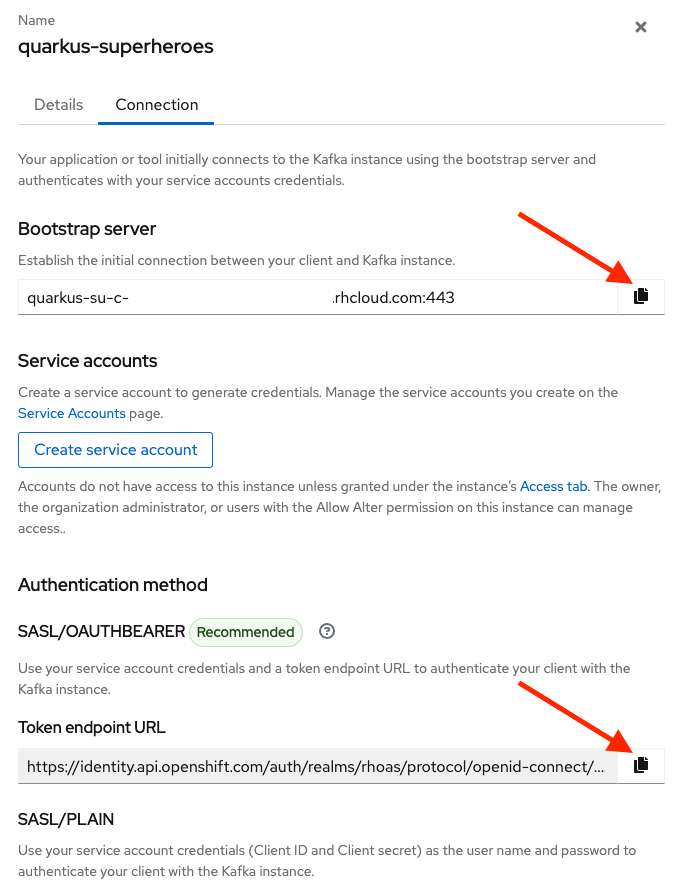
Figure 11: Get the Service Registry instance connection info. Click the Copy to clipboard buttons for the Core Registry API and the Token endpoint URL fields as shown in Figure 12. Save these URLs in a safe place—they will be needed later when you configure the applications.

Figure 12: The Service Registry instance connection details.

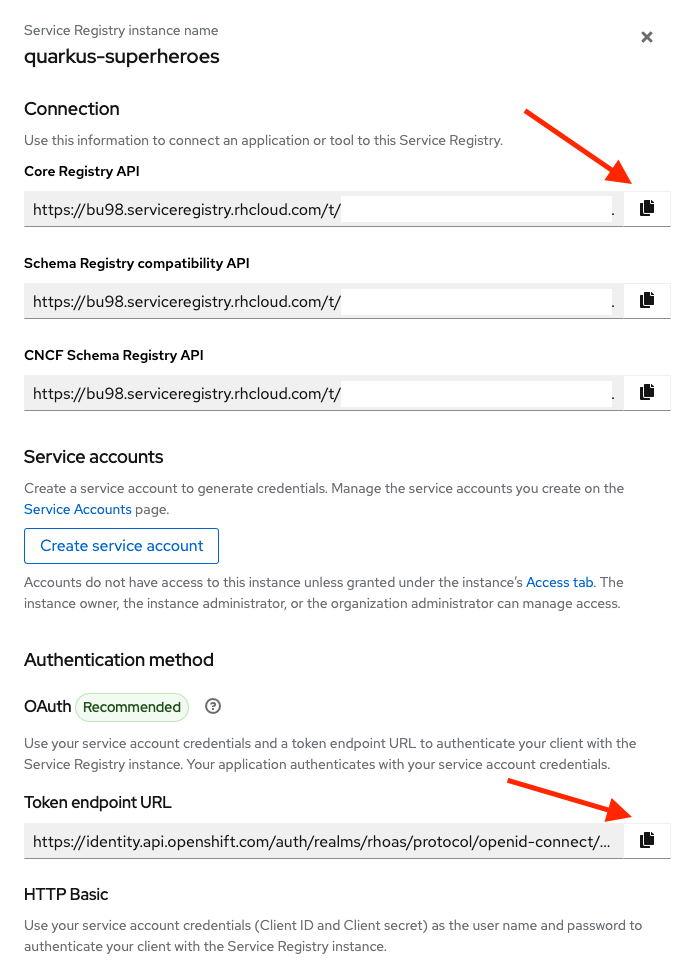
OpenShift Service Registry provides the following APIs to connect applications to the service:
- The Core Registry API is the most powerful and works with Apicurio client libraries. This is the endpoint that the applications will connect to.
- The Schema Registry compatibility API provides compatibility with the Confluent Schema Registry API.
- The CNCF Schema Registry API provides compatibility with the CNCF specification.
Creating an Apache Kafka instance
Red Hat OpenShift Streams for Apache Kafka is a managed cloud service that provides a streamlined developer experience for building, deploying, and scaling new cloud-native applications or modernizing existing systems.
Create a Kafka instance
Follow these steps to create a Kafka instance:
- From the Red Hat OpenShift Application Services dashboard, expand the Streams for Apache Kafka entry on the left-side menu, and click Kafka Instances.
- Click the Create Kafka Instance button in the middle of the screen.
- In the Name field, enter
quarkus-superheroes. - In the Cloud region field, select US East, N. Virginia. Trial instances are not available in the EU region.
Click the Create Instance button.
Note: There is limited capacity in the service's free tier. If you get a message saying "Something went wrong or There was a problem processing the request," try again later.
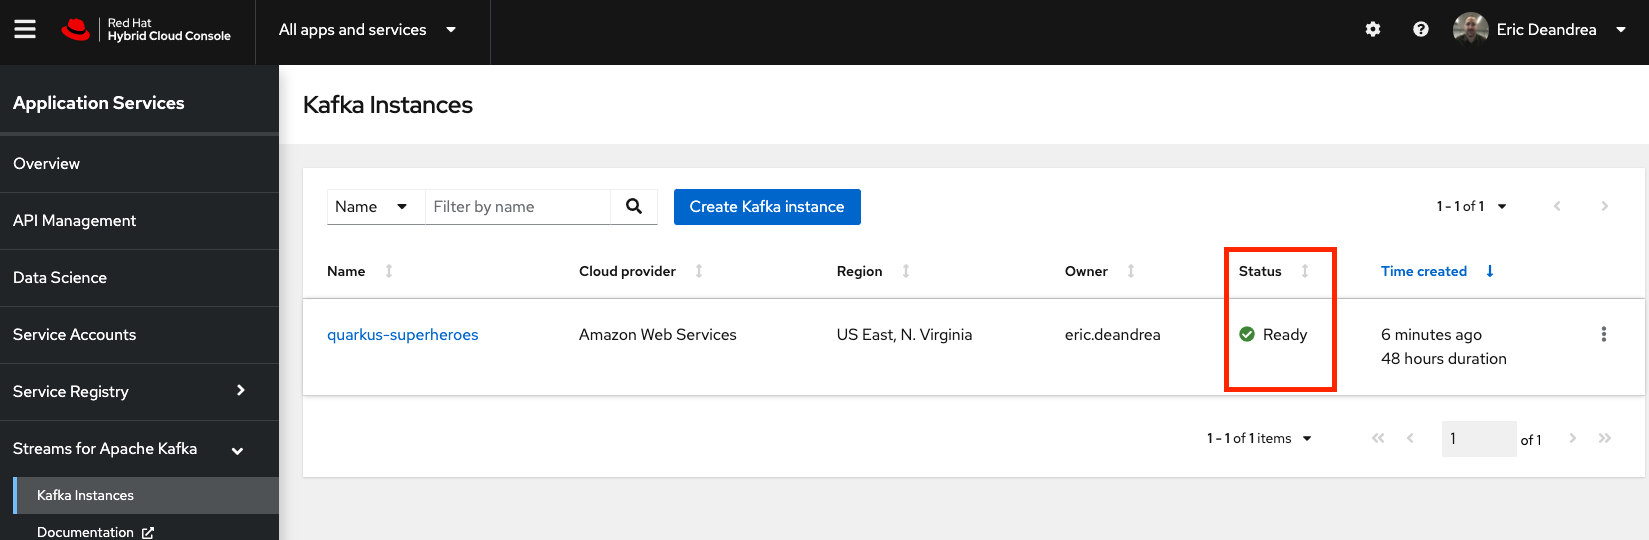
- It might take a few minutes for the instance to create. The Status column will display a green checkmark to indicate when the instance is ready for use, as shown in Figure 13.
Create a Kafka topic
Now follow these steps to create a topic within the instance:
- Click the
quarkus-superheroesinstance. - Click the Topics item on the top of the
quarkus-superheroesinstance dashboard. - Click the Create topic button in the middle of the screen.
- In the Topic name field, enter
fights, then click the Next button at the bottom of the screen. - In the Partitions field, leave the selection of 1 in place and click the Next button at the bottom of the screen.
- On the Message retention screen, leave the defaults in place and click the Next button at the bottom of the screen.
- On the Replicas screen, leave the defaults in place and click the Finish button at the bottom of the screen. The topic will be created.
Assign service account access to Kafka
Now follow these steps to assign proper access to the topic for the two service accounts:
- Click the Access item on the top of the
quarkus-superheroesinstance dashboard. - Click the Manage access button at the top of the Access screen.
- In the Manage access pop-up dialog that appears, select the
event-statisticsservice account from the Account dropdown, then click Next. Click the down arrow next to the Add permission button at the bottom of the pop-up dialog. Select Consume from a topic, as shown in Figure 14, then click the Save button at the bottom of the dialog.

Figure 14: Access management for consuming messages from a Kafka topic. - Click the Manage access button at the top of the Access screen.
- In the Manage access pop-up dialog that appears, select the
rest-fightsservice account from the Account dropdown, then click Next. Click the down arrow next to the Add permission button at the bottom of the pop-up dialog. Select Produce to a topic, as shown in Figure 15, then click the Save button at the bottom of the dialog.

Figure 15: Access management for producing messages to a Kafka topic.

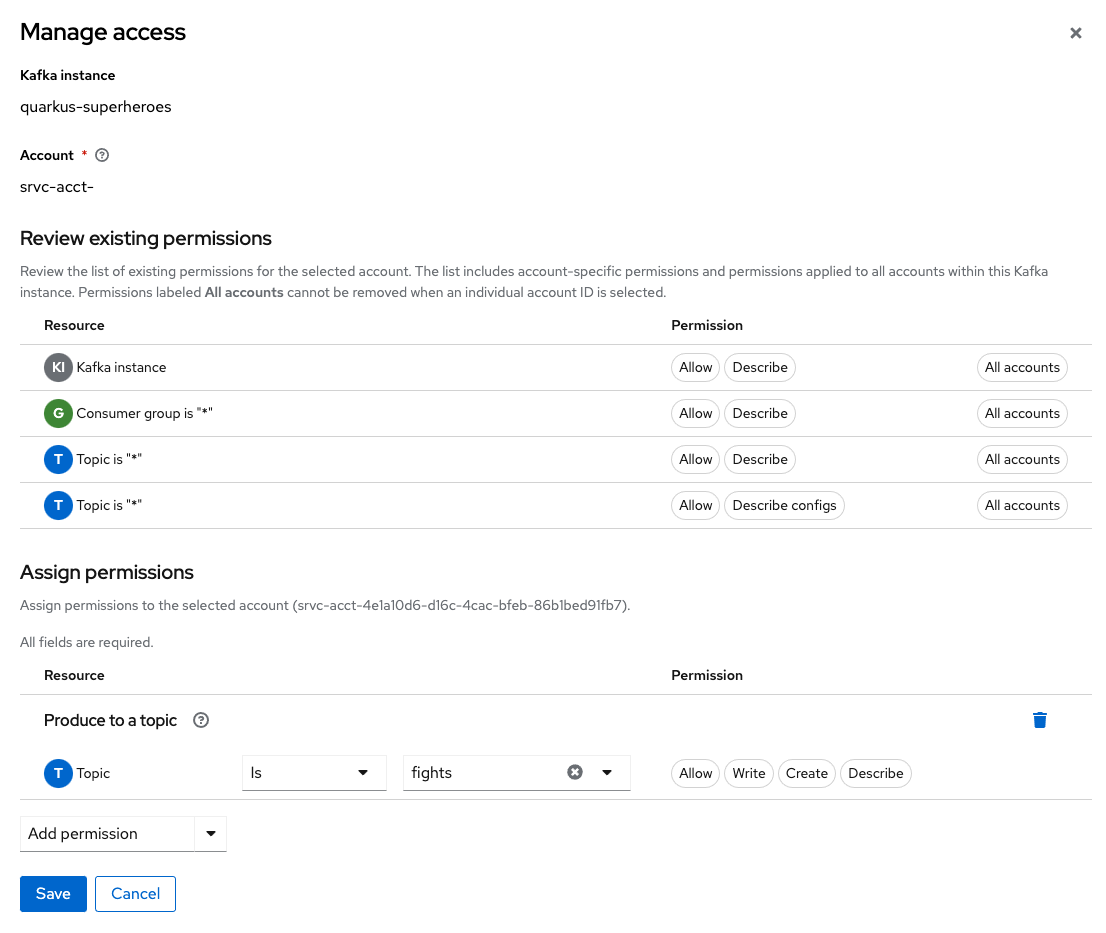
Figure 16 shows the Access tab containing all the Kafka permissions.

Get Kafka connection details
Now follow these steps to get the connection details for the Kafka instance:
- Click the Kafka Instances link on the left-side menu to return to the list of Kafka instances.
Click the menu on the right of the
quarkus-superherosinstance and select Connection, as shown in Figure 17. This displays the client connection information for thequarkus-superheroesinstance.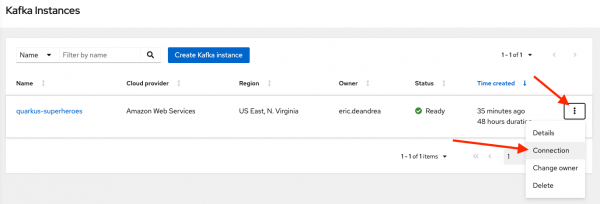
Figure 17: Get the Kafka instance connection info. - Click the Copy to clipboard buttons for the Bootstrap server and the Token endpoint URL fields, as shown in Figure 18. Save these URLs in a safe place, because they will be needed later when you configure the applications.

Note: The Token endpoint URL is most likely the same as the service registry Token endpoint URL. Both services use the same identity provider.
Connect the application to managed services
Now, let's connect our applications to the managed services we've created. First, let's get a little disruptive by deleting the existing Apicurio Schema Registry and Kafka workloads.
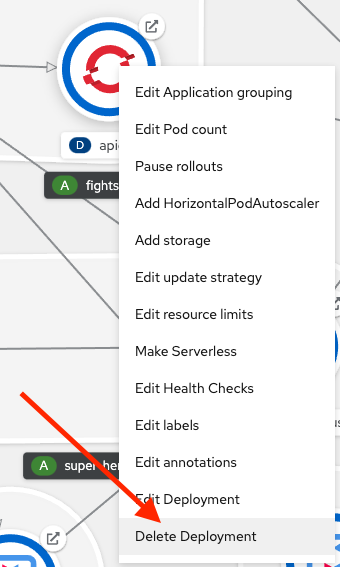
Return to the Topology view of the Developer Sandbox, find the
apicurioworkload, right-click it, and select Delete Deployment as shown in Figure 19.
Figure 19: Delete Apicurio Deployment. - When the Delete Deployment confirmation pops up, check the Delete dependent objects of this resource box and click Delete.
- Repeat steps 1 and 2 to delete the
fights-kafkaworkload as well.
Deleting these workloads might cause some of the other workloads to turn red or show errors in their logs, which is expected. Let's now fix the applications by connecting them to the managed services.
Every application has a corresponding ConfigMap and Secret containing its configuration and credentials. These two places in the event-statistics and rest-fights services need to be updated with the new configuration.
Connect the event-statistics service
Follow these steps to connect the event-statistics service to the managed services:
- Click the ConfigMaps link on the left-hand navigation of the sandbox.
- Find and click the
event-statistics-configitem. - Click the YAML tab at the top of the
event-statistics-configscreen. In the
datasection near the bottom, perform the following:- Replace the value of
kafka.bootstrap.serverswith the Bootstrap server value you saved earlier from the Getting Kafka connection details section. - Replace the value of
mp.messaging.connector.smallrye-kafka.apicurio.registry.urlwith the Core Registry API value you saved earlier from the Getting service registry connection details section. Add the following new key/value combinations:
mp.messaging.connector.smallrye-kafka.apicurio.auth.service.token.endpoint: <Token endpoint URL> mp.messaging.connector.smallrye-kafka.sasl.jaas.config: org.apache.kafka.common.security.oauthbearer.OAuthBearerLoginModule required oauth.client.id="${CLIENT_ID}" oauth.client.secret="${CLIENT_SECRET}" oauth.token.endpoint.uri="<Token endpoint URL>" ; mp.messaging.connector.smallrye-kafka.security.protocol: SASL_SSL mp.messaging.connector.smallrye-kafka.sasl.mechanism: OAUTHBEARER mp.messaging.connector.smallrye-kafka.sasl.login.callback.handler.class: io.strimzi.kafka.oauth.client.JaasClientOauthLoginCallbackHandler mp.messaging.connector.smallrye-kafka.apicurio.auth.client.id: ${CLIENT_ID} mp.messaging.connector.smallrye-kafka.apicurio.auth.client.secret: ${CLIENT_SECRET}- Replace
<Token endpoint URL>with the Token endpoint URL value you saved earlier from either the Getting service registry connection details or Getting Kafka connection details section. The value should be the same in both places.
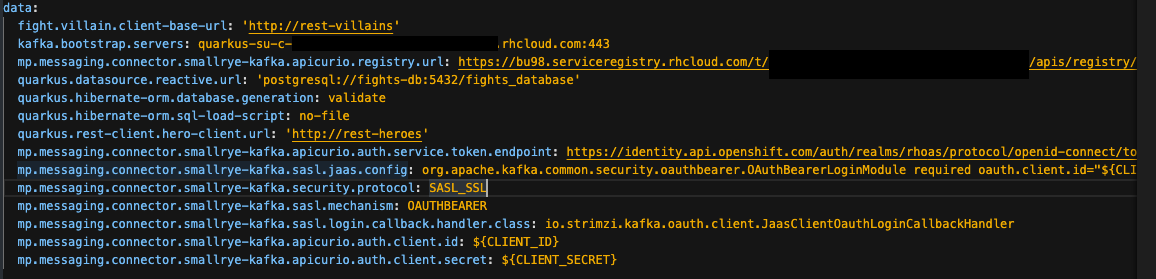
When complete, the data section in your
event-statistics-configConfigMapshould look something like Figure 20.
Figure 20: The event-statistics-config ConfigMap YAML contents. - Replace the value of
- Click Save at the bottom of the screen.
- Click the Secrets link on the left-hand navigation of the sandbox.
- Find and click the
event-statistics-config-credsitem. - Click the YAML tab at the top of the
event-statistics-config-credsscreen. Add a
stringDataelement at the bottom and add the following key/value pairs, as shown in Figure 21:CLIENT_ID: <event-statistics-client-id> CLIENT_SECRET: <event-statistics-client-secret>- Replace
<event-statistics-client-id>with the client ID for theevent-statisticsservice you created in the Creating service accounts section. Replace
<event-statistics-client-secret>with the client secret for theevent-statisticsservice you created in the Creating service accounts section.
Figure 21: The event-statistics-config-creds Secret YAML contents.
- Replace
- Click Save at the bottom of the screen.
- Click the Topology link on the left-hand navigation of the sandbox.
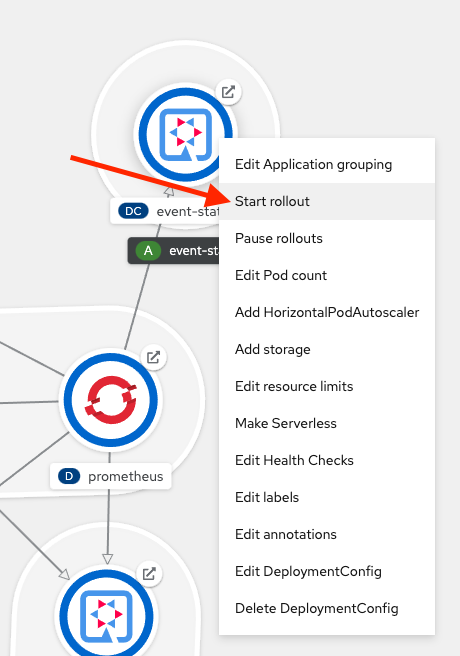
- Find and right-click the
event-statisticsworkload, then select Start rollout as shown in Figure 22. A new instance of theevent-statisticsworkload will be rolled out with the updated configuration. The rollout should only take a minute or less.


Move on and connect the rest-fights service while the event-statistics is rolling out.
Connect the rest-fights service
Next, follow these steps to connect the rest-fights service to the managed services, which are nearly identical to the previous steps connecting the event-statistics service:
- Click the ConfigMaps link on the left-hand navigation of the sandbox.
- Find and click the
rest-fights-configitem. - Click the YAML tab at the top of the
rest-fights-configscreen. In the
datasection toward the bottom, perform the following:- Replace the value of
kafka.bootstrap.serverswith the Bootstrap server value you saved earlier from the Get Kafka connection details section. - Replace the value of
mp.messaging.connector.smallrye-kafka.apicurio.registry.urlwith the Core Registry API value you saved earlier from the Get service registry connection details section. Add the following new key/value combinations:
mp.messaging.connector.smallrye-kafka.apicurio.auth.service.token.endpoint: <Token endpoint URL> mp.messaging.connector.smallrye-kafka.sasl.jaas.config: org.apache.kafka.common.security.oauthbearer.OAuthBearerLoginModule required oauth.client.id="${CLIENT_ID}" oauth.client.secret="${CLIENT_SECRET}" oauth.token.endpoint.uri="<Token endpoint URL>" ; mp.messaging.connector.smallrye-kafka.security.protocol: SASL_SSL mp.messaging.connector.smallrye-kafka.sasl.mechanism: OAUTHBEARER mp.messaging.connector.smallrye-kafka.sasl.login.callback.handler.class: io.strimzi.kafka.oauth.client.JaasClientOauthLoginCallbackHandler mp.messaging.connector.smallrye-kafka.apicurio.auth.client.id: ${CLIENT_ID} mp.messaging.connector.smallrye-kafka.apicurio.auth.client.secret: ${CLIENT_SECRET}- Replace
<Token endpoint URL>with the Token endpoint URL value you saved earlier from either the Get service registry connection details or Get Kafka connection details section. The value should be the same in both.
When complete, the data section in your
rest-fights-configConfigMapshould look something like Figure 23.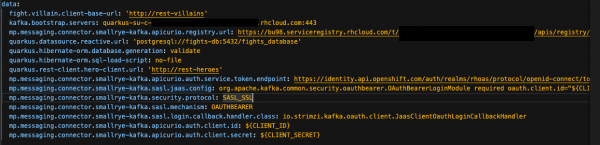
Figure 23: The rest-fights-config ConfigMap YAML contents. - Replace the value of
- Click Save at the bottom of the screen.
- Click the Secrets link on the left-hand navigation of the sandbox.
- Find and click the
rest-fights-config-credsitem. - Click the YAML tab at the top of the
rest-fights-config-credsscreen. Add a
stringDataelement at the bottom and add the following key/value pairs, as shown in Figure 24:CLIENT_ID: <rest-fights-client-id> CLIENT_SECRET: <rest-fights-client-secret>Replace
<rest-fights-client-id>with the client ID for therest-fightsservice you created in the Creating service accounts section.Replace
<rest-fights-client-secret>with the client secret for therest-fightsservice you created in the Creating service accounts section.
Figure 24: The rest-fights-config-creds Secret YAML contents.
- Click Save at the bottom of the screen.
- Click the Topology link on the left-hand navigation of the sandbox.
- Find and right-click the
rest-fightsworkload, then select Start rollout as shown in Figure 25. A new instance of therest-fightsworkload will be rolled out with the updated configuration. The rollout should take a minute or less.


Re-examine the application
The application is ready again when the event-statistics and rest-fights services have solid blue circles around their icons. Once these services are ready, go back to the main Superheroes and event statistics UIs and refresh the browser. The application should function just as before, except now the messages are being sent to a managed Kafka instance, and the schema is stored in a managed Service Registry instance.
Go to the Service Registry Instances dashboard and click the quarkus-superheroes instance. You should see the same Fight schema as you did before with the self-deployed Apicurio instance.
Next, go to the Kafka Instances dashboard and click the quarkus-superheroes instance. You should see a bunch of metrics around the instance, topics, client connections, message rates, and more.
What's next?
Red Hat OpenShift Application Services delivers a streamlined developer experience for building, deploying, and scaling cloud-native applications.
Don't miss your chance to preview some of our new application services. Want to bring some artificial intelligence and machine learning into your applications? Want to put an API management layer in front of all your services? If so, take a look at some of the other managed OpenShift Application Services, such as Red Hat OpenShift Data Science and Red Hat OpenShift API Management.
Last updated: August 27, 2025