Note: This product is no longer supported. Refer to the documentation for Red Hat build of Apicurio Registry, a data store for standard event schemas and API designs based on the Apicurio Registry open source community project.
Red Hat OpenShift Service Registry is a fully hosted and managed service that provides an API and schema registry for microservices. OpenShift Service Registry makes it easy for development teams to publish, discover, and reuse APIs and schemas.
Well-defined API and schema definitions are essential to delivering robust microservice and event streaming architectures. Development teams can use a registry to manage these artifacts in various formats, including OpenAPI, AsyncAPI, Apache Avro, Protocol Buffers, and more. Data producers and consumers can then use the artifacts to validate and serialize or deserialize data.
This article gets you started with OpenShift Service Registry. You’ll create a Quarkus-based Java application that uses the registry to manage schemas for data sent through topics in an Apache Kafka cluster. The tutorial should take less than 30 minutes, and involves the following steps:
- Create a Red Hat Hybrid Cloud account.
- Provision an OpenShift Service Registry instance.
- Provision an OpenShift Streams for Apache Kafka instance.
- Create Kafka topics.
- Create a service account to facilitate authenticated access to your Kafka and Service Registry instances.
- Build and run a Java application.
Note: Schemas and API definitions are metadata that represent a contract between decoupled services, so they must be discoverable, documented, and assigned versions to track their evolution over time.
About OpenShift Service Registry
Red Hat OpenShift Service Registry is based on the open source Apicurio Registry project. It provides a highly available service registry instance that is secure and compatible with both the Confluent Schema Registry API and CNCF Schema Registry API. OpenShift Service Registry is also a perfect companion service for applications that use Red Hat OpenShift Streams for Apache Kafka and Red Hat OpenShift API Management.
Prerequisites
You need a Red Hat Hybrid Cloud account to run the examples in this article. Create an account for free at sandbox.redhat.com. You also need the following tools in your development environment:
- Java 11 or higher
- Maven 3.8.1 or higher
- Git
- Your favorite IDE or text editor
Creating a Service Registry instance
Organizations or individuals with a Red Hat Hybrid Cloud account are entitled to a two-month trial instance of OpenShift Service Registry. To create an instance:
- Log in to your account on sandbox.redhat.com.
- In the user interface (UI), select Application Services from the menu on the left.
- Expand the Service Registry entry on the side menu and click the Service Registry Instances link. Acknowledge the warning that it is a beta service.
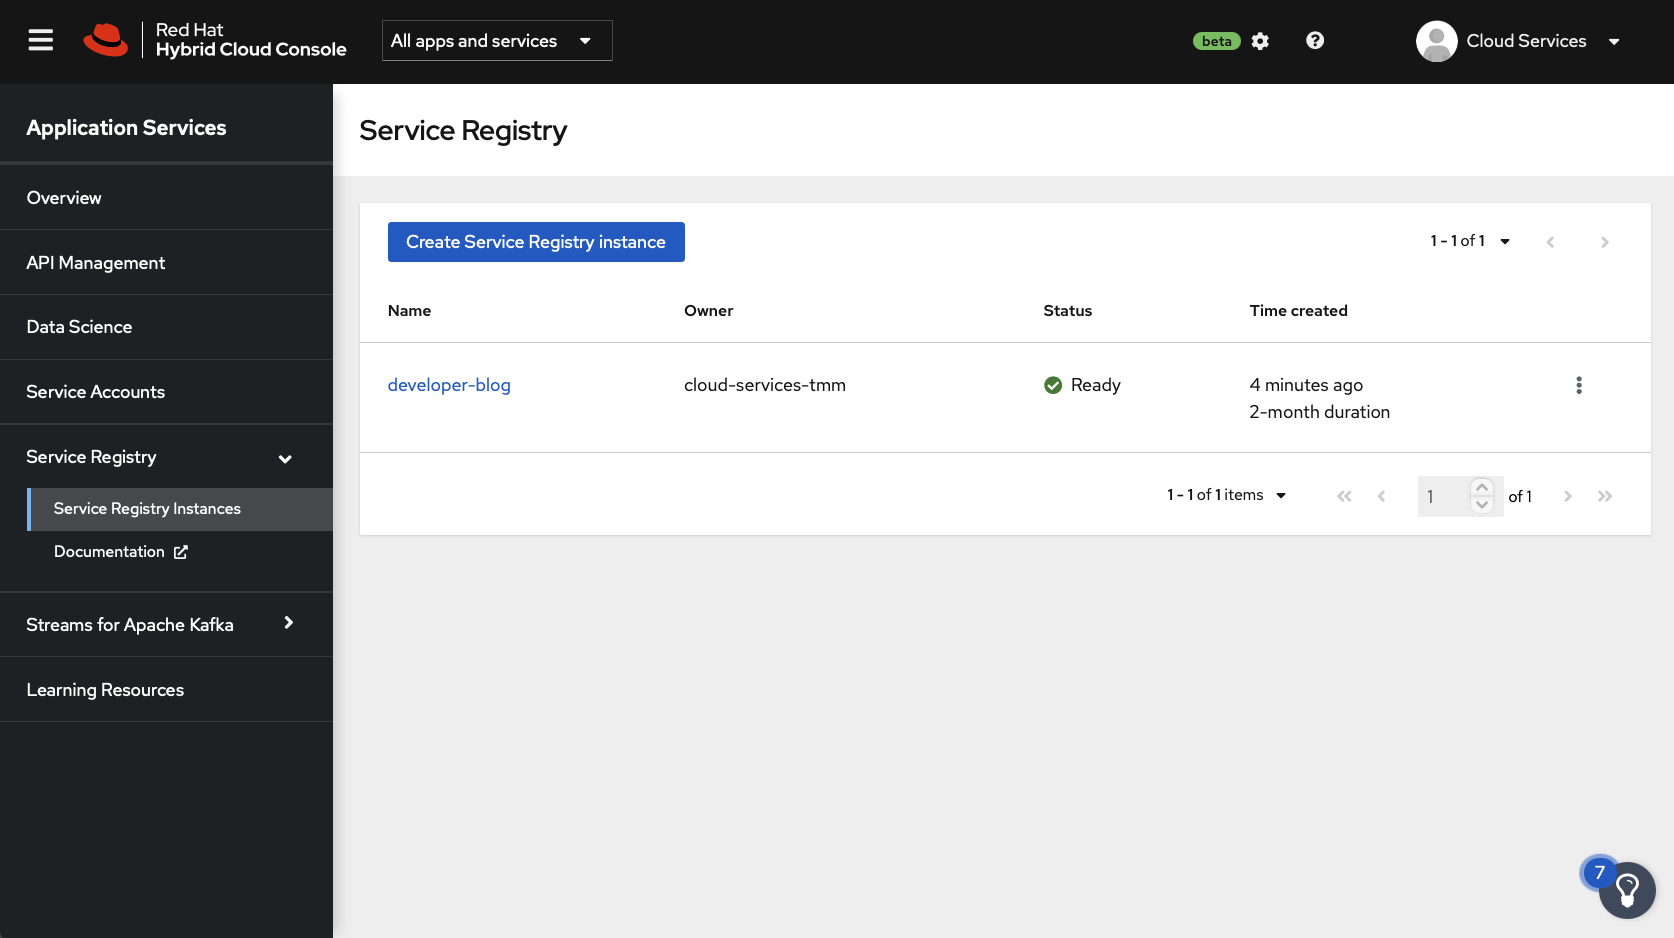
- Click the Create Service Registry instance button. A modal dialog will be displayed.
- Enter a name for your Service Registry instance and click the Create button.
Your OpenShift Service Registry instance will be ready to use in a minute or two. A green checkmark will be displayed in the Status column to indicate when the instance is ready, as shown in Figure 1.
Once your instance is ready, click on its row in the portal to view connection information, as shown in Figure 2. Take note of the Core Registry API value because you'll need it soon.

Integrating Java applications with Service Registry
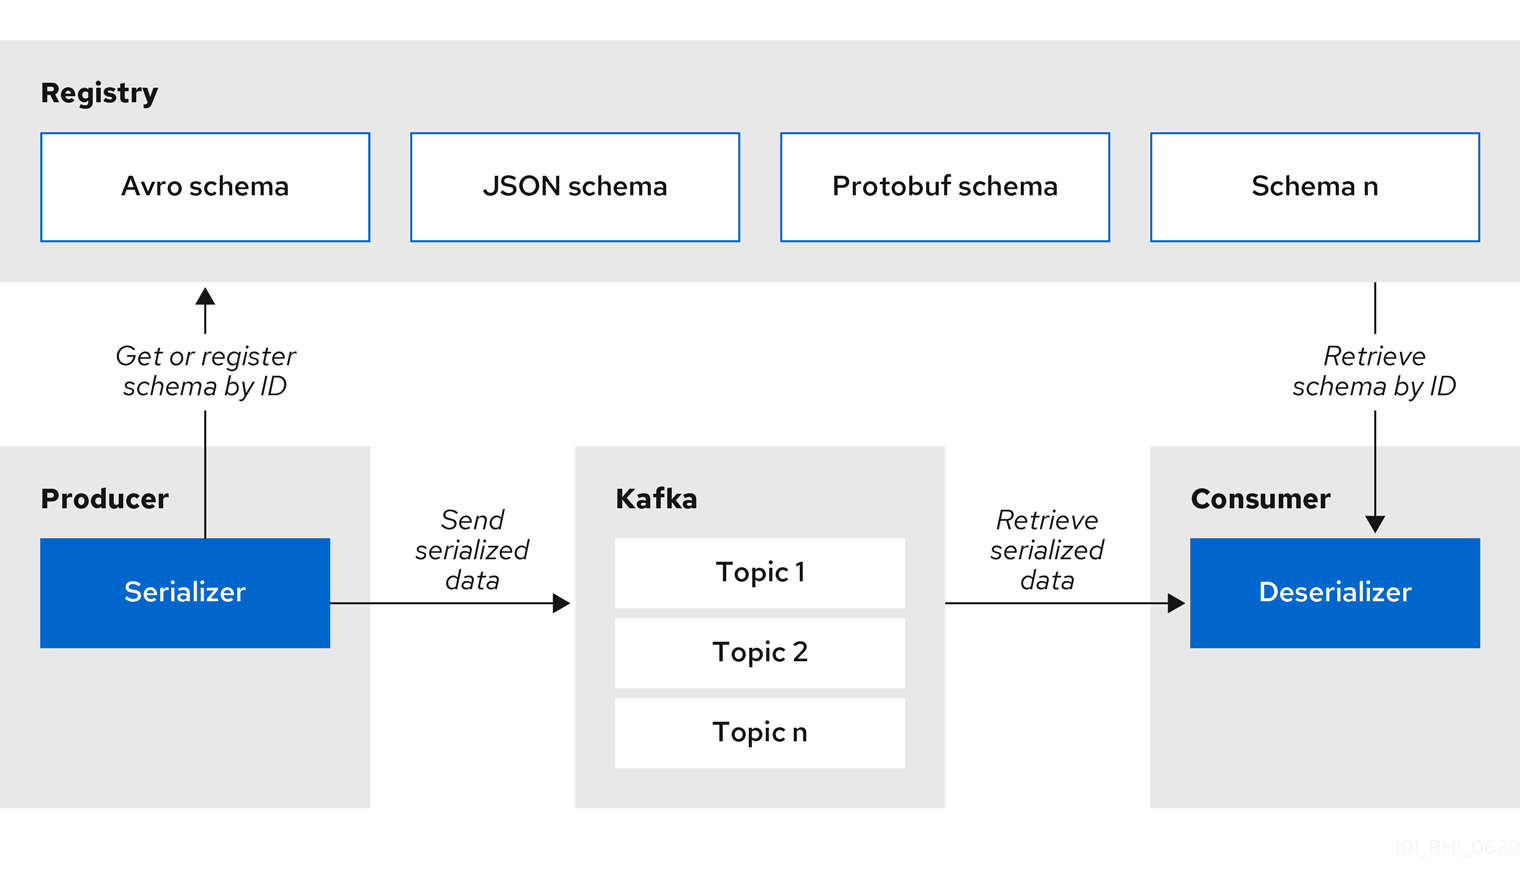
Kafka producer applications can use serializers to encode messages that conform to a specific event schema. Kafka consumer applications can then use deserializers to validate that messages were serialized using the correct schema, based on a specific schema ID. This process is illustrated in Figure 3. You'll test serialization and deserialization using Java producer and consumer applications that connect to Kafka.
Provision a managed Kafka instance and create topics
To get started, you'll need to create an OpenShift Streams for Apache Kafka instance and two topics: one named quote-requests and the other named quotes. We've explained how to obtain this runtime environment for free in this article.
Remember to take note of your Kafka instance's bootstrap server URL. You will need this URL soon.
Create a service account
A service account is required to connect applications to the OpenShift Service Registry and OpenShift Streams for Apache Kafka instances. The service account provides a client ID and client secret that applications use to authenticate against the cloud services.
To create a service account:
- Visit sandbox.redhat.com/beta/application-services/service-accounts.
- Click the Create service account button.
- Enter a name for the service account.
- Click the Create button.
- The client ID and client secret will be displayed. Copy these down someplace safe.
- Close the modal dialog.
Deploying the producer Java application
At this point you have:
- An OpenShift Service Registry instance
- An OpenShift Streams for Apache Kafka instance
- A service account for connecting applications to the previous two instances
- Kafka topics to hold messages published by a producer
Now, it's time to deploy a producer application that publishes messages to your Kafka topic. This application utilizes an Avro schema to encode messages in Avro format. It also publishes this schema to your OpenShift Service Registry. Consumer applications can fetch the schema from OpenShift Service Registry to deserialize and validate records they consume from your Kafka topic.
The source code for both the producer and the consumer is available in this GitHub repository. Clone it into your development environment:
$ git clone $REPOSITORY_URL rhosr-getting-startedOpen the rhosr-getting-started project using your preferred IDE or text editor, and open the producer/pom.xml file. This file contains typical dependencies that are used to connect to Kafka and expose REST services. The quarkus-apicurio-registry-avro dependency is used to generate Java classes based on Avro schema definitions. It also brings in dependencies required to work with the service registry, such as service registry-aware Kafka serializers and deserializers.
Next, open the producer/src/main/avro/quote.avsc file. This file contains an Avro schema defined using JSON. This schema can be used to generate a Quote.java class that extends and implements the necessary Avro class and interface. The Quote class is used to serialize outgoing messages to the underlying Kafka topic, and by the quotes channel to deserialize incoming messages. The generated class can be found in the target/generated-sources/Quota.java file after compiling the application or running it in development mode.
Lastly, examine the producer/src/main/resource/application.properties file. This file configures the application to connect to a Kafka instance, register schemas with a registry, and use Avro serialization and deserialization.
Run the producer application
You can run the producer application wherever you like, including on an OpenShift cluster. I'll demonstrate how you can run the producer in your local development environment.
First, define the following environment variables in a shell. Replace the text within <> angle brackets with the values you found in previous sections:
# Used to authenticate against the registry and kafka cluster
export CLIENT_ID=<your-client-id>
export CLIENT_SECRET=<your-client-secret>
# Used to connect to and authenticate against the service registry
export OAUTH_SERVER_URL=https://sso.redhat.com/auth
export REGISTRY_URL=<core-service-registry-url>
# Used to connect to and authenticate against the kafka cluster
export BOOTSTRAP_SERVER=<kafka-bootstrap-url>
export OAUTH_TOKEN_ENDPOINT_URI=https://sso.redhat.com/auth/realms/redhat-external/protocol/openid-connect/token
Once these values are defined, you can start the producer application in the same shell using the following command:
$ mvn quarkus:dev -f ./producer/pom.xml -Dquarkus-profile=prodThe Quarkus application is now running in and has exposed an HTTP server on http://localhost:8080/. Use the following command to send a POST request that creates a quote and sends it to the quote-requests Kafka topic:
$ curl -X POST http://localhost:8080/quotes/requestYou should receive a response in JSON format that contains a unique quote id and random price.
View the Quote schema in Service Registry
When you start the producer application and make a request to the /quotes/request endpoint, the producer gets ready to send data to your Kafka topic. Prior to sending the data, the producer checks that the Quote Avro schema is available in OpenShift Service Registry. If the Quote schema is not found, the producer publishes the schema to the registry. The producer then serializes the outgoing data using the schema and includes the registered schema ID in the message value.
A downstream consumer application can use the schema ID found in the message payload to fetch the necessary schema from the registry. The consumer application can then use the schema to validate and deserialize the incoming message.
To confirm that the Avro schema was published to OpenShift Service Registry:
- Go to your OpenShift Service Registry Instances listing.
- Select the instance used by your producer application.
- Select the Artifacts tab.
You should see the Quote schema, as shown in Figure 4.

Select the Quote schema in the list and view the Content tab. Use the Format button to improve the legibility of the JSON, and confirm that it matches the Quote.avsc file in the producer application codebase.
Consuming messages in Service Registry
The repository you cloned as part of this exercise contains a consumer application. This consumer application is configured using the same environment variables as the producer and reads messages from the quote-requests topic. Because the producer and consumer use OpenShift Service Registry, the consumer can fetch the necessary Avro schema to validate and deserialize incoming quote requests.
Run the producer and consumer at the same time. Use cURL to open a connection to the server-sent events (SSE) endpoint at http://localhost:8080/quotes, then use another HTTP client to POST to http://localhost:8080/quotes/request. The consumer should correctly deserialize and process the items from the quote-requests topic and place the processed quote into the quotes topic, after which the SSE endpoint should display the items as shown in Figure 5.

Enforcing schema compatibility rules
OpenShift Service Registry supports various schema compatibility rules to prevent the publication of schema changes that could lead to incompatibilities with downstream applications (that is, breaking changes). You can read more about compatibility rules in the service documentation. To enable this enforcement:
- Open the Service Registry UI at sandbox.redhat.com/beta/application-services/service-registry.
- Select your instance and view the Quote schema.
- Set the Validity Rule to Full and the Compatibility Rule to Backward (see Figure 6).
- Click the Upload new version button.
- Paste in the following Avro schema and click Upload:
{
  "namespace": "org.acme.kafka.quarkus",
  "type": "record",
  "name": "Quote",
  "fields": [
    {
      "name": "id",
      "type": "string"
    },
    {
      "name": "price",
      "type": "int"
    },
    {
      "name": "notes",
      "type": "string"
    }
  ]
}
Figure 6 shows these updates in the console.
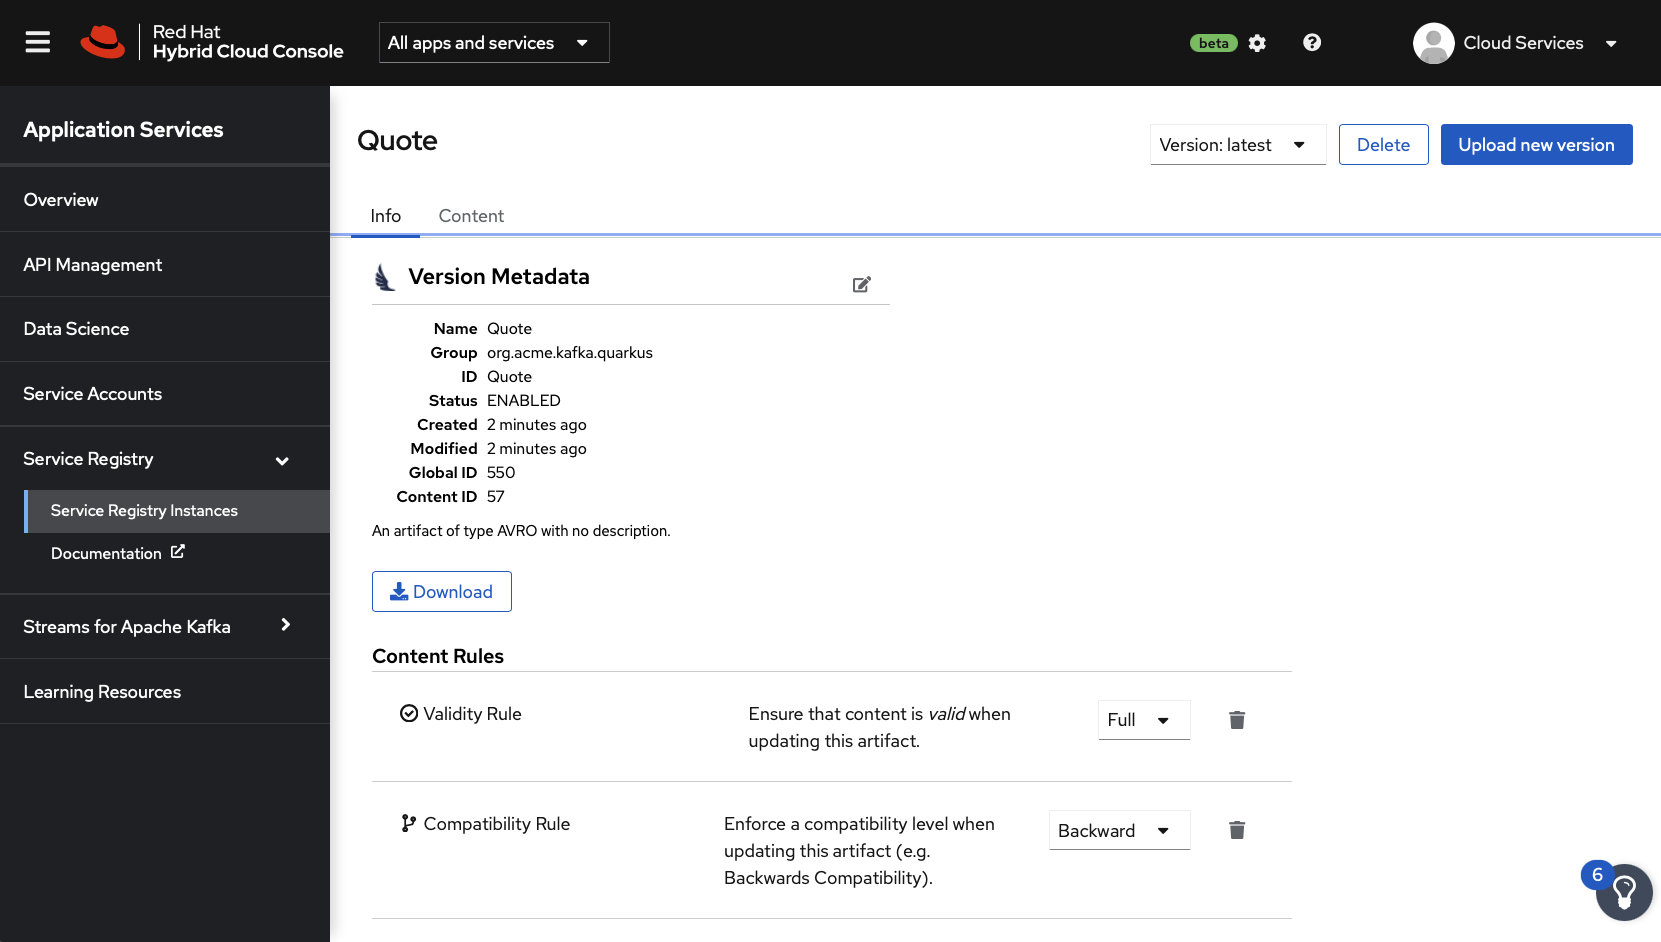
An Invalid Content error should be displayed, because this new schema violated the backward compatibility rule by adding a new required field. New fields must be optional if backward compatibility is enabled. As the error message indicated, new schemas are required to provide backward-compatible schemas for all future evolution.
Conclusion
Congratulations—in this article you have learned how to:
- Use OpenShift Service Registry.
- Use OpenShift Streams for Apache Kafka.
- Create Avro schemas.
- Integrate Java applications that use Avro schemas with both services.
- Manage schema evolution and apply rules to prevent breaking changes for downstream consumers.
Sign up for the services described in this article, and let us know your experience in the comments.
Last updated: August 27, 2025