Data privacy and data protection have become increasingly important globally. More and more jurisdictions have passed data privacy protection laws to regulate operators that process, transfer, and store data. Data pseudonymization and anonymization are two common practices that the IT industry turns to in order to comply with such laws.
In this article, you'll learn about an open source cloud-native solution architecture we developed that allows managed data service providers to anonymize data automatically and in real time.
Data anonymization
Pseudonymized data can be restored to its original state through a different process, whereas anonymized data cannot. Encryption is a typical way to pseudonymize data; for example, encrypted data can be restored to its original state through decryption. On the other hand, anonymization is a process that completely removes sensitive and personal information from data. In Figures 1 and 2, images containing license plates and faces are anonymized via blurring to remove sensitive and personal information.
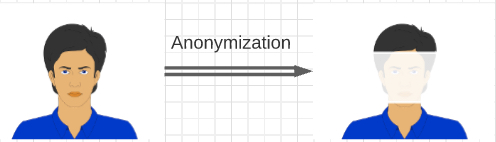

Once data has been anonymized, its use is no longer subject to the strict requirements of GDPR, the European Union's data protection law. In many use cases, anonymizing data facilitates that data's public exchange.
Solution architecture overview
As illustrated in Figure 3, this solution uses Cloud Native Computing Foundation (CNCF) projects such as Rook (serving as the infrastructure operator) and KEDA (providing a serverless framework), along with RabbitMQ for its message queue, and YOLO and OpenCV for object detection without loss of generality. The containerized workloads, Rook, RabbitMQ, or KEDA, run on MicroShift, a small footprint Kubernetes/Red Hat OpenShift implementation.
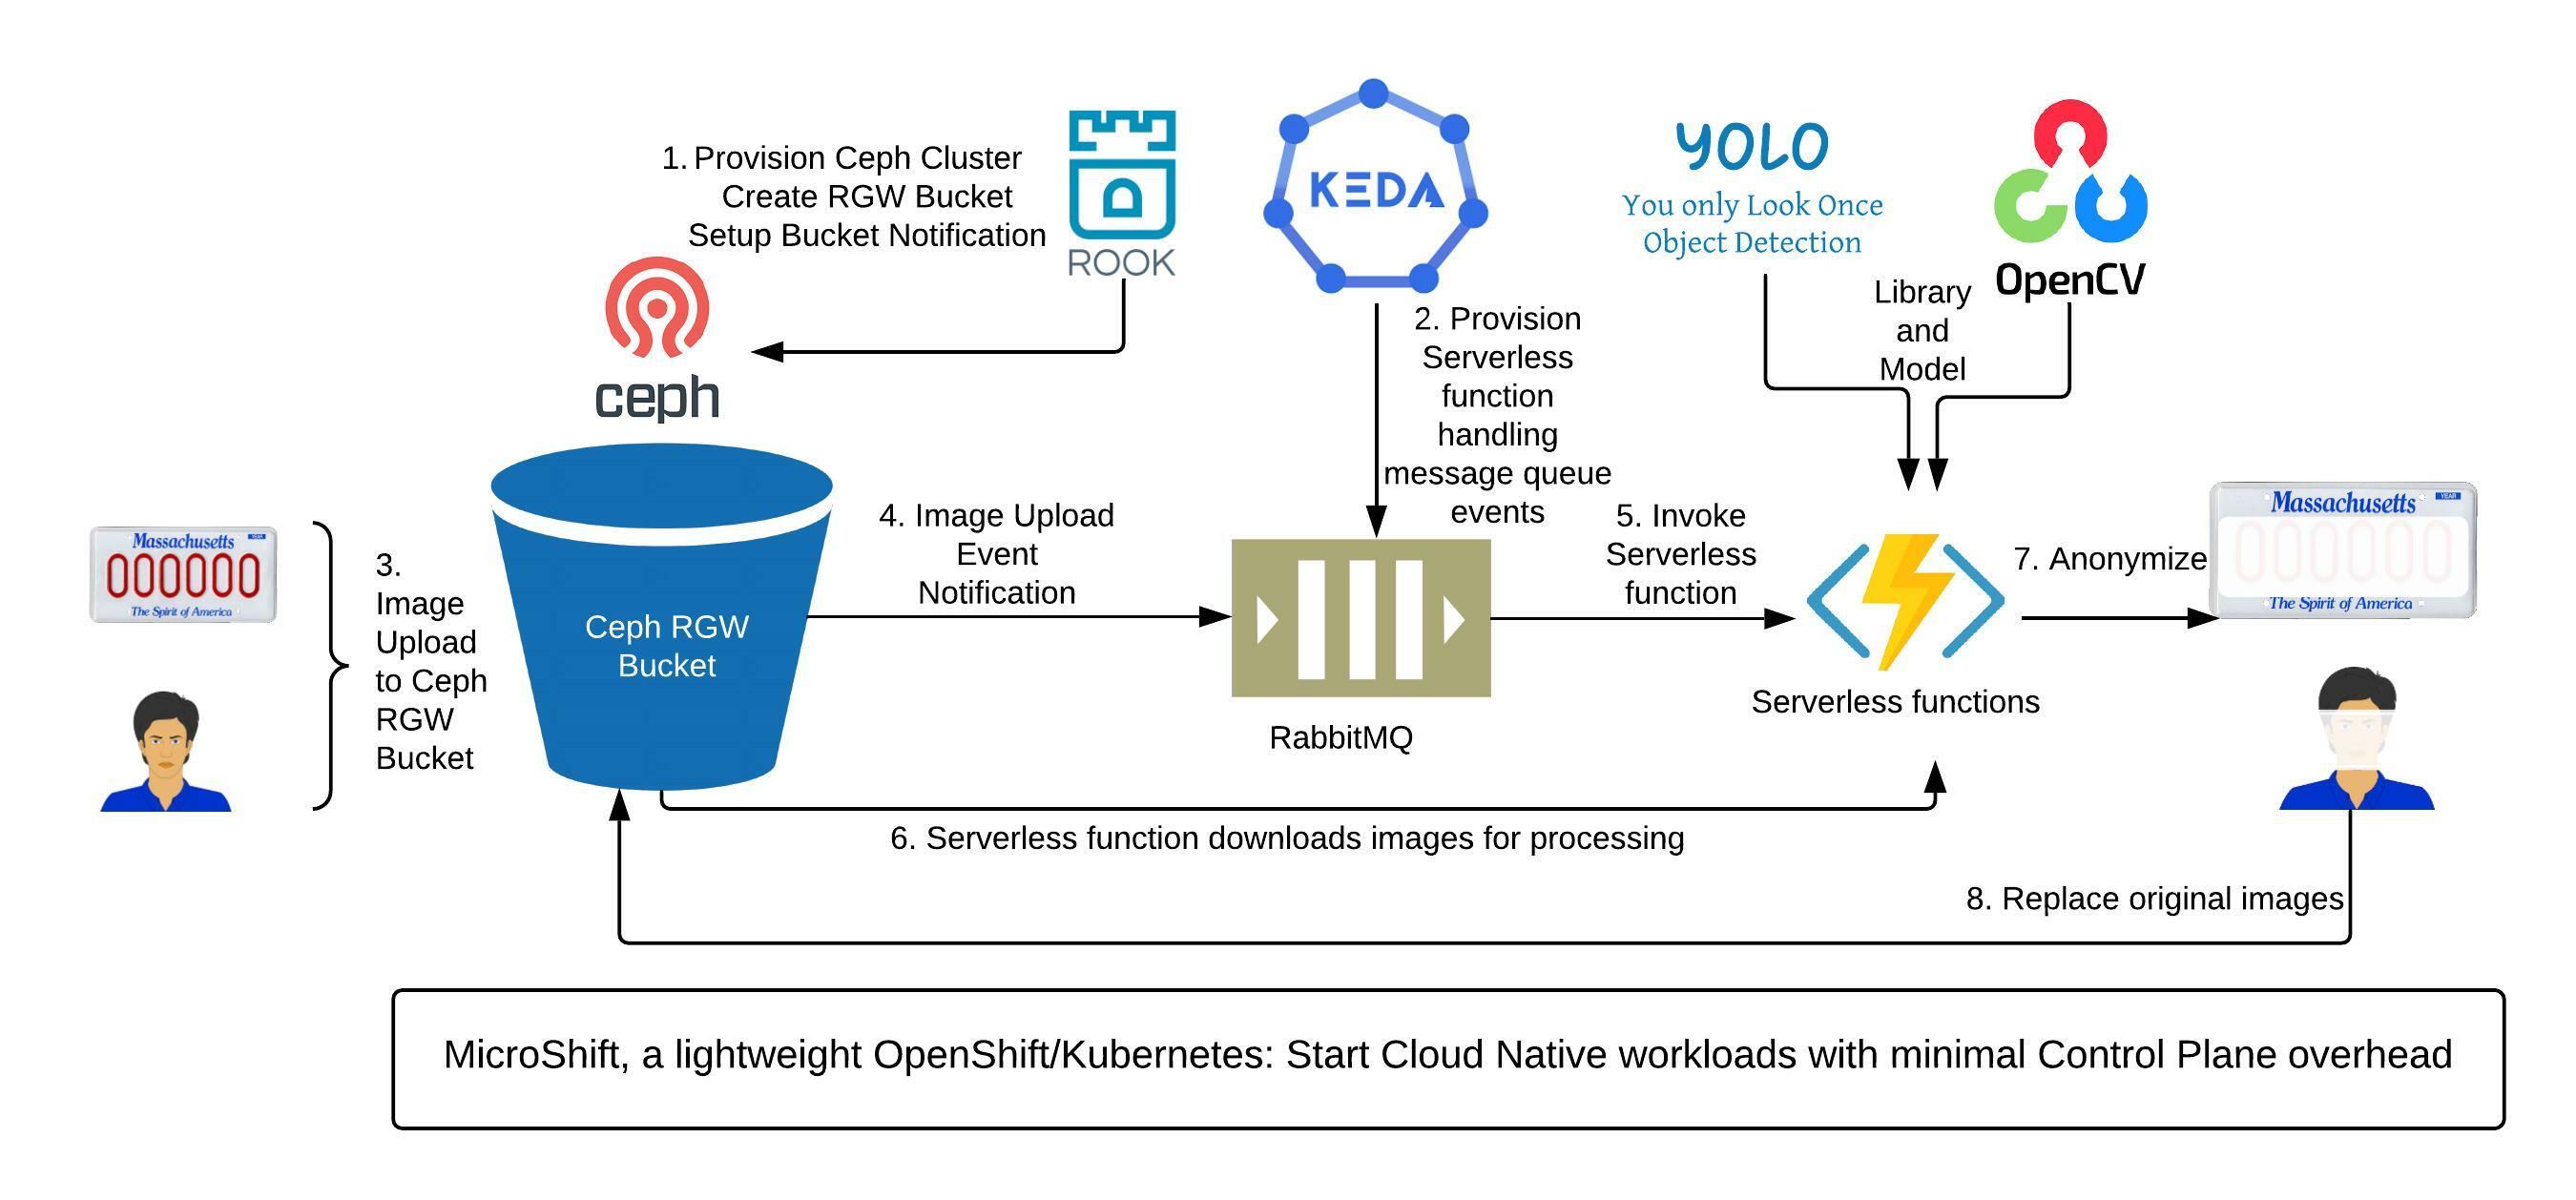
Under this architecture, a Ceph Object Gateway—also known as RADOS Gateway (RGW) bucket—provisioned by Rook, is configured as a bucket notification endpoint to a RabbitMQ exchange. A KEDA RabbitMQ trigger is created to probe the queue lengths in the exchange. Once the queue length exceeds the threshold, a serverless function, implemented as a StatefulSet, scales up, reads queue messages, parses bucket and object information, retrieves the object, detects regions of interest, blurs sensitive information, and replaces the original data with transformed data.
Building the solution
Bringing all these CNCF projects into one cohesive solution sounds complex. But it isn't in practice, thanks to the declarative, YAML-based configuration used by the different operators that make up the solution. Full instructions, scripts, and a recorded demo are available here.
MicroShift
First, we need to install MicroShift. The solution would work in a fully fledged OpenShift or Kubernetes cluster, but if you want to get it up and running quickly on your laptop, then MicroShift is your most lightweight option.
First, create a default StorageClass and use hostpath-provisioner in the MicroShift cluster:
cat << EOF | kubectl apply -f -

apiVersion: v1

kind: PersistentVolume

metadata:

  name: hostpath-provisioner

spec:

  capacity:

    storage: 8Gi

  accessModes:

  - ReadWriteOnce

  hostPath:

    path: "/var/hpvolumes"

EOF

kubectl patch storageclass kubevirt-hostpath-provisioner -p '{"metadata": {"annotations":{"storageclass.kubernetes.io/is-default-class":"true"}}}'
Another option would be to run the solution on minikube. But minikube uses a virtual machine (VM), so you would need to add an extra disk to the minikube VM before installing Rook.
Rook
Next, install the Rook operator:
kubectl apply -f https://raw.githubusercontent.com/rootfs/rook/microshift-int/cluster/examples/kubernetes/ceph/crds.yaml
kubectl apply -f https://raw.githubusercontent.com/rootfs/rook/microshift-int/cluster/examples/kubernetes/ceph/common.yaml
kubectl apply -f https://raw.githubusercontent.com/rootfs/rook/microshift-int/cluster/examples/kubernetes/ceph/operator-openshift.yaml
Note that you have to use a developer image in operator-openshift.yaml, because bucket notifications in Rook are still a work in progress.
Before moving on, verify that the Rook operator is up and running:
kubectl get pods -l app=rook-ceph-operator -n rook-ceph
Now you need to create a Ceph cluster. Use cluster-test.yaml, because you'll be running the solution on a single node.
kubectl apply -f https://raw.githubusercontent.com/rootfs/rook/microshift-int/cluster/examples/kubernetes/ceph/cluster-test.yaml
Note that you'll use a custom Ceph image in cluster-test.yaml to work around the RabbitMQ plaintext password limitation.
Next, verify that the cluster is up and running with monitors and OSDs:
kubectl get pods -l app=rook-ceph-mon -n rook-ceph
kubectl get pods -l app=rook-ceph-osd -n rook-ceph
Finally, you should add the object store front end to the Ceph cluster, together with a toolbox that allows you to run administrative commands:
kubectl apply -f https://raw.githubusercontent.com/rootfs/rook/microshift-int/cluster/examples/kubernetes/ceph/object-test.yaml
kubectl apply -f https://raw.githubusercontent.com/rootfs/rook/microshift-int/cluster/examples/kubernetes/ceph/toolbox.yaml
You can now verify that the RGW is up and running:
kubectl get pods -l app=rook-ceph-osd -n rook-ceph
At this point, everything is set up to create the bucket with its StorageClass:
cat << EOF | kubectl apply -f -
apiVersion: storage.k8s.io/v1
kind: StorageClass
metadata:
   name: rook-ceph-delete-bucket-my-store
provisioner: rook-ceph.ceph.rook.io/bucket # driver:namespace:cluster
reclaimPolicy: Delete
parameters:
   objectStoreName: my-store
   objectStoreNamespace: rook-ceph # namespace:cluster
   region: us-east-1
---
apiVersion: objectbucket.io/v1alpha1
kind: ObjectBucketClaim
metadata:
  name: ceph-delete-bucket
  labels:
    bucket-notification-my-notification: my-notification
spec:
  bucketName: notification-demo-bucket
  storageClassName: rook-ceph-delete-bucket-my-store
EOF
Note that the bucket has a special label called bucket-notification-my-notification with the value my-notification. This indicates that notifications should be created for this bucket. The notification custom resource hasn't been created yet, but the notification will be defined for the bucket once it has been. That's the beauty of declarative programming.
To create the topic and notification, you'll need some details from the RabbitMQ broker, so you'll configure that next.
RabbitMQ
Begin by installing the RabbitMQ operator:
kubectl apply -f https://github.com/rabbitmq/cluster-operator/releases/latest/download/cluster-operator.yml
Next, define a RabbitMQ cluster. You can use the default "hello world" cluster for the purposes of this article:
kubectl apply -f https://raw.githubusercontent.com/rabbitmq/cluster-operator/main/docs/examples/hello-world/rabbitmq.yaml
There's one manual step you'll need to take to sync up definitions between RabbitMQ and the bucket notifications topic you defined in Rook. First, define the topic exchange in RabbitMQ with the same name that you used to define in the bucket notifications topic.
kubectl exec -ti hello-world-server-0 -c rabbitmq -- rabbitmqadmin declare exchange name=ex1 type=topic
Next, get the username/password and the service name defined for the RabbitMQ cluster:
username="$(kubectl get secret hello-world-default-user -o jsonpath='{.data.username}' | base64 --decode)"
password="$(kubectl get secret hello-world-default-user -o jsonpath='{.data.password}' | base64 --decode)"
service="$(kubectl get service hello-world -o jsonpath='{.spec.clusterIP}')"
You'll use these to create the bucket notification topic, pointing to that RabbitMQ cluster.
You are about to send a username/password as part of the configuration of the topic, and in production, that would require a secure connection. For the sake of this demo, however, you can use a small workaround that allows you to send them as cleartext:
kubectl -n rook-ceph exec -it deploy/rook-ceph-tools -- ceph config set client.rgw.my.store.a rgw_allow_secrets
Now you can configure the bucket notification topic:
cat << EOF | kubectl apply -f -
apiVersion: ceph.rook.io/v1
kind: CephBucketTopic
metadata:
  name: demo
spec:
  endpoint: amqp://${username}:${password}@${service}:5672
  objectStoreName: my-store
  objectStoreNamespace: rook-ceph
  amqp:
    ackLevel: broker
    exchange: ex1
EOF
You can also configure the notification configuration (the same one from the special ObjectbucketClaim label) pointing at that topic:
cat << EOF | kubectl apply -f -
apiVersion: ceph.rook.io/v1
kind: CephBucketNotification
metadata:
  name: my-notification
spec:
  topic: demo
  filter:
  events:
    - s3:ObjectCreated:*
EOF
KEDA
The last component in the configuration is KEDA, a very generic framework that allows autoscaling based on events. In this example, you will use it as a serverless framework that scales its functions based on the RabbitMQ queue length.
The installation of KEDA is based on Helm, so you should download and then install Helm if you haven't done so already. Once you have, use it to install KEDA.
helm repo add kedacore https://kedacore.github.io/charts
helm repo update
kubectl create namespace keda
helm install keda kedacore/keda --version 1.4.2 --namespace keda
Now you need to tell KEDA what to do. The KEDA framework will be polling the queue from the RabbitMQ cluster you configured in the previous steps. That queue does not exist yet, so you need to create it first:
kubectl exec -ti hello-world-server-0 -c rabbitmq -- rabbitmqadmin declare queue name=bucket-notification-queue durable=false
kubectl exec -ti hello-world-server-0 -c rabbitmq -- rabbitmqadmin declare binding source=ex1 destination_type=queue destination=bucket-notification-queue routing_key=demo
Note that the name of the routing key (demo) must match the name of the bucket notification topic.
KEDA will also need to know the RabbitMQ username/password and service, and the function it spawns will need to know the credentials of the Ceph user so it can read the objects from the bucket and write them back after anonymizing. You already retrieved the RabbitMQ secrets in the previous step, so now you need to get the Ceph ones:
user=$(kubectl -n rook-ceph -it deploy/rook-ceph-tools -- radosgw-admin user list | grep ceph-user |cut -d '"' -f2)
aws_key_id=$(kubectl -n rook-ceph -it deploy/rook-ceph-tools -- radosgw-admin user info --uid $user | jq -r '.keys[0].access_key')
aws_key=$(kubectl -n rook-ceph -it deploy/rook-ceph-tools -- radosgw-admin user info --uid $user | jq -r '.keys[0].secret_key')
aws_url=$(echo -n "http://"$(kubectl get service -n rook-ceph rook-ceph-rgw-my-store -o jsonpath='{.spec.clusterIP}') |base64)
Now you can configure the secrets for KEDA and the RabbitMQ scaler for KEDA:
cat << EOF | kubectl apply -f -
apiVersion: v1
kind: Secret
metadata:
  name: rabbitmq-consumer-secret
data:
  amqp_url: amqp://${username}:${password}@${service}:5672
---
apiVersion: v1
kind: Secret
metadata:
  name: rgw-s3-credential
data:
  aws_access_key: ${aws_key}
  aws_key_id: ${aws_key_id}
  aws_endpoint_url: ${aws_url}
---
apiVersion: keda.k8s.io/v1alpha1
kind: ScaledObject
metadata:
  name: rabbitmq-consumer
  namespace: default
spec:
  scaleTargetRef:
    deploymentName: rabbitmq-consumer
  triggers:
    - type: rabbitmq
      metadata:
        host: amqp://${username}:${password}@${service}:5672
        queueName: "bucket-notification-queue"
        queueLength: "5"
      authenticationRef:
        name: rabbitmq-consumer-trigger
---
apiVersion: keda.k8s.io/v1alpha1
kind: TriggerAuthentication
metadata:
  name: rabbitmq-consumer-trigger
  namespace: default
spec:
  secretTargetRef:
  - parameter: host
    name: rabbitmq-consumer-secret
    key: amqp_url
EOF
Anonymizing data
Finally, you're ready to actually anonymize data. This example uses the awscli tool, but you could use any other tool or application that can upload objects to Ceph.
awscli uses environment variables to get the user credentials needed; you can use the ones fetched in previous steps:
export AWS_ACCESS_KEY_ID=$aws_key
export AWS_SECRET_ACCESS_KEY=$aws_key_id
Next, you need to upload the image you want to anonymize:
aws --endpoint-url $aws_url s3 cp image.jpg s3://notification-demo-bucket/
The KEDA logs will show the serverless function scaling up and down:
kubectl logs -n keda -l app=keda-operator -f
And the serverless function's logs will show how it fetches the images, blurs them, and writes them back to Ceph:
kubectl logs -l app=rabbitmq-consumer -f
The RADOS Gateway logs will show the upload of the image, the sending of the notification to RabbitMQ, and the serverless function fetching the image and then uploading the modified version of it:
kubectl logs -l app=rook-ceph-rgw -n rook-ceph -f
Conclusion
This open source solution, based on CNCF projects, addresses pressing needs for data privacy protection. We believe this solution can be extended to other use cases, such as malware and ransomware detection and quarantine and data pipeline automation. For instance, ransomware encrypts objects without authorization. Our solution can help detect ransomware activities by running a serverless function to detect entropy changes as soon as an object is updated or created. Similarly, a serverless function can run, scan, and quarantine newly created objects if viruses or malware are detected.
If you're excited about the project or have new ideas, please share your success stories at our GitHub repository.
Last updated: November 17, 2023