Redhat Developers  Logo
  • AI

    Get started with AI

    • Red Hat AI
      Accelerate the development and deployment of enterprise AI solutions.
    • AI learning hub
      Explore learning materials and tools, organized by task.
    • AI interactive demos
      Click through scenarios with Red Hat AI, including training LLMs and more.
    • AI/ML learning paths
      Expand your OpenShift AI knowledge using these learning resources.
    • AI quickstarts
      Focused AI use cases designed for fast deployment on Red Hat AI platforms.
    • No-cost AI training
      Foundational Red Hat AI training.

    Featured resources

    • OpenShift AI learning
    • Open source AI for developers
    • AI product application development
    • Open source-powered AI/ML for hybrid cloud
    • AI and Node.js cheat sheet

    Red Hat AI Factory with NVIDIA

    • Red Hat AI Factory with NVIDIA is a co-engineered, enterprise-grade AI solution for building, deploying, and managing AI at scale across hybrid cloud environments.
    • Explore the solution
  • Learn

    Self-guided

    • Documentation
      Find answers, get step-by-step guidance, and learn how to use Red Hat products.
    • Learning paths
      Explore curated walkthroughs for common development tasks.
    • Guided learning
      Receive custom learning paths powered by our AI assistant.
    • See all learning

    Hands-on

    • Developer Sandbox
      Spin up Red Hat's products and technologies without setup or configuration.
    • Interactive labs
      Learn by doing in these hands-on, browser-based experiences.
    • Interactive demos
      Click through product features in these guided tours.

    Browse by topic

    • AI/ML
    • Automation
    • Java
    • Kubernetes
    • Linux
    • See all topics

    Training & certifications

    • Courses and exams
    • Certifications
    • Skills assessments
    • Red Hat Academy
    • Learning subscription
    • Explore training
  • Build

    Get started

    • Red Hat build of Podman Desktop
      A downloadable, local development hub to experiment with our products and builds.
    • Developer Sandbox
      Spin up Red Hat's products and technologies without setup or configuration.

    Download products

    • Access product downloads to start building and testing right away.
    • Red Hat Enterprise Linux
    • Red Hat AI
    • Red Hat OpenShift
    • Red Hat Ansible Automation Platform
    • See all products

    Featured

    • Red Hat build of OpenJDK
    • Red Hat JBoss Enterprise Application Platform
    • Red Hat OpenShift Dev Spaces
    • Red Hat Developer Toolset

    References

    • E-books
    • Documentation
    • Cheat sheets
    • Architecture center
  • Community

    Get involved

    • Events
    • Live AI events
    • Red Hat Summit
    • Red Hat Accelerators
    • Community discussions

    Follow along

    • Articles & blogs
    • Developer newsletter
    • Videos
    • Github

    Get help

    • Customer service
    • Customer support
    • Regional contacts
    • Find a partner

    Join the Red Hat Developer program

    • Download Red Hat products and project builds, access support documentation, learning content, and more.
    • Explore the benefits

Java monitoring for custom targets with Cryostat

November 2, 2021
Andrew Azores Hareet Dhillon
Related topics:
JavaKubernetesOpen source
Related products:
Red Hat JBoss Enterprise Application PlatformRed Hat OpenShift

    By default, Cryostat automatically recognizes discoverable, valid targets with remote Java Management Extensions (JMX) and JMX-RMI-enabled connectivity. Discoverability is based on various mechanisms, including Kubernetes API-based service endpoints and the Java Discovery Protocol (JDP).

    With Cryostat 2.0, developers can now create connections by providing custom URLs for known potential Java application targets that are valid but not yet discoverable. You can save custom target definitions so they are available even after the Cryostat instance restarts. This feature is available on the Cryostat web front-end through the Create Target functionality introduced in this article.

    Cryostat 2.0 also introduces the new clientlib directory. By adding target application JARs to this directory, you can specify custom connection protocols for any custom targets you create. We'll show you how to add a custom target that uses one such connection protocol.

    Read all of the articles in this series:

    • Part 1: Get started with Cryostat 2.0
    • Part 2: Configuring Java applications to use Cryostat
    • Part 3: Java monitoring for custom targets with Cryostat
    • Part 4: Automating JDK Flight Recorder in containers
    • Part 5: Creating Custom JFR event templates with Cryostat 2.0

    Note: Cryostat is JDK Flight Recorder for Kubernetes or Red Hat OpenShift. The Red Hat build of Cryostat 2.0 is now widely available in technology preview. The Red Hat build includes the Cryostat Operator to simplify and automate Cryostat deployment on Red Hat OpenShift.

    Prerequisites and setup

    For this demonstration, we will connect to a custom target with a client-defined connection protocol. As a prerequisite, you must have Cryostat installed and running on a Red Hat OpenShift cluster via the Cryostat Operator. See Cryostat.io for installation details.

    We'll use a simple WildFly application for our target. First, we need to add the application to the same namespace where our Cryostat instance is running:

    
    oc new-app quay.io/andrewazores/wildfly-demo:v0.0.2 && oc expose svc wildfly-demo --port=8082


    Now that the application is running on the cluster, we'll see it alongside the cryostat-operator and the Cryostat instance when we enter oc status.

    Note: See the previous article in this series for instructions for configuring Java applications to use Cryostat. See the end of this article for more ways to learn about Cryostat.

    Adding the client-defined connection protocol

    The application listens on port 9990 using the JMX remote+http protocol, but not JMX-RMI, which is Cryostat's default connection protocol. For the Cryostat instance to recognize and communicate with our target application (that is, accept a custom connection protocol), we must supply it with additional JARs.

    Download the WildFly client JAR

    For a WildFly application, the JARs can be obtained by downloading the full WildFly release. The version chosen must correspond to the one used to create the application, which in this case is version 23.0.1.Final. So, we need to download the Jakarta EE Full & Web Distribution tarball for this version. Once downloaded, we'll extract the tarball as follows:

    
    tar -xvf ~/Downloads/wildfly-23.0.1.Final.tar.gz


    The required jboss-client.jar is located in the extracted wildfly-23.0.1.Final/bin/client/ directory.

    Add the client JAR to clientlib

    Now that we have the required JAR, we only need to add it to the clientlib directory in the persistent volume mounted to our Cryostat instance. First, we need to get the name of the pod that houses the instance:

    
    oc get pods -l app=cryostat-sample


    Now that we know the pod name, we can transfer the JARs using the oc cp command:

    
    oc cp ~/Downloads/wildfly-23.0.1.Final/bin/client/jboss-client.jar ${PROJECT_NAME}/${CRYOSTAT_POD_NAME}:/opt/cryostat.d/clientlib.d


    Note: The PROJECT_NAME is the name of the project (i.e., namespace) containing your cluster and CRYOSTAT_POD_NAME is your result from running the previous command.

    Restart your Cryostat instance

    Because we've added the JARs to the Cryostat classpath, we need to restart the Cryostat instance for the file to be loaded:

    
    oc rollout restart deployment/cryostat-sample -n ${PROJECT_NAME}


    Adding the custom target for Cryostat monitoring

    Once the pod is back up and running, we can add the WildFly application as a custom target for Cryostat to monitor. First, we need to get the IP address of the pod housing the application.

    Get the pod name and IP address

    Start by getting the pod name:

    
    oc get pods -l deployment=wildfly-demo


    Now, use the pod name to get the IP address:

    
    oc get pod ${WILDFLY_POD_NAME} -o jsonpath='{.status.podIP}' ; echo


    Note: WILDFLY_POD_NAME is your result from running the previous command.

    Add WildFly as a custom target

    Now that the IP address is known, we can go ahead and add the WildFly application as a custom target.

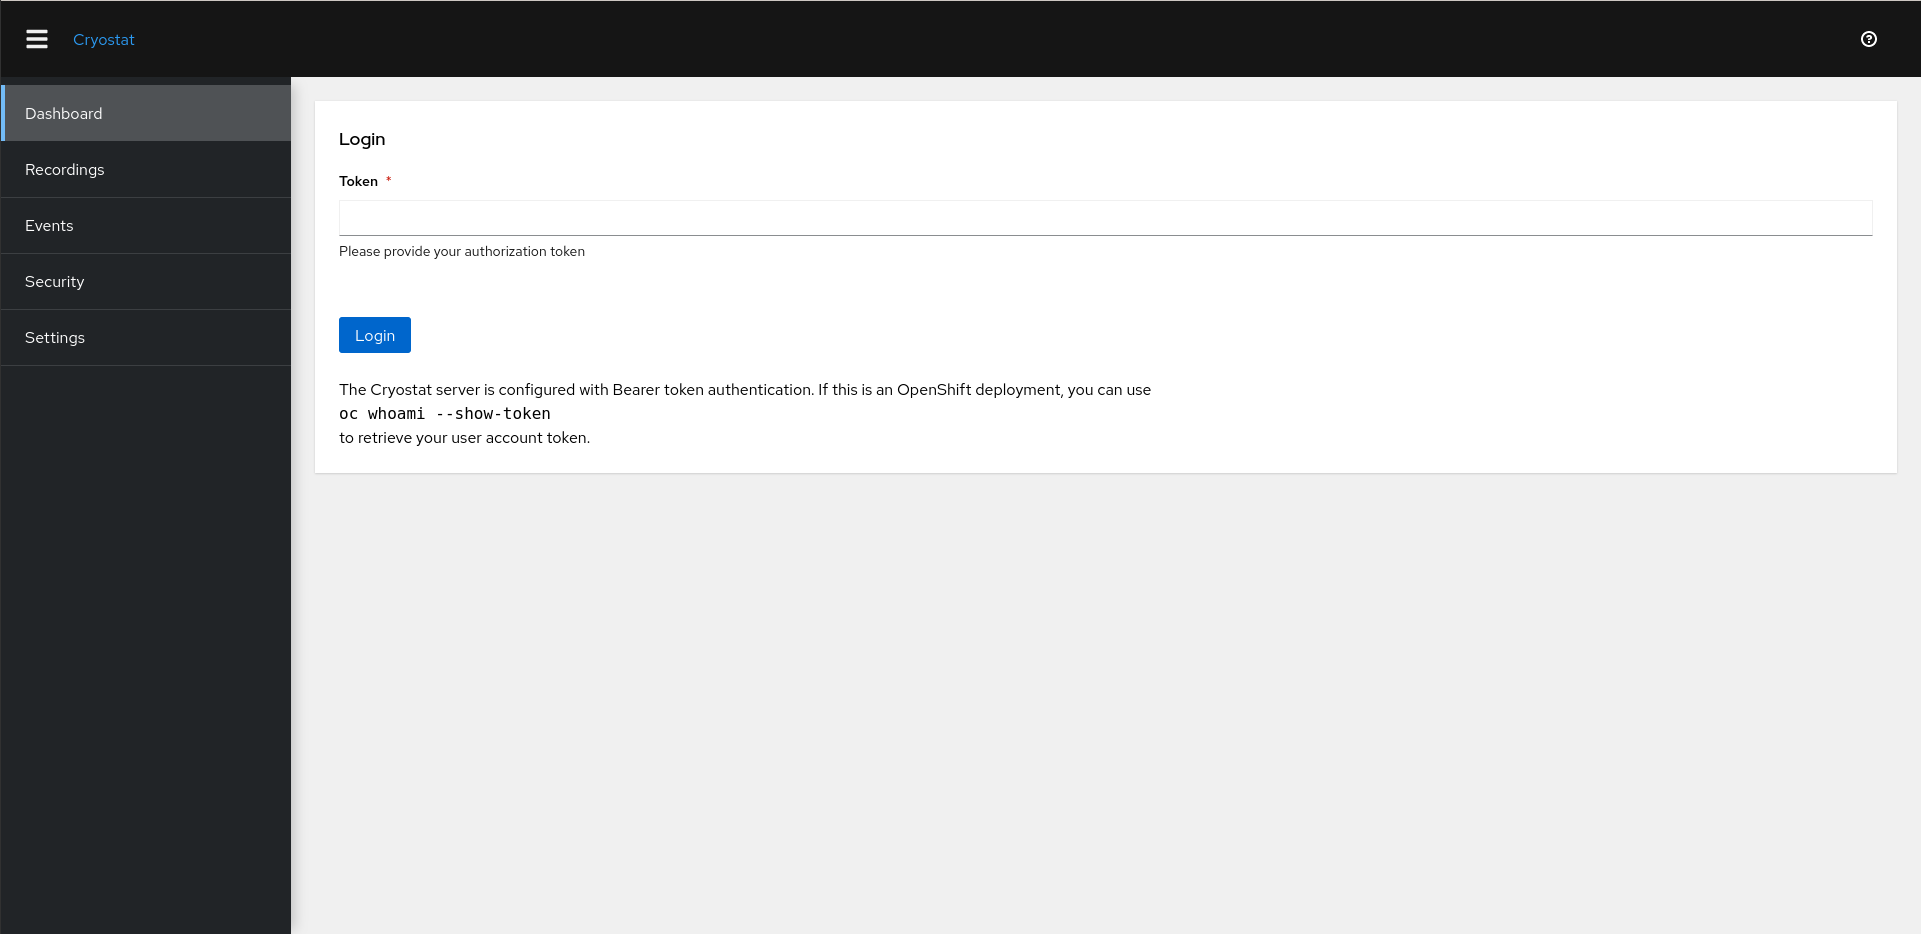
    To use Cryostat's web front-end, check oc status and follow the application URL for the cryostat-sample service. When prompted for an authorization token, provide your OpenShift account token, which you can retrieve using oc whoami -t. Figure 1 shows the Cryostat login page.

    Screenshot of the Cryostat web interface login page.
    Figure 1. The Cryostat login page.

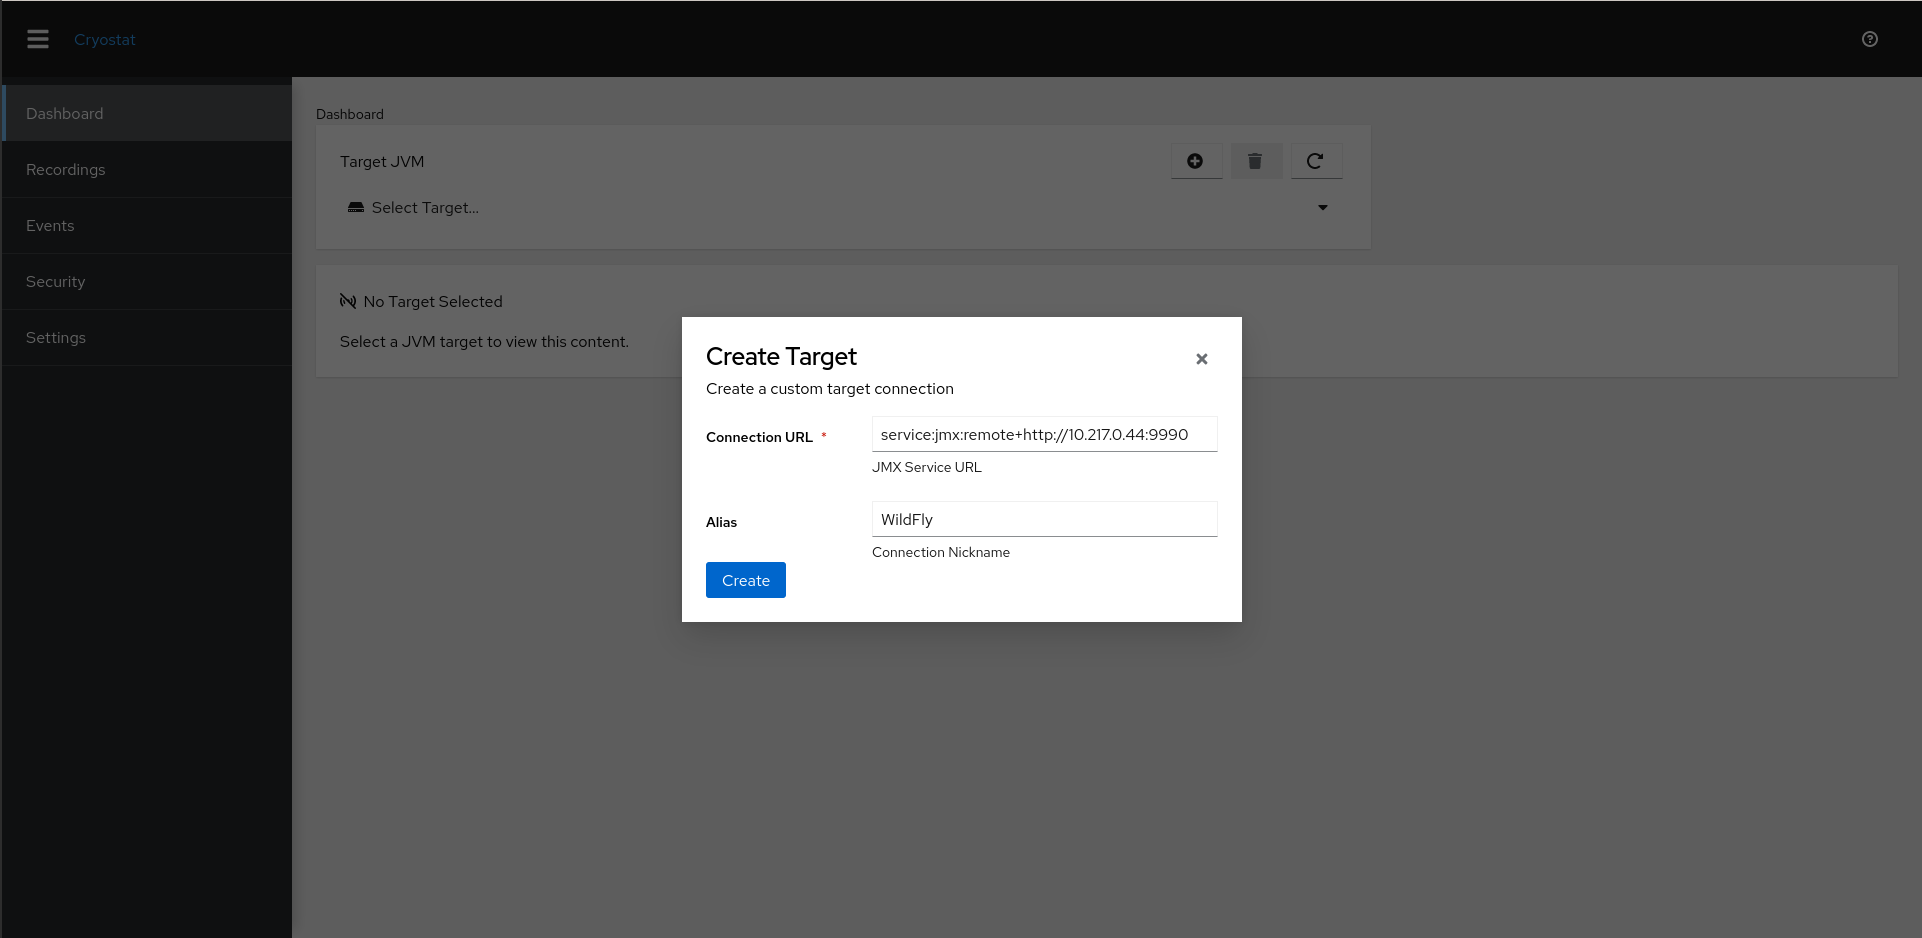
    Press the + icon beside Target JVM to create the custom target. For your connection URL, enter service:jmx:remote+http://${IP_ADDRESS}:9990, where IP_ADDRESS is your address for the WildFly application pod. For the Alias, we’ll go with “WildFly," as shown in Figure 2.

    Screenshot of the Cryostat web interface for creating a custom target definition.
    Figure 2. Creating a custom target definition.

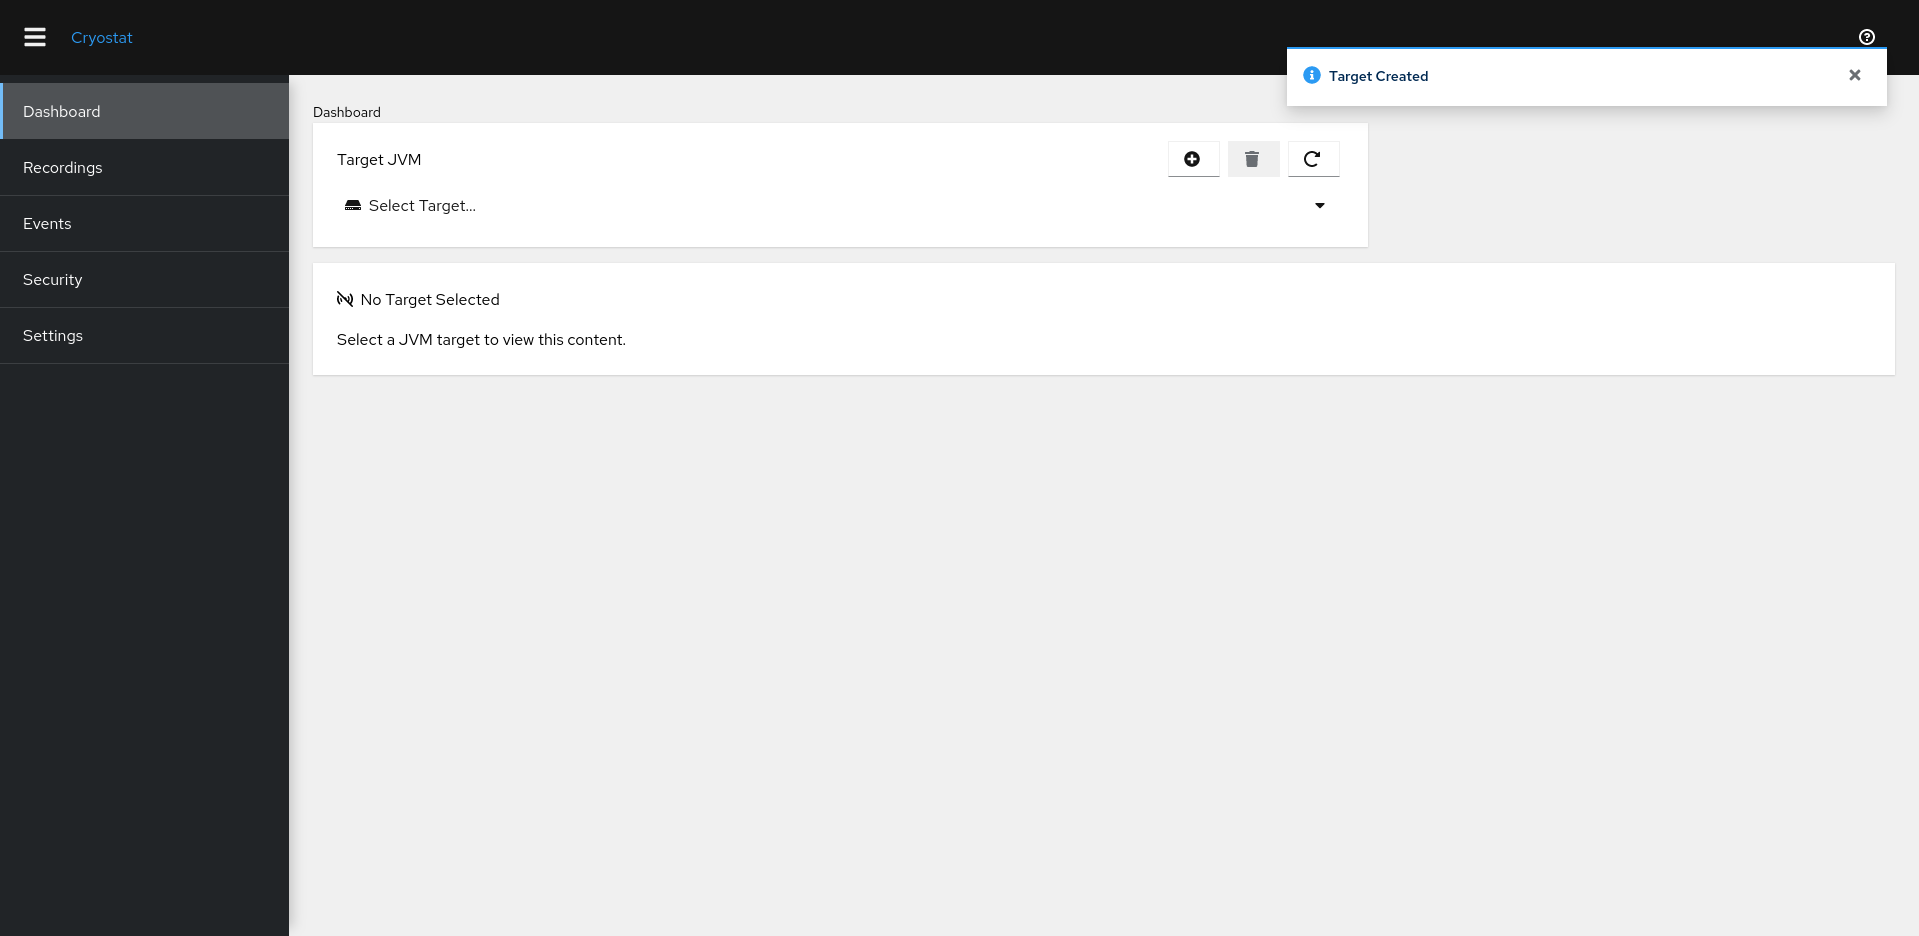
    The screen in Figure 3 confirms the target was created.

    Screenshot of the Cryostat web interface confirming target creation.
    Figure 3. Confirmation the target was created.

    Authenticating with the target JVM

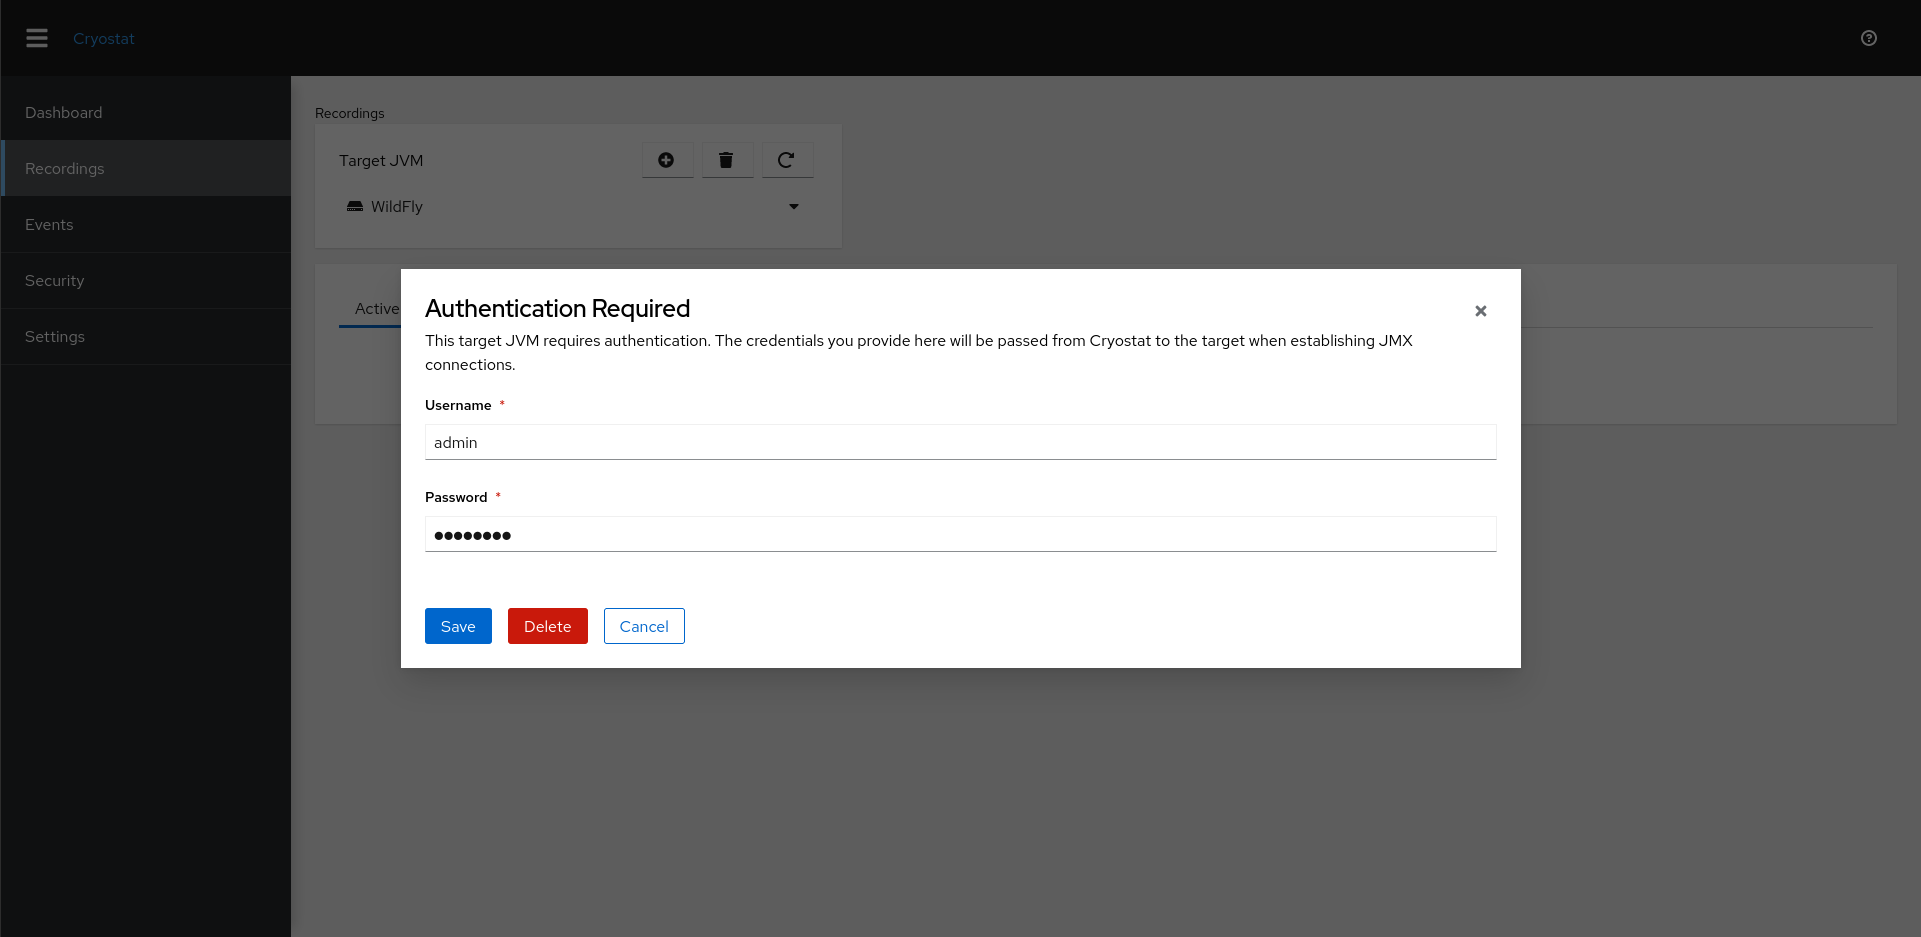
    Once the WildFly target is created, we can select it and navigate to Recordings, as shown in Figure 4.

    Screenshot of the Cryostat web interface and selecting the newly-created target.
    Figure 4. Select the newly-created target.

    We will be prompted to authenticate with the target JVM (i.e., the WildFly application). The application is set up to use JMX authentication with the username “admin” and password “password." Figure 5 shows the authentication screen.

    Screenshot of the Cryostat web interface prompting for credentials to connect to the new target.
    Figure 5. Enter your credentials to connect to the new target.

    Once we’re all set up, we can create a new flight recording on the WildFly target application, as shown in Figure 6.

    Screenshot of the Cryostat web interface when starting a new recording on the target.
    Figure 6. Starting a new recording on the custom target.

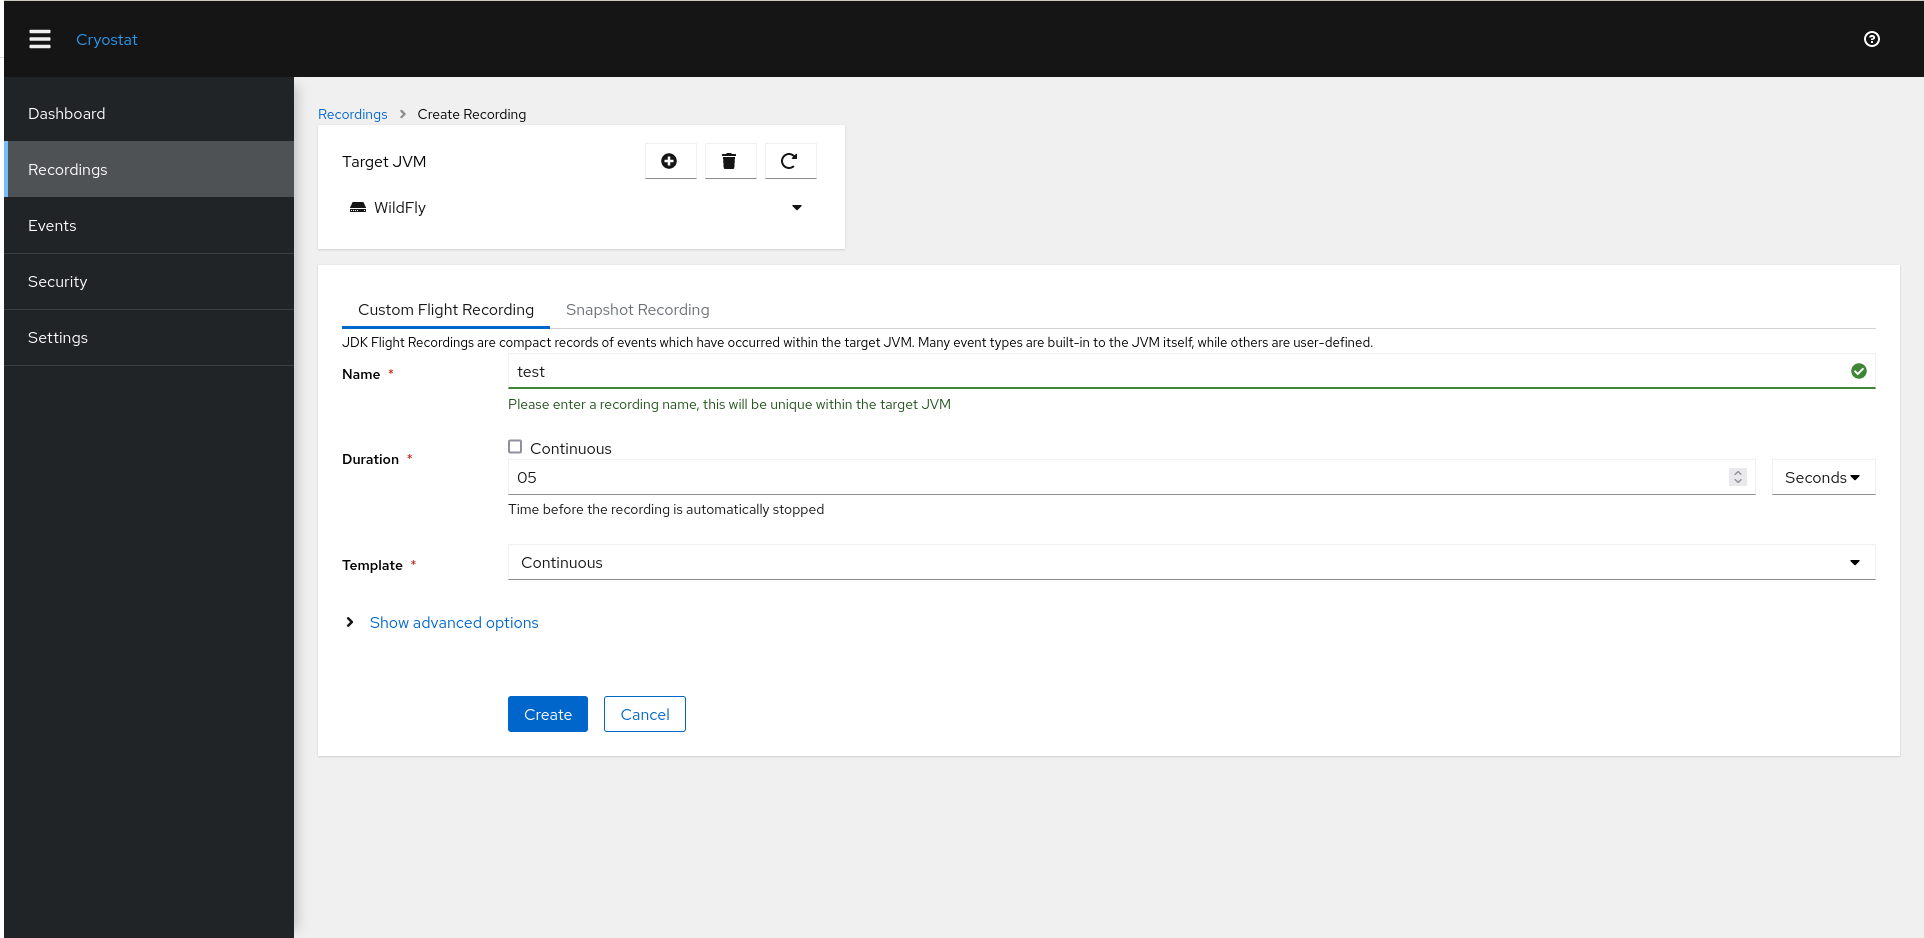
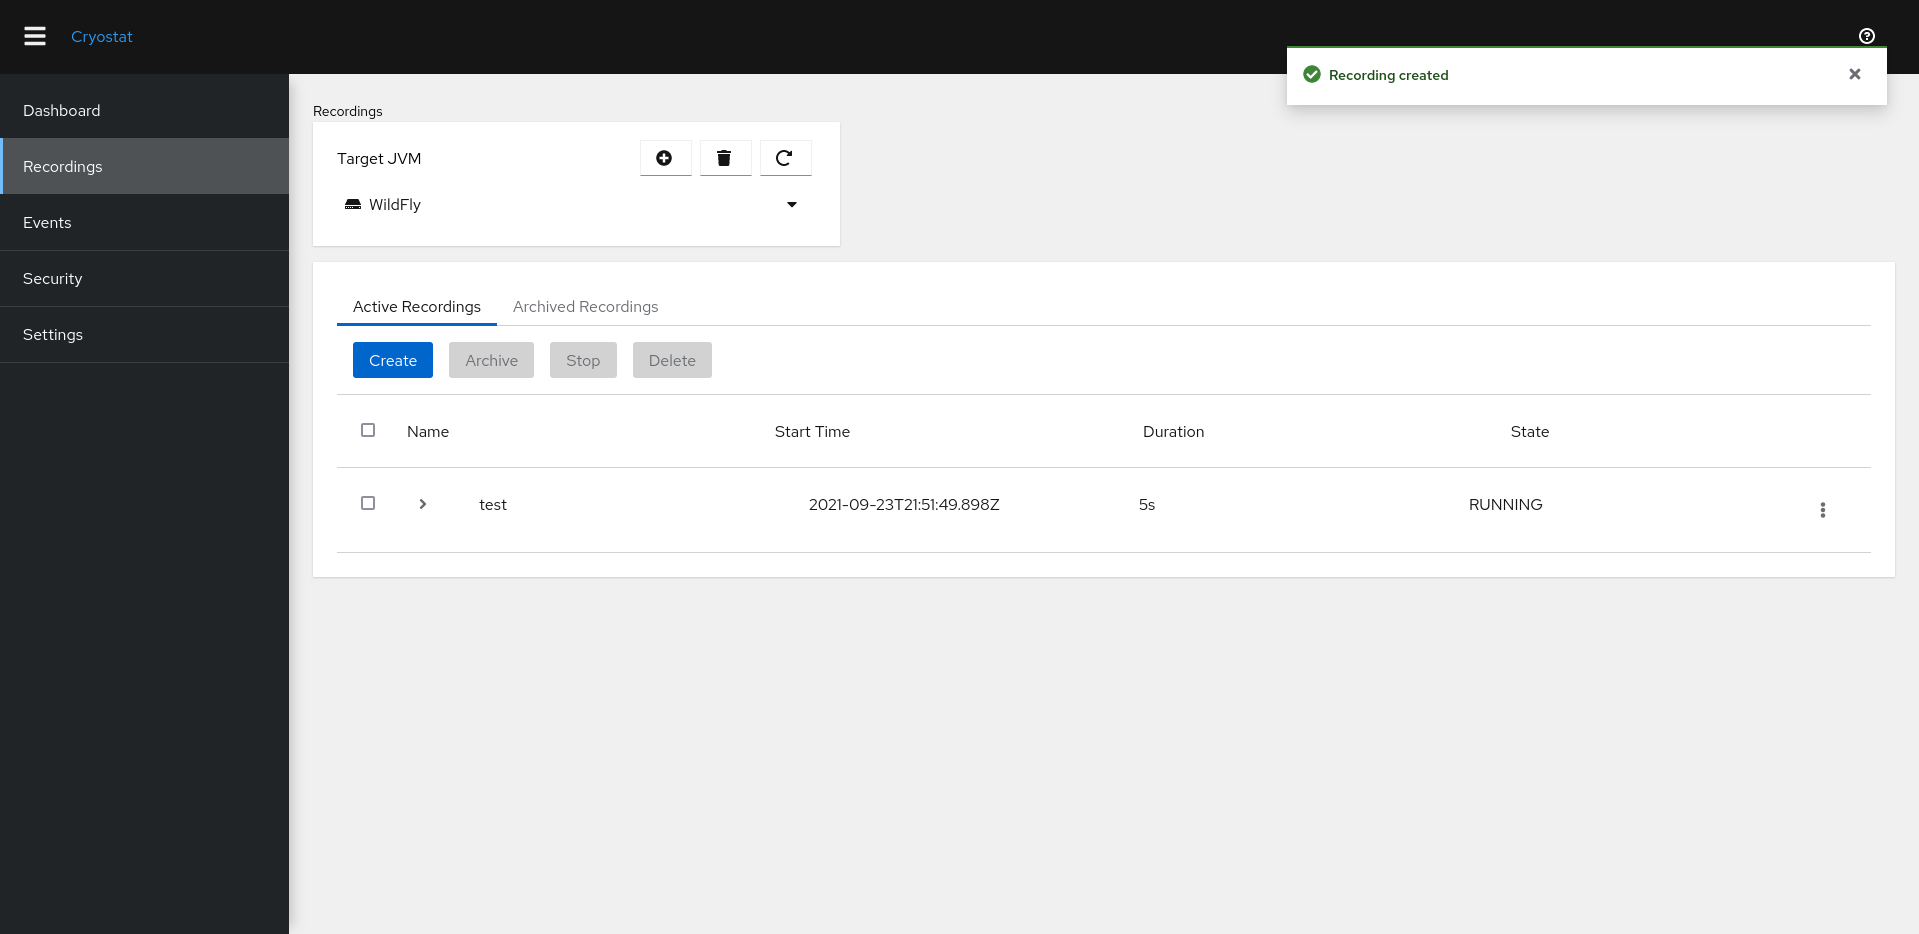
    Figure 7 shows that we were successful.

    Screenshot of the Cryostat web interface displaying the recording running on the target.
    Figure 7. The recording running on the target.

    Conclusion

    In this article, you've learned how to define a custom target for Cryostat monitoring using a client-defined protocol. Once you have set up your custom target in Cryostat, you may interact with it in a variety of ways. Visit Cryostat.io and see the following articles for details:

    • Introduction to Cryostat: JDK Flight Recorder for containers
    • New features in Cryostat 2.0, plus tips for getting started
    • Tutorial: Configuring Java applications to use Cryostat
    Last updated: September 20, 2023

    Related Posts

    • Introduction to Cryostat: JDK Flight Recorder for containers

    • Announcing Cryostat 2.0: JDK Flight Recorder for containers

    • Configuring Java applications to use Cryostat

    Recent Posts

    • Protect data offloaded to GPU-accelerated environments with OpenShift sandboxed containers

    • Case study: Measuring energy efficiency on the x64 platform

    • How to prevent AI inference stack silent failures

    • Preventing GPU waste: A guide to JIT checkpointing with Kubeflow Trainer on OpenShift AI

    • How to manage TLS certificates used by OpenShift GitOps operator

    Red Hat Developers logo LinkedIn YouTube Twitter Facebook

    Platforms

    • Red Hat AI
    • Red Hat Enterprise Linux
    • Red Hat OpenShift
    • Red Hat Ansible Automation Platform
    • See all products

    Build

    • Developer Sandbox
    • Developer tools
    • Interactive tutorials
    • API catalog

    Quicklinks

    • Learning resources
    • E-books
    • Cheat sheets
    • Blog
    • Events
    • Newsletter

    Communicate

    • About us
    • Contact sales
    • Find a partner
    • Report a website issue
    • Site status dashboard
    • Report a security problem

    RED HAT DEVELOPER

    Build here. Go anywhere.

    We serve the builders. The problem solvers who create careers with code.

    Join us if you’re a developer, software engineer, web designer, front-end designer, UX designer, computer scientist, architect, tester, product manager, project manager or team lead.

    Sign me up

    Red Hat legal and privacy links

    • About Red Hat
    • Jobs
    • Events
    • Locations
    • Contact Red Hat
    • Red Hat Blog
    • Inclusion at Red Hat
    • Cool Stuff Store
    • Red Hat Summit
    © 2026 Red Hat

    Red Hat legal and privacy links

    • Privacy statement
    • Terms of use
    • All policies and guidelines
    • Digital accessibility

    Chat Support

    Please log in with your Red Hat account to access chat support.