Prerequisites
- You installed RHEL AI with the bootable container image on compatible hardware. Get the RHEL AI image here.
- You created a Red Hat registry account and logged in on your machine. You can create/view your service account on Red Hat Registry
- You have root user access on your machine.
Step-by-step guide
Serving and Chatting with a foundational model
Connecting to and configuring your RHEL AI Environment
Let’s connect to your RHEL AI environment via SSH. Follow the steps below to authenticate and gain access to your environment.
Open your terminal and run the provided SSH command with your unique endpoint:
ssh <YOUR_RHEL_AI_SSH_ENDPOINT>The first time you connect, you may receive a security warning like the one below, asking you to verify the host’s authenticity. After accepting, the system will permanently add the host to your known hosts list. You’ll then be prompted to enter your password.
Once authenticated, you’ll be successfully connected to the RHEL AI environment, and you should see a message as shown below.

Now, you’ve logged in to your RHEL AI Machine. Let’s proceed to configure your RHEL AI Environment so that you can download LLMs and utilize other functionalities available on RHEL AI.
Configuring your RHEL AI Environment
To download Red Hat indemnified LLMs, you’ll need to authenticate with the Red Hat container registry and then initialize InstructLab with the right config. This ensures that you have access to the foundational models provided by Red Hat. This section guides you through setting up your Red Hat account and logging in to the registry via podman.
Create a Red Hat Account
If you don’t already have a Red Hat account, you can create one by following the procedure outlined in the Register for a Register for a Red Hat account page.
Create a Red Hat Registry Account
Once your Red Hat account is set up, you’ll need a Red Hat registry account to download models. To create a registry account:
- Visit the Registry Service Accounts page and select the New Service Account button.
- Once created, you can view your account username and password by selecting the Regenerate Token button on the webpage.
Log in to the Red Hat Registry via CLI
After creating your registry account, log in to the Red Hat container registry using podman in your terminal. Here’s how you can authenticate:
[instruct@bastion ~1$ podman login -u='username' -p
<key> registry.redhat.ioNow, you should be able to see a “Login Succeeded!” message as shown below

Optional: Configuring Red Hat Insights
For hybrid cloud deployments, Red Hat Insights offers visibility into your environment and can help identify operational risks. If you wish to configure Red Hat Insights, follow the procedure in Red Hat Insights documentation.
To configure your system with an activation key, use the following command:
rhc connect --organization <org id> --activation-key <created key>If you prefer to opt out of Red Hat Insights or are working in a disconnected environment, run the following commands:
sudo mkdir -p /etc/ilab
sudo touch /etc/ilab/insights-opt-outInitialize InstructLab
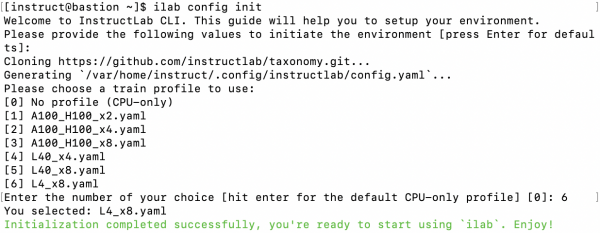
Now that we have logged into the required accounts, let’s initialize InstructLab, which is necessary to configure your environment for training and aligning large language models (LLMs). As part of this process, InstructLab will also clone the taxonomy repository, which manages the skills and knowledge structure for model training. We’ll dive deeper into this in the Model Alignment section later.
ilab config initOnce you run it, you’ll be prompted to choose a training profile that matches your hardware setup. You will see several profile options as listed below. Enter the corresponding value for the GPUs you have on your machine. If you are on RHEL AI 1.2 or newer, your hardware may be automatically detected. Once done you will be able to see the message "Initialization completed successfully, you're ready to start using 'ilab'. Enjoy!".

Now, you are ready to download the Red Hat indemnified foundational LLMs.
Downloading a foundational model
In this step, you’ll download a foundational model from the Red Hat registry to begin working with it in InstructLab. For this guide, we'll be downloading the granite-7b-redhat-lab model.
Before proceeding, ensure that you’ve successfully logged in to the Red Hat registry as detailed in the previous section. If you’re not logged in, the download process will fail.
Download the model
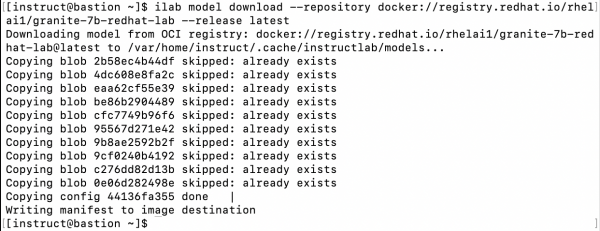
Run the following command to download the granite-7b-redhat-lab model from the Red Hat registry. This may take a few minutes depending on the connection speed your RHEL AI instance has.
ilab model download --repository
docker://registry.redhat.io/rhelai1/granite-7b-redhat-lab --release latestThe --repository option specifies the source of the model, in this case, the Red Hat registry.
The --release latest option ensures you are downloading the most up-to-date version of the model.
During this process, you'll see output similar to the following in the terminal. Each line corresponds to the download status of different parts (or "blobs") of the model. Once the process completes, the model will be stored in the cache directory, typically located at /var/home/instruct/.cache/instructlab/models.

Verify the Model Download
After the download completes, verify that the model has been downloaded successfully by running:
ilab model listThis command will list all the models currently available in your environment. You should see output similar to:

In the next step, we’ll move forward with serving the model to make it available for training and alignment tasks.
Serving and interacting with the model
Now that the granite-7b-redhat-lab model has been successfully downloaded, let’s serve the model so that it can be used for tasks such as alignment, inference, or chat.
To start the model serving process, run:
ilab model serveHere’s what the terminal output will look like when you serve the model:


This indicates that the model is being served locally using the vLLM backend, and is accessible at http://127.0.0.1:8000/v1.
At this point, you’ll be able to see the logs indicating that the model is served, but since you’re connected via SSH and only have access to a single terminal instance, you won’t be able to interact with the model directly using the chat feature yet.
To solve this, we need to to run the ilab model service in the background so that we can use the ssh session to chat with the model.
Now let’s stop the ilab model serve process using CTRL+C keyboard inputs to continue with setting up the model serving in the background.
You should be able to see something like this:

Serving model as a service on RHEL AI
To keep your model serving consistently in the background without needing multiple SSH sessions, you can set it up as a systemd service. This ensures that even if you log out or restart your machine, the model serving will continue to run in the background.
Follow the steps below to configure ilab model serve as a systemd service:
Create the systemd directory:
First, make sure the systemd user service directory exists by running the following command:
mkdir -p $HOME/.config/systemd/userCreate the service file:
Next, create a service file for the ilab model serve command:
cat << EOF > $HOME/.config/systemd/user/ilab-serve.service
[Unit]
Description=ilab model serve service

[Install]
Start by default on boot
WantedBy=multi-user.target default.target

[Service]
ExecStart=ilab model serve --model-family granite
Restart=always
EOFReload systemd:
After creating the service file, reload the systemd daemon to register the new service:
systemctl --user daemon-reloadStart the service:
Now you can start the ilab-serve.service in the background using:
systemctl --user start ilab-serve.serviceCheck the status:
You can verify that the service is running with:
systemctl --user status ilab-serve.serviceBy following these steps, you have successfully set up the ilab model serving as a background service on RHEL AI. This configuration allows you to continue using the terminal for other commands while the model serves requests continuously. If you ever need to check the logs for this service, you can use the journalctl command as previously discussed.
Chat with the model
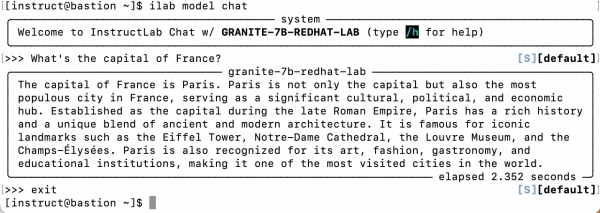
With the service running in the background, you can now interact with the model using the chat interface:
ilab model chatYou will see an interface indicating that you are connected to the model. Here’s an example of what the terminal might display:

Do not forget to play around with any other prompts you might want to try.
If you see an error message something like "Failed to start server: vLLM failed to start". Do not worry, the model serve is probably still starting, wait for sometime depending on the hardware performance you have and retry. I used 4 x L4(g6.12xlarge) and it took about a 30 seconds for the service to come up.

You can always use the following command to view real-time logs of the service to get a better sense of what’s going on
journalctl --user -u ilab-serve.service -fYou’ve now successful experimented with
Exiting the Chat Interface and Stopping the Model Serving Service
Exiting the chat interface
Once you’ve finished interacting with the InstructLab chat model, it’s important to exit the chat interface and stop the model serving service properly. This is crucial, especially if you’re using cloud resources, as running workloads unnecessarily can lead to unwanted billing due to the expense of GPU usage.
To exit the chat interface safely, simply type "exit" as shown below:
exit
Stop the model serving service
After exiting the chat, it’s a good practice to stop the model serving service to conserve resources. You can do this by executing the following command:
systemctl --user stop ilab-serve.serviceThis command stops the ilab-serve service that was running in the background, ensuring that no unnecessary resources are being consumed. You should see something as below on your terminal too

By following these steps, you can effectively manage your resources and avoid incurring additional costs associated with running GPU workloads in the cloud. Properly exiting chat sessions and stopping background services is a key practice in maintaining efficient operations in AI model serving environments.
Conclusion
Congratulations on successfully setting up and interacting with the InstructLab chat model using RHEL AI! You have achieved several key milestones:
Setup your RHEL AI Environment: You’ve learnt to configure Red Hat registry access and optionall Red Hat Insights too
Model Download: You successfully downloaded the foundational model from the Red Hat registry, preparing it for use.
Model Serving: You configured the model to run as a background service, allowing for easy access without needing multiple SSH sessions.
Chat with the model: You were able to send messages to the LLM and get responses
Exiting the environment safely: You learned the importance of exiting the chat interface and stopping the model serving service to manage costs effectively, especially when using cloud resources.
For more information and to explore the full capabilities of RHEL AI, please visit the RHEL AI product page. Thank you for your engagement, and keep up the great work in your AI journey!
