Operators are one of the ways to package, deploy, and manage application distribution on Red Hat OpenShift. After a developer creates an Operator, the next step is to get the Operator published on OperatorHub.io. Doing this allows users to install and deploy the Operator in their OpenShift clusters. The Operator is installed, updated, and the management lifecycle is handled by the Operator Lifecycle Manager (OLM).
In this article, we explore the steps required to test the Operator's OLM integration. For demonstration, we use a simple Operator that prints a test message to the shell. The Operator is packaged in the recently introduced Bundle Format.
For our local development environment, we need access to the following toolkits:
- Red Hat CodeReady Containers (CRC)
- Podman, or a Docker daemon process running on the local machine
- Operator SDK toolkit, v1.0.0 or higher (optional)
- Operator Package Manager (OPM)
- OpenShift Container Platform, cluster version 4.5 or higher
We need CRC because it provides convenient single-node minimal OpenShift clusters that are primarily intended to aid developers in testing. The OPM provides our local desktop environment.
Note: After downloading OPM, we rename the opm binary for ease of use by setting the binary's permission to at least make it readable and executable.
Once you have everything set up, create a free account on Red Hat Quay.io. We use Quay to build, analyze, distribute, and host container images. In this case, take note of the quay_username and set the following environment variable for ease of use:
> export quay_username=<your_quay_user_name>
> echo $quay_username
Now we are ready to get started on our OLM integration test.
Step 1: Download the Operator package
To get started, let’s clone the following Git repository. This repository contains our example Operator bundle package that we deploy to the local OperatorHub instance in our cluster.
> git clone https://github.com/taneem-ibrahim/olm-testing-bundle-format-index.git
This creates the following directory structure:
foo-operator % tree
├── bundle
│   ├── manifests
│   │   ├── example.com_foobars.yaml
│   │   ├── foobar-operator-metrics-reader_rbac.authorization.k8s.io_v1beta1_clusterrole.yaml
│   │   └── foobar-operator.clusterserviceversion.yaml
│   ├── metadata
│   │   └── annotations.yaml
│   └── tests
│       └── scorecard
│           └── config.yaml
├── bundle.Dockerfile
├── catalogsource.yaml
└── subscription.yaml
Step 2: Build and push the Operator bundle image
Our next step is to build the Operator bundle image and publish it to a container registry. In our examples, we use Quay to host our container images. From the Operator's root directory, foobar-operator, let’s run the following commands. Substitute the <quay_username> tag for your own quay_username.
Note: When you use Podman, you can run the following commands just by replacing the word Docker with Podman. For example:
> docker login quay.io -u $quay_username
> docker build -f bundle.Dockerfile -t quay.io/$quay_username/foobar-operator:v0.0.1 .
> docker push quay.io/$quay_username/foobar-operator:v0.0.1
When we create a new repository in Quay by default, the repository visibility is set to private. For simplicity, we log into the Quay web portal and see the repository access to the public. This can be set from the repository's Settings tab or by going to https://quay.io/repository/. Then substitute the quay_username or repository name accordingly.
When we prefer to keep the repository visibility private, we can add an image pull secret. Operator pods use the default service account in the openshift-marketplace namespace.
This Operator is a simple image that loops and prints the following message v0.0.1 to the console:
spec:
....
              containers:
              - command: [ "/bin/sh", "-c", "while true ; do echo v0.0.1; sleep 10; done;" ]
                image: docker.io/busybox
Step 3: Validate the Operator bundle package (optional)
This is an optional step. Let’s validate the Operator bundle package we just built and pushed. The following command needs to end with the message: all validation tests have completed successfully
> operator-sdk bundle validate quay.io/$quay_username/foobar-operator:v0.0.1
Step 4: Build and push an index image
Once the Operator bundle image is pushed, the next step is to create and publish an index image, making the Operator available using the OLM for users to install in their clusters. Index image is a database of pointers to Operator manifest content, which enables OLM to query the Operator image versions and get the desired Operator version installed on the cluster.
We use the OPM tool to create the index image for our foobar-operator bundle. After building the image, we push the image to Quay. When we use Podman, we do not need to add --build-tool docker because opm defaults to Podman for the build tool:
> opm index add --bundles quay.io/$quay_username/foobar-operator:v0.0.1 --tag quay.io/$quay_username/foobar-operator-index:latest --build-tool docker
> docker push quay.io/$quay_username/foobar-operator-index:latest
As before, we need to set the repository visibility of foobar-operator index to public for simplicity on Quay.
Step 5: Create a custom CatalogSource object
The CatalogSource represents Operator metadata that OLM can query to discover and install Operators and their dependencies. We create the following CatalogSource resource. Don’t forget to substitute the appropriate quay_username according to the $quay_username for the index image location on Quay. Save the file as catalogsource.yaml:
spec:
  sourceType: grpc
  image: quay.io/<substitute_quay_username>/foobar-operator-index:latest
  displayName: Custom Catalog
  updateStrategy:
    registryPoll:
      interval: 5m
Let’s create the catalog source object:
> oc create -f catalogsource.yaml
We are using the openshift-marketplace namespace above since it is a global namespace. This means a subscription created in any namespace is able to resolve in the cluster. However, we can choose any custom namespace here as long as it matches the related subscription object namespace created in the next step.
Additionally, the name of the CatalogSource object determines which catalog registry the Operator shows up under on the OperatorHub console. In the example above, we are using custom with the display name set to CustomCatalog. We also configured the catalog to automatically poll for the latest version of the index image for the Operator every five minutes.
We can validate the deployment of the pod by querying the pod logs:
> oc get pods -n openshift-marketplace | grep “custom”
> oc logs custom-<pod_id> -n openshift-marketplace
> … level=info msg="serving registry" database=/database/index.db port=50051
Step 6: Create a subscription object
A subscription is a custom resource that describes the channel the Operator subscribes to, and whether the Operator needs to be updated manually or automatically. We are installing the Operator in the alpha channel since our bundle manifest channel is set to alpha in the annotations.yaml file. The other available channel is stable.
We can validate the channel by running the following command:
> oc get packagemanifests foobar-operator -o jsonpath='{.status.defaultChannel}'
> alpha
The GitHub repository has a subscription.yaml file provided. From the foobar-operator root directory, we can run the following command to create the subscription object:
> oc create -f subscription.yaml
Step 7: Install the Operator from the OperatorHub
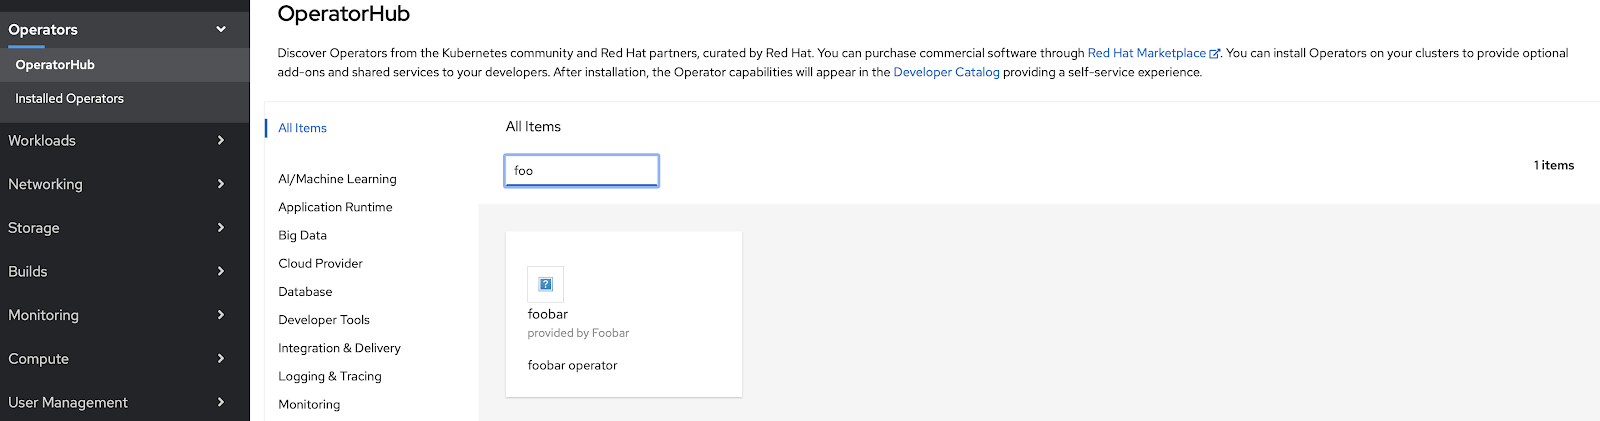
Let’s log into the OpenShift admin console, navigate to the OperatorHub, and search for our Operator, as shown in Figure 1.
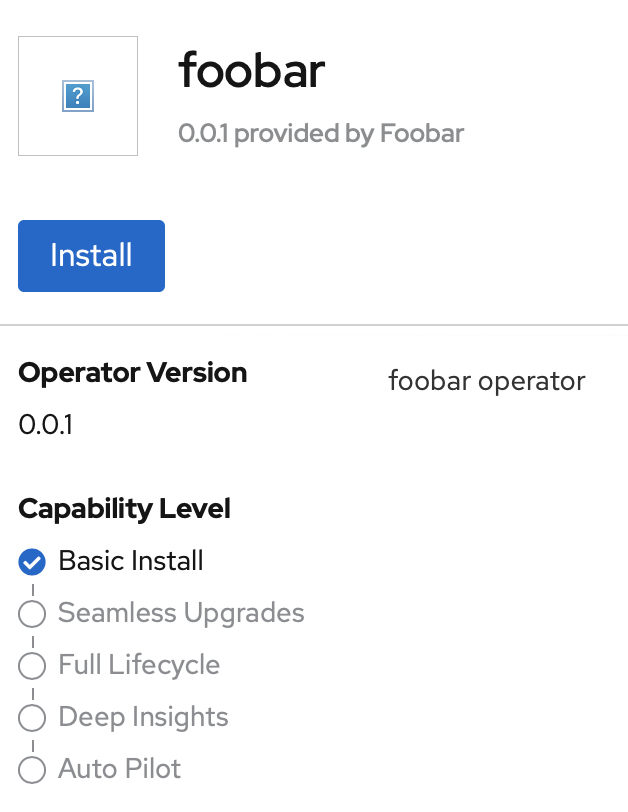
Now we can install this Operator as shown in Figure 2.
We can also query the Operator pod logs to see if it’s printing v0.0.1 as we had in our deployment container spec for the Operator image:
> oc logs -f foobar-operator-controller-manager-<pod_id> -n openshift-marketplace
> v0.0.1
That’s it. We successfully validated our Operator integration with OLM.
Upgrade the Operator version
Now we do a simple Operator upgrade test just by updating the Operator version tag from 0.0.1 to 0.0.2 in the CatalogService Version (CSV) file. Let’s run the following command from the root directory of our foobar-operator:
> sed 's/0.0.1/0.0.2/g' ./bundle/manifests/foobar-operator.clusterserviceversion.yaml > ./bundle/manifests/foobar-operator.clusterserviceversion.yaml
Next, we repeat Steps 1 and 2 above to build and optionally validate the new Operator bundle image, and substitute the image version tags to be 0.0.2 instead of 0.0.1 in the Docker push commands respectively.
We are now ready to add the new Operator version to the registry. We can do that by using the opm add command. Notice how we are adding the upgraded Operator version cumulatively by inserting the from-index parameter. If using Podman, then we do not have to pass the --build-tool docker option since opm defaults to Podman build tool:
> opm index add --bundles quay.io/$quay_username/foobar-operator:v0.0.2 --from-index quay.io/$quay_username/foobar-operator-index:latest --tag quay.io/$quay_username/foobar-operator-index:latest --build-tool docker
In the Quay repository, we can validate the latest versions of the Operator image and index image by running the Docker images (or Podman images) command as shown in Figure 3.

We push this new version of the index image to Quay:
> docker push quay.io/$quay_username/foobar-operator-index:latest
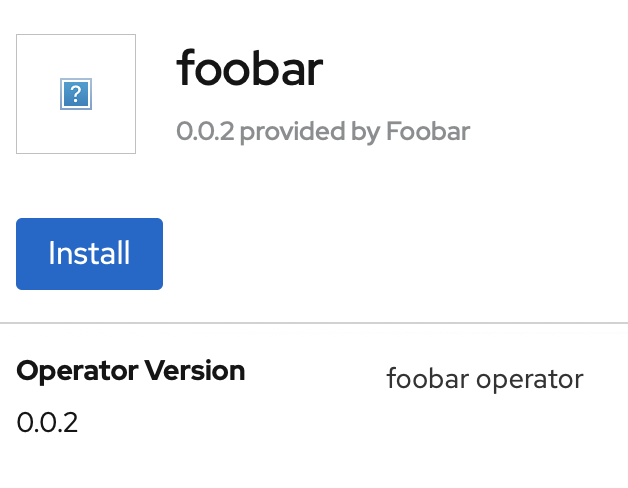
The CatalogSource automatically polls for the latest version every five minutes. After five minutes have passed, we can go to the OperatorHub console and validate the Operator version 0.0.2 is available as shown in Figure 4.
Let’s install the new Operator version in the openshift-marketplace namespace and validate the Operator pod log to see if v0.0.2 is being echoed:
> oc logs -f foobar-operator-controller-manager-<pod_id> -n openshift-marketplace

v0.0.2
Now that you know how to test OLM integration for an Operator, give it a try with your own projects!
Last updated: January 20, 2023